The WP Ultimate CSV Importer plugin helps you manage NextGEN Gallery images with ease. Instead of manually uploading and organizing pictures, you can bulk import images into NextGen Gallery galleries (with details like title, description, and tags) directly from a CSV or Excel file. You can also export existing images and gallery data for backup or migration.
This guide covers the entire process from preparing your import file, mapping fields, and configuring settings, to verifying results and exporting images when needed.
Prerequisites #
Before starting the import, ensure that the following prerequisites are met:
- You have installed and activated the WP Ultimate CSV Importer plugin.
- You have the NextGEN Gallery plugin installed and activated on your WordPress site.
- Enable the Cron entry on our website for seamless image import. To enable the Cron, refer How to enable & Configure wp-cron article here.
- Make sure your images are hosted locally in your WordPress media, or if you use external site image URLs, ensure it’s accessible so that they can be imported.
- You have created the necessary NextGEN Galleries or Albums where the images will be imported.
Step-by-Step Guide to Import Images into NextGEN Gallery #
Step 1: Prepare Your CSV/Excel or other format File
You need a file, whether it is a CSV or another format file we support, that contains the necessary image data to import. It should have the following columns (at a minimum):
- Title (Optional): Title of the image.
- Image URL(Required): URL to the image file (if it’s hosted externally) or the relative path to the image file in your WordPress directory (if locally hosted).
- NextGen Gallery Name (Required): The name of the NextGen Gallery where the image will be added.
- NextGen Gallery ID (Optional): The ID of your NextGen Gallery name.
- Description (Optional): Description of the image (if required).
- File Name (Required): The unique name of the image you’ll use to store it.
- Alt Text (Required): Small description of the image to display when the browser is unable to load it.
- Tags (Optional): Tags or categories related to the image, if you want to organize your images.
Download the NextGEN Gallery Import Sample CSV file to know how to format the values.
Step 2: Set Up the Import in WP Ultimate CSV Importer
- Navigate to the WP Ultimate CSV importer from the WordPress Dashboard.
- Choose the Import/Update option from the top side menu (It will automatically land here if you visit the plugin once).
- Click on Browse to upload your import file, such as a CSV or Excel file or other type file. You can also use other upload options to upload your file.
- Choose the data type as “ngg_pictures” from the drop-down.
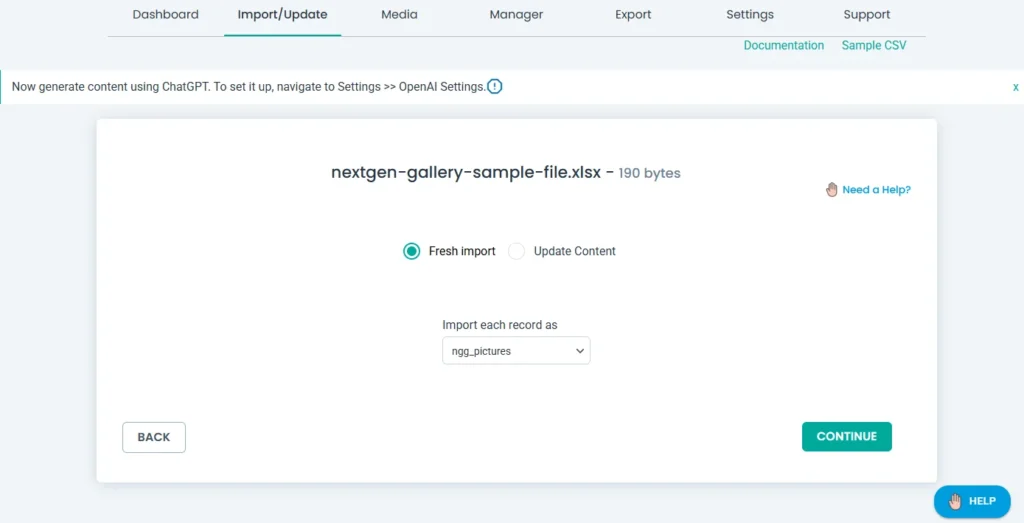
- Select the import type as Fresh import if you are importing new records. If you want to update the existing content, you can choose the Update Content option.
- Click on Continue to move on to the Mapping Section.
Step 3: Map Your Import File Fields with WordPress & NextGEN Gallery Fields
There are two modes of Mapping in the WP Ultimate CSV importer.
Advanced Mode: Map the WP core fields and the import file fields with the drop-down method.
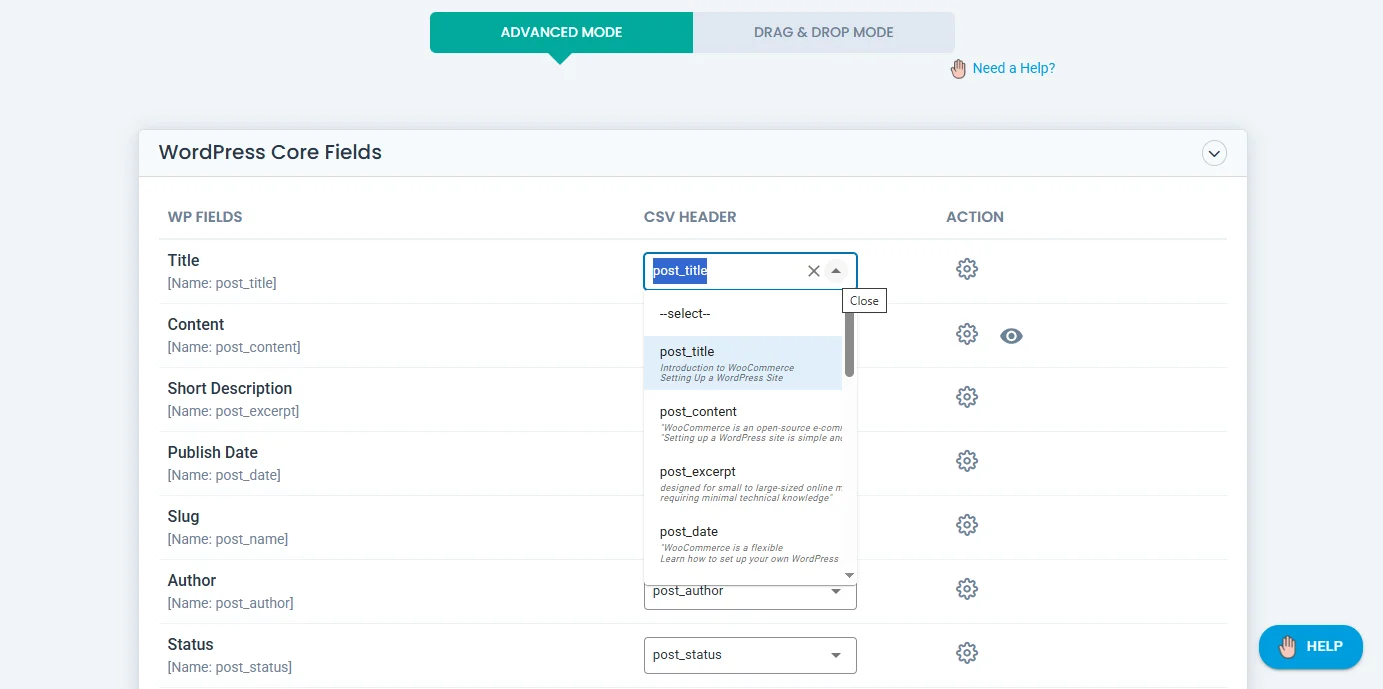
Drag and Drop: Map WP core fields and the desired file fields(the columns in your prepared import file) with the drag and drop method.
You will map the CSV(or other supported file) columns to the appropriate fields in WordPress and NextGen Gallery.
- Map the Image Field:
- You should map the Image URL column from your CSV file to the Featured Image field in WP Ultimate CSV Importer.
- For example, select the column that contains the Image URL and drag it into the Featured Image box.
- If you are using locally hosted images, ensure that the file paths are correct (e.g., /wp-content/uploads/2024/beach.jpg).
- Map the Gallery (Mandatory):
- If you have a Gallery Name column in your import file and want to assign each image to a specific NextGen Gallery, you can map this column to the NextGen Gallery field in CSV Importer.
- Note: Only if the gallery exists, the image will be added to it.
- Map Additional Data (Optional):
Map other desired fields such as Title, Description, and Tags as necessary. These fields will help organize the imported images within the NextGen Gallery and provide relevant metadata.
4. Save the Mapping template
- Finally, save the mapping template with a unique name. You can use this template for future imports.
WP Ultimate CSV Importer Pro
Get Ultimate CSV/XML Importer to import data on WordPress faster, quicker and safer.
Step 4: Configure the Import Settings
- Manage the media uploads by configuring media settings for effective handling of images on your data imports. Choose one option here.
- Importing Images from External URLs: If your image URLs are external (i.e., hosted on another server), ensure that the Download Post Content External Images to Media option is enabled. This will download the image to your WordPress media library during the import process.
- Enable the rollback option to backup data before import. Also, you can switch on the maintenance mode while importing.
- You can also handle duplicates on existing records by configuring the import settings.
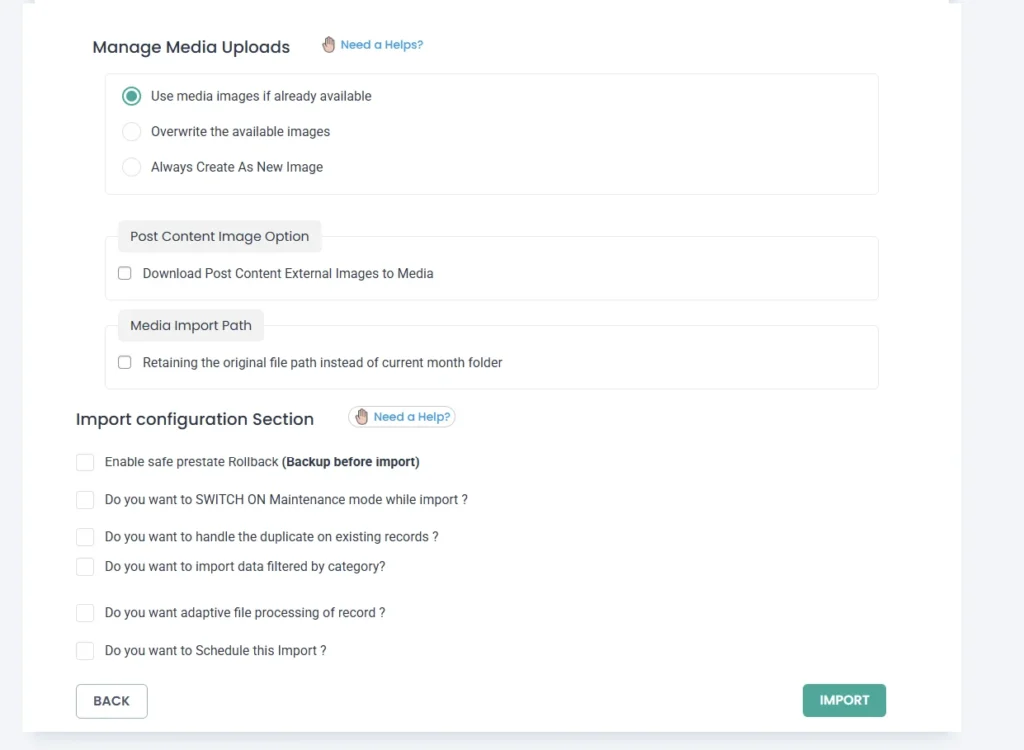
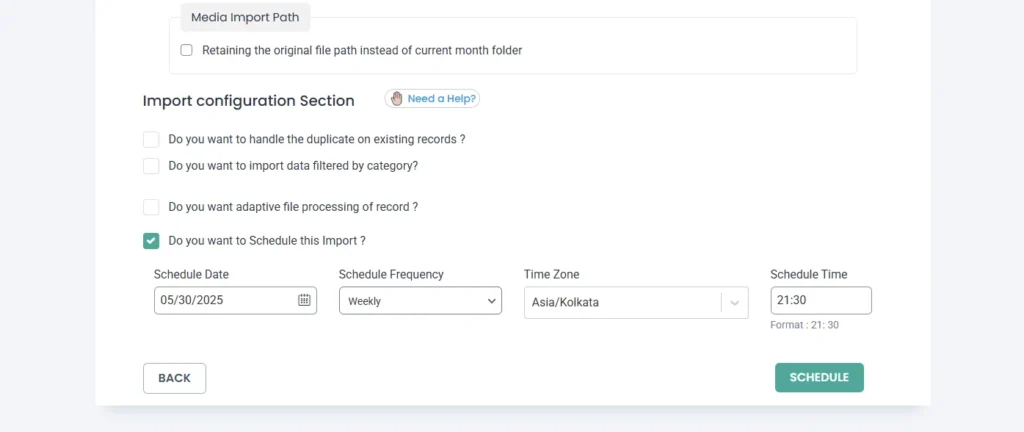
- Enable the Schedule import option if you want to schedule your data import at your desired time. But make sure to add a cron entry in your WordPress.
- Once done, click on Import.
Step 5: Verify the Import
Once the import is complete, go to NextGEN Gallery in your WordPress dashboard to verify the imported images.
- Check Galleries: Go to NextGEN Gallery > Manage Galleries and ensure that the images have been imported into the correct galleries.
- Check Image Metadata: Review the Title, Description, Tags, and any other fields you imported to make sure everything is correctly populated.
View Front-End: Visit the gallery page on the front end of your site to ensure that the images are displayed correctly in the galleries.
For detailed import steps, visit the guide on how to import CSV file with WP Ultimate Ultimate CSV Importer.
Export NextGen Gallery Images #
To export NextGen gallery images from your WordPress site,
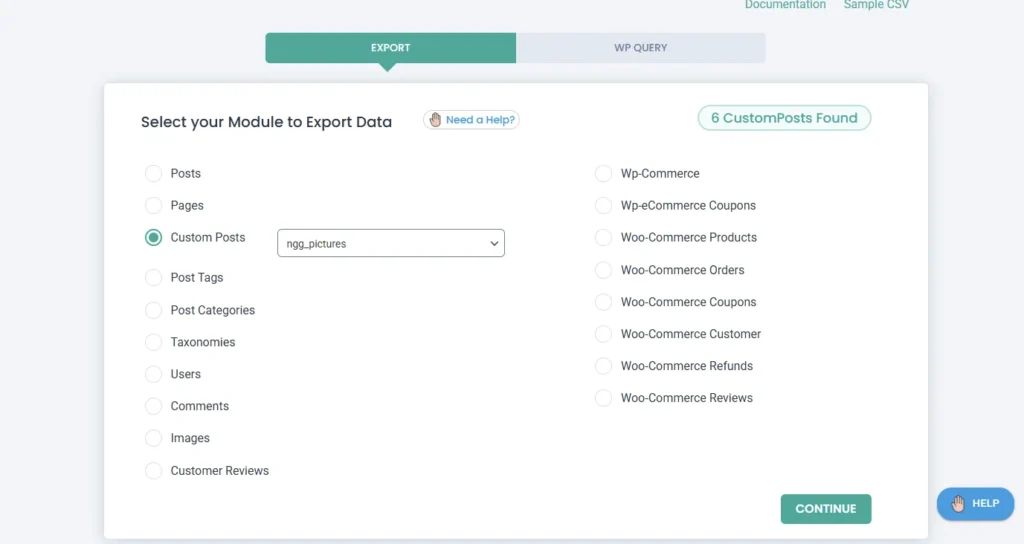
- Navigate to the WP Ultimate CSV importer Pro > Export.
- Choose the Post type as Custom Posts and select “ngg_pictures” from the dropdown.
- Configure the Export settings by providing the file name and file type.

- Configure the Advanced filters to export your data more specifically. To know more about the advanced filter, refer to the exporter guide.
- You can also schedule the export at your desired time by enabling the schedule export option.
- Once done, click on Export. Your gallery images start to export and are prepared as a file to download.
- Click Download and save it to your computer.
WP Ultimate CSV Importer Pro
Get Ultimate CSV/XML Importer to import data on WordPress faster, quicker and safer.
Troubleshooting Tips #
1. Images Are Not Displaying in the NextGEN Gallery
- Ensure that the Image URL in the CSV file is correct and publicly accessible. If you are using external URLs, test that they load in a browser.
- Check if the Download Images option is enabled in the import settings for external images.
- Ensure the correct Gallery Name is mapped and the gallery exists.
2. Image URLs Are Not Downloading
- Verify that the Download Images option is enabled and your server allows remote requests (some servers block external URLs).
- Check the file permissions in the /wp-content/uploads/ directory to make sure WordPress can upload and store the images.
3. Import Fails or Times Out
- Increase the PHP memory_limit and max_execution_time in your php.ini file if the import fails due to large image files or a lengthy process.
- Split large CSV files into smaller chunks if your import contains a large number of images.
FAQs Related to NextGEN Gallery Import & Export #
1. What file formats are supported for importing images into NextGEN Gallery?
WP Ultimate CSV Importer supports a wide range of file formats, making it easier for you to import data from multiple sources. You can upload CSV files, Excel spreadsheets (XLS/XLSX), XML files, TSV files, Google Sheet URLs, and Dropbox URLs. This flexibility ensures that no matter where your image data is stored, you can quickly bring it into NextGEN Gallery. To get started, prepare your file in one of these formats with the required columns (such as Image URL, File Name, and Gallery Name). Then, follow the step-by-step instructions in the guide above to map fields, configure settings, and import your images successfully.
2. Do I need to create NextGEN Galleries before importing images?
Yes, the galleries must already exist in your NextGEN setup before you begin the import process. The importer is designed to place images into galleries you specify, but it does not create new galleries automatically. For example, if your CSV file lists a gallery name that hasn’t been created in NextGEN yet, the import will skip those entries. To avoid errors or missing images, it’s best to set up the required galleries in advance and ensure that the names in your CSV or Excel file exactly match the gallery names inside NextGEN Gallery.
3. How do I prevent duplicate images from being imported?
To avoid clutter and maintain clean galleries, WP Ultimate CSV Importer offers a Handle Duplicates setting. In the import configuration section, you can define a unique identifier (such as the File Name or Image URL) that the importer will check against existing records. If a match is found, the duplicate image will be skipped rather than added again. This feature is especially helpful if you run regular imports or update large datasets, as it prevents accidental duplication of the same image. For best results, always use a consistent unique field (like File Name) in your import files so the plugin can detect duplicates accurately.
4. Can I update existing images in NextGEN Gallery?
Yes, WP Ultimate CSV Importer allows you to update already imported images without creating duplicates. Instead of choosing a fresh import, select the Update Content option. This option is useful when you need to make changes to existing images, such as editing the title, updating the description, modifying alt text, or adding new tags. For example, if you imported 200 images with basic metadata but later want to add SEO-friendly alt text, you can re-import the file with the Update option and map only the fields you want to update. This saves time and ensures your galleries always have the most accurate and up-to-date information.
5. Where do I verify if my images are imported correctly?
Once the import is complete, you can verify the results directly inside NextGEN Gallery > Manage Galleries, where you’ll see the list of galleries and the images assigned to each one. Check whether all the images appear in the correct galleries and review their metadata (titles, descriptions, tags, and alt text) to confirm accuracy.
6. Is it possible to schedule imports or exports?
Yes, WP Ultimate CSV Importer includes a scheduling feature that lets you automate imports and exports at regular intervals. To use scheduling, you’ll need to ensure that WordPress cron is enabled and properly configured on your site. Once set up, the importer will handle the process automatically, reducing manual work and ensuring your galleries stay up to date.
Related Guides
- Data Export Access for Non-admin User
- Export Data using WP_Query
- Add Import Conditional Filters in WP Ultimate CSV Importer
- How to Import and Export WordPress Data to an Excel file
- Troubleshooting Guide – WP Ultimate CSV Importer
- How to Import, Update, and Schedule WordPress Data
- FAQs Related to WP Ultimate CSV Importer
Contact Support
If you still have any questions after reading this guide, please feel free to reach out to us at [email protected]. You can reach out for queries like issues with NextGen Gallery import or export, and want additional features.