CSV Importer Pro is compatible with both ACF Free and Pro plugins. If you have created custom fields, custom posts, or custom taxonomies using ACF, you can seamlessly import and export their data with our plugin. It supports ACF fields assigned to post types like posts, pages, custom posts, users, events, locations, recurring events, WooCommerce, WP eCommerce, tags, categories, customer reviews, and taxonomies.
Remember that before importing data to ACF fields, you have custom posts or custom fields created and associated with a post type.
How to Import Advanced Custom Fields From CSV or XML #
To import ACF data, go to Import/Update and start the new import process. Upload the prepared file, match the fields in the CSV/XML to the WordPress Fields, and import the data.
There are no limitations for rows and columns. You can import unlimited records and many custom fields.
Step 1: Browse the file to import – CSV/XML of custom post type
Navigate to WP CSV Importer Pro > Import/Update tab. Browse the CSV/XML file that contains Advanced Custom Fields data and upload it. You can use other upload types if you prefer.
Now click on Continue and select the content type from the dropdown.
For instance, if you import custom post types of ACF, select the custom post type name.
Step 2: Select the Action as Import or Update
Once you select the file type,
- Select the option Update Content for data updates.
- Select the other option Fresh Import for the new data import ACF Data.
Step 3: Match the CSV/XML fields with WordPress & ACF Fields
If you’re updating content, it takes you to the saved mapping templates page to select any previously configured mapping. Click the Use Template button of one mapping template from the lists. Edit the mapping if needed or navigate to the next step.
If you are doing a new import, match all the CSV headers to the desired WordPress & ACF Fields. Try mapping using any one comfortable options below:
Advanced Mode– It uses the dropdown method to map fields. Map the WP fields with the desired CSV header from the drop-down.
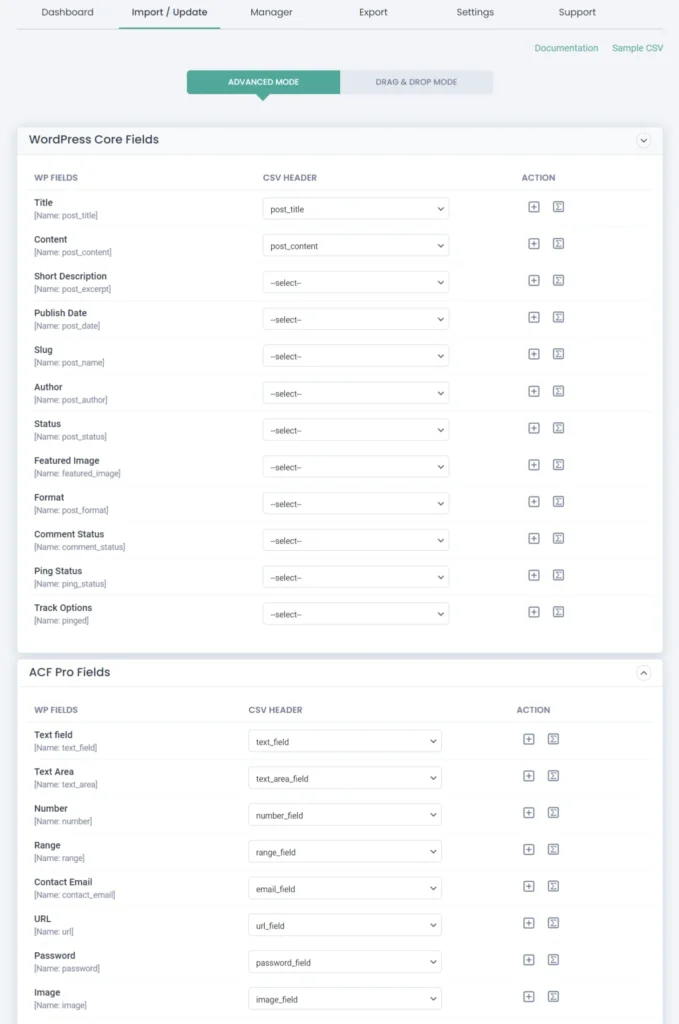
Drag-and-drop mode– Map the fields by dragging the appropriate CSV header fields from the right-side draggable panel. Drop them in the corresponding WordPress core fields and ACF Fields.
Separate mapping widgets are allocated to map the ACF Free and Pro Fields.
Once done with the mapping, enter a unique name for the mapping template at the bottom of the screen. Click on Continue.
Step 4: Run the Importer
Now configure the Import settings. WP CSV importer Pro provides crucial configurations to set up before import. Enable Roll back to back up and Roll back to the previous state after import if any issues are found. Switch to the maintenance mode option to notify your visitors about your site update. Configure duplicate handles on existing records to prevent duplicate creation while importing. Schedule the ACF import to be done later.
Learn more about How to Schedule Advanced Custom Fields Import here.
Finally, click on Import.
Your ACF custom post types and custom field data will be imported successfully.
Try using Advanced Custom Fields Sample File: Download the ACF CSV sample File to try the test import.
Step 5: Verify the ACF Fields Imported with Logs & Summary File
When the import is happening, you can view the import summary for each record on the screen. After it completes, it will pop up a window with the message ‘Import Completed!’. From here, you can download the summary and failed media files as CSV.
You can also review the results by directly visiting the post type and checking each record.

WP Ultimate CSV Importer Pro
Get Ultimate CSV/XML Importer to import data on WordPress faster, quicker and safer.
ACF Repeater Fields #
The ACF repeater fields allow you to create a set of subfields that come up repeatedly. This is used when you have to create and manage highly customized data.
With WordPress Ultimate CSV Importer, you can import any Repeater values of ACF. You have to separate the repeater values using the Pipeline(|) separator in your CSV/XML file.
Ex: Let’s repeat Text(Car Name) & Radio button(Fuel type – Petrol or Diesel) Values.
Q5 35 TDI Premium Plus – Petrol
A6 35 TDI Matrix – Diesel
Q7 45 TDI Quattro Technology – Diesel
Along with your post details add two additional columns in your CSV file – one for Car Name & other for Fuel Type.
Now mention the values in the pipeline separator like:
Car Name – Q5 35 TDI Premium Plus|A6 35 TDI Matrix|Q7 45 TDI Quattro Technology
Fuel Type – Petrol|Diesel|Diesel
Download the ACF Repeater Field Sample CSV File.
Import Repeater of Repeater ACF Fields
The Repeater field in ACF acts as a parent for subfields, providing an organized way to handle repeating content like team members or call-to-actions (CTAs). WP Ultimate CSV Importer enables you to import values for Repeater of Repeater fields with ease.
To format your CSV, the field values should be separated using -> (hyphen followed by greater-than symbol) for nested values and | (pipeline) for grouping items.
Example Structure:
Repeater Field (Model Name): Q5, A6, Q7
Repeater of Repeater (Car Name):
Q5: 35 TDI Premium Plus, 35 TDI Technology
A6: 35 TDI Matrix, 35 TFSI Matrix
Q7: 45 TDI Quattro Technology, 45 TDI Design Edition
CSV Format:
Add the necessary post information and include two additional columns to define the values as follows:
Models: Q5|A6|Q7
Cars:
Q5 35 TDI Premium Plus->Q5 35 TDI Technology|A6 35 TDI Matrix->A6 35 TFSI Matrix|Q7 45 TDI Quattro Technology->Q7 45 TDI Design Edition
Update WordPress with ACF Fields #
You can update existing WordPress records or data based on your ACF custom fields. Here’s how to do it:
Step 1: Set up Update Content Action after file upload
Once you upload your CSV/XML file, click the Update Content option. Then choose your post_type from the dropdown.
Step 2: Follow step 3 of the mapping fields explained above
The Field Mapping follows the same procedure you do for import.
Step 3: Configure & run update
The data update is done based on the text or number field. So in the import section, enable the ‘Do you want to update the records based on ACF Fields?’ option and enter the name of the text or number field.
The update will be done based on the ACF fields you have entered.
ACF Flexible Content Field Import and Export #
ACF flexible content field is a block-based editor designed with layouts and sub-fields. You can import and export flexible content field data as CSV/XML along with the other fields and assigned post types like pages, posts, or custom posts using the CSV Importer Pro plugin.
Import Flexible Content Field into WordPress
To import flexible content field data into your website, all you first need to do is prepare a proper CSV/XML file. If you want to prepare a CSV file to import, follow the field value format to give inside CSV by downloading the sample file below.
Download ACF Flexible Content Field CSV
Note: Use pipeline separator to separate values for flexible content fields.
Add an additional field called flexible content and mention the layout names in comma separator like:
flex_label,flex_label
After you prepare the CSV, follow the upcoming steps to import it into WordPress.
Step 1: Start the Import process
Upload the CSV in the CSV Importer plugin and select the post type from the dropdown.
Step 2: Map Fields in the ACF Flexible Fields widget
Map the CSV/XML fields using ‘advanced mode’ or ‘drag & drop mode’. Make sure to map all the fields in the ACF Flexible Fields widget. Click Continue.
Step 3: Run the import
Click the Import button to import CSV or XML data instantly.
For more information about scheduling the import, Refer to the How to Import, Update, and Schedule documentation.
WP Ultimate CSV Importer Pro
Get Ultimate CSV/XML Importer to import data on WordPress faster, quicker and safer.
Export ACF Flexible Content Field data
You can export ACF flexible content field data along with Posts, Pages, or Custom Posts. To export flexible content field data,
Step 1: Choose a Module to Export
Move to the Export tab and select the post type where you’ve associated this flexible content field like Pages, Posts, or Custom Posts.
If you choose Custom Posts, select one Custom Post name from the dropdown.
Step 2: Fill in file name and choose file type
Give a name for the file to export and select one file type like CSV or XLS.
Step 3: Configure Filters & Run the Export
Configure advanced filters like specific fields, author, or status. Refer to our Export data with CSV Importer documentation to learn more about the filters.
Step 4: Click export and download the file
Now click Export. The file will be prepared and ready to export. Click download to save the backup on your local desktop.
You can schedule the export. Refer to the How to Import, Update, and Schedule documentation to know more about this.
Icon Picker Import #
The Icon Picker field in ACF helps to choose from a predefined set of icons. With WP Ultimate CSV Importer Pro, you can now import icon picker values from a CSV file. This is particularly useful when dealing with custom icon sets for your website, such as Font Awesome, or any other icon set you’ve configured.
Steps to Import Icon Picker Fields:
- First, create an Icon Picker field and associate it with a post, page, or custom post type in ACF.
- Prepare your CSV file, by including the icon picker field with the correct icon reference. For example, if you’re using Font Awesome icons, include the icon class name (e.g., fa-heart or fa-star) in the CSV.
- Map the corresponding icon picker field during the CSV import process.
The importer will automatically assign the correct icon from the list. This saves time and enhances the consistency across your data.
Bidirectional Relationship Support #
WP Ultimate CSV Importer Pro also supports Bidirectional Relationships for ACF fields. This enables a seamless import of complex relationships between posts or custom post types.
Bidirectional relationships are commonly used when you have two interconnected fields. For example, you may have a custom post type Project, and a Team Member post type, where each team member can be assigned to multiple projects, and each project can have multiple team members.
How Bidirectional Relationship Works:
- With WP ultimate CSV importer, the relationship is automatically created in both directions when a Team Member is linked to a Project.
- The importer will create references in both the source and destination fields. This maintains data integrity and links both post types correctly.
Steps to Import Bidirectional Relationships:
- Create ACF relationship fields for both source and destination post types.
- In your CSV file, provide the post IDs or slugs for the related posts in both fields.
- Map the relationship fields properly.
- The importer will establish the relationship in both directions automatically.
This ensures that the relationships between the entities remain intact and properly linked, which is crucial for maintaining the structure of your site when dealing with complex data relationships.
Related Articles #
- How to Export and Import ACF Fields
- How to Import Variable Products in WooCommerce using Single CSV File
- How to import CSV in WordPress
- SEO Import By WP Ultimate CSV Importer
- How to Import WooCommerce Products from a CSV File
- FAQs Related to WP Ultimate CSV Importer
Useful “How-To” Videos #
- Export ACF Google Maps Data
- Import ACF Google Maps in WordPress
- Import ACF Group Fields in WordPress
- ACF Basic Custom Fields Data Import
- WooCommerce Field Data Update using ACF Custom Field
- Export ACF Group Fields in WordPress
- ACF Custom Fields for Users Import & Export
Frequently Asked Questions (FAQs) #
1. How Do I Add ACF to WordPress?
– Install and activate the ACF plugin in the WordPress admin dashboard.
– Go to ACF > Field Groups > Add New. Name your field group, and add fields like text, image, or repeater.
– Choose where the fields should appear (e.g., posts, pages, or custom post types).
– Prepare the CSV/XML file with custom post types fields headers and values.
– Import ACF fields and custom posts into WordPress with the WP CSV Importer Pro Plugin.
2. How do I fetch ACF data in WordPress?
To fetch Advanced Custom Fields (ACF) data in WordPress, you can use the get_field() function provided by the ACF plugin. This function retrieves the value of a specific field assigned to the current post or a specified post.
Here’s how you can use get_field():
<?php
// Get a single value from a specific field
$custom_field_value = get_field(‘field_name’);
// Get a single value from a specific field for a specific post
$custom_field_value = get_field(‘field_name’, $post_id);
// Get multiple values from a repeater field
$repeater_field_values = get_field(‘repeater_field_name’);
// Get multiple values from a repeater field for a specific post
$repeater_field_values = get_field(‘repeater_field_name’, $post_id);
// Example usage in a loop
if (have_posts()) :
while (have_posts()) :
the_post();
$custom_field_value = get_field(‘field_name’);
// Display or manipulate the retrieved value
endwhile;
endif;
?>
Replace the term ‘field_name’ with the name or key of your ACF fields and $post_id with the ID of the post from which you want to retrieve the custom field data. If you omit $post_id, it will default to the current post in the WordPress Loop.
You can use this method in your theme files such as single.php, and page.php, or even in your template parts like header.php or footer.php to display custom field data wherever you need it.
3. What do you do if your ACF import file is empty?
If you got an error on the ACF import file as empty, follow the below steps:
– Navigate to the browser inspector and search for the term <form method=” post”>.
– Replace it with <form method=”post” enctype=”multipart/form-data”>.
– Ensure your ACF file (JSON file) has any syntax errors such as Comma (,) at the end of the file.
4. Where is ACF data saved?
In the ACF WordPress plugin, the data is saved as custom fields in the WordPress database. ACF provides an interface for creating and managing custom fields, and these fields are associated with specific posts or pages. When you add data to these fields via the WordPress admin interface, it gets saved in the wp_postmeta table of your WordPress database.
5. What is the return format for the ACF gallery?
By default, when you create a gallery field in ACF, the return format is an array of image IDs. However, you can customize the return format to suit your business needs. For example, you can choose to return the URLs of the images instead of the IDs. This can be configured when you set up the ACF fields in the WordPress admin panel.
6. How do I get an image field in ACF?
To get the value of an image field in ACF, you can use the get_field() function. If you want to retrieve the URL of the image, you would typically set the return format of the image field to “Image URL” in the ACF fields settings. Then, you can use get_field(‘image_field_name’) to get the URL of the image.
Example:
<?php
$image_url = get_field(‘image_field_name’);
echo ‘<img src=”‘ . $image_url . ‘” alt=”Image”>’;
?>
Replace ‘image_field_name’ with the name or key of your ACF image field.
Remember to replace the term ‘image_field_name’ with the actual name or key of your ACF image field. This will retrieve the URL of the image, which you can then use to display the image in your WordPress theme.
7. How do you export Custom Fields in WordPress?
The WP CSV importer supports both import and export ACF fields(custom fields).
– Navigate to the importer plugin- >Export.
– Choose the option custom posts and then select the desired custom posts from the dropdown menu.
– Click on Export.
– All the custom posts and their related custom fields will be exported. In this way, you can export custom fields in WordPress.
List the fields of ACF that the CSV importer Plugin supports
The CSV importer supports all the below fields of ACF.
Repeater Field
Automate repeating a section with the same set of subfields with ACF repeater fields. Automation of repeating a section inserts the data in each field type. If the inserted field type has multiple values, you can separate it. Just mention
the value in comma(,) separation or pipeline(|) separation.
For Example:
If one of the field types is a checkbox and the field name is color. Then, you can have the header as a color to automap and the value as blue, black, red, or blue|black|red
Taxonomy Field
Create an ACF taxonomy field and assign it to the taxonomy values. The values can be a comma(,) or pipeline(|) separation. Create a new taxonomy, if the value of the taxonomy doesn’t exist then the new taxonomy and assigned to the Post or Page.
Relationship Field
Advanced linking links multiple Pages or Posts with other Post types. It can import related multiple post-object data. You can mention the related Post or Page ID. Use the comma(,) separation with the field name as the header in your CSV file. It relates the CSV file with the created ACF fields automatically.
Gallery Fields
Now you can import your photos or gallery field images. Import from the WordPress media library or the external image URL. You can specify the URL in comma(,) separation in your CSV with the field name as the header to automap the field. You can also select the media ID for the image in the media library.
WP Ultimate CSV Importer Pro
Get Ultimate CSV/XML Importer to import data on WordPress faster, quicker and safer.