Cloneable fields allow multiple instances of the same custom field, which is useful for repeating content like group items, lists, or any structured data. With WP Ultimate CSV Importer, you can easily import data into Meta Box custom fields with cloneable fields.
What Are Cloneable Fields? #
Cloneable fields in Meta Box enable you to duplicate a single custom field multiple times. For example:
- A field for entering multiple phone numbers.
- A group field for adding multiple addresses.
- Any data structure requiring multiple instances of the same type of input.
Each cloneable field is stored in the database as a serialized array.
How to create MetaBox custom fields- Cloneable #
To create a Metabox custom fields as cloneable,
- Navigate to Metabox-> Custom fields.
- In this section, enable the cloneable option.
- Now, create a Custom post.
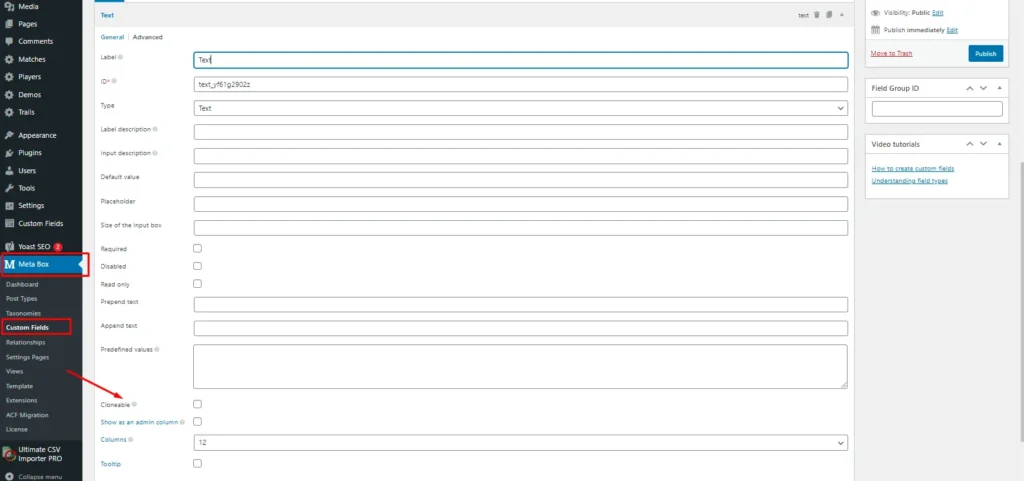
The multiple values are separated using the pipeline (|) separator. Let’s consider that we have created a text field with a cloneable option. Then the values should be like this in the CSV file – Text1|Text2|Text3 Number field – 123|435|904. Create a Checkbox list with sizes like S, M, L, XL. For multiples values use comma (,) separator, and for clone field values use Pipeline (|) separator. Checkbox list – S, L|XL|M, L.
Now, let’s see how to import Metabox cloneable fields.
Step 1: Prepare Your CSV File #
First, create a Meta Box custom field by clicking on Add New at the top of the page. Create a CSV file that includes the data you want to import. Each cloneable field should be formatted as serialized data to ensure proper mapping.
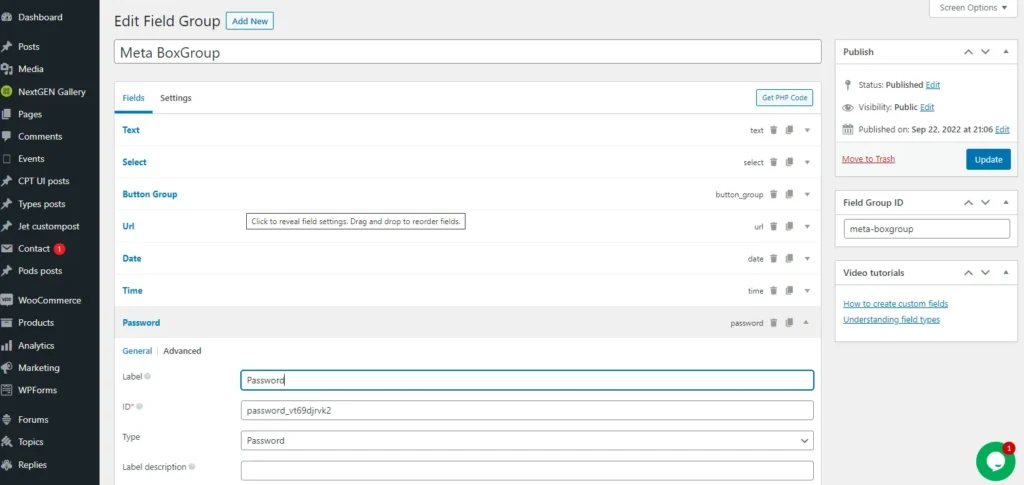
Formatting Cloneable Data
Ensure that:
- Cloneable field data is stored as a serialized array (e.g., [‘item1’, ‘item2’]).
- Special characters in your data are properly escaped.
Use tools or scripts to serialize your data if necessary before importing.
Click here to download the Sample CSV file.
Step 2: Upload Your CSV File #
- Navigate to Ultimate CSV Importer Pro in your WordPress admin dashboard.
- Click Import/Update and select your CSV file.
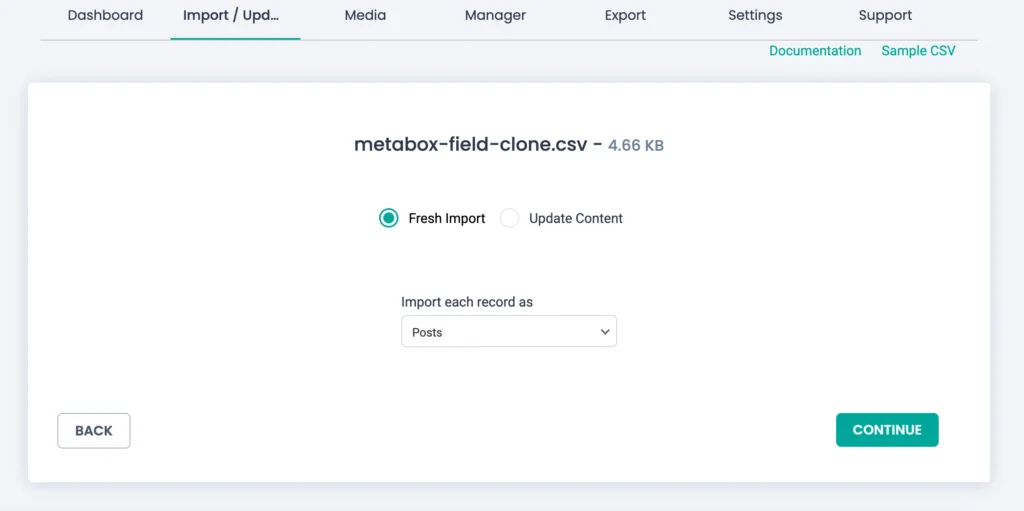
3. Map CSV fields to MetaBox custom fields and custom post types.
Step 3: Map Cloneable Fields #
- In the field mapping section, locate the cloneable custom field from your Meta Box configuration.
- Map the corresponding column from your CSV file to this custom field.
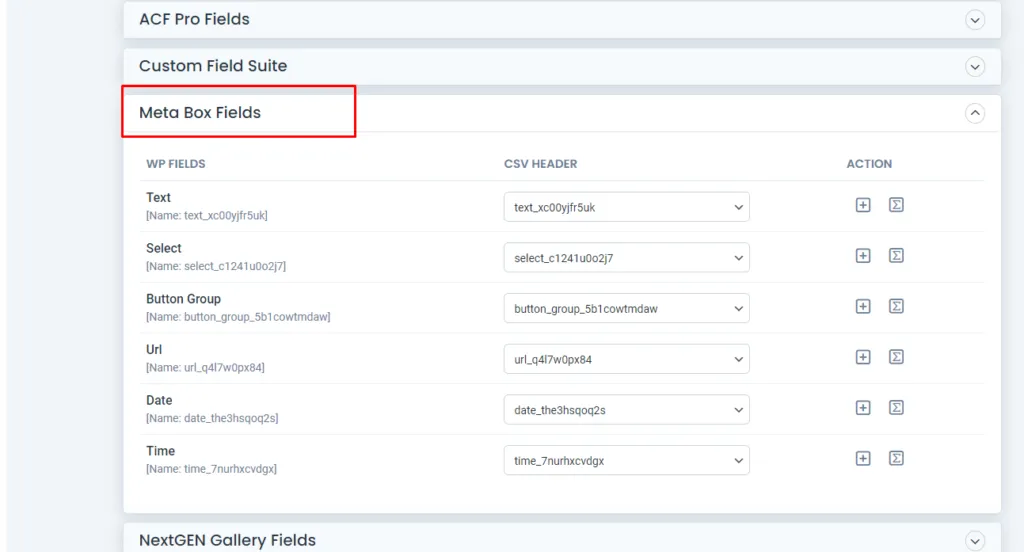
For example, map the column meta_cloneable_field to the field meta_cloneable_field in Meta Box.
- You can use the drag-and-drop method or drop-down method for efficient mapping.
- Once done, save the mapping template and click on Continue.
Step 4: Configure Import Settings #
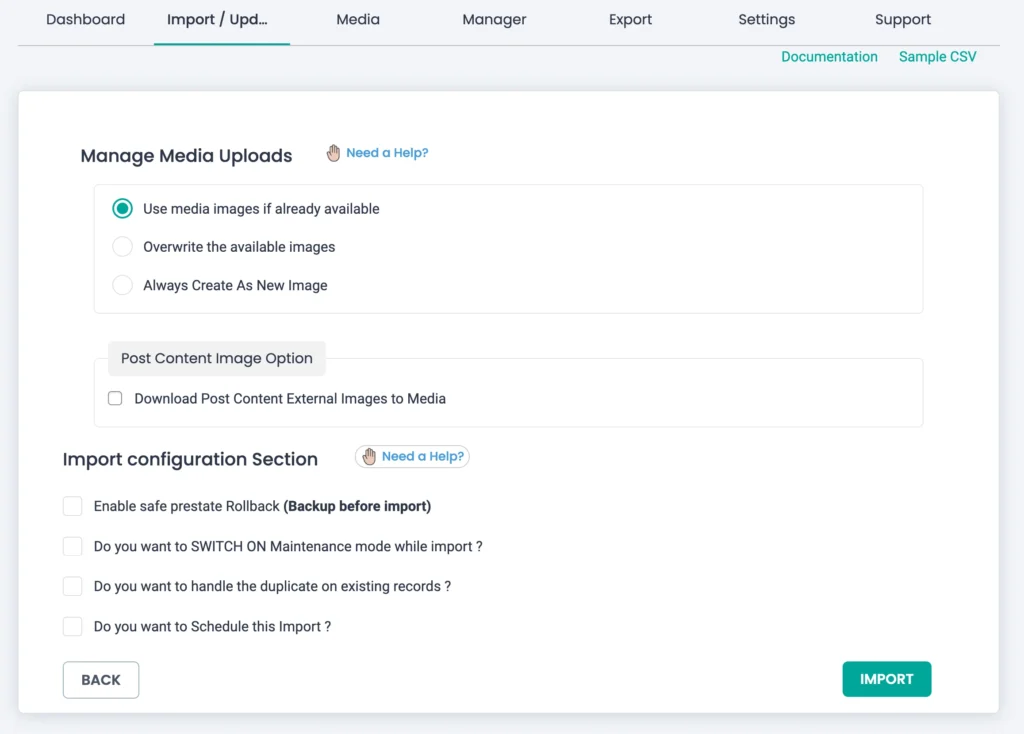
Manage Media Uploads:
It is flexible to configure media uploads on your post-import. Select the desired media upload options based on your needs:
- Upload the media images if already available
- Overwrite the available images
- Always create a new image
The import settings configuration is the step before the final step of running the import. From here, you can configure the settings of your post import with the Rollback option( backup before import) and switch on the maintenance mode while importing. Efficient duplicate handling of existing records for duplicate-free post-import.
Step 5: Run the Import #
- Click ‘Start Import’ to begin the process.
- Wait for the import to complete. The plugin will create posts and save cloneable field data as serialized arrays in the database.
Step 6: Verify Your Import #
After the import, verify that the data is correctly displayed on the frontend and in the WordPress admin:
- Edit a post to ensure that the cloneable fields are populated with the imported data.
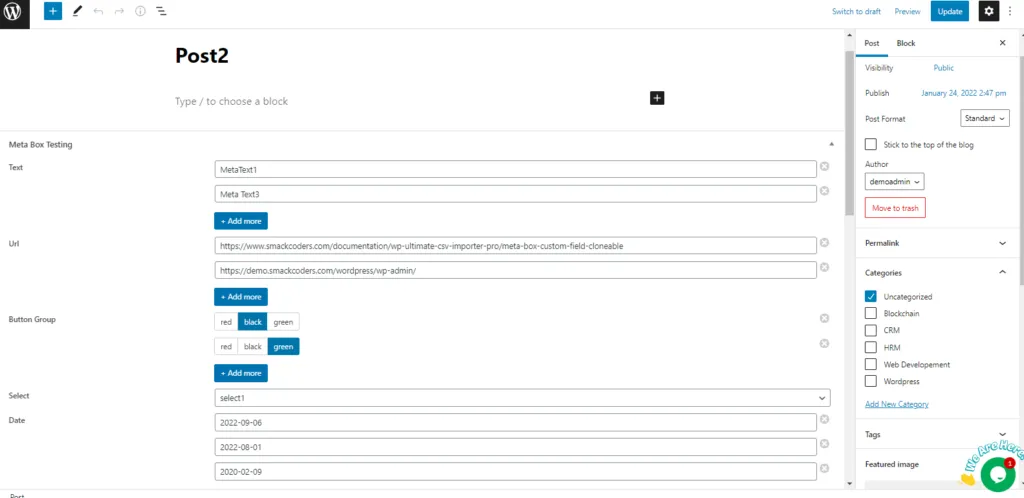
- If you encounter any issues, double-check your CSV formatting and mappings.

WP Ultimate CSV Importer Pro
Get Ultimate CSV/XML Importer to import data on WordPress faster, quicker and safer.
Advanced Topics #
1. MetaBox Group #
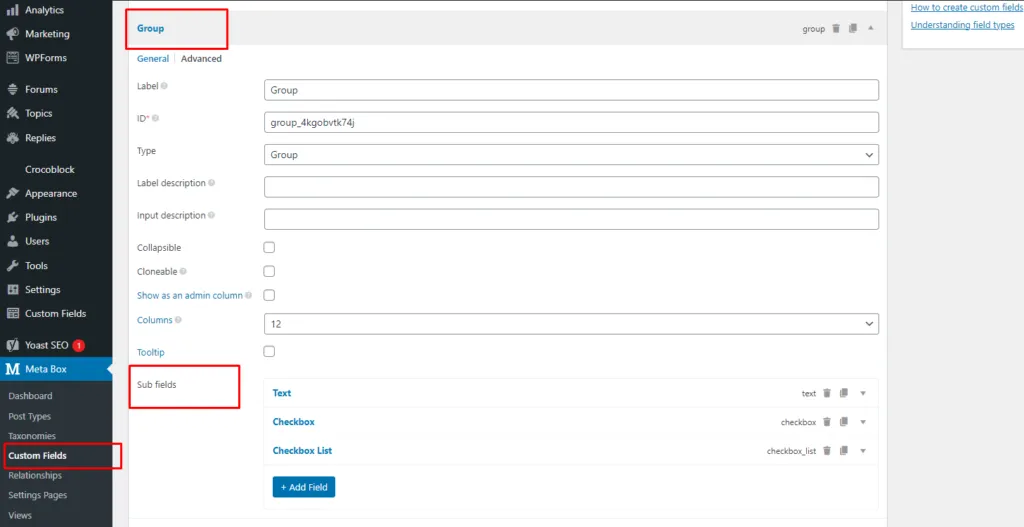
Meta Box Group allows for creating a set of subfields. For this, you need to download and install the Meta Box Group plugin, or else you should have Meta Box AIO. The Ultimate CSV Importer Pro can now import Meta Box Group fields. Once the plugin is installed, click on the Custom Field tab in Meta Box, create a group field, and click on publish/update to add respective fields in the post/custom posts.
Creating a Meta Box Group #
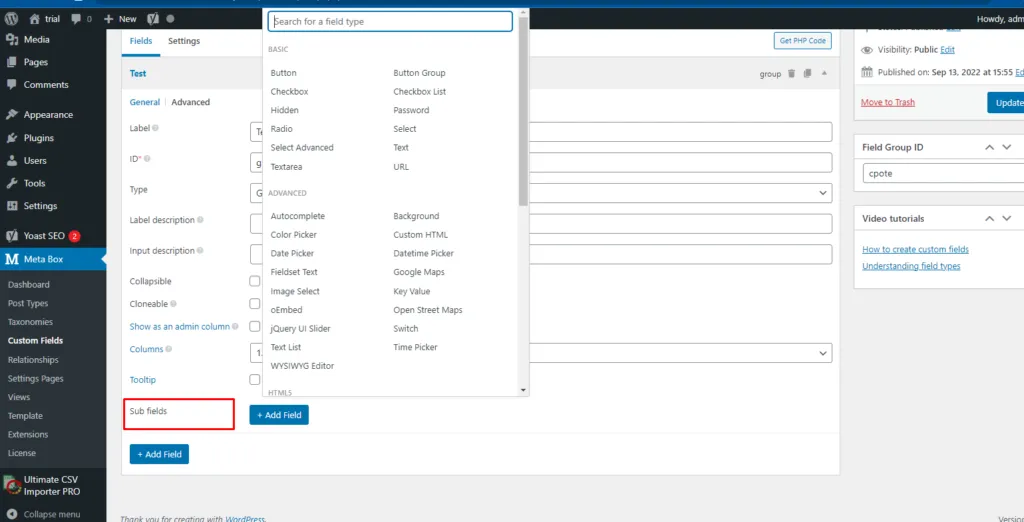
Once we select the type as “Group,” we can see a new option called ‘subfield,’ where we can create several subfields by clicking “Add Field.”
Importing Meta Box Group Data #
- Create a CSV file with Meta Box Group field values. Download the Sample CSV file.
- Import the file using WP Ultimate CSV Importer.
- Map the required fields in the Meta Box Group field during the mapping process.
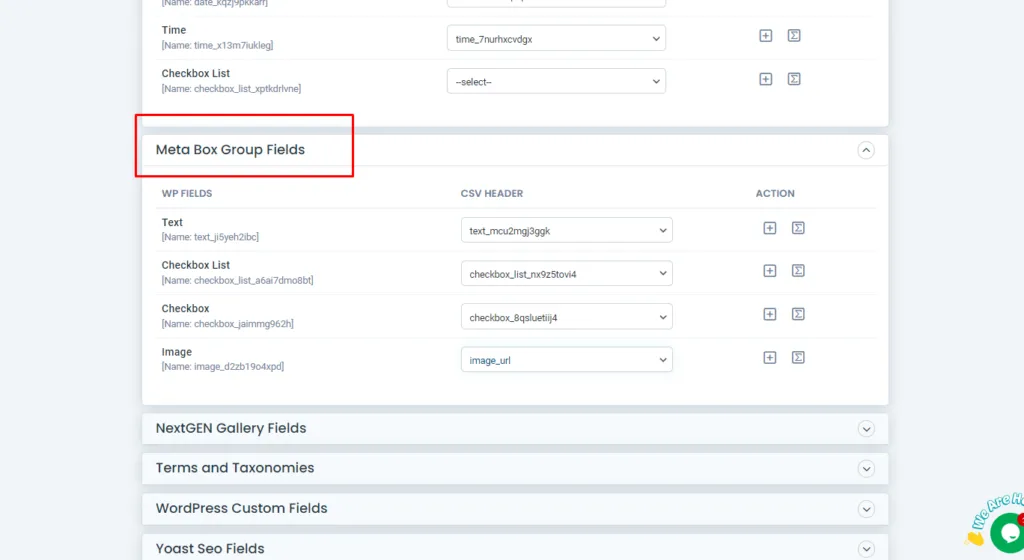
4. Run the import process. The results will display as expected.
2. Subfield Cloneable Options #
WP Ultimate CSV Importer can import any Meta Box Group values and supports creating cloneable options in subfields. To enable this:
- Enable the cloneable option in the subfield.
- For Group subfields, use the Comma (,) separator for multiple values and the Arrow (->) separator for cloneable fields.
- Example CSV values:
- Mobile Name: Samsung->iPhone->Moto
- RAM: 12GB->12GB->6GB
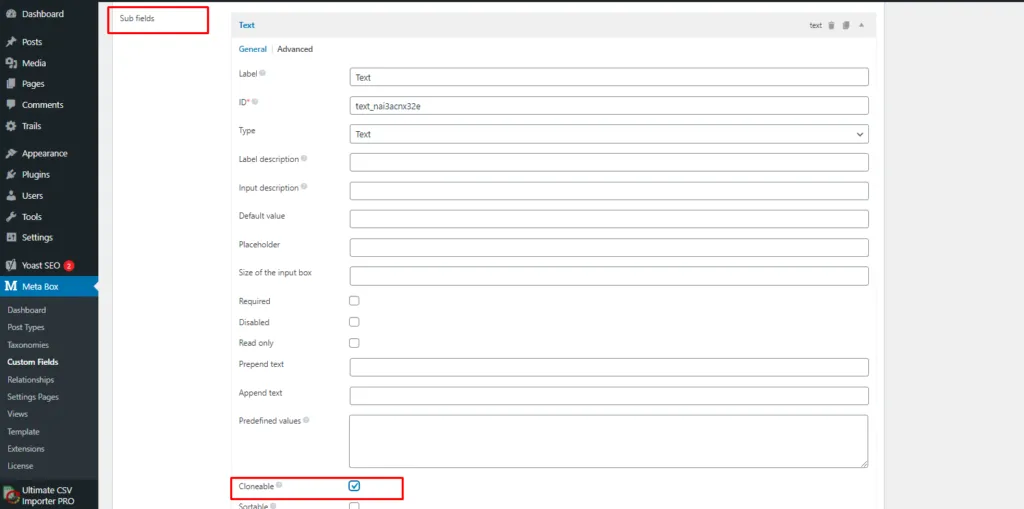
Download the Sample CSV File here.
3. Meta Box Group Clone #
The clone field acts as a repeater field. To enable this feature:
- Tick the ‘Cloneable’ checkbox while creating a group field.
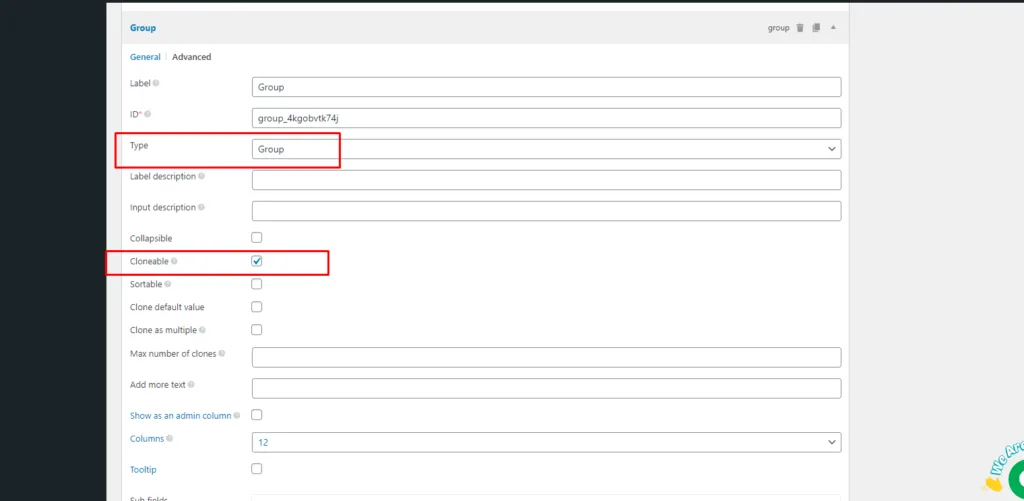
2. Cloneable subfield values use:
- Comma (,) separator for multiple choices.
- Arrow (->) separator for cloneable subfields.
- Pipeline (|) separator for group cloneable values.
3. Example CSV values:
- OS: Android, ios|ios, ios
- Mobile: Samsung->iPhone|Moto->Samsung
4. Meta Box Relationships #
Create relationships between posts, custom posts, pages, and WooCommerce products. To do this:
- Ensure the custom posts are already created.
- Navigate to the Meta Box plugin and select “Relationship.”
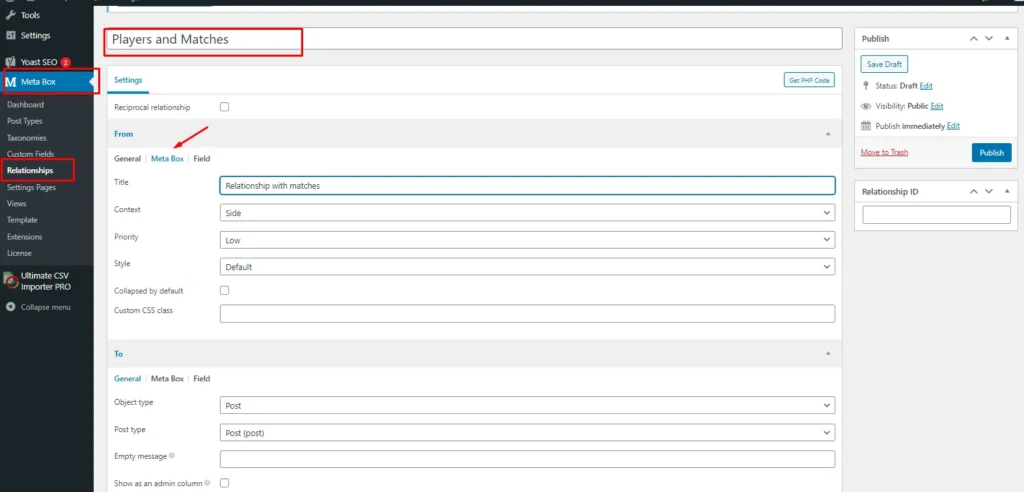
3. Specify the relationship details and publish.
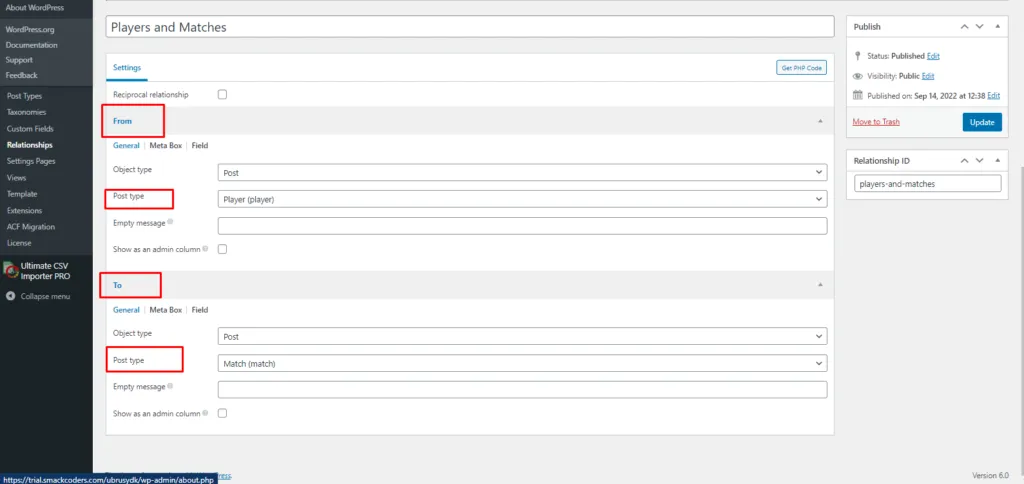
4. Import data using CSV with the following fields:
- mb_relation_to: Specify the post type name. Use, for multiple values.
- mb_relation_from: Specify the post type name. Use, for multiple values.
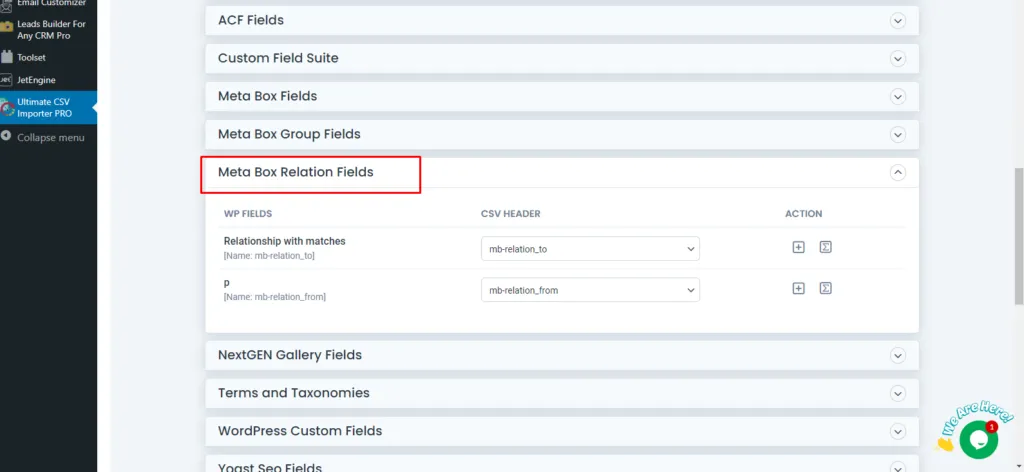
5. Meta Box Custom Table #
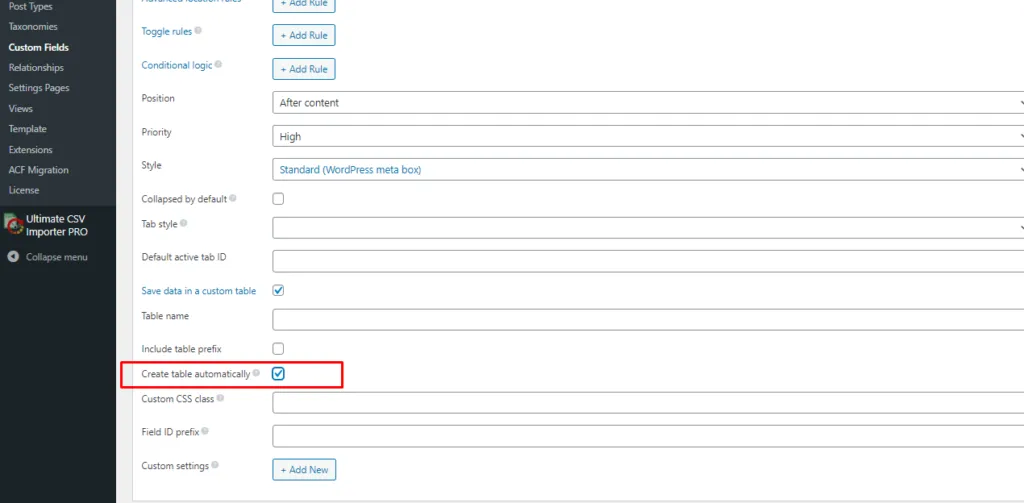
Meta Box supports saving data in a custom table instead of the default WordPress meta table. To enable this:
- Go to Meta Box → Custom Field → Settings.
- Enable ‘Save data in a custom table’.
- Specify the custom table name in the “Table Name” field.
- Enable “Create table automatically” to let the plugin create the table for you. This field is optional.
- It helps to store the data in one place, so we can easily check and import/export it.
6. Exporting Meta Box Data #
Meta Box field data can be exported along with Posts, Pages, or Custom Posts.
- Navigate to the WP Ultimate CSV importer > “Export” tab.
- Select the post type (Posts or Custom Posts).
- Use the Mapping template for the export file, or create a new mapping for your export based on business needs.
- Configure the advanced filters to export your posts most specifically. With an advanced filter, you can also export meta box fields separately.
- To know more about the advanced filter refer here.
- Click “Export” and download the file.
This process ensures that data is stored efficiently and can be easily imported or exported as required.

WP Ultimate CSV Importer Pro
Get Ultimate CSV/XML Importer to import data on WordPress faster, quicker and safer.
