The WordPress importer plugin helps you easily fill your WordPress websites with bulk content in a few minutes. In this guide, we will discuss how to use WP Ultimate CSV Importer to import data, how to use the plugin to update existing records on WordPress, and schedule your data imports and updates.
How to Import Data into a WordPress Site #
To import any data into WordPress, you just need to follow a few simple steps:
- File upload & Types configuration
- Field mapping
- Media uploads & Import configuration
Step 1: File Upload & Types Configuration
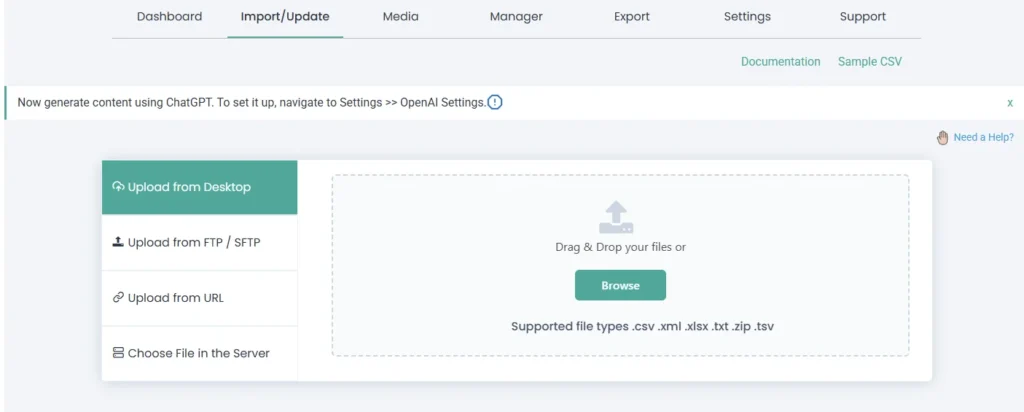
File Upload
WP Ultimate CSV importer supports four types of file uploads to import your CSV, XML, Excel, or TSV data into WordPress.
1. Upload from Desktop
This lets you easily browse the desired import file directly from your computer. The file should be in any of the following formats:
- CSV
- XML
- Excel
- TSV
- TXT
- Zip
The data stored on the uploaded import file will then be imported with the subsequent import process.
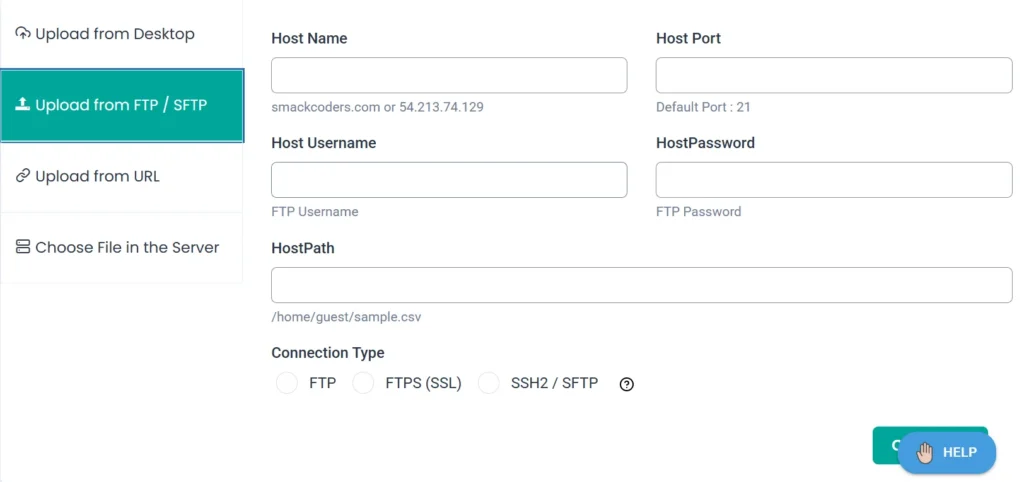
2. Upload CSV from FTP/SFTP server
By this method, it is easy to upload the import file from sources like FTP and SFTP, then import the data into WordPress.
For that, navigate to “Upload from FTP/SFTP” on the left sidebar. Once you provide all the credentials to access the FTP or SFTP, you can seamlessly import the file to your WordPress site.
Try the test import using our trial WordPress instance using these sample CSV & XML files.
3. Upload a file from the URL
Here you can upload the url of any cloud storage, like Google Sheets or Dropbox, where you’ve stored the import file. But make sure these URLs are publicly accessible.
Check out this tutorial video on generating a public CSV URL in Google Sheets.
Now, to upload your desired file from the external URL, navigate to the “Upload from URL” tab from the left side menu.
Provide the file path(URL) where your desired file is located. Then the CSV importer retrieves that file from the URL and imports its data into your WordPress site.
4. Upload File from the Server
With WP Ultimate CSV Importer, you can also upload a file from your local server for seamless data import. Navigate to Import/Update and select Upload file from the server.

Now browse the desired file on your server to import.
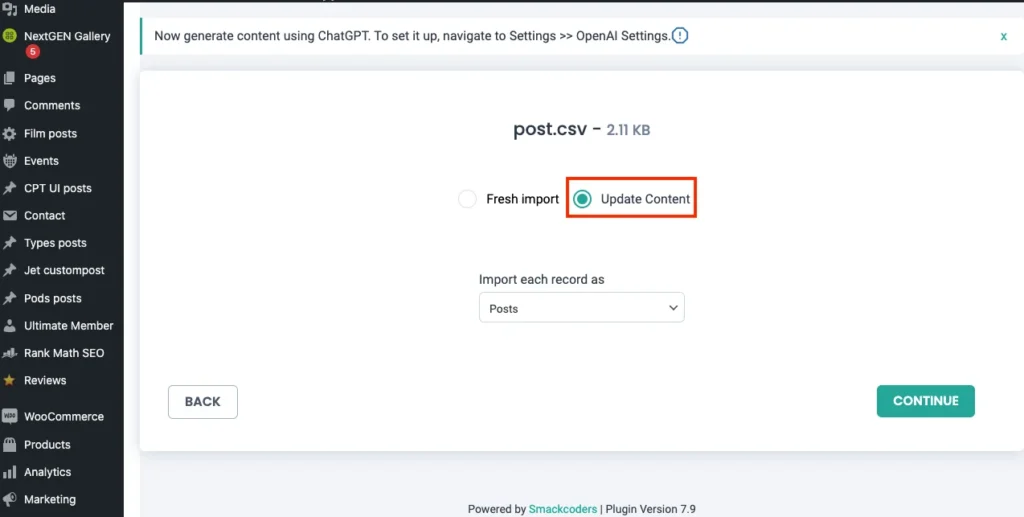
Choose the Post Type & Data Import Type(New Import or Update Existing)
Once you upload the import file, the very next step is to decide whether you need to perform a new import or update the existing data.
For new records import, select the “Fresh Import” option. It is chosen by default.
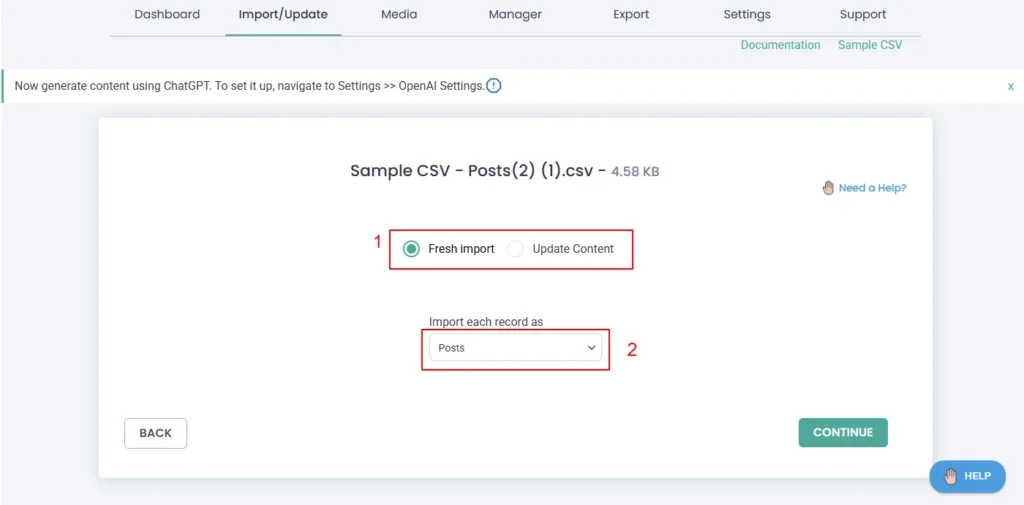
If you want to update available records in your WordPress, select “Update Content”.
Below that, choose a post type you want to import the file records into. Choose an option from the dropdown. Example: Pages or WooCommerce Orders.
Click Continue.
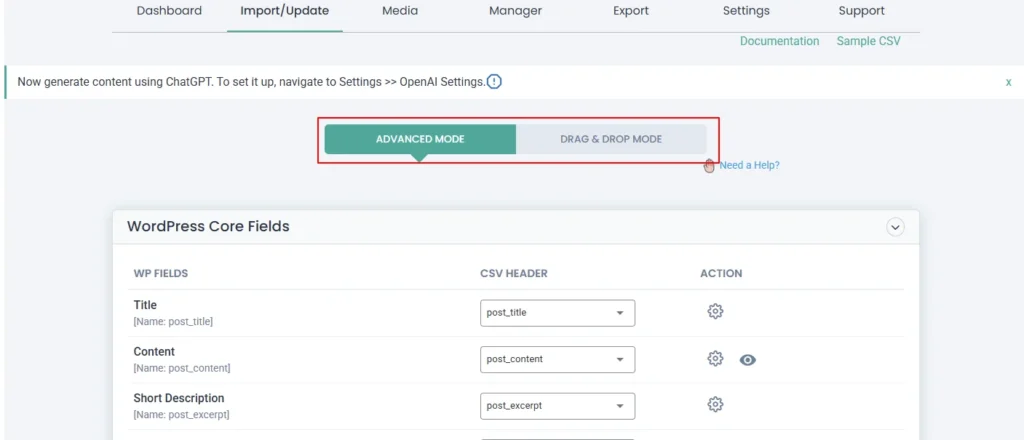
Step 2: Field Mapping
The next step is the Field Mapping. This is where you match the file headers with the WordPress fields. This ensures the accurate data import as the importer processes the data import based on these fields mapping set up.
WP Ultimate CSV Importer will list out the previously saved mapping templates that asks you to choose from. You can also search for templates here to apply and reuse them. You can either go with this option.
Or choose ‘create new mapping template’ if you are okay with matching fields from scratch.
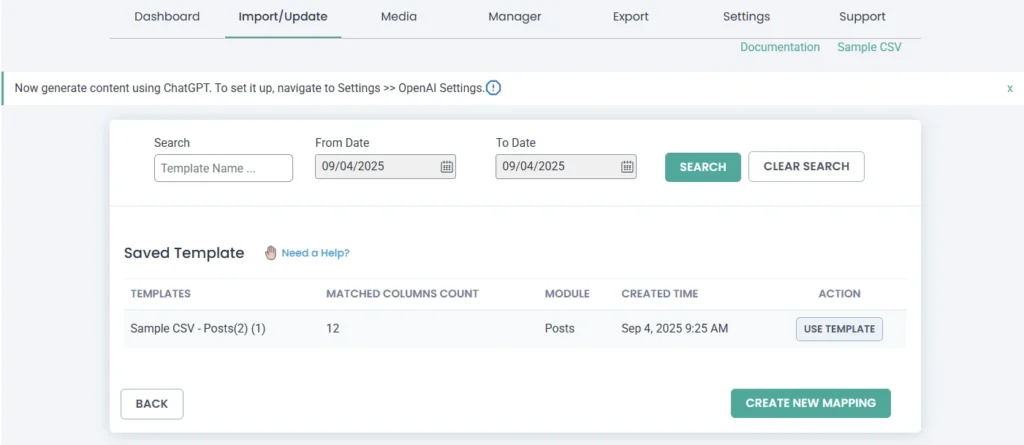
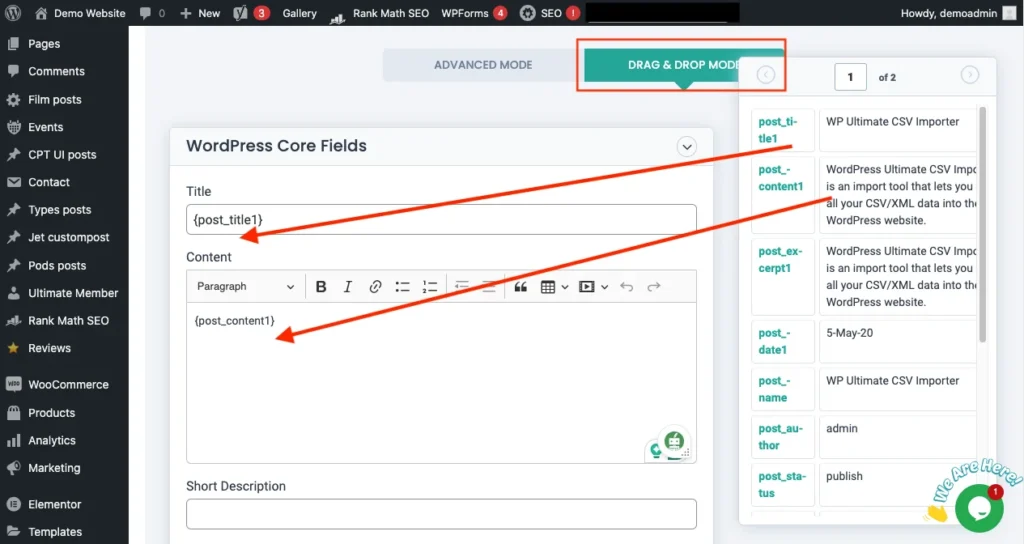
Both of them will open up the field mapping interface. By default, it will show the Advanced mode, you can switch to the drag and drop mode to map fields.
Map the Incoming File Fields with WordPress Fields
The perfect import process includes the accurate mapping of fields to ensure a flawless import. That is, for example, the post title of your file header column should be mapped with the post title field of WordPress. The WP Ultimate CSV importer supports two mapping modes: Advanced mode and Drag & Drop mode.
Advanced Mode
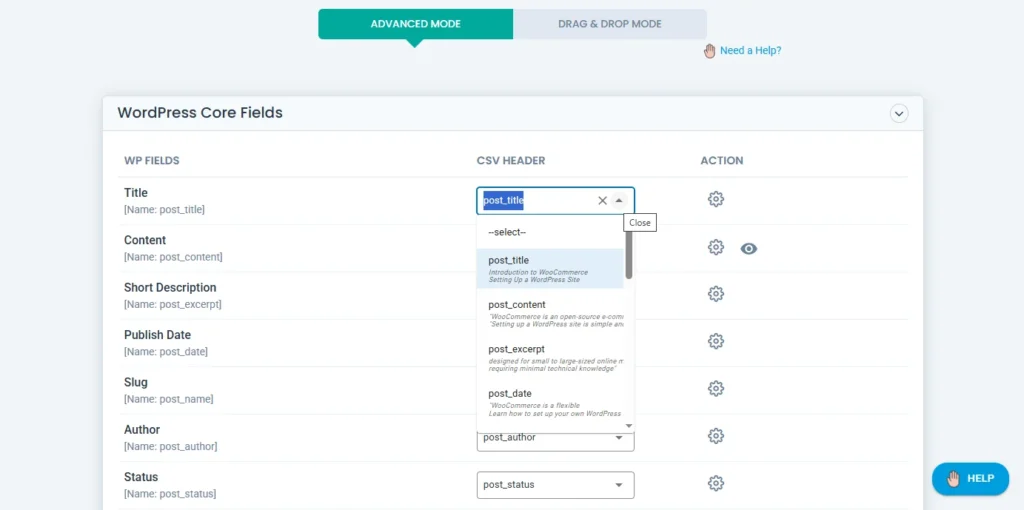
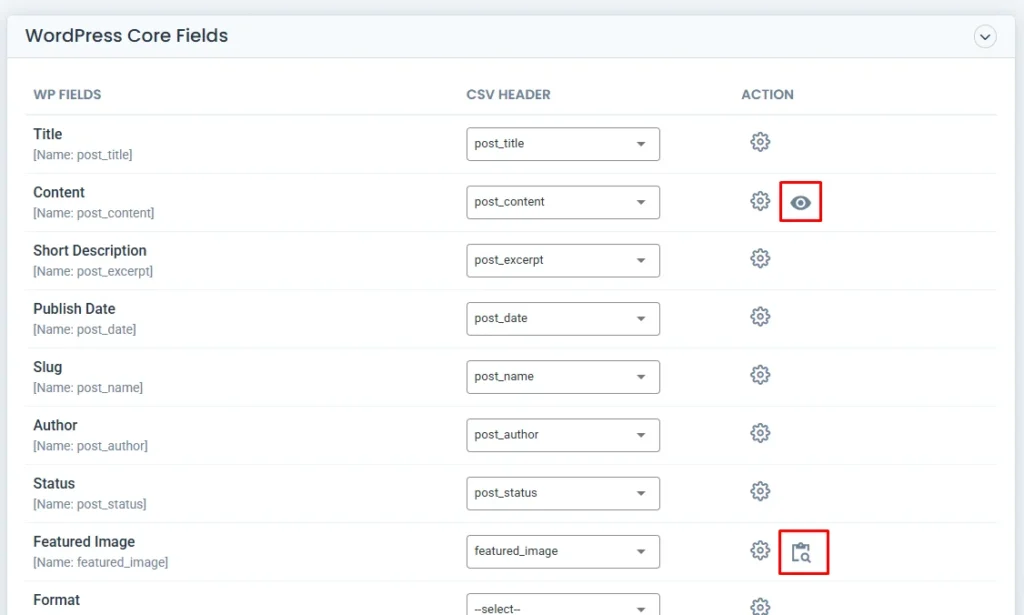
Map the file headers with the WP core fields using the drop-down field selection.
Here you can see multiple fields grouped together as separate widgets, and there are many widgets. Expand a widget to map fields inside it. Do this up to you finish mapping all the necessary fields in your import file.
Note: If your file headers are the same as the WordPress fields name, the importer will automatically map them.
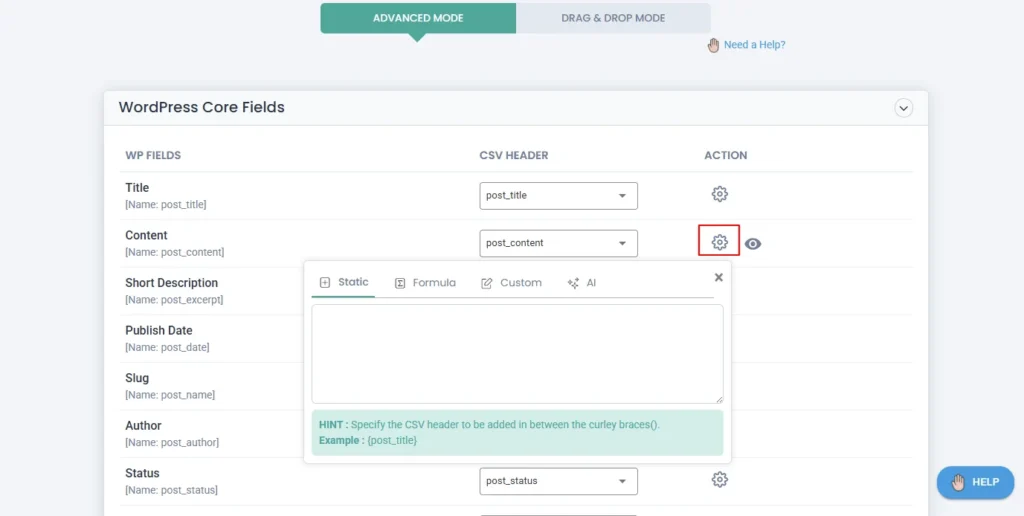
In Advanced Mode, there are some key actions you can perform, which are grouped under a single settings icon. Click on the settings icon provided for a desired field. It will open up a small window with 4 tabs, namely
- Static
- Formula
- Custom
- and AI
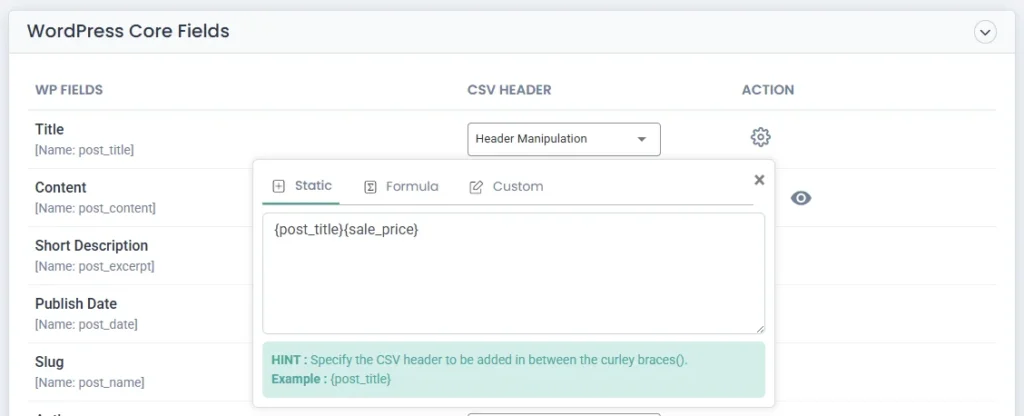
Header Manipulation Field
Once you choose any one tab and start to add inputs, the field selection value will automatically set to “Header Manipulation”.
Each option has unique functionality that helps you customize your imports.
- Static
Use it to merge file columns. Inside the textbox, provide multiple field names within curly braces to combine their values during import. For example, (post_title} {product_price}. You can also add a static text within the curly braces.
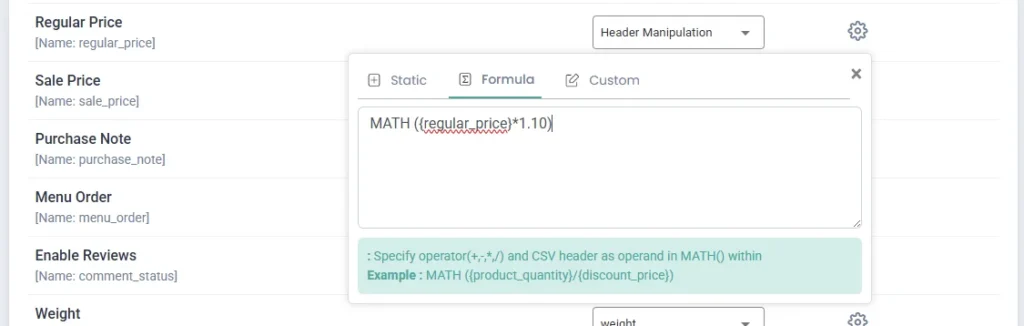
- Formula
In this formula tab, you can input math calculations(such as adding or multiplying, or dividing column values). This is especially useful if you want to do some calculations in any field. For example, applying discounts to the sales price by calculating the regular price.
- Custom
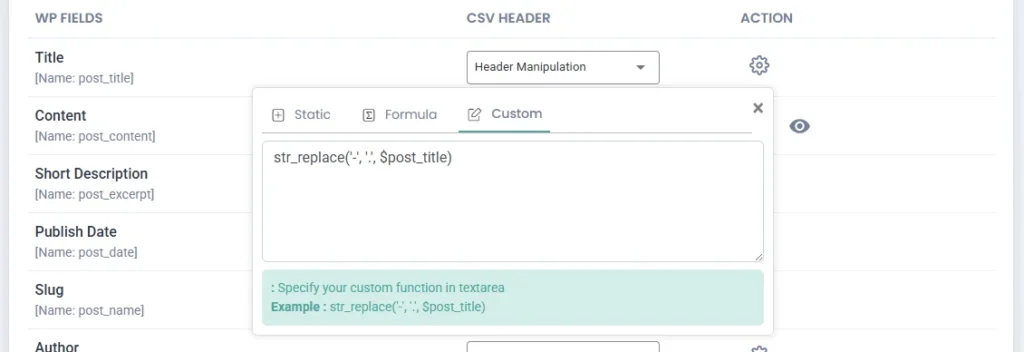
Add any php custom functions here to manipulate the data values of any specific fields. For example: add a custom function to replace a string value in your post title.
str_replace(‘-‘, ‘.’, $post_title)
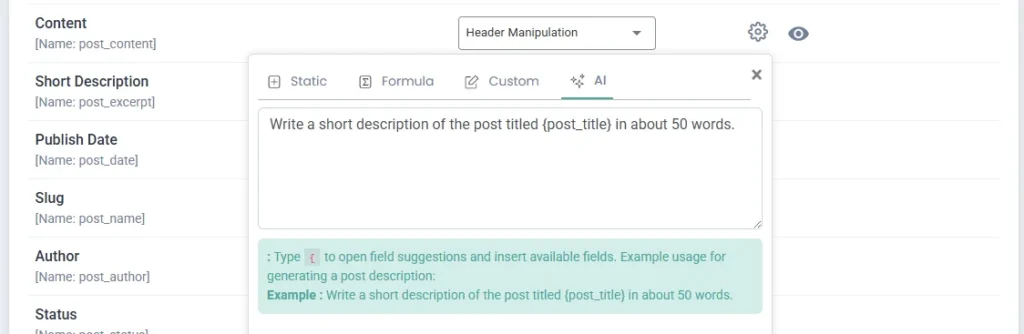
- AI
This option is only visible if you’ve configured your AI provider in Settings > AI Credential. Choose any one AI provider like claude, gemini, or chatgpt, add their api key, and click Save. After you save, the AI tab will be viewable in mapping.
Here, provide the prompt value to generate content based on the prompt for the field. This AI content generation is available for text and image-based fields. You can generate content and images dynamically with the AI Integration.
Drag and Drop Mode
The Drag & Drop Mapping feature makes the mapping process easy and visual. You simply drag the CSV fields from the right and drop them into the corresponding WordPress fields on the left. The CSV headers will be automatically mapped if they match the WordPress field names. If they differ, you can manually select the correct field from a dropdown.
Common for both advanced and drag & drop mode:
- Style Formatting
For post content, the WYSIWYG editor in the post content field allows you to format text in bold, italics, and bullet point styles. This feature works for both static text and dynamic data imported from your CSV or XML ,or any other file supported.
- Preview Field Values
Preview the real-time values of fields like post content and featured image. Select the eye icon provided beside the field to preview them. It shows record previews one by one.
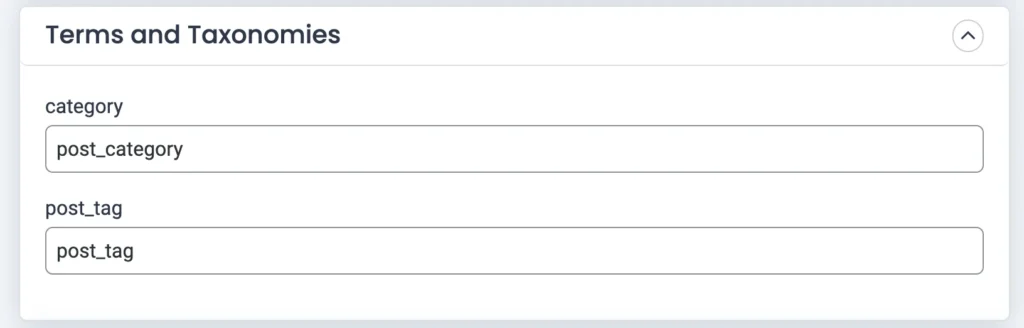
- Terms and Taxonomies
You can also import taxonomies like categories and tags by mapping the relevant file fields to WordPress categories and tags. In the category, you can import your post categories, and in tags, you can import your keywords.
4. Create WP Custom Fields
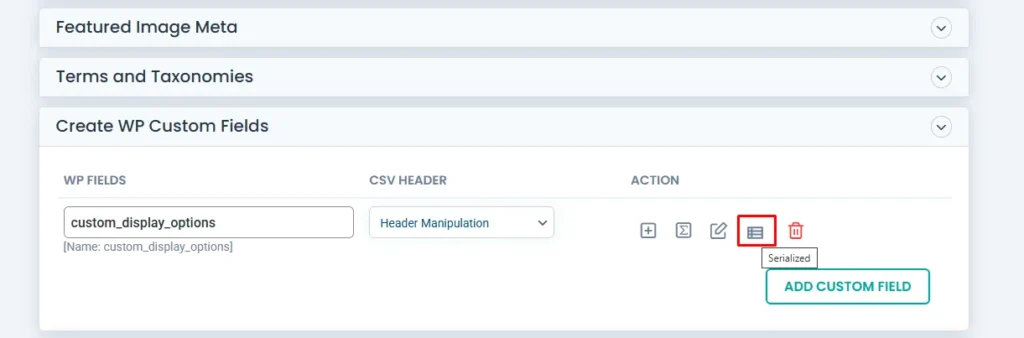
You can create Custom Fields dynamically during import in WordPress using the “Add Custom Field” button.
Visit the Create WP Custom Fields widget in the mapping, click the ‘Add Custom Field’ button. Type the name of your custom field and choose the custom field header you’ve added in your import file from the dropdown. The main use of this section is to create custom fields in WordPress that are not already present in your website, but in your CSV(import file).
Add as many custom fields as you want using the ‘Add Custom Field’ button.
Apply actions too if needed.
Delete custom fields if you don’t want them using the delete icon.Click the Serialized option from the actions area to create serialized fields. Learn how to import serialized data into WordPress Custom fields in this help guide.
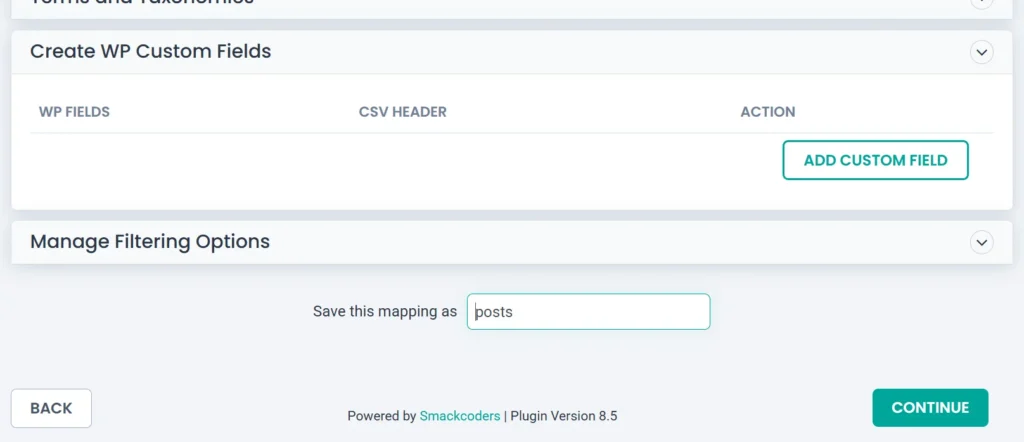
5. Manage Filtering Options (Import Filters)
Use this section to filter and export only the desired rows from your import file. The filtering conditions are applied based on the import file headers. Add rules for filters like equals, not equals, greater than, equals or greater than, less than, contains, and more to your field headers based on your needs. Learn more about using the import conditional filters in WP Ultimate CSV Importer here.
6. Save Mapping as Template
Save your configured import mapping as a template to reuse it in your future imports, instead of preparing them from scratch again for a similar import process. Simply enter a unique name for your template in the “Save this mapping as” textbox and click “Continue” to save it.
Step 3: Media Uploads & Import Configuration
This page includes two sections. The first is the Manage Media Uploads section, and the next one is the Import Configuration Section.
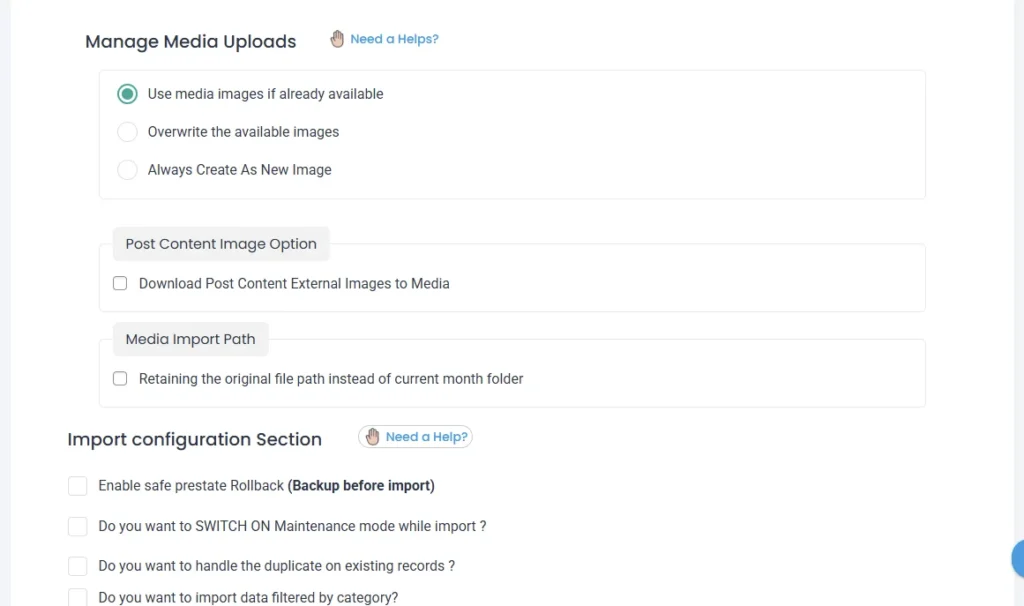
Manage Media Uploads
In this section, you can configure options based on how you want your media imports should be handled.
First, three different options are provided to handle your media uploads effectively. You are free to choose any of the options below that best suit your data imports.
- Use media images if already available
- Overwrite the available images
- Always create new images
Post Content Image Option
To download the external images added inside your post content into your media library, enable the option “Download Post Content External Images to Media”.
Media Import Path
Check the checkbox of “Retaining the original file path instead of current month folder” to keep the same file path or URL of media instead of storing in your WordPress’s standard month folders.
Data Import Settings Configuration
This step is to configure the advanced import settings before running the import. The plugin can handle bulk WordPress imports of any size. This means the plugin can process large imports smoothly, without crashing or stalling during import events.
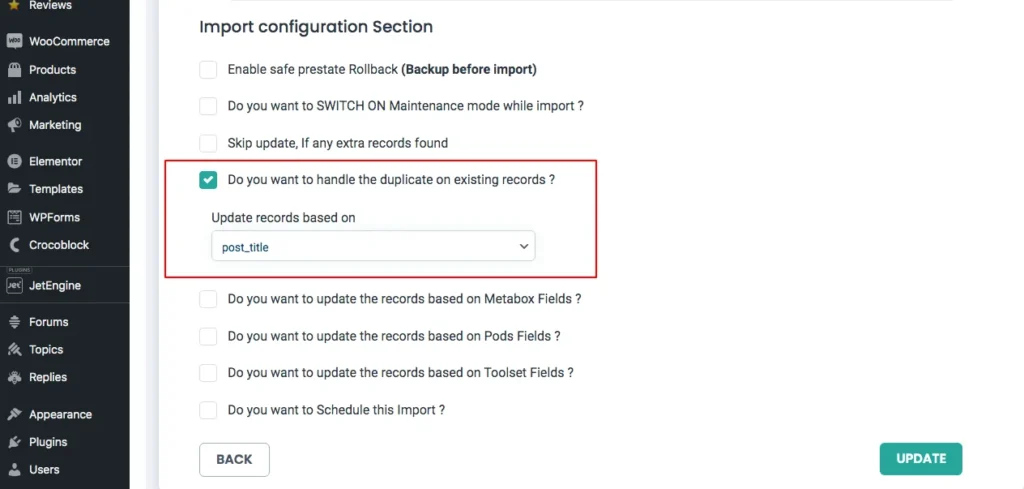
But please make sure the basic minimum requirements are met. Adjust your php.ini settings based on the values provided in the minimum requirements provided under Settings tab > Security and Performance section.WP Ultimate CSV Importer Pro plugin offers advanced options to make your import process more secure, including Duplicate Check, RollBack, and Maintenance Mode.
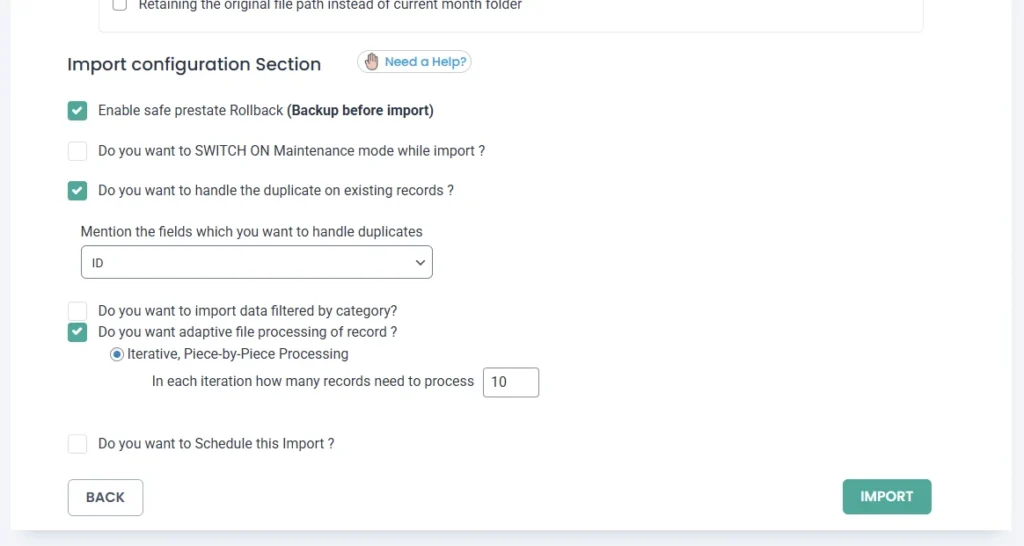
- Backup Before Import(Rollback)
The RollBack option allows you to create a backup of your database before starting the import. This ensures you can restore the database to its previous state if anything goes wrong during the import. To enable this feature, check the box of “Enable safe prestate Rollback (Backup before import)” option. If an error occurs, you can easily roll back with the backup. You will see the Rollback button shown in the import log page after import. - Maintenance Mode
The Maintenance Mode option lets you put your website into maintenance mode during the import, so visitors are notified that updates are in progress. This helps you manage backend changes without disrupting the user experience. To activate maintenance mode during the import, check the option “Do you want to SWITCH ON Maintenance mode while import?”.
- Handle Duplication
To avoid importing duplicate records, the plugin includes a duplicate handling feature. It checks for duplicates based on a specific WordPress field (e.g., post title or ID). If a duplicate is found, the importer will skip that record to prevent redundancy. To access this feature, check the box “Do you want to handle the duplicate on existing records ?” and select one WordPress field from the dropdown, like id, title, or name. - Category-Based Import (Enable Category Filter)
Enable the “Do you want to import data filtered by category?” option to filter records based on categories and import. A dropdown will appear listing available WordPress categories. Select the categories to import only the records that belong to them.
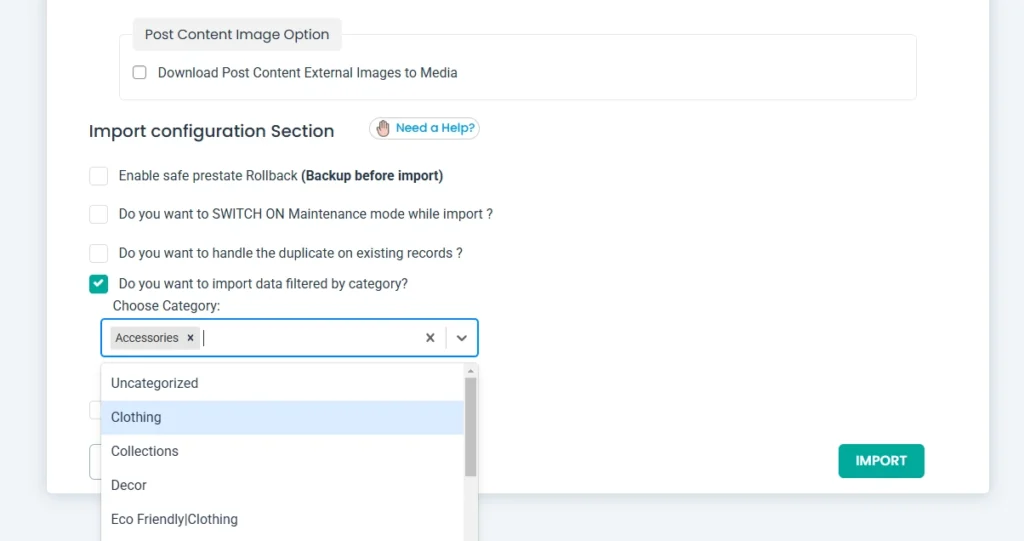
Note: The category-based import filter is available only for Posts, Pages, Custom Post Types, and Products.
The plugin will check each record’s category and import only those matching the selected categories, skipping the rest.
5. Iteration-based import processing
Choose the option “Do you want adaptive file processing of record ?” to run your imports batch by batch. Once you select this option, Iterative or Piece-by-Piece Processing is enabled, and asks you to select the count to process records per iteration. Provide a number or choose a number in the “In each iteration how many records need to process”. The plugin will import records chunk by chunk, matching the provided records count. Learn more about iteration based import method.
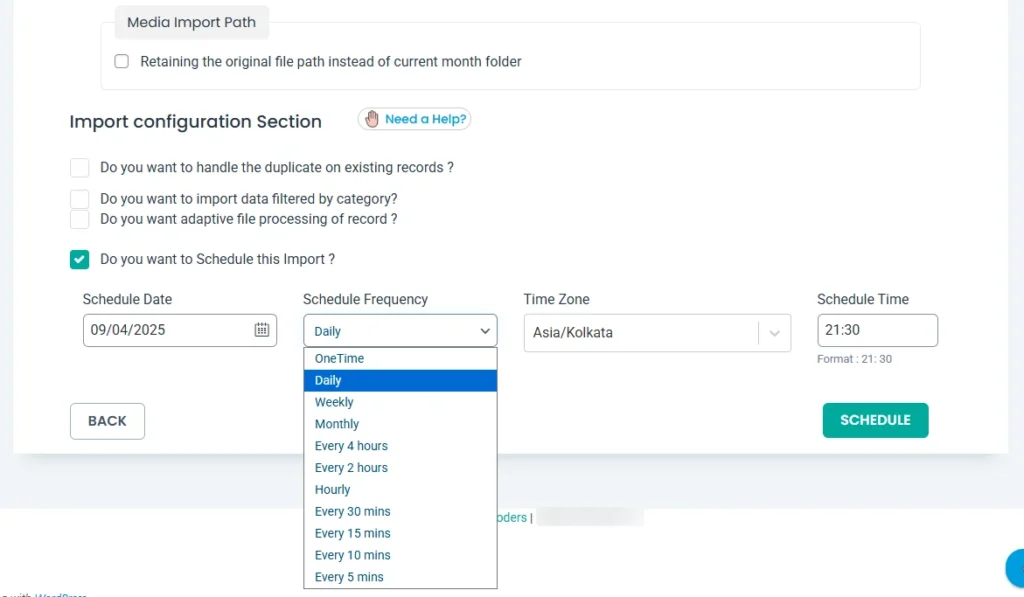
6. Schedule the Import
Enable the “Do you want to Schedule this Import ?” to schedule the import process. You will learn scheduling import in detail in the upcoming section.
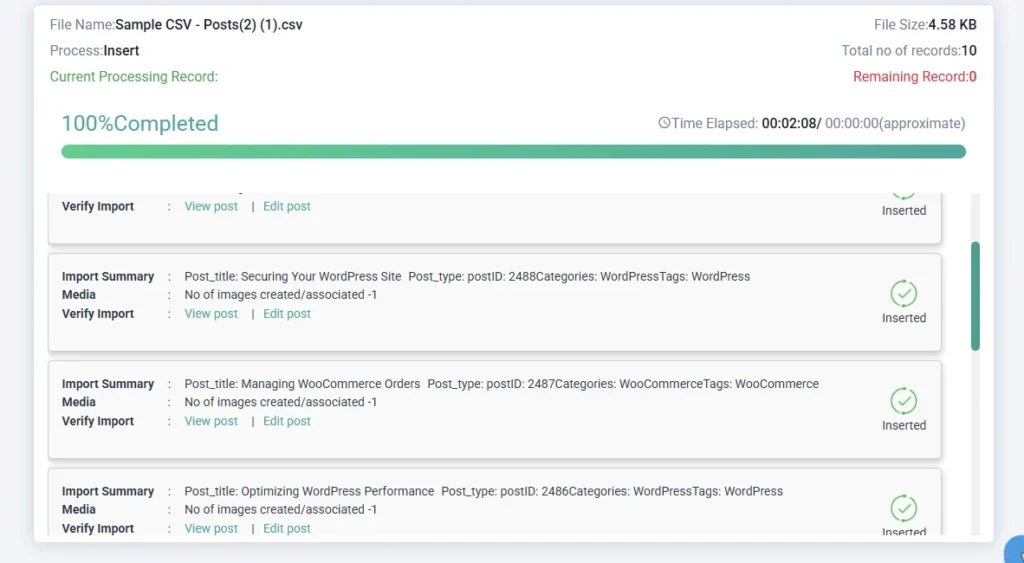
After configuring all the essential import settings, hit the import button to start the import. The importer will import records based on the configurations. Once it completes, you will see the import completed pop-up message window.
This window provides two buttons: “Summary Logs” and “Failed Media”. Click on them to download import logs and the failed media list as CSV files.
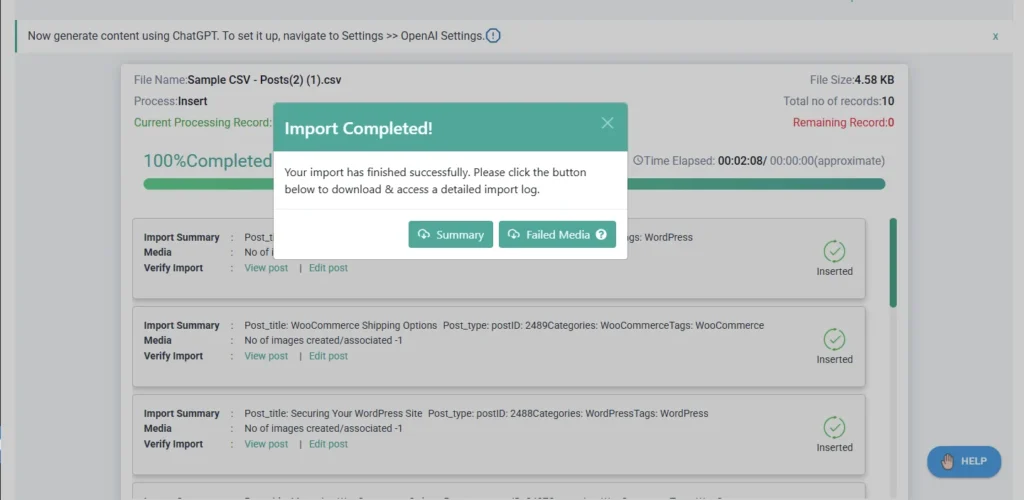
Close the window to view the import logs screen, which will provide the import status of each record. Here you can also see the error messages of records that failed to import. Use the “Edit” and “View” links to see the record in admin and front view.
How to Update WordPress Data #
You can update existing WordPress posts, pages, products, or custom post data with WP Ultimate CSV Importer.
It follows the same import steps; however, in only two areas, the configuration changes.
- Choose ‘Update Content’ as your import type from the post type selection area, then follow the regular import steps explained above.
- In the import configuration section, you’ll see that additional options are provided for updates. Below are them:
- Skip update, If any extra records found – Enable it and choose a file(like id or title) to update only the records that match, and skip extra records that are not in your WordPress.
- Do you want to handle the duplicate on existing records? – This is to update records that match the field selection from the dropdown.
- Enable the category filter “Do you want to update records based on a selected category?” – only category-specific records are updated, preventing unnecessary modifications to other data. A dropdown will appear listing available WordPress categories. Select the categories you want to update records for.
Note: The category filter can be used only if you enable one of these options:
- “Skip update, if any extra records found” (to prevent updating unrelated records)
- “Do you want to handle duplicates on existing records?” (to update only duplicate records and avoid overwriting unique ones)
The importer will check and update only the records that belong to the selected categories, skipping others.
- “Do you want to update the records based on Metabox Fields ?” – to update records based on text or number fields created with the MetaBox plugin.
- “Do you want to update the records based on JetEngine Fields ?” – Choose to update records based on the text or number fields of the JetEngine plugin.
- “Do you want to update the records based on Pods Fields ?” – Choose to update records upon Pods plugin fields.
- “Do you want to update the records based on Toolset Fields ?” – Enable it and choose a toolset types plugin field to run the update based on the selected field.
Once done, click Update, and the importer will update all your available records in WordPress.
How to Schedule WordPress Data Imports #
To schedule recurring imports, make sure to:
- Upload file from the FTP/SFTP or the Upload from URL option.
- Select “Update Content” as the import type.
In this way, whenever you make some changes in your import file, it will be automatically reflected at the time the schedule runs.
For scheduling, follow the same steps as data import. In the import configuration setting, choose the option “Do you want to Schedule this Import ?”.
Enter the scheduled date, time, frequency, and Time Zone.
Important note:
- Ensure the time zone is as your WordPress site’s time zone configuration
- You must add an entry in CRON before setting up the scheduling. Learn more about adding a cron entry in your terminal.
Now, click Schedule to schedule the import of your data.
You can view all the scheduled events by visiting the Manager > Smart Schedule. From here, you can edit your schedule settings and delete any events if required.
Related Topics #
How to download data from the Google sheet to your WordPress website?
Follow the steps below to download data from Google Sheets
- Prepare all your data to be imported into the Google Sheets.
- Ensure your data is correctly set up on the Google Sheets.
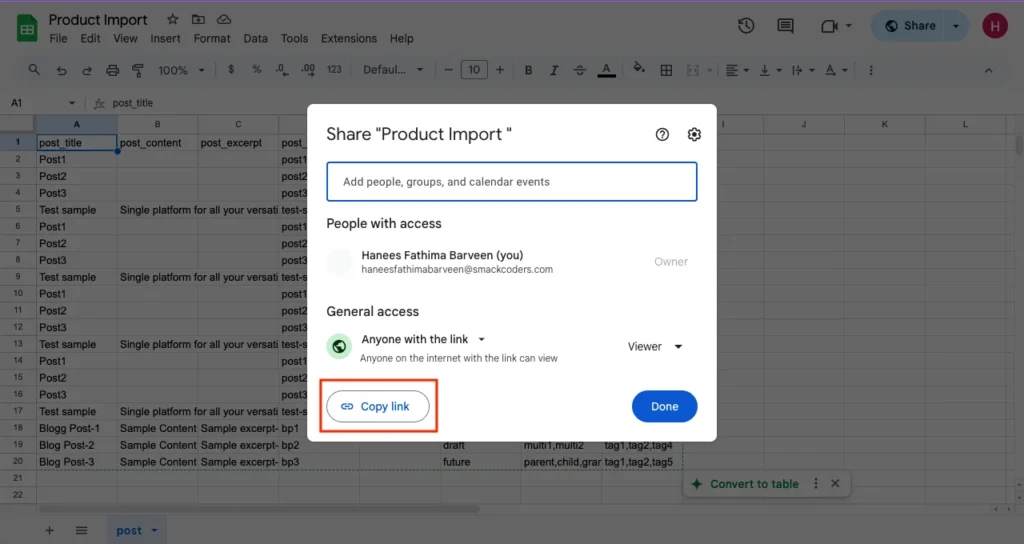
- Once done, get the publicly accessible URL of the sheet by clicking on Share >Publish to web > Sheet name > CSV.
- In Step 1 of the import process, select Upload file from URL and paste the URL of the Google Sheets.
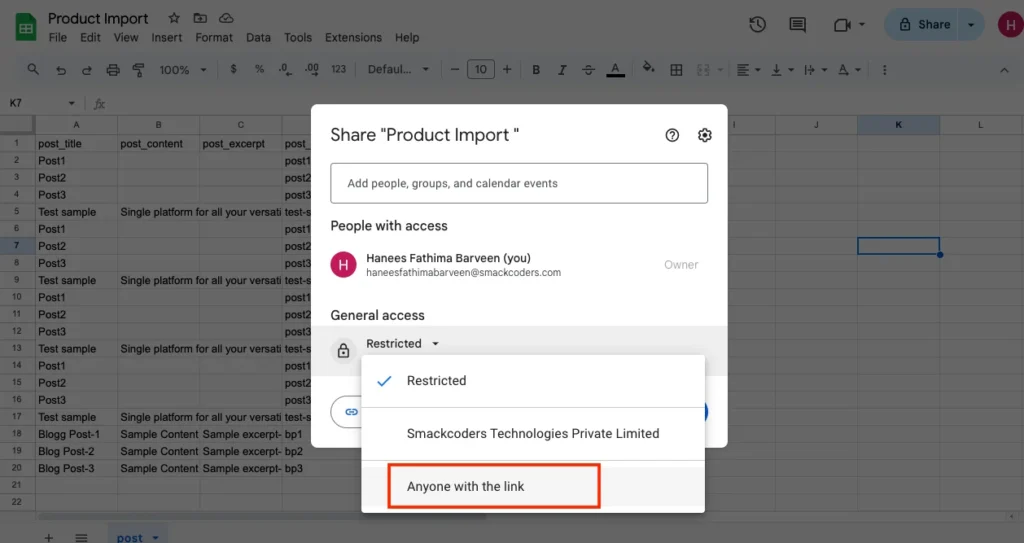
- Now copy the URL of the Google Sheets with the copy link option.
How to Export WordPress Data Efficiently
To export WordPress data using WP Ultimate CSV Importer,
- First, navigate to the Export option on the Top menu.
- Select the data type that you want to export. For example, Posts, pages, Custom posts, Woocommerce products, etc.
- Click on Continue. The Mapping template will be displayed. You can use the existing template, or you can create a new Mapping.
- The Export Configuration Window will be displayed. Provide the file name and file type. You can choose the Export file type as CSV, XML, JSON, or XLS.
- Enable the “Split the record” option. If you want to export bulk records, you can split the records as per your needs and then export them.
- Use the advanced filter option to export your wordpress data more specifically.
- With Advanced Filters, you can export your file as a Google Sheet by enabling the export data as a Google Sheet option.
- The advanced filter option also includes export data with auto delimiters, export data with specific inclusions, export data with a specific status, export data with a specific period, export data with a specific author, export data with a specific post ID, and export data with a specific post title.
- If you want to export data at your convenience, enable the schedule export option.
Sample Data Library #
Download the required CSV & XML samples here to test the import with WP Ultimate CSV Importer. You can also use our trials or demo to test the plugin before purchasing.
Integrations #
See what plugins we have integrated with WP Ultimate CSV Importer to import and export their data.
Related Guides #
Import and Export Data to Excel
WP Ultimate CSV Importer Troubleshooting Guide
WooCommerce Variable Products Import
FAQs related to WP Ultimate CSV Importer
Contact Support #
If you face any problem with importing, updating, or scheduling your data with WP Ultimate CSV Importer, feel free to reach us at [email protected] or fill out the contact us form here. We are just a message away.