Table of Contents
As a WordPress user, there may be times when you need to import pages into your website. Whether you’re transferring content from another platform or importing specific pages from a different site, WordPress offers several reliable methods to make the process smooth and efficient.
In this blog, we’ll walk you through the import WordPress pages, types of pages you can import, the available import methods, and provide step-by-step instructions to guide you through each one.
Why Import Pages Into WordPress?
Importing pages into WordPress can be beneficial for several reasons. First, it saves you time and effort by eliminating the need to recreate pages from scratch. If you are migrating from another content management system (CMS) or a website builder, importing your existing pages allows you to seamlessly transition to WordPress without losing valuable content.
Additionally, importing pages from another website can be useful when you want to merge or consolidate multiple websites into one WordPress installation.
Types of Pages You Can Import
Before we delve into the methods of importing pages into WordPress, it is important to understand the different types of pages you can import. WordPress allows you to import various types of pages, such as static pages, blog pages, and eCommerce product pages. Let’s take a closer look at each of these page types.
Static Pages
Static pages are the cornerstone of any website. These pages contain fixed content and are not influenced by the dynamic nature of blog posts or other types of content. Importing static pages into WordPress is a common requirement, especially when you are migrating from another CMS or website builder.
Blog Pages
If you have a blog hosted on a different platform and want to migrate it to WordPress, you can easily import your blog pages. WordPress offers seamless integration for importing blog posts, preserving the content, images, and even publishing dates.
E-commerce Product Pages
For those running an online store, importing e-commerce product pages is crucial. Whether you are moving from another e-commerce platform or want to consolidate multiple stores, WordPress provides robust solutions for importing and managing product pages efficiently.
Common Scenarios and Methods to Import Pages into WordPress
WordPress offers built-in tools and functionalities to facilitate the importing process. The method you choose will depend on the source of your pages and your specific requirements. Let’s take a look at some of the common scenarios and the corresponding methods to import pages into WordPress.
How to Import a Page from Another Website in WordPress
If you want to import a page from another website into WordPress, you can use the WordPress plugins available for this purpose. One such popular plugin is “WP Ultimate CSV Importer“. Here’s how you can use it to import pages from another website:
Preparing for Import
Before diving into the importing process, it is essential to make sure you have everything in order. Here are a few crucial steps to prepare for a successful import.
Step 1: Backup your website
Before importing any pages, it is vital to create a backup of your WordPress website. This precautionary step ensures that even if something goes wrong during the import process, you can easily revert to the previous state of your site without losing any valuable data.
Step 2: Export Pages from the Source
If you are importing pages from a different WordPress installation, head over to the source site and export the relevant pages. You can use our export tool to select specific pages or export the entire content from the source site as an XML or CSV file.
Also, you can install WP Ultimate CSV importer pro, which efficiently helps in both import and export processes.
To export pages from your website,
- Install and activate WP Ultimate CSV Importer Pro
Access the extension and navigate to the export option from the top side menu. - Select the post type as pages. It shows the number of pages on your site.
- Check and confirm the number of pages to be exported
Now click on Export.
You can export your file in CSV/XML/Excel/ZIP format.
Step 3: Review the Exported File
Once you have exported the pages, take a moment to review the exported file. Ensure that all the desired pages are included and that the file is error-free. Carefully examine the content, formatting, and any associated media files to ensure a smooth import.
Importing pages in WordPress
Now that you have prepared adequately, it is time to proceed with the actual import of your WordPress pages. Here is a step-by-step guide on how to import pages seamlessly:
Step 1: Get Started with Plugin Installation
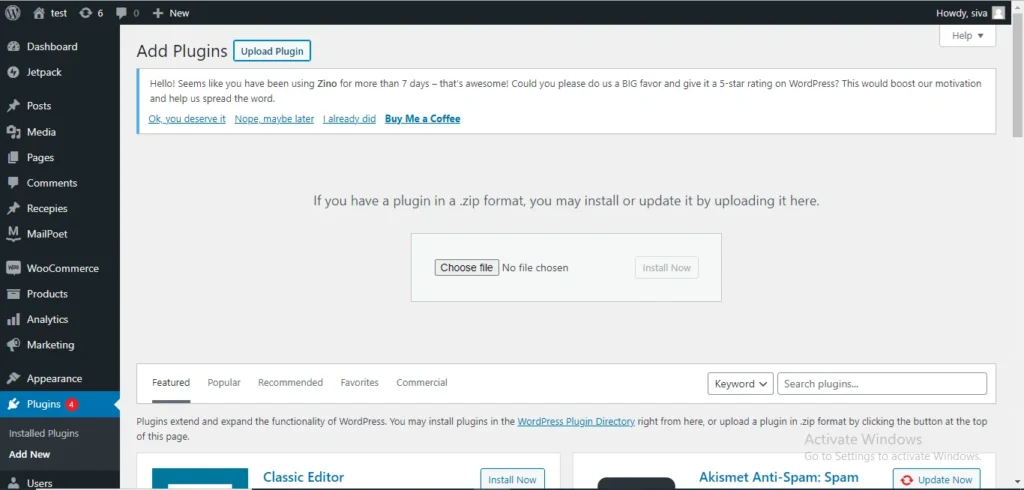
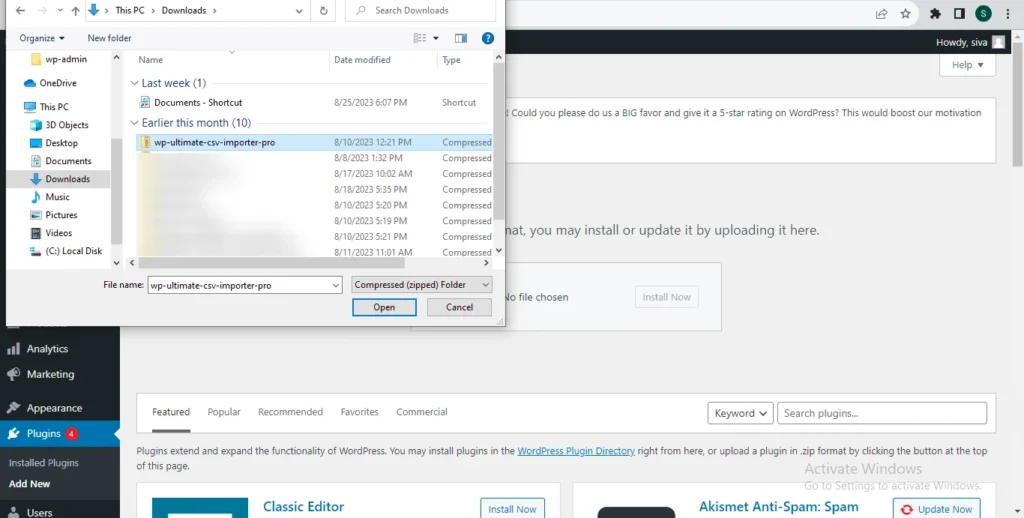
Head over to our website, buy the WP Ultimate CSV Importer plugin, and download the compressed zip file. Once you have it, follow these steps to integrate the plugin into your WordPress environment:
- Navigate to the “Plugins” section within your WordPress dashboard.
- Click on “Add New” and find the “Upload Plugin” button.
- Select the downloaded zip file and hit “Install Now.”
- Once WP Ultimate CSV Importer is installed, activate it by clicking the “Activate” button.
Step 2: Prepare Your CSV/XML File
To get started, it’s important to organise your page data in a structured file format. The WP Ultimate CSV Importer plugin supports different file types like CSV, XML, XLSX, TSV, TXT, and ZIP. But since CSV and XML are the most commonly used and easiest to work with, we’ll stick to them for our examples here.
Structure it with columns like “Title,” “Content,” “Parent Page,” “Slug,” and other relevant information. Follow the instructions to prepare a CSV.
1. Open your preferred spreadsheet software, whether it’s Microsoft Excel or Google Sheets.
2. Organise your data neatly into the appropriate columns.
3. Once your data is organised, save the file in CSV format.
If you need a reference, our blog includes sample CSV and XML files to guide you.
Step 3: Accessing the Importer
With your CSV file ready, it’s time to access the WP Ultimate CSV Importer tool.
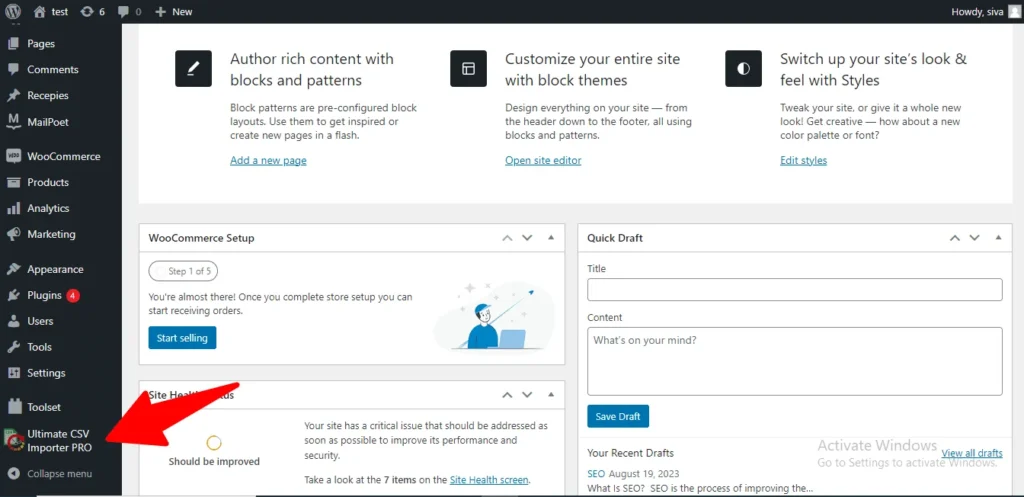
1. Within your WordPress dashboard, you will see “Ultimate CSV Importer” in the left-hand menu.
2. Click on it to access the plugin.
Step 4: Importing CSV/XML data into WordPress
Now comes the exciting part—uploading your CSV file and initiating the import process.
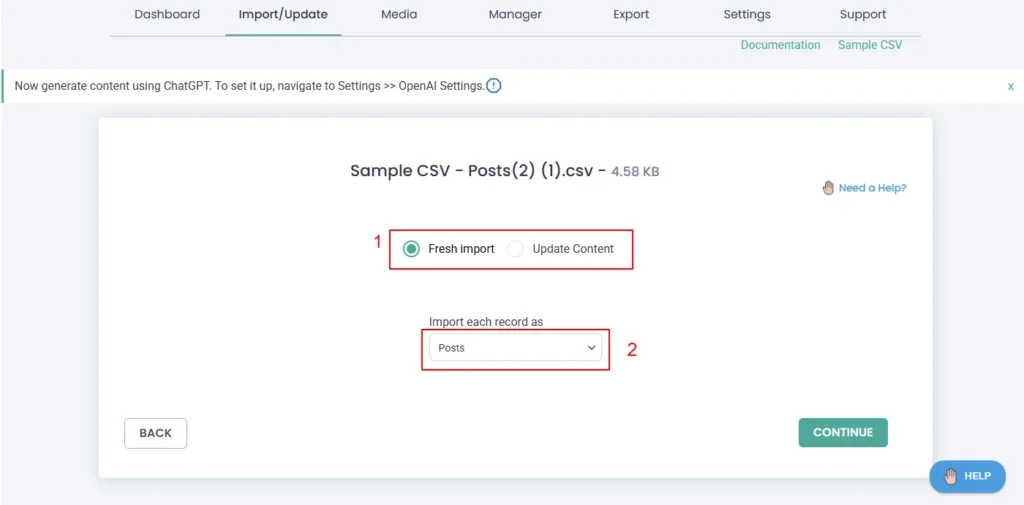
1. Start by uploading your prepared CSV or XML file using the Importer tool.
2. You have four options for file upload: desktop, FTP/SFTP, external URL, and server.
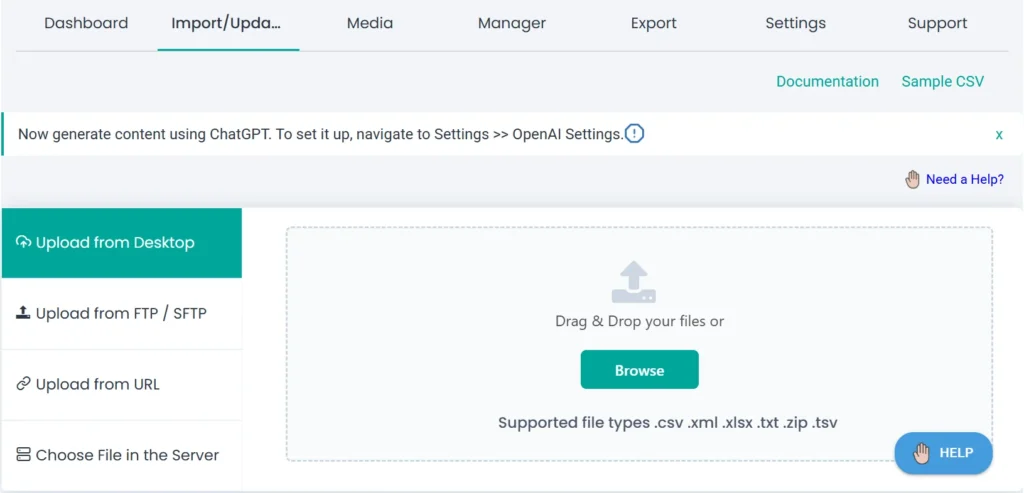
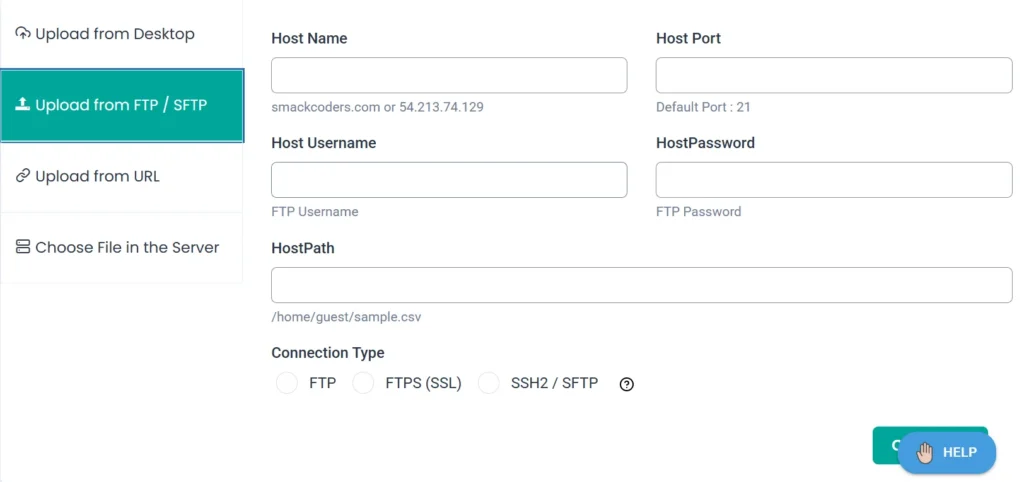
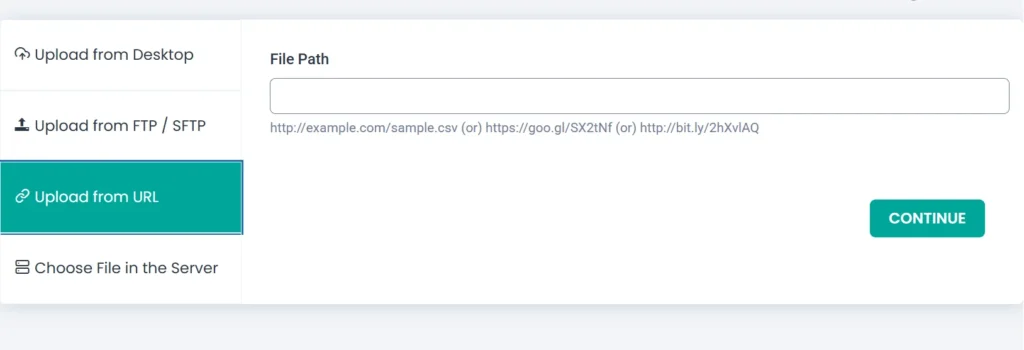

3. After uploading, a new window will pop up, prompting you to select the post type. Since we’re dealing with pages, opt for “Pages”. Here, you can also select your import type as Fresh content or Update content
Step 5: Mapping File Headers with WordPress Fields
Mapping ensures a smooth transition of your CSV or XML data into the corresponding WordPress fields.
With the post type chosen, the importer will display relevant WordPress fields for that type, in our case, “Page” fields.
Map the headers from your CSV/XML file to the appropriate WordPress fields. This step ensures data accuracy within WordPress.
If CSV headers and WordPress fields match, the plugin handles the mapping automatically. For any discrepancies, manually select the right field from the dropdown or use the drag and drop mode.
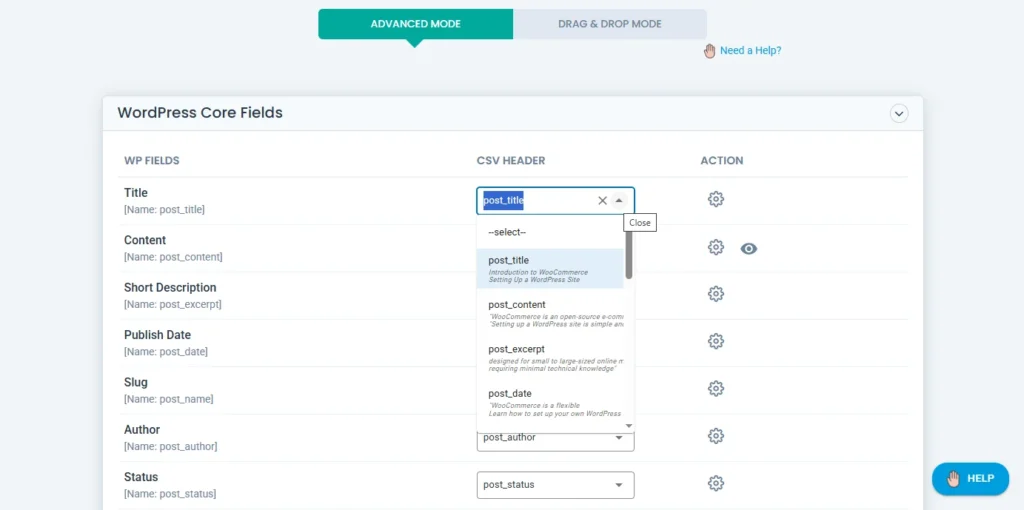
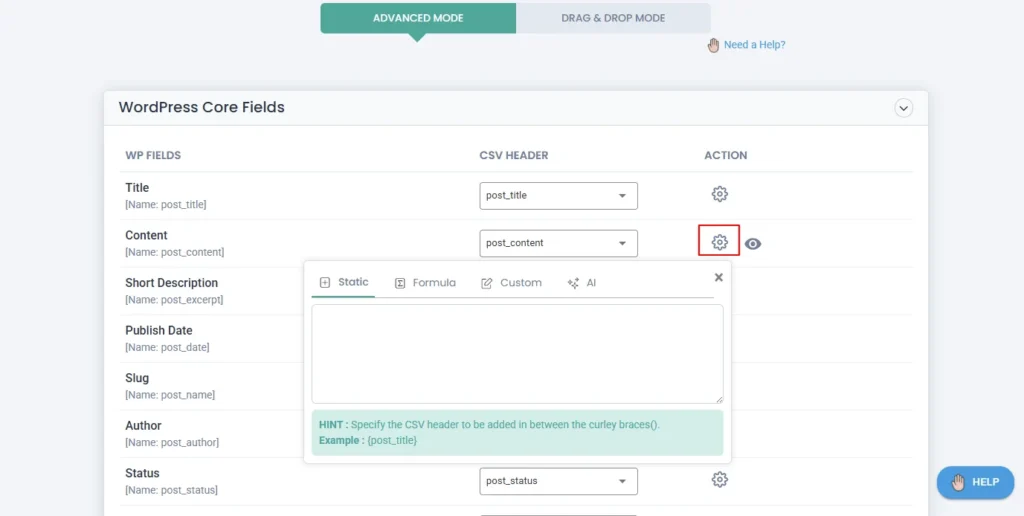
You can customize your data imports with the user-friendly mapping section. With the advanced features, you can view the setting icons corresponding to each field. Clicking on this will lead to four tabs like static, formula, custom, and AI. Learn more about the advanced features here
Step 6: Handling Media
Managing media, such as images, is a breeze during the import process with the WP Ultimate CSV Importer.
Whether you’re importing images in bulk or along with your pages, the plugin offers seamless solutions.
Download external images to your media. You can decide whether the image (inline image, featured image, or gallery image) imported with your post should be in the Media Library or not in this section.
Image Handling: WP Ultimate CSV Importer will handle efficient media handling on data imports. This is useful to handle the media on your import.
Choose options like use available media images, overwrite existing ones, or always create new images.
Enable the ‘Download the post content external images to media’ option, and you can download all the media inside your post content into the media library.
On the media import path, enable the “Retaining the original file path instead of the current month folder” in the media import path to use your media file’s original path instead of creating a new one when importing.
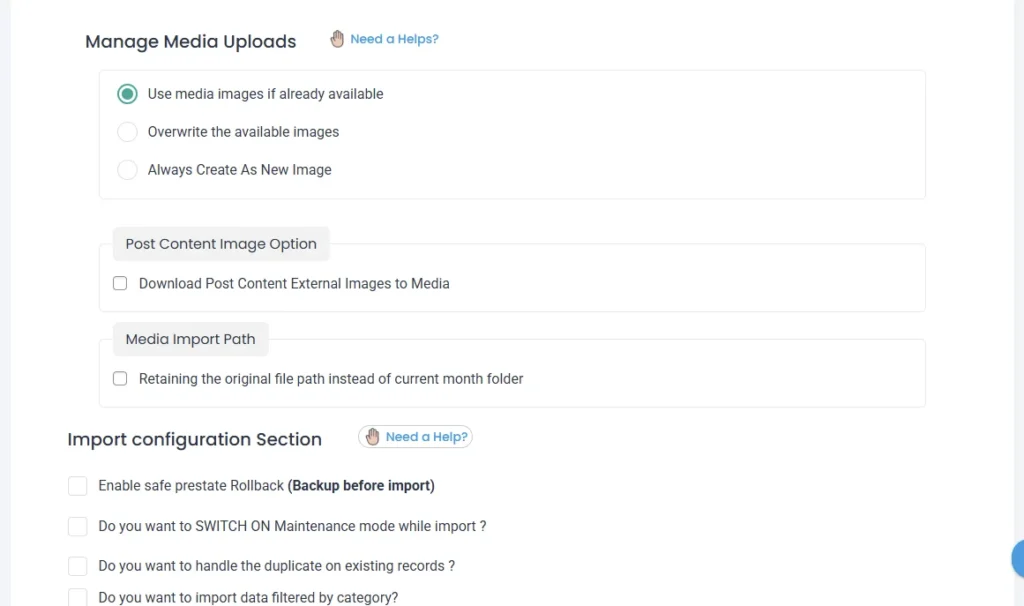
Step 7:Import Configuration Section
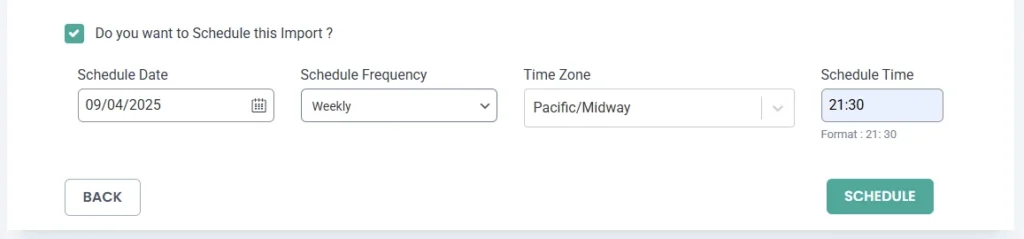
In this section, you can take a safe backup before importing. Also, you can notify your visitors that the site is in maintenance mode. Then kick off the duplicates while importing the data based on title or name.How to Import, Update, and Schedule WordPress DataEnable “Do you want to import data filtered by category?” and choose categories from the list to import records of those categories only.
Configure the “Do you want adaptive file processing of record?” option if you have bulk records to import. Learn more about iteration-based importing here.Additionally, you can set up a scheduled import by selecting a specific date, time, timezone, and frequency to schedule the importing of your file.
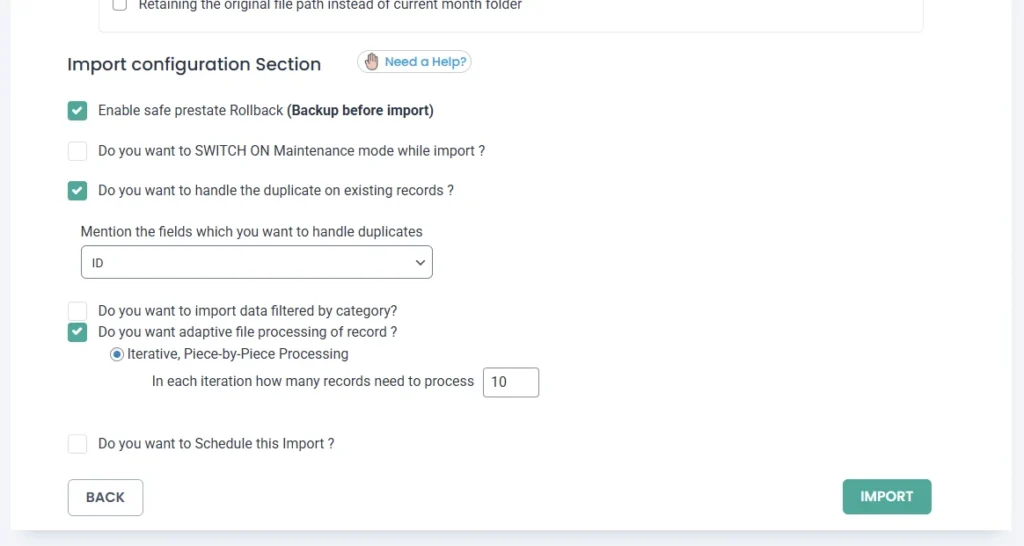
Schedule your import at your own time in this section. Once done, click Import to import all your data into the WordPress instance.
Refer to the WP Ultimate CSV Importer documentation for detailed guidance.
Step 8: Finalizing the import
With all the steps in place, it’s time to finalize the import process and review the results.
1. Click “Import” to begin the process. The plugin handles each CSV row or XML data, either creating new WordPress pages or updating existing ones.
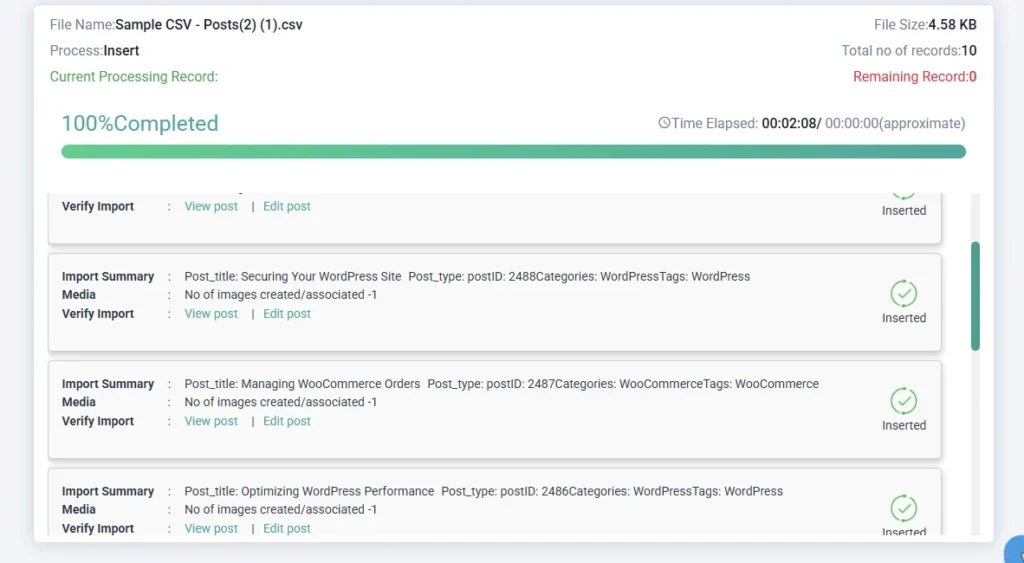
After the import is complete, it’s essential to review and verify the accuracy of your newly imported pages.
2. Thoroughly inspect page content, titles, and relationships to ensure they align with your expectations.
3. Once you’re satisfied with the results, revel in the success of your newly imported WordPress pages!
How To Import an Existing Website into WordPress
If you want to import an entire existing website into WordPress, including all its pages, blog posts, and other content, you can use the available WordPress migration plugins. Or you can also try a popular plugin like “WP Ultimate CSV Importer“.
How to Import an HTML Page in WordPress
Option 1: Use “Import HTML Pages” Plugin
A more current, lightweight plugin for importing static HTML files.
Plugin: Import HTML Pages
- Actively maintained
- Converts local HTML files into WordPress pages or posts
- Maps folders and file names to page slugs
- Minimal setup, but doesn’t create block content
Steps:
- Install & activate the plugin
- Upload your .html files to /wp-content/uploads/import-html-pages/
- Go to Tools > Import HTML Pages
- Select files and import them as Pages
- Clean/convert content into Gutenberg blocks manually (next step)
Option 2: Manual HTML-to-Gutenberg Block Conversion
Once HTML is imported, you often get a single Custom HTML block or raw content in the Classic Editor.
You can manually convert this HTML into native Gutenberg blocks in two ways:
Method A: Use Gutenberg’s “Convert to Blocks” Tool
If content is placed inside a Classic block:
- Click “Convert to Blocks”
- Gutenberg will try to auto-convert paragraphs, headings, images, etc.
Method B: Use HTML Comment-Based Block Syntax
You can manually structure the HTML as Gutenberg blocks using HTML comments:
Example:
<!– wp:heading {“level”:2} –>
<h2>Welcome to the Imported Page</h2>
<!– /wp:heading –>
<!– wp:paragraph –>
<p>This content was imported from a static HTML file.</p>
<!– /wp:paragraph –>
<!– wp:image {“id”:123,”sizeSlug”:”large”} –>
<figure class=”wp-block-image size-large”><img src=”image.jpg” alt=”Example”/></figure>
<!– /wp:image –>
- Add this to the content field when importing via REST API or directly into the post editor (in code mode).
- WordPress will render these as real blocks.
Bonus Tools to Help with Conversion
| Tool | Purpose |
| Blockify HTML to Blocks (online tool) | Converts HTML into block comment syntax |
| Postman / REST Client | For testing HTML-to-block REST imports |
| VS Code + Regex Replace | Automate conversion of <h1>, <p>, etc., into block syntax |
| Custom Script (Python/Node) | Convert bulk HTML into <!– wp:block –> format |
What to Avoid
- Avoid relying on raw HTML inside Custom HTML blocks, as it:
- Breaks block editing
- Disables visual editor functionality
- Breaks block editing
Makes future edits harder
How to Import Pages from A WordPress Website to Another with Built-in WordPress Importer
If you want to import pages from one WordPress website to another, you can use the WordPress export and import feature. Here’s how you can do it:
- Log in to the WordPress admin dashboard of the website from which you want to export pages.
- Under “Tools,” click “Export.”
- Choose the “Pages” option and select the specific pages you want to export.
- Click on the “Download Export File” button to save the exported pages to your local computer.
- Log in to the WordPress admin dashboard of the website you want to import the pages into.
- Go to the “Tools” menu and select “Import.”
- You will be prompted to install the WordPress importer plugin if you haven’t already.
- Activate the plugin and choose the “WordPress” option for import.
- Select the file you downloaded in step 4 for import.
- Complete the import process by following the on-screen instructions.
You can also use other plugins or use the WP Ultimate CSV Importer plugin for importing pages from one WordPress website to another WordPress site.
To import WordPress pages using the REST API, you can use the WordPress REST API POST /wp/v2/pages endpoint. This is useful for programmatically creating or updating pages from external systems, content migrations, or headless WordPress setups.
Step-by-Step: Import WordPress Pages via REST API
1. Enable REST API Access
- WordPress comes with REST API enabled by default.
- You need an authenticated user with permissions (usually editor or administrator).
2. Authentication Setup
You must authenticate your requests. Common methods:
A. Application Passwords (Recommended)
- Go to Users > Profile > Application Passwords
- Generate one, e.g., “Page Import Tool”
Use Basic Auth with:
Authorization: Basic base64(username:application_password)
B. JWT Auth (Advanced)
- Install a plugin like JWT Authentication for WP REST API
- Use Bearer tokens for more secure, scalable authentication
3. POST Data to Create a Page
POST https://yourdomain.com/wp-json/wp/v2/pages
Example JSON Payload:
{

  "title": "Imported Page Title",

  "content": "<h2>This is imported content</h2><p>From external source.</p>",

  "status": "publish",

  "slug": "imported-page",

  "author": 1

}
Headers:
Content-Type: application/json
Authorization: Basic base64encoded(username:app_password)
4. Example with curl
curl -X POST https://yourdomain.com/wp-json/wp/v2/pages \

  -u "yourusername:yourapplicationpassword" \

  -H "Content-Type: application/json" \

  -d '{

    "title": "Imported via API",

    "content": "<p>This is a test import.</p>",

    "status": "publish"

  }'
5. Batch Importing Multiple Pages
If you have an array of pages:
- Loop through them in a script (e.g., Python, Node.js)
- POST each page to /wp/v2/pages
- Handle throttling/rate limits with delays or retries
6. Optional Fields You Can Use
You can set more fields if needed:
- excerpt: Short description
- parent: Parent page ID
- template: Page template (e.g., template-about.php)
- meta: Custom fields (if enabled via register_meta)
- featured_media: ID of an uploaded media item
Notes & Troubleshooting
| Issue | Solution |
| 401 Unauthorized | Check the application password or token |
| 403 Forbidden | User lacks permissions |
| 404 Not Found | REST API may be blocked (e.g., via a security plugin) |
| HTML not rendering | Ensure content is wrapped in allowed HTML tags |
Programmatic Import Option: Creating Pages with wp_insert_post()
If you need to create WordPress pages programmatically—such as during theme or plugin setup, or when migrating content—you can use the built-in wp_insert_post() function.
Here’s a simple example:
$page = array(

    'post_title'   => 'Sample Page',

    'post_content' => 'Content here',

    'post_status'  => 'publish',

    'post_type'    => 'page',

);

$post_id = wp_insert_post($page);
Adding Security Measures
When handling user input or external data, you should always sanitize the input and verify intent with nonces if the action is triggered via form submission.
Example with Security Best Practices
if ( isset($_POST['my_plugin_nonce']) && wp_verify_nonce($_POST['my_plugin_nonce'], 'my_plugin_create_page') ) {

    // Sanitize user input

    $title   = sanitize_text_field($_POST['page_title']);

    $content = wp_kses_post($_POST['page_content']);

    // Prepare page data

    $page = array(

        'post_title'   => $title,

        'post_content' => $content,

        'post_status'  => 'publish',

        'post_type'    => 'page',

    );

    // Insert the page

    $post_id = wp_insert_post($page);

    if ( is_wp_error($post_id) ) {

        // Handle the error

        echo 'Failed to create page: ' . $post_id->get_error_message();

    } else {

        echo 'Page created successfully with ID: '. $post_id;

    }

}
HTML Form Example (to pair with the above PHP)
<form method="post">

    <?php wp_nonce_field('my_plugin_create_page', 'my_plugin_nonce'); ?>

    <input type="text" name="page_title" placeholder="Page Title" required>

    <textarea name="page_content" placeholder="Page Content" required></textarea>

    <input type="submit" value="Create Page">

</form>
Notes
- Use sanitize_text_field() for simple text fields like titles.
- Use wp_kses_post() for content that may include HTML but should be restricted to safe tags.
- Always use wp_verify_nonce() to protect against CSRF (Cross-Site Request Forgery) attacks.
- Consider checking if the page already exists using get_page_by_title() to avoid duplicates.
Conclusion
Importing pages into WordPress is a straightforward process that can be accomplished in various ways depending on your specific requirements. Whether you need to import a single page, import pages from another website, or import an entire existing website, WordPress provides the necessary tools and plugins to make the import process seamless and efficient.
Ready to import your pages into WordPress? By following the step-by-step instructions provided in this article, you can easily import pages into your WordPress website and ensure a smooth transition of your content. Make your website migration a breeze with WP Ultimate CSV Importer today!
Frequently Asked Questions
1. What WordPress versions support wp_insert_post() and programmatic imports?
wp_insert_post() has been part of WordPress since version 1.5, so it’s widely supported across all modern versions. You can use it safely in WordPress 5.x and 6.x, including the latest block editor (Gutenberg) era.
2. How do I handle large page imports without errors?
When importing many pages or heavy content, you can batch process the content by splitting imports into chunks (e.g., 100 records per request). Additionally, you can use WP CLI to run imports via the command line, thereby avoiding web server timeouts.
To increase server limits:
max_execution_time = 300
memory_limit = 512M
upload_max_filesize = 100M
You can also log progress to a file to resume on failure.
Tip: Combine with set_time_limit(0); in PHP (with caution) for long scripts.
3. How do I secure page imports?
To secure page imports, always sanitize and validate the input below
sanitize_text_field() for titles
wp_kses_post() for post content
Use nonces to prevent CSRF in forms. Only allow admin users to run imports. Escape output with esc_html() or esc_attr() when displaying imported data.
Use capability checks:
if ( ! current_user_can( ‘manage_options’ ) ) {
wp_die( ‘Unauthorized’ );
}
What if my CSV has encoding issues (e.g., special characters)If your CSV has encoding issues, first convert the CSV to UTF-8 without BOM before importing. You can use tools like Notepad++ (Encoding → Convert to UTF-8) and LibreOffice (Save As → UTF-8)
In PHP, run the command below
$content = mb_convert_encoding($content, ‘UTF-8’, ‘auto’);
If using fgetcsv(), set locale properly:
setlocale(LC_ALL, ‘en_US.UTF-8’);
4. Can I automate page imports without a plugin?
Yes. You can use custom PHP scripts or WP CLI commands in a cron job or deployment pipeline.
Example with a custom WP CLI command:
wp myplugin import_pages
Or trigger imports via REST API or webhook, with proper authentication and nonce validation.
5. How do I debug page import errors?
To debug page import errors, use WP_DEBUG and WP_DEBUG_LOG in wp-config.php:
define(‘WP_DEBUG’, true);
define(‘WP_DEBUG_LOG’, true);
Log errors with:
error_log( ‘Error: ‘ . print_r( $error, true ) );
Check Invalid post data (e.g., missing post_title), Permissions, wp_insert_post() returning WP_Error. Use var_dump(), die(), or Xdebug for deeper inspection during development.
6. Can I import WooCommerce product pages without a plugin?
Yes, but it’s more complex. WooCommerce products are custom post types (product) with custom fields and taxonomy.
Minimum product insert example:
$product = array(
‘post_title’ => ‘Sample Product’,
‘post_content’ => ‘Product description’,
‘post_status’ => ‘publish’,
‘post_type’ => ‘product’,
);
$product_id = wp_insert_post($product);
// Set product meta
update_post_meta($product_id, ‘_price’, 29.99);
update_post_meta($product_id, ‘_regular_price’, 29.99);
Also handle product types (simple, variable), Stock and SKU Taxonomies (product_cat, product_tag).
Use WooCommerce functions like wc_get_product() or WC_Product classes when available.
7. How do I import pages with translations?
To support multilingual content, use plugins like WPML, Polylang, or TranslatePress. WP Ultimate CSV Importer supports translation page imports for all three.
