This guide will walk you through the process of importing multilingual content into your WordPress site using WP Ultimate CSV importer and Polylang. Polylang lets you create a bilingual or multilingual WordPress site. With WP Ultimate CSV Importer, you can easily import translations for posts, pages, custom post types, WooCommerce data, etc.
| Important: Free plugin now required for all Pro packages. Starting from CSV Importer Pro 8.15, CF Pro 8.3, and WPML Pro 6.2, the free WP Ultimate CSV Importer plugin must be installed and active on your site before any Pro package will work. If the free plugin is not detected, the Pro package will auto-deactivate and display a setup notice in your WordPress admin. |
Prerequisites
Before you begin, ensure you have the following:
- The Polylang plugin is installed and configured.
- WP Ultimate CSV importer PRO Plugin installed
How to Import WordPress Posts on Multilingual Websites #
Step 1: Preparing Your Import File
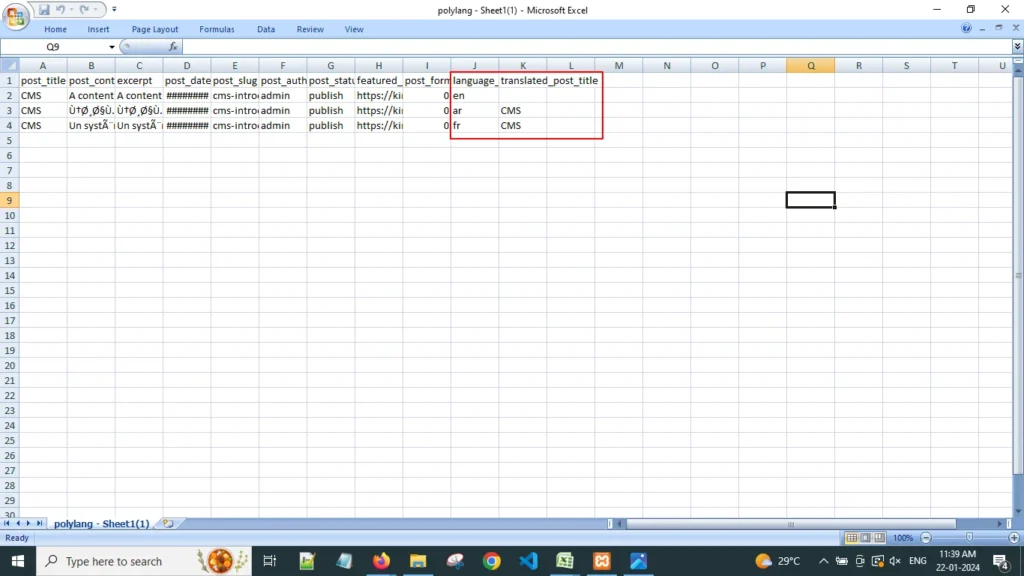
Your import file should contain content for all languages in CSV, XML, or Excel format. Each row should represent a single post or page, with columns for different language content.
- Important Columns: Make sure to include columns for:
- Post Title: Provide the title of the desired posts to import on each row
- Content: Enter the content of the posts on the desired row of the corresponding posts
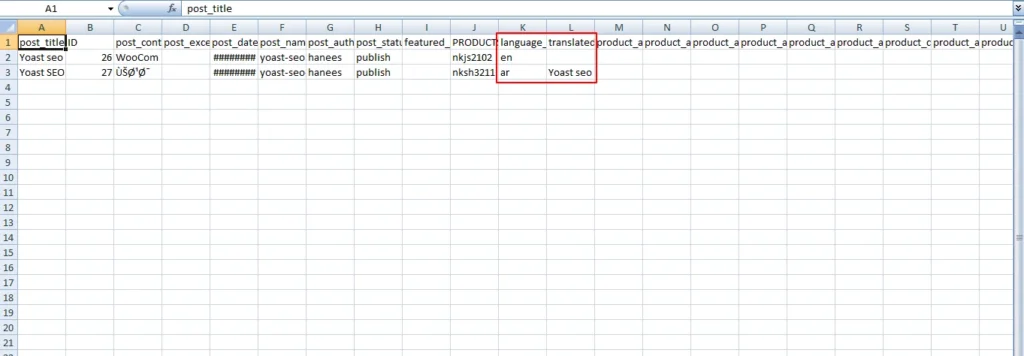
- Language code: Specify which language the content is associated with. For example, en for English, and fr for French. You can view the language code for your desired languages from the polylang language settings.
- Translation Post title: The translated_post_ title should be empty on the original or source posts. However, on all translated posts, enter the source posts’ post title in the translated_post_title field. This helps identify the original posts for the translated content.
Step 2: Importing Data with WP Ultimate CSV importer
- Start a New Import: Navigate to WP Ultimate CSV Importer > Import/Update and browse your import file (CSV, XML, or Excel).
- Choose Import type: Select the ‘Fresh Import’ option to import new posts. If you want to update the existing posts, then select Update Content.

3. Configure Import Settings:
- Select the post type to import (e.g., Post, Page, Custom Post Type).
- To import Posts, Select Posts and click on Continue.
4. Customize the field Mapping:
- Map the WP post fields with their corresponding CSV fields
- In the “Post Title” and “Content” fields, map the corresponding columns from your CSV or XML file.
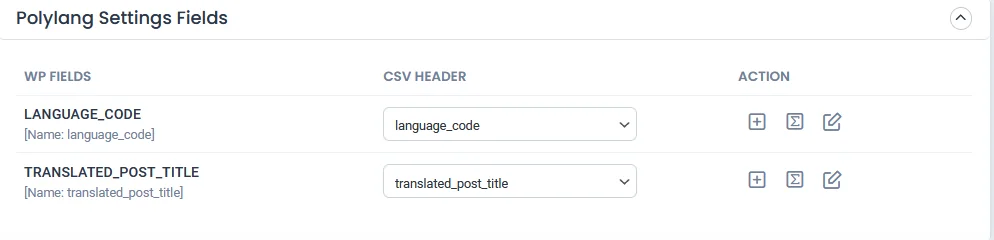
Map the Polylang Settings field:
- On the polylang fields, map the language_code field and translated_post_title field.
WP Ultimate CSV Importer Pro
Get Ultimate CSV/XML Importer to import data on WordPress faster, quicker and safer.
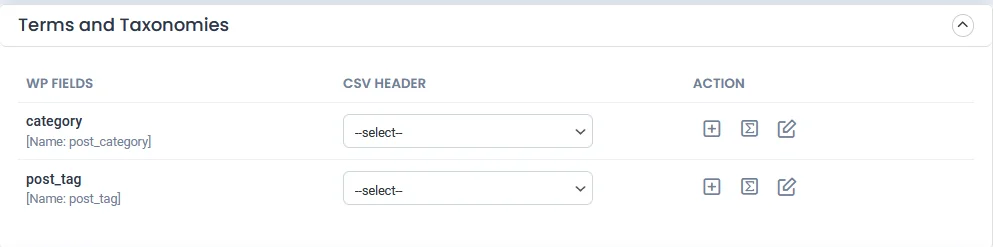
Terms and taxonomies:
If you want to import the post category, map the category field here. You must also include the post category field in your CSV file for this. Also, to import post_tag, add the post_tag field in your CSV file and simply map this post_tag field.
- Save the mapping template and click on Continue.
Step 3: Configure Import Settings
Manage the media uploads and configure the import settings
Enable /Disable the below configuration based on your business needs.
- Enable safe prestate Rollback (Backup before import)
- Do you want to SWITCH ON Maintenance mode while import?
- Do you want to handle the duplicates in existing records?
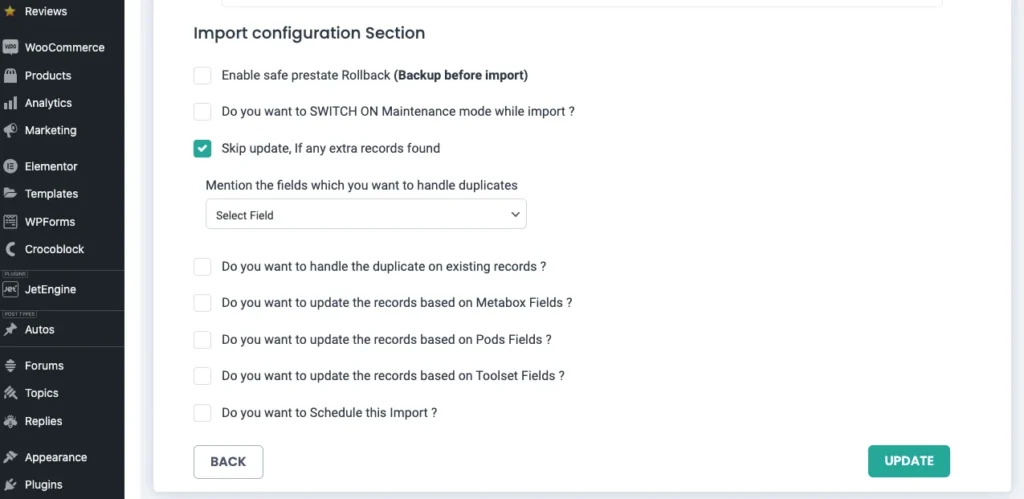
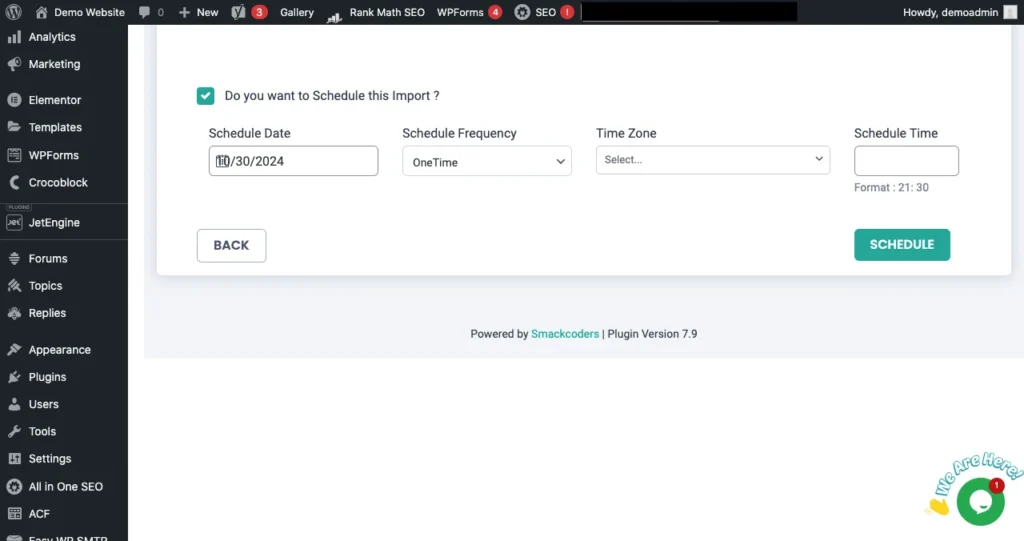
- Do you want to Schedule this Import?
If scheduling, provide the scheduled date, time, frequency, and time zone. Then click the Schedule button.
If not, just click the Import.
Step 4: Review and Finalize the Import
Verify Translations: After completing the import, visit the site to ensure the translations are correctly linked. Each post should have its translations linked and available in the language switcher on your website.
Importing categories and Post tags in Multi-language #
With CSV importer you can import your categories and post_tags along with the post. However, you can also import the translated content of your post categories and post tags even after importing the posts.
Ensure that you have already imported the related post before importing the post categories and tags.
While importing, select the Import each record as “categories” from the drop-down
Advanced Topic: Importing WooCommerce Data in Multilingual Websites #
Import Woocommerce Product
The import process for the WooCommerce product is the same as that of importing Posts explained above.
- First, prepare a CSV with the source product and translated products. Ensure to include the language_code and translated_post_title column.
- Once you have prepared the CSV, start the import process.
- Navigate to the WP Ultimate CSV importer-> Import/Update
- Browse the prepared CSV file. Select the fresh import for the new import.
- Select the data type as WooCommerce product and click on Continue

- Map all the WooCommerce data of WP fields with their related CSV fields
- Map the Polylang settings fields for language_code and translated_post_title
- Once done with the Mapping, configure the import settings.
- Click on Import. Now WooCommerce Products have been successfully imported into multilingual websites.
Importing WooCommerce Variations
Variations will also be imported automatically when WooCommerce products are imported. However, you have the option to import WooCommerce variations separately.
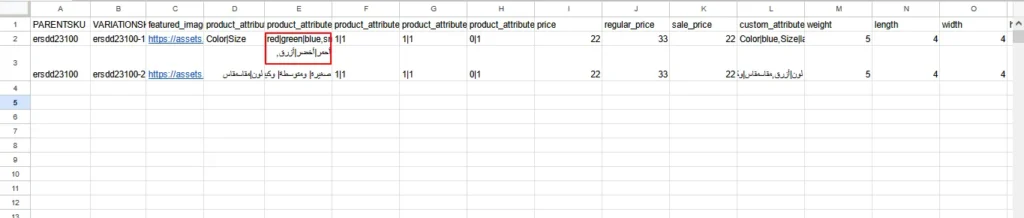
To begin, prepare your CSV file containing WooCommerce variations along with their translated content. When preparing the CSV, ensure product attributes are translated for multiple values and separated by a pipeline (|), just as they appear in the original content.
Importing Variable Products using Single CSV
With WP Ultimate CSV Importer, it is easy to import WooCommerce products and variations from a single CSV file, on multilingual websites using Polylang. By preparing a CSV with the necessary fields such as parent SKUs, product attributes, and variation-specific data, you can efficiently import both simple and variable products. The WP Ultimate CSV importer, allows you to map these fields to corresponding WooCommerce product fields, including handling multiple attributes per variation (e.g., color, size). Additionally, it offers a seamless way to manage translations, enabling you to import variations and their attributes in different languages by setting up separate columns for each language in your CSV file. This functionality ensures that variations are correctly linked to their parent products, and Polylang-compatible translations are maintained, streamlining the import process for multilingual WooCommerce stores.
- Product CSV attribute translation
Once your CSV file is ready, use the WP CSV Importer plugin by following the import steps outlined above.
During the import process:
- Select WooCommerce Variations as the post type.
- Map your WooCommmerce fields and polylang settings fields correctly.
- Complete the import.
This allows you to easily import WooCommerce variations for existing products on your site.
Importing WooCommerce Orders
To import WooCommerce orders, start by preparing a CSV file with your WooCommerce orders and their translated content.
To know how to prepare a csv, refer to this article
Once the CSV is ready, follow the import steps provided by the WP CSV Importer plugin.
Note: Make sure the corresponding products for the orders you are importing are already present on your WordPress site before proceeding with the order import.
To import:
- Select WooCommerce Orders as the post type.
- Map your fields.
- Configure the import settings and click Import.
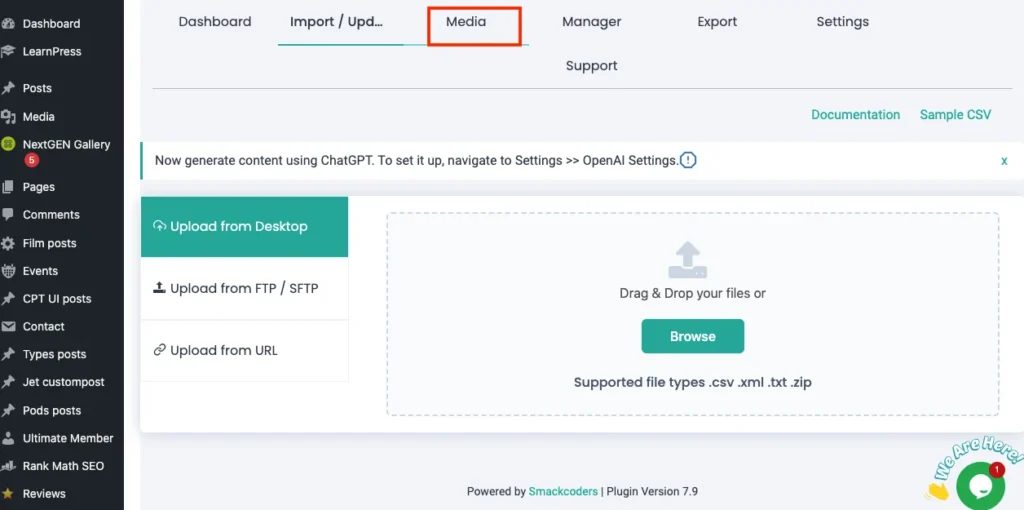
Importing Images on Your Multilingual Website #
The WP CSV Importer makes it easy to import images to your site. First, compress (zip) the image files or folders you want to import.
In your CSV file, reference the zipped folder (including the extension) in the Image field. If you zipped a folder containing multiple images, use the format foldername/imagename. For example, if you zipped a folder named pictures, and the image is WPexporter.jpg, use pictures/WPexporter.
Once your CSV is prepared:
- Go to the Media tab in the WP CSV Importer plugin.
2. Choose the Device option and browse for your zip file.
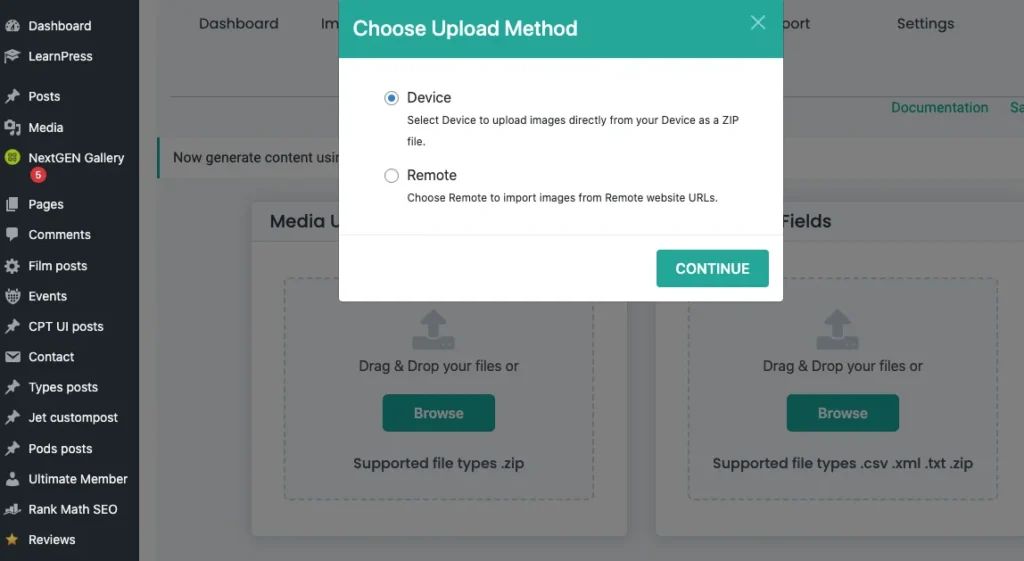
3. You’ll be prompted to select which images from the zip file to import. To import all images, check the box next to the name and click OK.
4. Upload the prepared CSV that contains fields like filename, title, caption, description, and alt text.
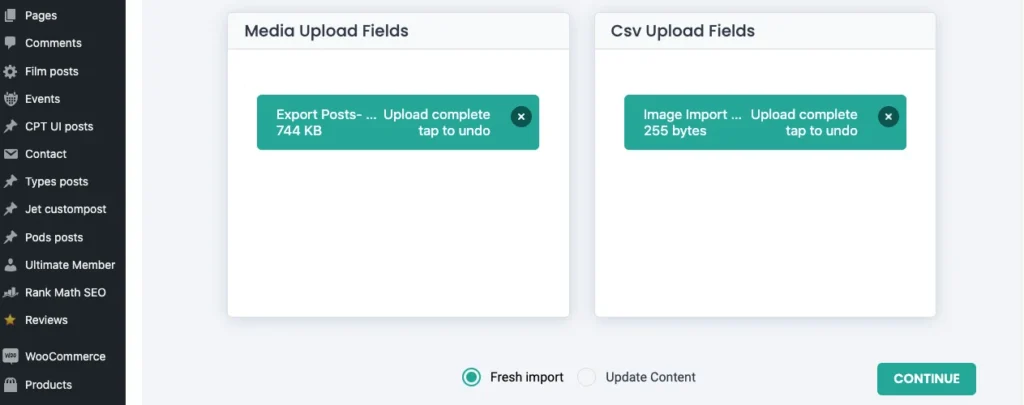
5. Select Fresh Import as you are importing new images.
6. Map the fields (they will auto-map if the CSV headers match the WordPress media fields).
7. Save the mapping template and complete the import configuration.
Click Import to upload the images to your Media Library.

Exporting Content from a Multilingual Site #
With the WP CSV Importer, you can export content from a multilingual Polylang-powered site, including posts, pages, custom posts, WooCommerce products, variations, and more.
To export content:
- Go to the Export tab in the WP CSV Importer.
- Select the post type or module you want to export.
- If exporting custom posts, choose a specific post from the dropdown.
- Click Continue.
- Name the file you wish to export and select the export format (CSV, XML, XLS, or JSON).
- Click Export to download the data immediately, or enable the “Do you want to schedule this export?” option to set a scheduled export with the desired date, time, and frequency.
Once exported, click Download to save the file to your computer.
Updating Translated Records Data #
To update existing translated content, follow these steps:
- Upload the updated CSV or XML file.
- Choose Update Content and select the post type.
- Click Continue.
- You can either select the Use template button to use a saved mapping template or click Create a new mapping to map the CSV fields to WP fields.
- Continue configuring the import settings.
- Enable the “Do you want to handle duplicates?” option to prevent overwriting existing records. Choose a field (e.g., post_title, ID, post_name) to manage duplicates.
- Click Update to update the data.
If you wish to schedule the update:
- Enable the Schedule Import option.
- Set the schedule details (date, time, frequency, and timezone).
- Click Schedule Update.
This allows you to update your site with the latest translated content and keep your data synchronized.
Troubleshooting
If you run into issues, here are some common solutions:
- Language Missing: Ensure that the Polylang plugin is installed and activated and that all languages are correctly configured.
- Translation Not Linked: Double-check that you are linking the original post to its translation using the Post ID and Translation ID fields.
- Import Errors: If you see import errors related to Polylang, ensure the WP All Import Polylang add-on is installed and activated.
Frequently Asked Questions #
1. Which Polylang Add-on is supported by the CSV Importer plugin?
The plugin supports the Polylang for WooCommerce Add-on.
2. What WooCommerce data can be imported by CSV Importer for Polylang?
The CSV Importer imports WooCommerce products with their taxonomies, WooCommerce orders, and WooCommerce Variations
3. Does the plugin automatically translate the content?
No, it doesn’t. WP Ultimate CSV Importer only imports and exports multilingual content. You should add the translated content in CSV or XML and then you can import it with our plugin.
4. How to use the spreadsheet for each language?
It is easy to include all the translated content in a single CSV or single spreadsheet. You can easily differentiate each language by adding an extra column to the CSV, such as the language code. Provide the language code (en for English, ar for Arabic, fr for French) corresponding to the translated content.
5. How to prepare the translations in a CSV file?
Step 1: Translate the original content to your desired languages.
Step 2: Open the Google spreadsheet
Step 3: Enter your post content title and its translations in the rows and provide all the post content details in the column.
Step 4: Add two extra columns for the language code and the translated post title.
Step 5: Enter the desired language code corresponding to the translated post content. That is provide the language code “en” corresponding to the English post. And provide the language code “fr” corresponding to the French post.
Step 6: Enter the post title of the original content in the translated post title column of all the translated content. Leave the translated post title column of the original content empty.
Step 7: Once done, Save the file. CSV format.
6. How to import the Polylang translations quickly?
With WP CSV importer, it is easy to import the polylang translation quickly. The import steps are explained above in this documentation.
WP Ultimate CSV Importer Pro
Get Ultimate CSV/XML Importer to import data on WordPress faster, quicker and safer.