Here in this guide, you’ll learn a step-by-step tutorial on how to import WooCommerce Variable Products with Ultimate CSV Importer Pro. It also imports simple, grouped, and external/affiliate WooCommerce products. Before running your WooCommerce variable products import, please ensure your import file has proper value formats. Only then will the importer run a successful import.
Step 1: Prepare the Import file for your WooCommerce Variable Products #
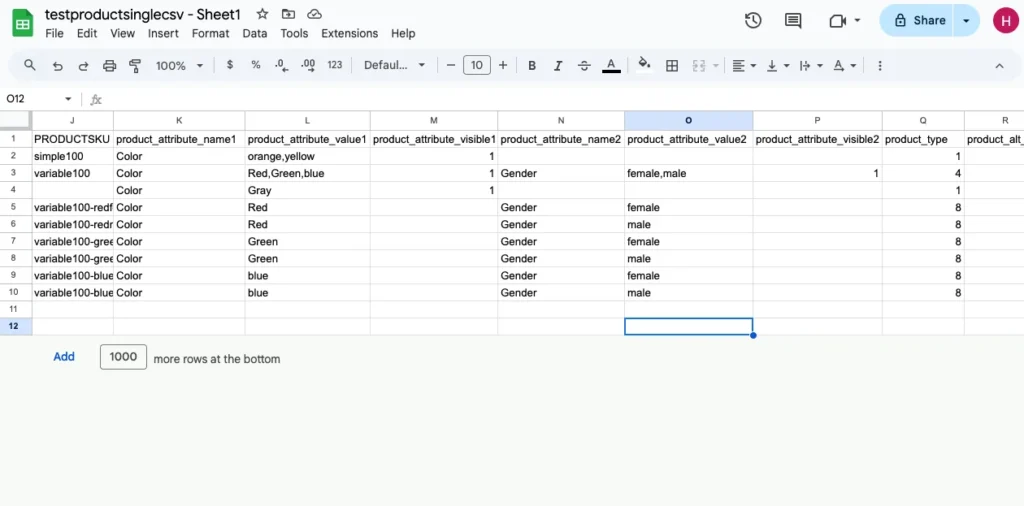
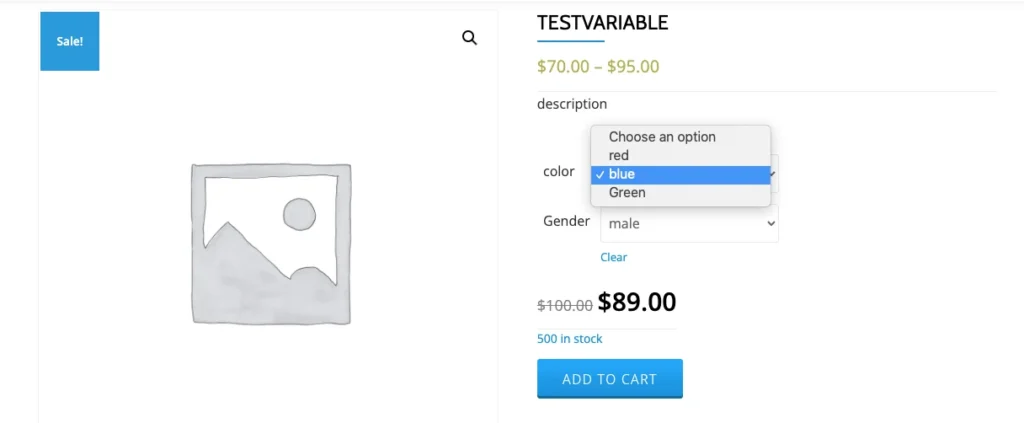
Start by preparing an import file (CSV, XML, or Excel) with all the necessary fields for your variable products. Make sure to include the Parent SKU field to link variations with their parent product. For variable products, define attributes in separate columns like Product Attribute 1, Product Value 1, Product Attribute 2, Product Value 2, and so on.
- Example:
- Attribute Name 1: Color
- Attribute Value: Red, Blue, Green
- Visibility: 1 (Enabled) or 2 (Disabled)
Product Type: Specify the product type as 8 for variations and 4 for the parent product.
Watch the tutorial below on how to import WooCommerce variable products and try the test import using our trial WordPress instance with this sample CSV file.
Please note that the above and below steps are the same for all file types we support. Learn more about what file types we support here.
Step 2: Upload your Import File #
Install and activate the WP Ultimate CSV Importer Pro plugin on your WordPress site. If you don’t have the plugin, please get WP Ultimate CSV Importer here.
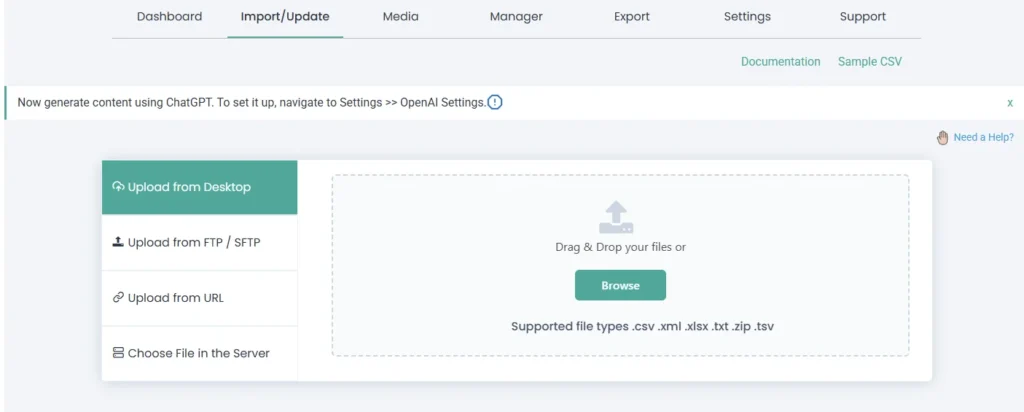
Navigate to WP Ultimate CSV Importer Pro -> Import/Update. You can upload your import file using any of the four file upload methods from the left-side menu. It has the options: Upload from desktop, Upload from ftp/sftp, Upload from URL, and Choose file in server.
If you want to upload the file from the desktop, click on Browse, select your file with variable products, and click Open. Your file will be uploaded to the importer plugin.
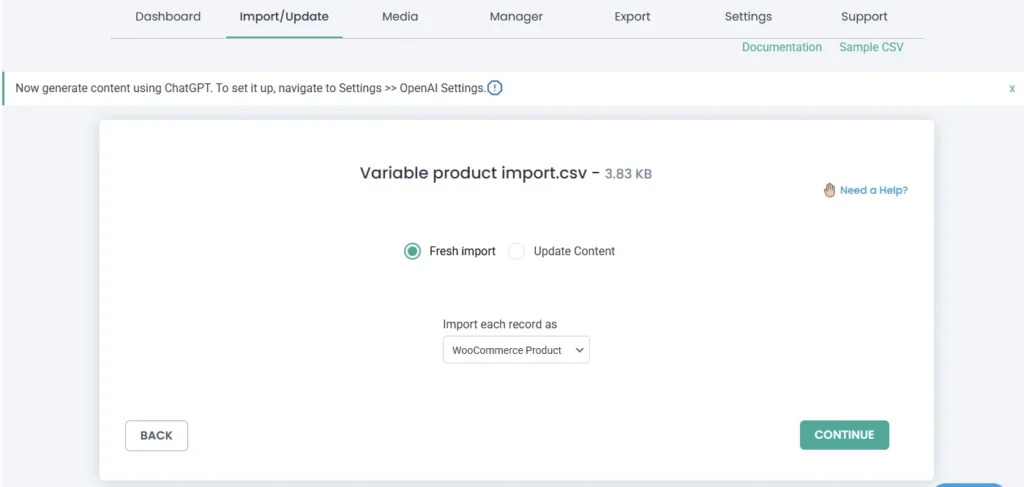
Next, configure whether you’re importing new products or updating existing ones. Select the “Fresh Import” option if you are inserting new variable products. Or click the Update Content option if you are updating existing variable product records.
Choose the post type as “WooCommerce Product” from the drop-down.
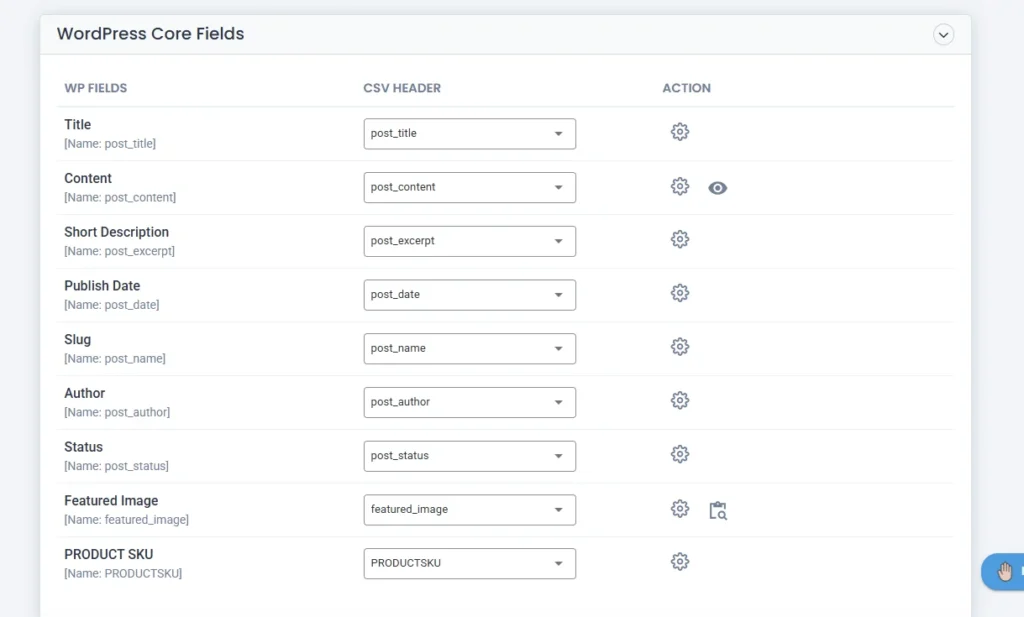
Step 3: Map Your Import File Fields with WooCommerce Fields #
If your import file headers exactly match the WooCommerce field headers, the plugin will automatically match those fields. If you want to map fields manually, use any of the two Mapping methods:
Advanced Mode: Select fields from the dropdown menu to match file columns with WooCommerce product fields.
Drag-and-Drop Mode: Drag fields from the draggable mapping panel from the right and drop them into the appropriate product fields.
Both modes allow you to easily configure your mappings, learn more about the Advanced mode and Drag & Drop mapping modes here.
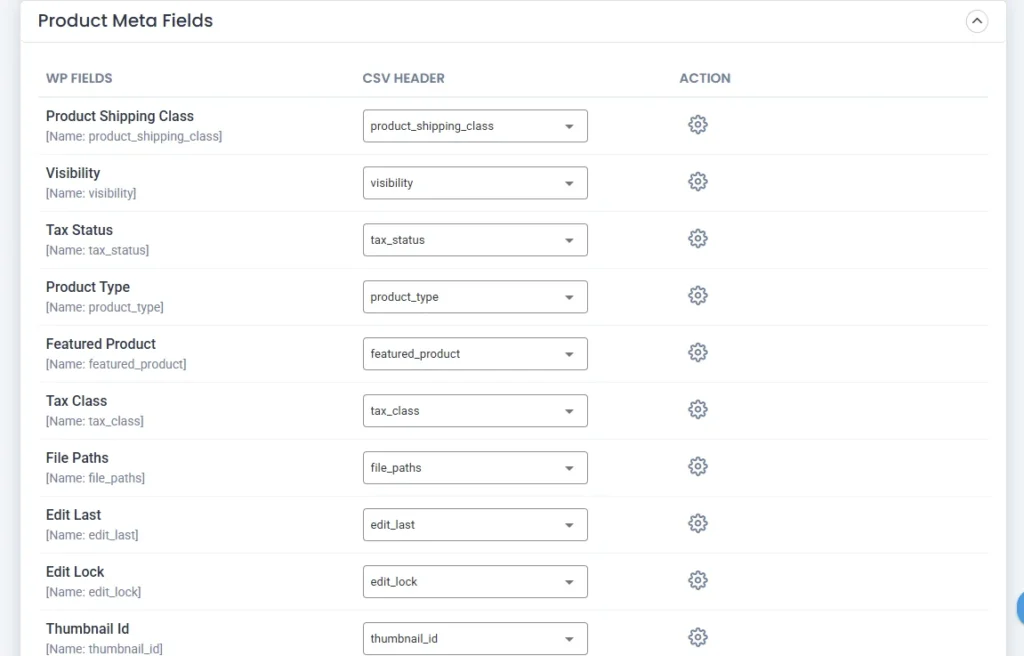
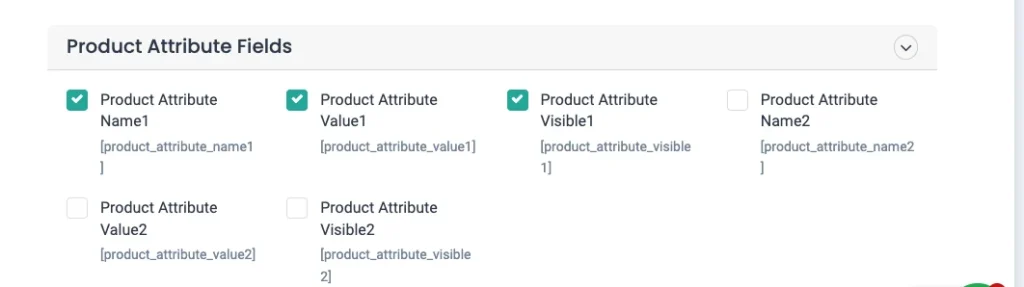
Note: Ensure that you’ve properly mapped all the headers in your import file with the WooCommerce product fields headers. For example, all the fields inside the “WordPress Core Fields”, “Product Meta Fields”, and “Product Attributes” widgets.
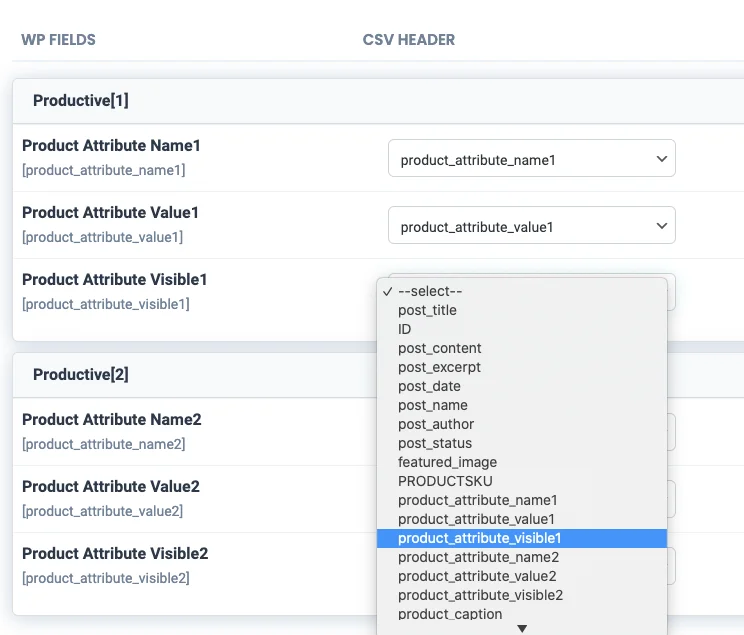
Mapping Product Attributes
In the Product Attributes mapping section, attributes are displayed in blocks (Productive[1], Productive[2], etc.). Each block represents a single attribute with its details, such as:
- Product Attribute Name (e.g., Color, Size)
- Product Attribute Value (e.g., Red, Blue, Green, or Small, Medium, Large)
- Product Attribute Visible (whether the attribute should be shown on the product page)
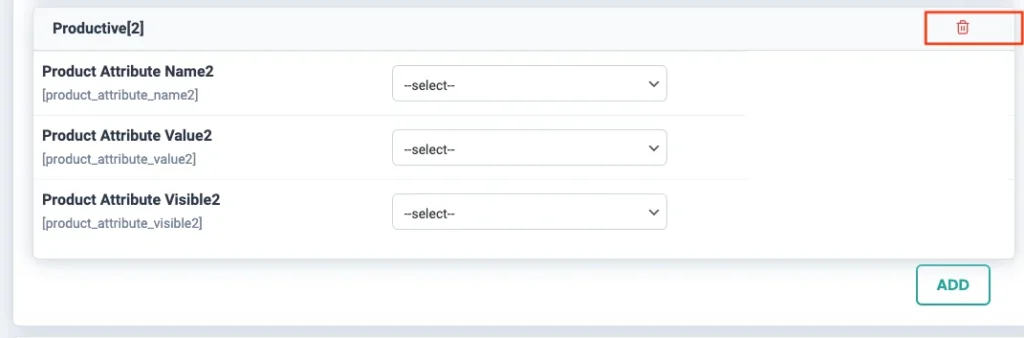
You can add more blocks by clicking the “Add” button. The number of blocks you create should match the maximum number of attributes any product in your import file contains.
Example:
- If Product A has 3 attributes (Color, Size, Material) and Product B has 2 attributes (Color, Size), then you need to create 3 attribute blocks in the mapping section.
Each block corresponds to one product attribute. So, Attribute 1 → Color, Attribute 2 → Size, Attribute 3 → Material. Make sure to map each CSV(import file) column to the correct WooCommerce attribute field to ensure accurate import.
If your import file contains fewer attributes than the maximum number of blocks displayed, you don’t need to worry. You can either:
- Leave the extra blocks unmapped.
- Delete the extra attribute block by clicking the delete icon next to that Attribute block.
Example Mapping:
- Product Attribute 1: Attribute Name (“Color”), Attribute Value ( “Red, Blue, Green”), Visibility (“1” for enabled)
- Product Attribute 2: Attribute Name (e.g., “Size”), Attribute Value (“S, M, L”), Visibility (“1” for enabled)
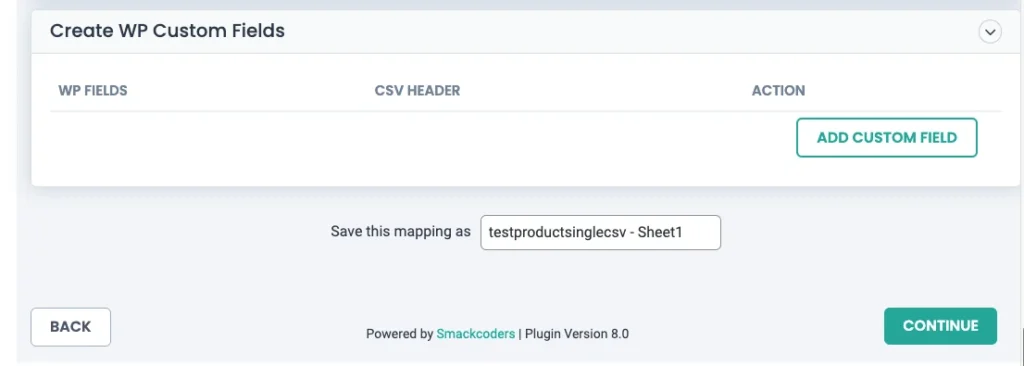
Step 4: Save Mapping Template #
Once you’ve mapped all necessary variable product fields, scroll down to the end of the page and enter a unique name inside the “Save this mapping as” text box and click on Continue. The mapping will be saved as a template for future use. You can see this listed inside the Manager > Templates section.
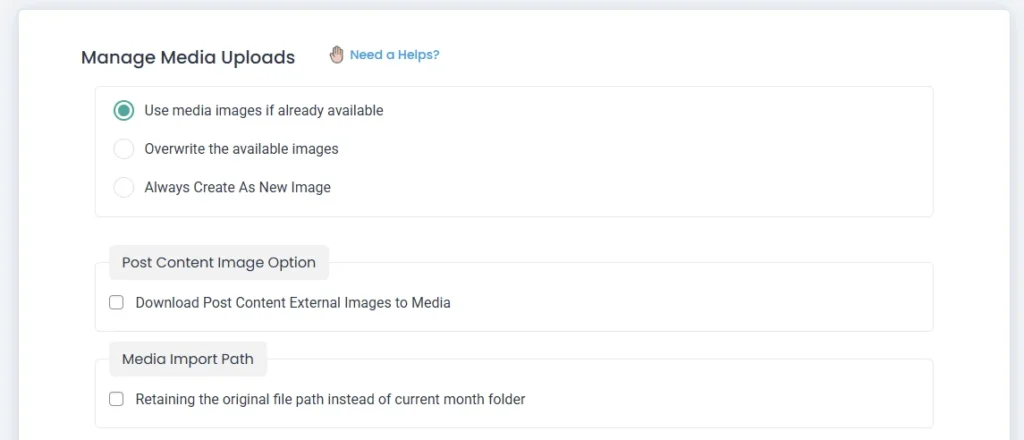
Step 5: Configure Media Handling and Import Settings #
Configure the Manage Media Upload section
This is useful to handle the product images during import.
Select one option from the three choices below:
- Use media images if already available(selected by default) – to use existing and avoid duplicate importing.
- Overwrite the available images – to update images and import newer ones.
- Always create as new images – to create every image as new.
From the Post Content Image Option:
- Enable “Download Post Content External Images to Media” to download image URLs added in your post content to your media library.
From the Media Import Path:
- Check the box of “Retaining the original file path instead of current month folder” – to use the original media file path instead of creating a new folder.
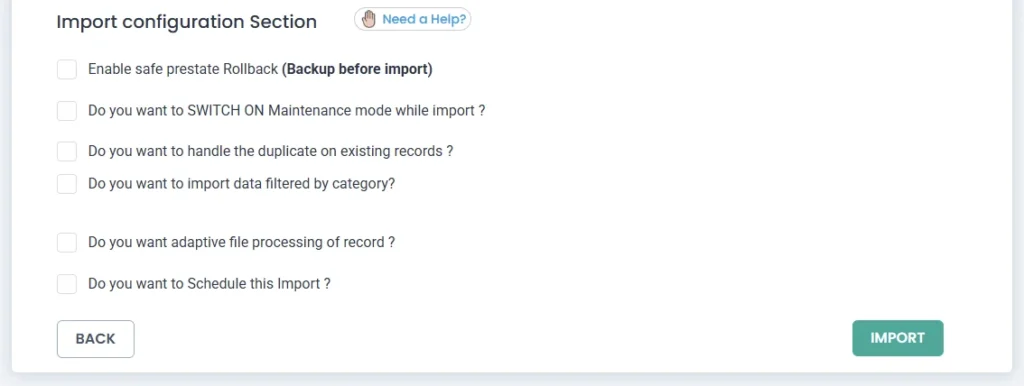
Import Configuration Section
Set up the import settings that best suit your needs.
- Safe Prestate Rollback – Creates a backup of your website before the import. If any issues occur after import, you can revert to the previous state.
- SWITCH ON Maintenance mode – Enable this option to put your site in maintenance mode and notify users while the import is in progress.
- Handle the duplicate on existing records – Select this option and choose a field from the dropdown to prevent duplicate entries from being inserted.
- Import data filtered by category – Import only the selected categories of variable products.
- Adaptive file processing of record – Enter a numeric value to process records in chunks during import, based on the number specified.
- Schedule this Import – Use this option to schedule the import. Learn more about how to import, update, and schedule WordPress data with WP Ultimate CSV Importer.
Step 6: Finalizing the Successful Import #
Your WooCommerce variable products have now been successfully imported. To confirm, follow the instructions:
- Click the summary log and failed media buttons shown in the Import Completed popup message(displayed after a successful 100% import) to check the records import status and failed to import media lists.
- Otherwise, close the Import completed pop-up and check the status for each record directly in the Import Logs screen. Here you will see records imported, updated, and even skipped. If skipped, the importer will tell you why it skipped the record to import. You can also use the view and edit links provided in each record’s logs to view them directly in the admin and storefront views.
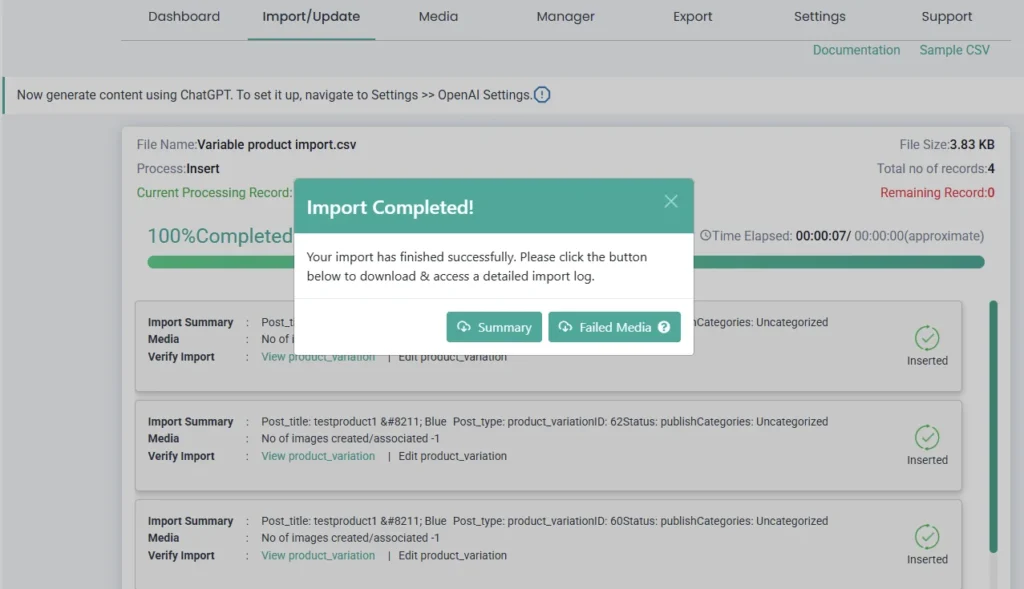
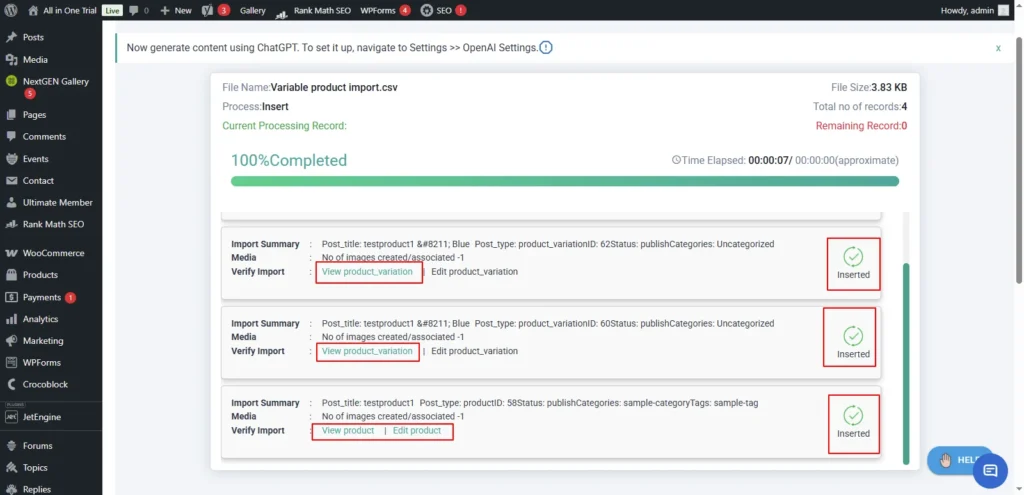
You can also verify the imported records directly by visiting the Products menu.

WP Ultimate CSV Importer Pro
Get Ultimate CSV/XML Importer to import data on WordPress faster, quicker and safer.
How to Export WooCommerce Variable Products #
To export a WooCommerce Variable Product, follow the steps below:
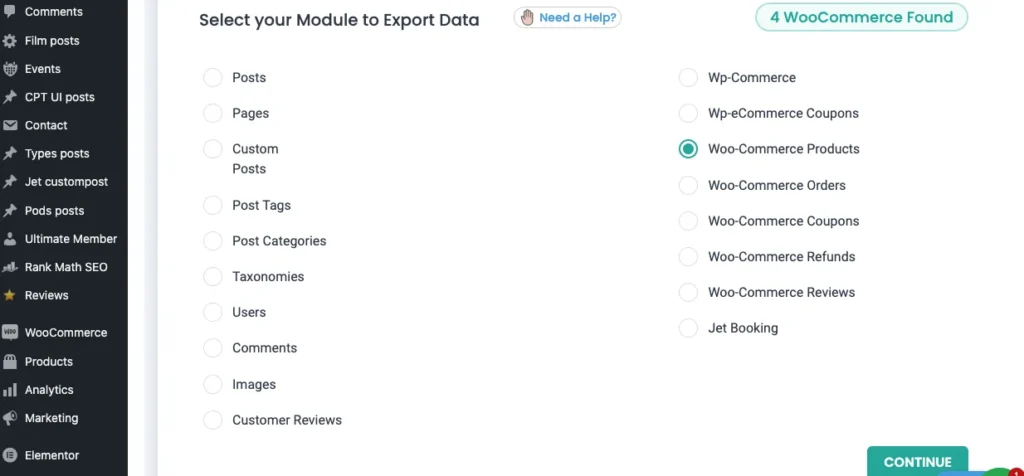
- Navigate to WP Ultimate CSV importer Pro -> Export
- Select the post type to Export as WooCommerce Products from the list of modules and click on Continue
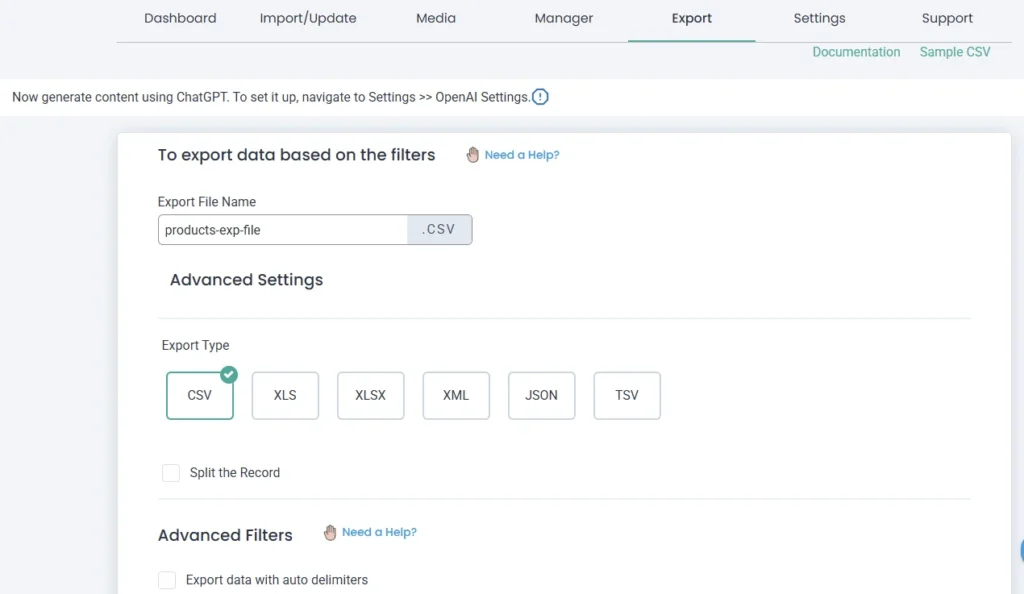
- On the Export configuration settings, enter the file name and choose the desired file type(like xlsx or csv).
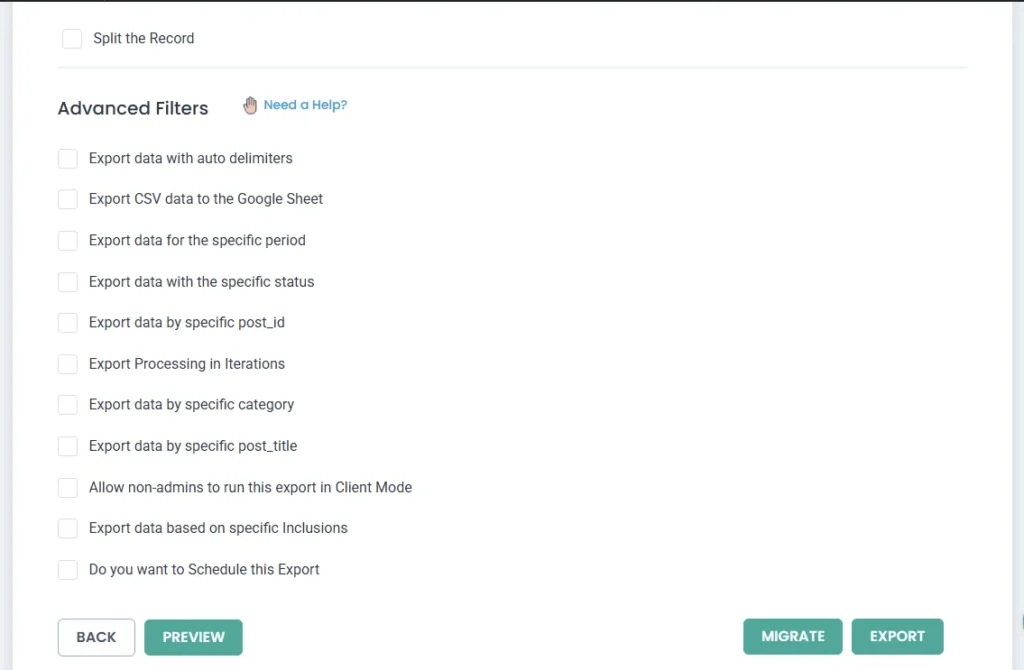
Use Advanced filter:
- Export data with auto delimiters – To export your CSV with delimiters.
- Export CSV data to the Google Sheet – Enable it to export data straight to your Google Sheets.
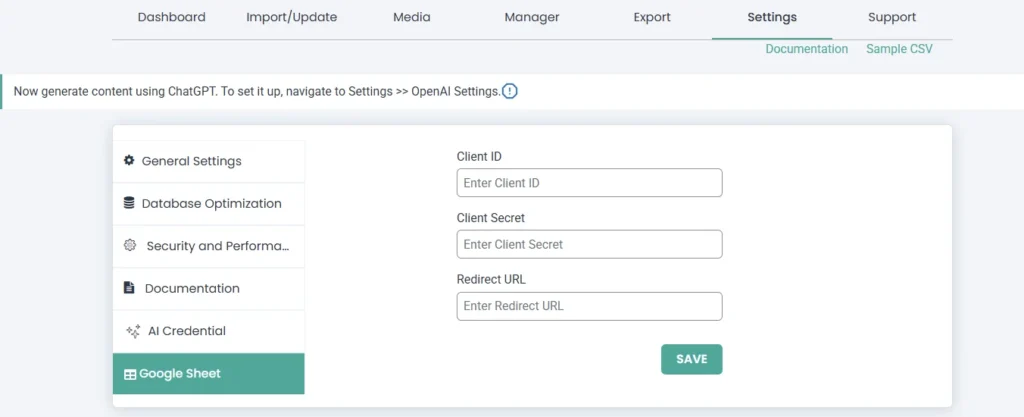
Note: To access this feature, you need to link your Google Sheets to our plugin settings. To do that, navigate to WP Ultimate CSV Importer Pro > Settings > Google Sheets. Enter client ID, client secret, and the redirect url of your Google account to link the Google Sheet with the plugin.
- Export data for the specific period – Select from and to date periods to export records created during that period.
- Export data with the specific status – Choose a status from the dropdown to export records only of it.
- Export data based on language code – Choose a language code, visible if you have a multilingual website created with WPML and Polylang plugins, to export only the chosen language records of WooCommerce Products.
- Export data by specific post_id – Enter multiple ids here to export your variable products.
- Export Processing in Iterations – Enable this option to export records in small batches, instead of all at once.
- Export data by specific category – Choose categories to export records of them only.
- Export data by specific post_title – Select single or multiple post titles from the dropdown list to export them.
- Learn more about Allow non-admins to run this export in Client Mode here.
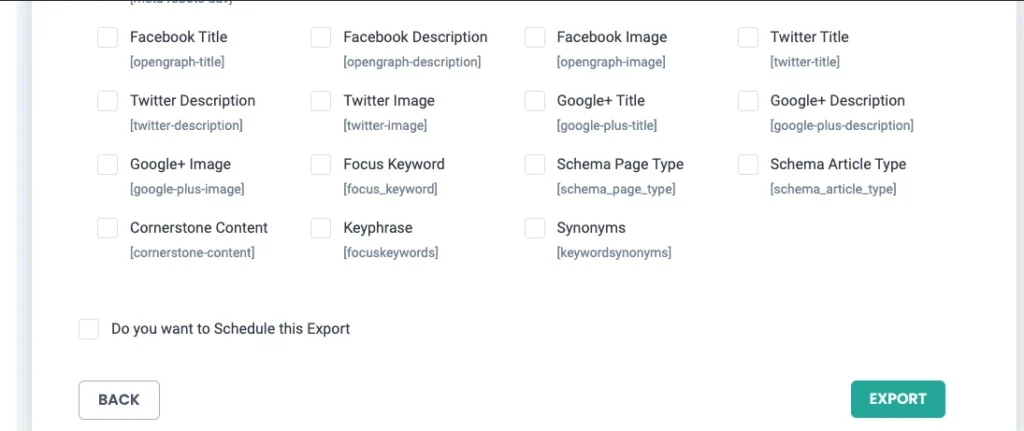
- On enabling the “Export data with Specific Inclusion” section, you can export the specific product attributes. For example: Select product_attribute 1, product_value 1, product_visible 1.
- Find out how to schedule an export with WP Ultimate CSV Importer.
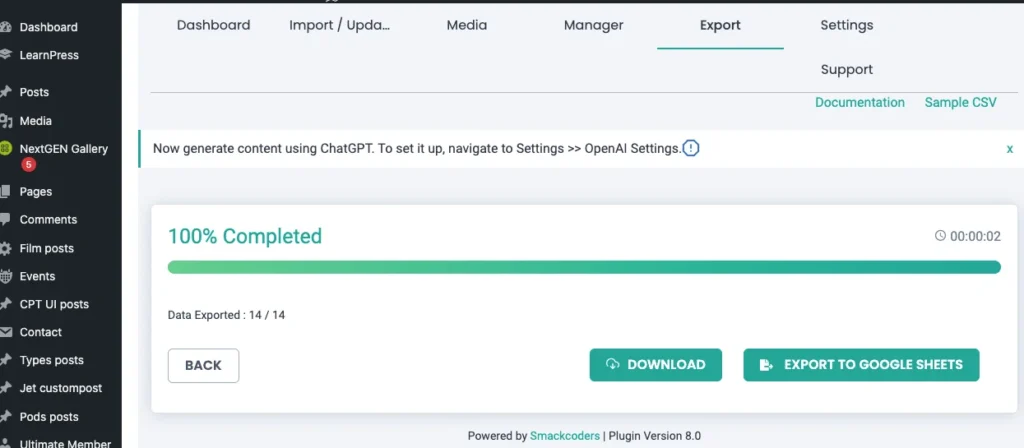
Once done configuring the export settings for variable products, click on Export.
The variable products export file will be prepared and ready to download. Click download and save the file to your device. If you’ve configured the Google Sheet export, you will see the button “Export to Google Sheets”. Clicking on it will export data straight to your Google Sheets.
Further Reading #
1. Managing Complex Product Variations in WooCommerce
When importing variable products with multiple attributes, ensuring that the variations are correctly linked to the parent product is crucial. Let’s see how we can manage more complex scenarios:
Multiple Attributes for Variations
If your variable products require several attributes (e.g., Color, Size, Material), ensure that each variation in your Import file is properly aligned with the corresponding parent product.
- Import file Structure: Each product variation needs to be specified in the CSV with its unique combination of attribute values, such as:
- Product SKU(for the parent product)
- Attribute Name: Color
- Attribute Value: Pink, Medium
- SKU: The variation-specific SKU
- Price, Stock, etc.
Multiple Attribute Group Blocks for Different Variations
For products with multiple sets of variations, you need to map several attributes and their values in the CSV(import file). Each variation should include the attribute name, value, and any other required data. For example, if a T-shirt comes in different colors and sizes, map both attributes (Color and Size) in the import file to create the variations accurately.
- Example File Columns:
- Parent Product SKU: T-Shirt-001
- Product Attribute Name 1: Color
- Product Attribute Value 1: Red
- Product Attribute Visibility 1: 1
- Product Attribute Name 2: Size
- Product Attribute Value 2: S
- Product Attribute Visibility 2: 1
- Variation SKU: T-Shirt-001-S-Red
This allows you to import all variations while ensuring that each variation is linked to the correct parent product.
2. Handling Custom Attributes in Variations
WooCommerce allows you to define custom product attributes that go beyond the default attributes like size, color, etc. When importing such custom attributes, the process requires some additional steps:
Custom Attributes Mapping
If your product uses custom attributes (such as material or custom design), you need to ensure that these attributes are included in the import file for each variation.
- Example:
- Product Attribute 1: Custom Design
- Product Attribute Value: Floral Print
In the mapping process, you’ll need to map each custom attribute to the respective field in WooCommerce.
Advanced Attribute Visibility
You can also control the visibility of custom attributes for each variation (e.g., show or hide certain attributes from the product page).
- Visibility Option: You can use the visibility codes 1 (visible) and 2 (hidden) to control whether certain attributes appear on the front end.
Note: For every attribute import, you need to follow the above steps given in this guide to import WooCommerce Variable Products. Select the WooCommerce type as Variable and the product type number as 4 for the parent and 8 to indicate variations.
3. Bulk Import WooCommerce Product Prices and Stock
In some cases, you may need to adjust prices or stock levels for each variation dynamically. This can be achieved easily by including the relevant columns in your import file and adding values to them for each variation.
- CSV Structure for Pricing:
- Parent SKU: T-Shirt-001
- Variation SKU: T-Shirt-001-S-Red
- Variation Price: $17.99
- Variation Stock: 50
If you’re working with products that have numerous variations (e.g., different sizes, colors, and materials), you can bulk update variation prices and stock by ensuring these columns are populated in your CSV(import file, you can use another file type too) and you’ve changed the necessary values. Refer to this WooCommerce variable product sample CSV file for more information.
4. Managing Out-of-Stock WooCommerce Variations
Sometimes you may want to import variations that are out of stock. These variations can be included in the import file, but they should be marked correctly to avoid issues during the import process.
- Out-of-Stock Variations:
- Stock Status: Mark the stock status as Out of Stock in your import file for variations that aren’t available for sale.
- Example:
- Variation SKU: T-Shirt-001-S-Red, Stock Status: Out of Stock
By doing this, you can ensure that the variation is imported, but it won’t show as available for purchase on the front end until stock is replenished.
WP Ultimate CSV Importer Pro
Get Ultimate CSV/XML Importer to import data on WordPress faster, quicker and safer.
FAQs related to WooCommerce Variable Products Import #
1. How do I structure my CSV file for products with variations?
For each product with variations, you need to specify the parent product as well as each variation. Ensure that each variation is identified by a unique SKU and has its row in the CSV. Additionally, each row should include:
Product ID (for the parent)
Variation-specific attributes (e.g., color, size)
SKU for each variation
Price, stock, and other variation-specific data
Refer to the sample file provided in this guide above to know how to structure your file for variable products import.
2. Can I import multiple variations for the same parent product?
Yes, you can import multiple variations for the same parent product. Each variation should be listed on a separate row with the same parent product identifier (typically the product SKU) and the unique variation attributes.
3. Do I need to link variations to the parent product manually?
No, WP Ultimate CSV Importer automatically links the variations to their parent product based on the product SKU. The parent product must have a unique identifier (SKU), and each variation must be associated with the same product ID or SKU.
4. What happens if I leave some attribute mapping templates empty?
If you leave any attribute mapping templates empty during the mapping process, those attributes will not be imported. However, you can safely leave some attribute mapping blocks empty if your import file does not include many attributes. It’s flexible and doesn’t impact the import process as long as the required fields are mapped correctly.
5. Can I import variations without having to create individual products for each?
Yes, when using WP Ultimate CSV Importer, you only need to import the parent product once. The variations are treated as child products and linked to the parent automatically. Each variation can share the same parent SKU while having its own attributes and pricing.
6. How do I update existing variations without duplicating them?
To update existing variations, make sure the SKU and Product ID match the existing variations in your WooCommerce store. When reimporting, select the “Update Content” as import option and follow the steps next. This will update the variation data (like price, stock, or attributes) without creating duplicates. Learn more about how to update data with WP Ultimate CSV Importer.
7. Can I import variations with different images?
Yes, you can import product variations with different images by including the image URLs in the corresponding columns for each variation. Make sure to map the image fields correctly during the import process.
8. What is the issue with assigning SKUs to products now?
Earlier, when you assigned a Product SKU to one product and tried to assign the same Product SKU to another product, it wasn’t allowed, as each product should have a unique Product SKU. But on recent updates, if you assign a product SKU to a product that is already assigned to another product, then the plugin will still import the product, but the Product SKU field will appear as empty in the imported data.
9. How do I prevent the empty SKU issue?
To avoid importing a product with an empty SKU, ensure that each product has a unique SKU. That is, if you need to change or update a Product SKU for a product, then ensure that the new SKU is not assigned to any other product. You can verify the existing SKUs in your system before making any changes to avoid an empty SKU issue.
10. Can I still assign the same SKU to multiple products?
No, each product should have a unique SKU. The recent update has allowed the system to import the product even if an SKU is duplicated, but the SKU will appear empty. For proper data management, it’s recommended to keep SKUs unique for each product to avoid confusion and potential data issues.