CSV Importer Pro integration with Elementor allows you to import and export templates and content designed with your favorite page builder. Using this plugin, you can import any pages, posts, or custom posts like WooCommerce products and templates in CSV format. After importing them, you can easily view or edit the data using the available features of the Elementor plugin. The export process for posts and templates is equally simple with this plugin and you can apply advanced filters to export specific templates and post types(content and design).
| Important: Free plugin now required for all Pro packages. Starting from CSV Importer Pro 8.15, CF Pro 8.3, and WPML Pro 6.2, the free WP Ultimate CSV Importer plugin must be installed and active on your site before any Pro package will work. If the free plugin is not detected, the Pro package will auto-deactivate and display a setup notice in your WordPress admin. |
Elementor Content Import/Export: #
This section describes the importing and exporting process of your content from the websites. Here we will import and export a page from one website to another. Before we start that process, we need to install the plugin. Let’s see its installation steps and then the import/export process.
Step 1: Installation of Plugin:
The plugin can be downloaded in three different ways. The step-by-step process is described here. Choose any option that seems easy for you and install the plugin.
1.1 By downloading the zip file – General way:
- Go to the MyAccount page and download the plugin’s zip file.
- After downloading the zip file, navigate to the Plugins option in the navigation bar.
- Select Add New > Upload.
- In the upload section, upload the downloaded zip file.
- Activate it.
1.2 Downloading it directly from the plugin section:(For Free version)
- Select Plugin> Add New in the navigation bar.
- In the search bar, search for the plugin – ‘WP Ultimate CSV Importer PRO’
- The search results will show the plugin. Click the install button.
- After the plugin is installed, you can see the Activate button.
- Click the Activate button.
1.3 For FTP users:
- Download the plugin’s zip file.
- Go to /wp-content/plugins/.
- Copy-paste the plugin’s zip file there and extract it.
- Now, navigate to the WordPress Dashboard.
- Select Plugins > Installed Plugins.
- Activate it.
Step 2: Export your CSV file – Download:
After installing the plugin, to import the content, we need a CSV file of it. It’s not mandatory to be in CSV format. But it is necessary to have it in any of the specified formats. Here are the steps to export your existing website to the required file format.
- Navigate to the Ultimate CSV Importer PRO.
- Click on Export and select the content types from the drop-down menu. Some of the examples are pages, posts, etc.
- The plugin will analyze the total number of pages you have and show it at the right end of the section.
- Verify the count and click Continue.
- Now you can see the fields to enter the file details. Enter your file name in the Export file name box.
- Click your required file type such as CSV in the advanced settings. As default, the CSV file is selected.
- If you want to split your file based on records, check in the ‘Split the record’ box.
- Using the options in the ‘Advanced Filters’ section, you can export any specified data. For example: Export the pages between specific periods.
- Click on the Export button at the right end.
Step 3: Export your CSV file – View the downloaded file:
After downloading the file, follow the below steps to view the file
- Open Google Spreadsheet.
- Go to File > Open > Upload Section.
- Click on Browse and select your exported file.
- Now you can see the entire content in the tabulated form.
In the spreadsheet, you can see that all the fields of the exported page, including the Elementor fields are placed in the field header. And the value of those tags is placed underneath.
Step 4: Import your downloaded file:
Now it’s time to import the file to your required website.
- Navigate to the Ultimate CSV Importer PRO tab.
- Open the Import/ Update tab.
- Use the browse button to select your downloaded CSV file.
Step 5: Create or Update an Existing File
Now you can see two options – Fresh Import and Update Content. The fresh import refers to importing a new website from the content file. And the updated content updates the content of the existing website.
You can import any content type. It can be pages, posts, and so on. For example, here I have imported pages. You can select any content type from the drop-down menu.
After that, click the ‘Continue’ button on the right.

WP Ultimate CSV Importer Pro
Get Ultimate CSV/XML Importer to import data on WordPress faster, quicker and safer.
Step 6: Set Mapping settings:
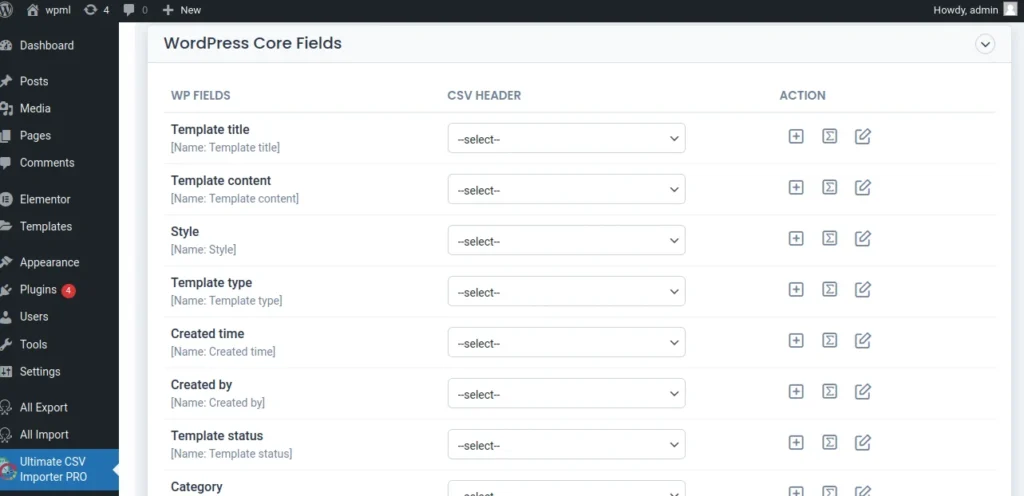
The Ultimate CSV Importer PRO plugin provides you with advanced settings where you can map the values of the WordPress fields. By default, this setting assigns the values in the uploaded CSV file by auto-mapping. It directs the respected header values to the WordPress Fields.
Ensure all the elementor fields are mapped correctly as in the CSV file.
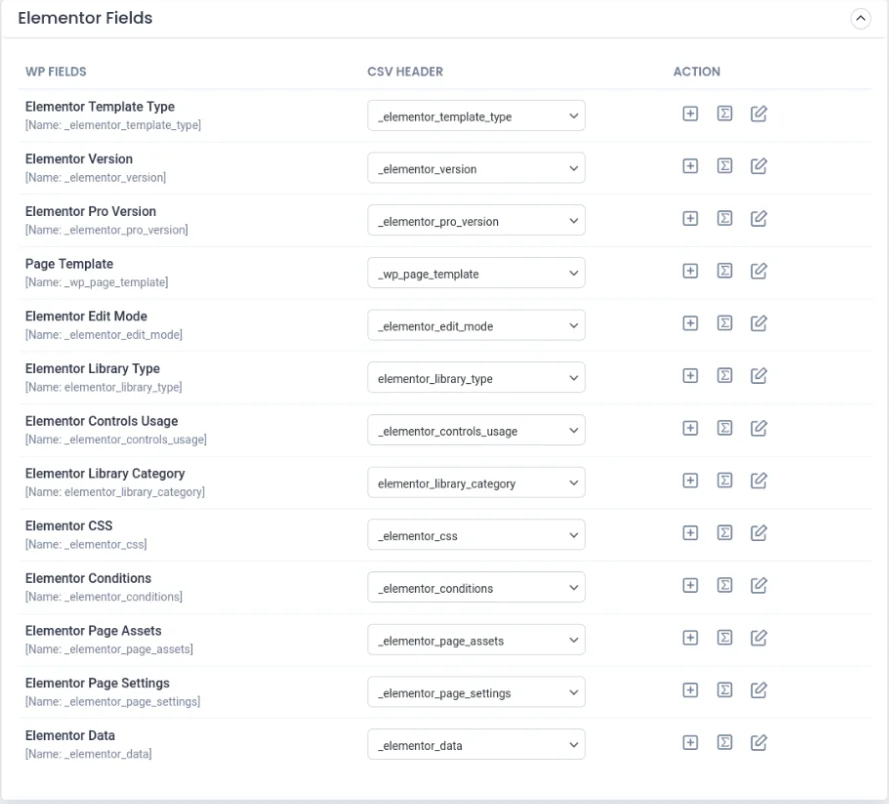
Furthermore, you can map them using the Advanced mode or the Drag & Drop Mode. You can map the field using the drop-down menu in the advanced mode.
You can also map the field values in CSV to the WP Fields using the drag-and-drop feature.
Step 7: Import Configuration settings:
After setting the image properties, you will be directed to the import configuration settings. This setting consists of various options. Those are listed below:
- Enable safe prostate Rollback – It backups the files before importing them
- Do you want to SWITCH ON Maintenance mode while importing? – After you select this option, your pages will be imported along with the maintenance mode.
- Do you want to handle the duplicates on existing records? – This option removes all the existing duplicates on your file before importing them.
- Do you want to schedule this import? – With this feature, you can set the time when the file has to be imported. It automatically imports them when the scheduled time reaches.
Select the desired configuration settings. Click on the Import button after choosing your option.
Step 8: View the imported post – Logs:
After the import process is finished, you can see the import completed window pop up on your screen. There you can download the import log and failed media details separately as CSV files. Closing the window will also show you the log for each record. You can verify them in both the front and back end using the view and edit links.
Elementor Template Import/Export: #
This plugin allows you to import or export the templates designed with Elementor from WordPress websites. The import and export in the CSV Importer PRO are the same irrespective of the files. It can be just a template or content including the template. The only thing that changes is the file-downloading process. If it is a content or post, download the content from the Posts or Pages section. And for the template, you can do the same from the Template section in the WordPress Dashboard.
Elementor Template Export:
- Navigate to Ultimate CSV Importer Pro-> Export
- To export the Elementor Templates, Select the content type as custom post and choose the Elementor Library from the drop-down menu
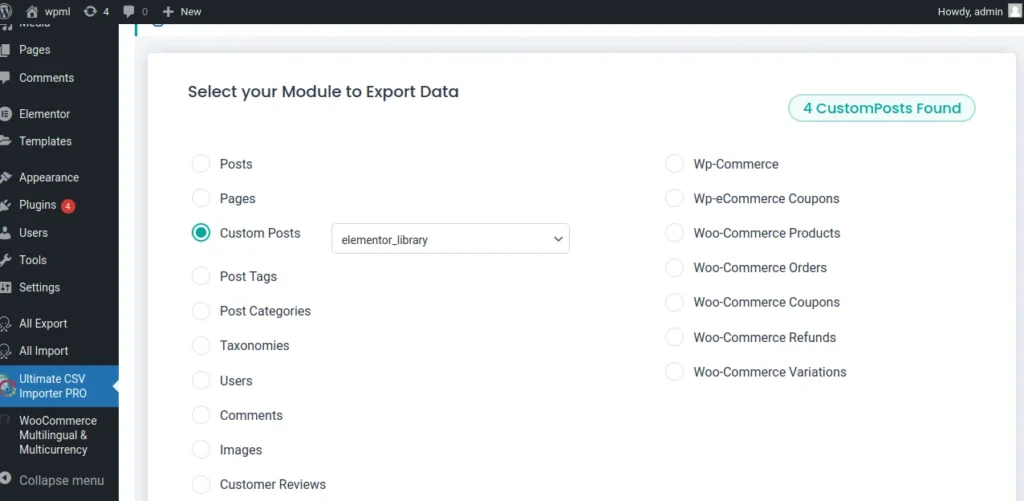
- Verify the number of templates and click on continue
- Provide the file name and select the file type
- Use the advanced filter based on your business needs
- Click on Export
- Now all your Elementor Templates will be exported in your desired file format.
Elementor template Import:
The import process is the same as that of the Elementor content update. Here you can import the Elementor Templates instead of Elementor content.
Ensure the Elementor Template fields are mapped correctly as in CSV.
Follow the import instructions described in the importing Elementor content section. Once done with the importing process, your Elementor Templates of the selected content type have been imported. You can download and check the import log to verify its success.
Conclusion: #
This documentation is the step-by-step procedure to use the Ultimate CSV Importer PRO. It describes the import and export features of the plugin in detail. So make your import/ export process simple with this plugin and do them effortlessly.
WP Ultimate CSV Importer Pro
Get Ultimate CSV/XML Importer to import data on WordPress faster, quicker and safer.