Table of Contents
In this blog post, we will explore the process of creating and importing custom post types in WordPress. Whether you are a seasoned WordPress developer or just starting, this guide will provide you with a step-by-step tutorial on how to unlock the possibilities of creating and importing custom post types to your WordPress website. We will cover the basics of custom post types, including what they are, why you might need them, and how to create them using plugins. Also, we will discuss WordPress importing custom post-type data from other sources, such as a CSV file. By the end of this tutorial, you will have a clear understanding of how to create, export-import custom post types csv in WordPress, and you will be able to take your website to the next level by offering unique content types to your users.
What is Custom Post Type in WordPress?
Let’s begin with understanding what a custom post is. In WordPress, custom post types are content types that you can create and customize to your specific needs. It can be created using custom code or a third-party add-on. In this article, we will see how to create custom posts using third-party plugins. By default, WordPress comes with five post types: Posts, Pages, Attachments, Revisions, and Menus. Custom post types allow you to add additional content types beyond defaults.
Why do we need Custom Post Types?
If you are planning to build a Real Estate website, the default Post/Page won’t be sufficient because we want a Post Type to have a Product Image and custom Fields related to the Post we are building here are some sample fields we need – Number of bedrooms, bathrooms, Pools and Minimum Price, and Type of Property either an apartment or Building or Bangalow, etc., so definitely we need a custom post to achieve our needs.
Most Popular Third-party Plugin for Custom Post Types
There are several third-party plugins available to create custom Posts but here I’m listing the most popular ones,
- Toolset
- JetEngine
- PODS
- Metabox
As a whole, these are the most popular plugins. Each has several features and depending on your specific needs and preferences, you can select any for your website.
In this article let us see how to create a Custom Post using the above addon and how to import it using the Ultimate CSV Importer Plugin.
How to create Custom Post Types using Toolset?
Toolset is a powerful plugin that allows you to create Custom Posts, Custom Fields, and Taxonomies without coding knowledge in simple steps. The toolset also includes other features, such as views, forms, and templates. These features enable you to create highly customized WordPress websites and applications.
- Install and activate the Toolset Types plugin in your WordPress instance.
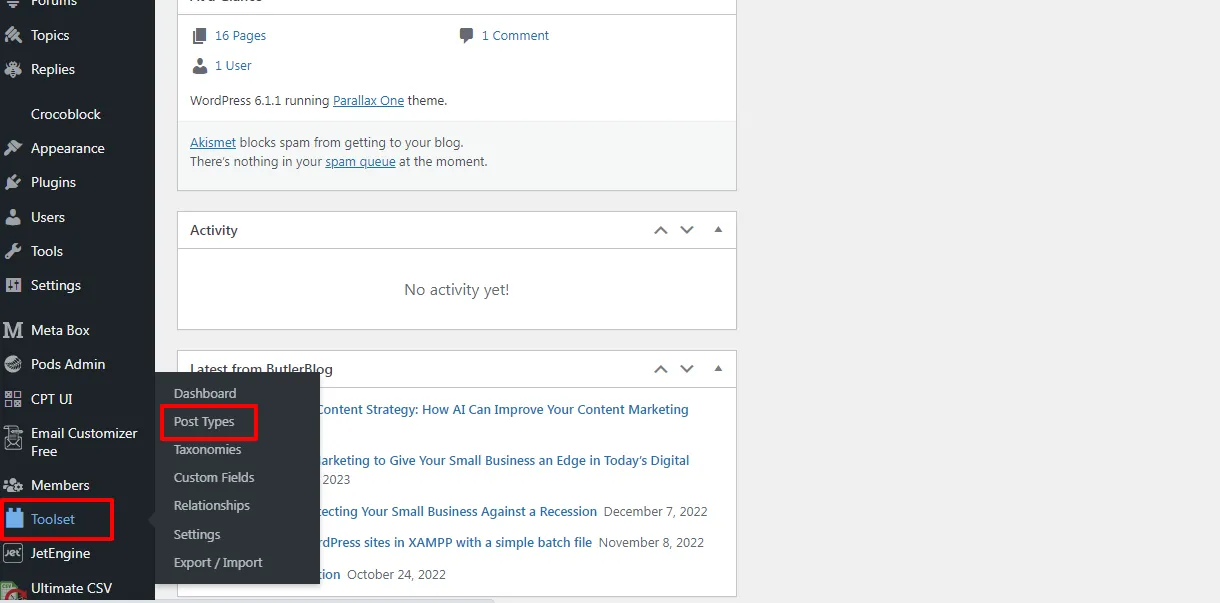
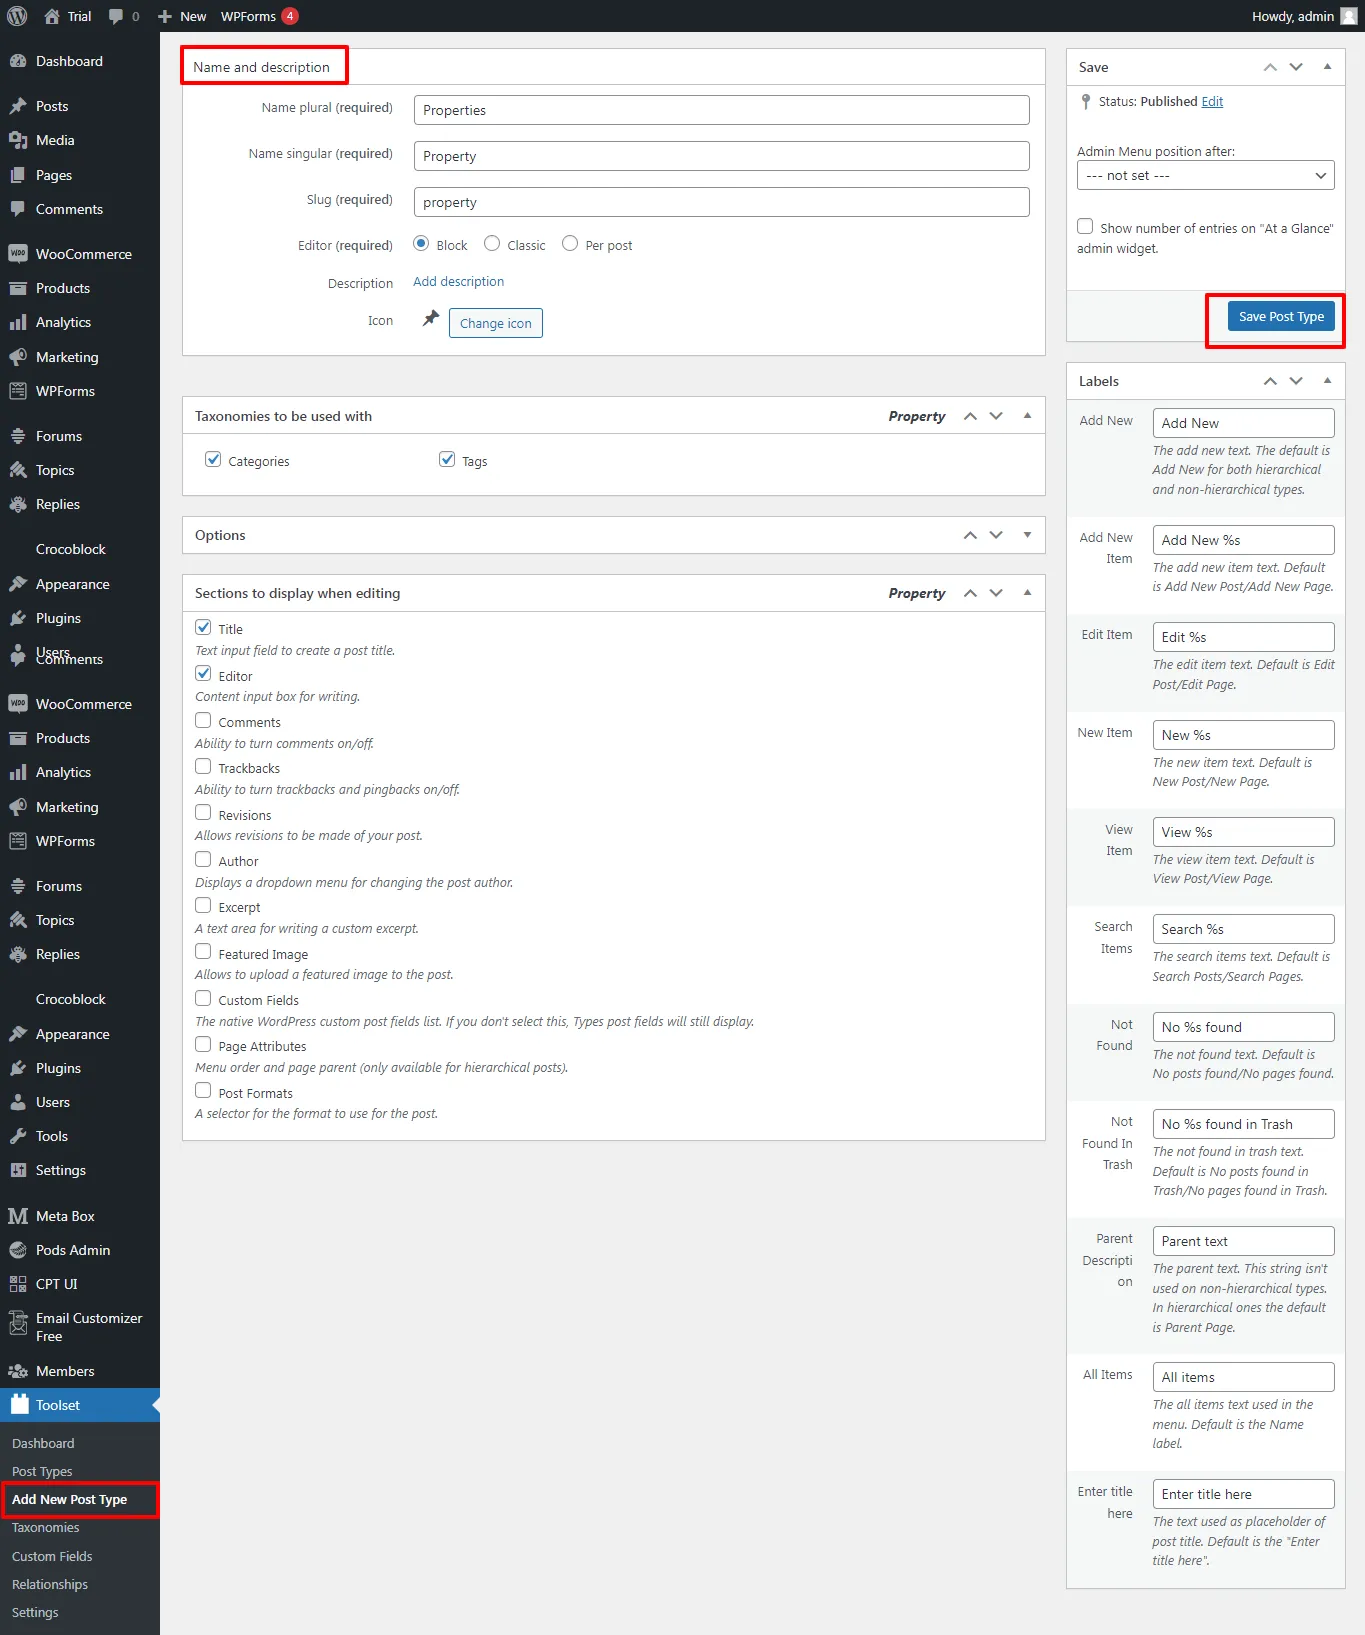
- Go to the Toolset -> Post Types in your WordPress dashboard.

- Click on the Add New button to create a new custom post.

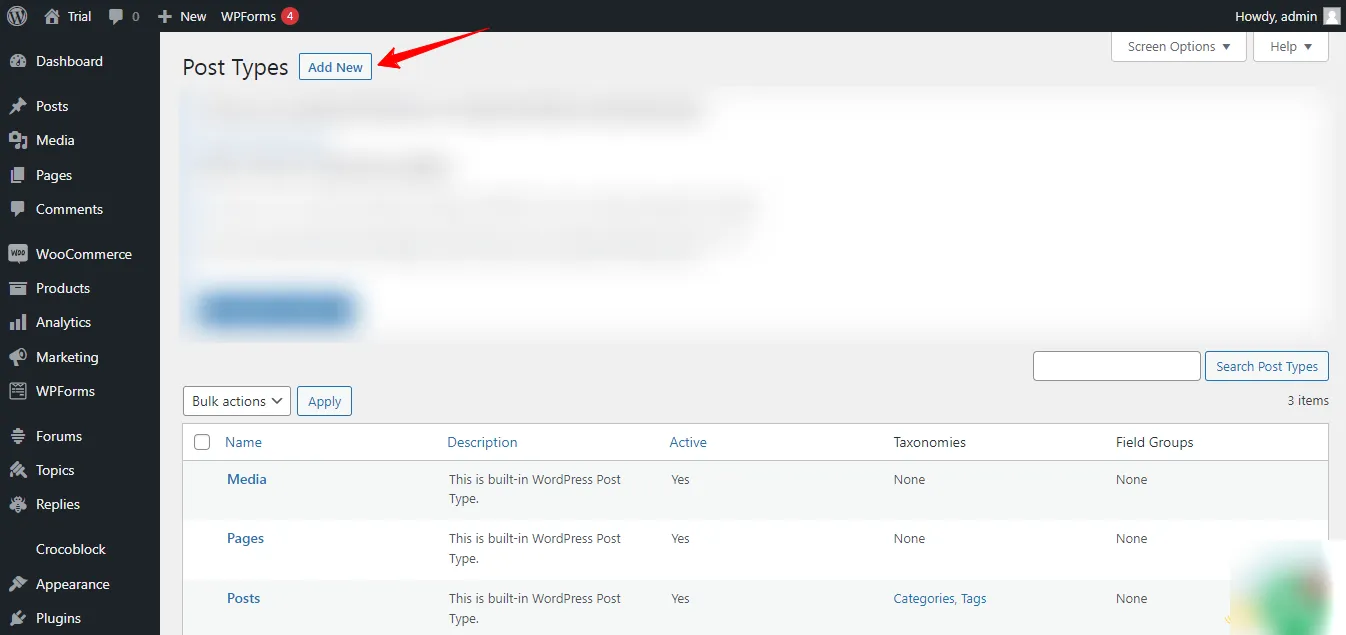
- In Post Type Name enter the Custom Post name and in the description field, enter the short description of the post. Under “Options,” select the settings you want for your custom post type. This includes the post-type label, menu icon, and capabilities. Fill in all the necessary fields and click Save Post
- Once you have created a custom post, your newly created custom post will appear in your WordPress instance.
- Add new custom fields to your custom post in two ways. By clicking Dashboard under the Toolset menu, you will see a newly created custom post. Then click Add Custom Fields, and Add Custom Taxonomy, to create custom fields and taxonomies for the custom post. You can also click on Custom Fields under the Toolset menu to create custom fields and Taxonomies to create custom Taxonomy.
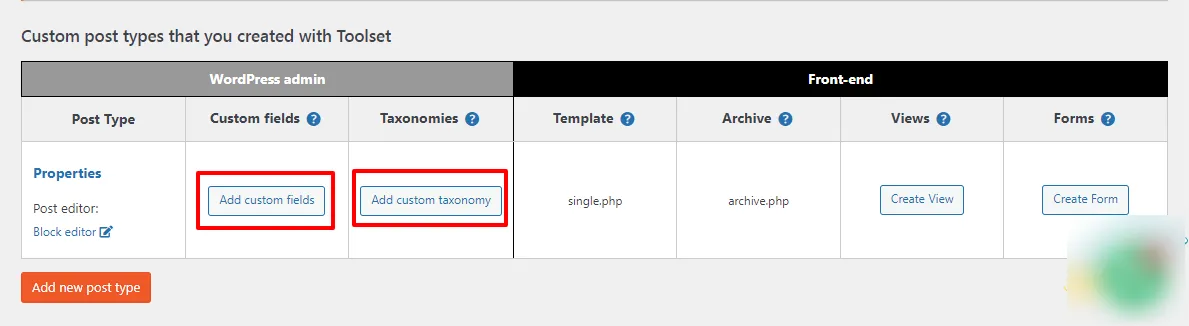
- Now you will be able to see Custom Post with fields and taxonomies in your WordPress instance.
How to create Custom Post Types using PODS?
PODS is a popular plugin that allows you to create custom Posts, Custom Fields, and Custom Taxonomies. Overall, PODS is a powerful plugin that offers a lot of flexibility for customizing WordPress sites.
We will see how to create Custom Post,
- Install and activate the PODS plugin in your WordPress Instance.
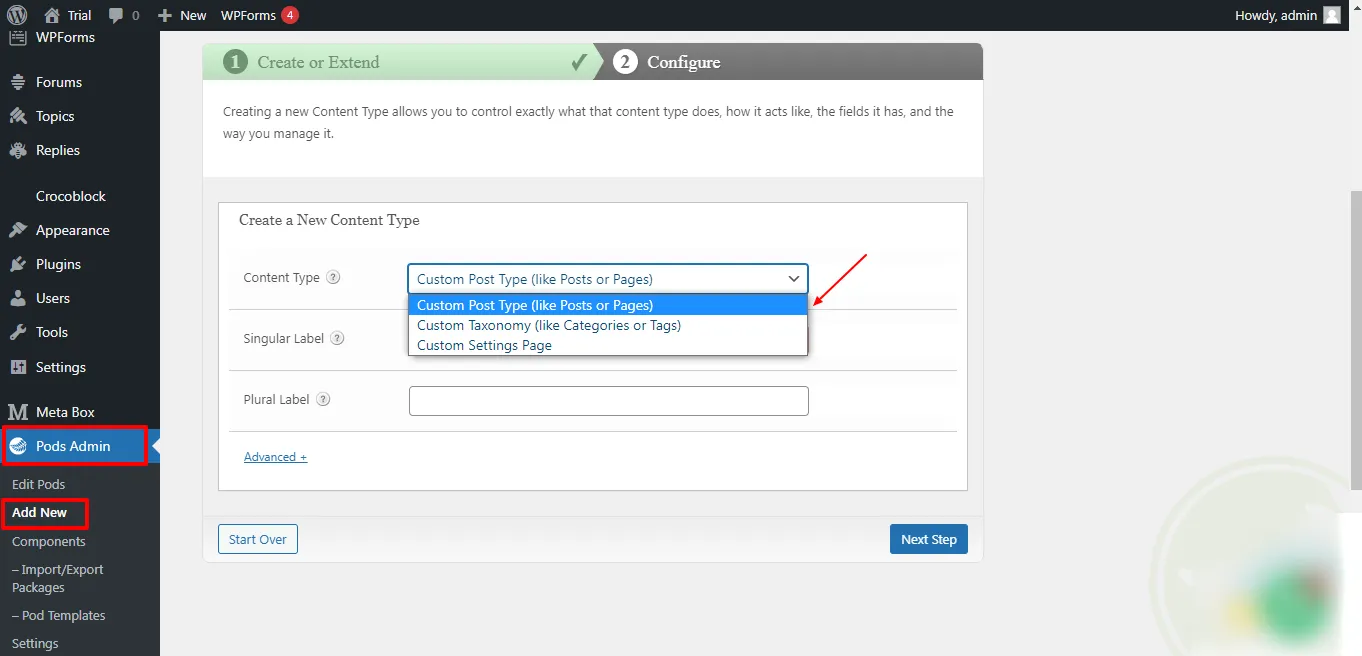
- In your WordPress dashboard, Click PODS Admin -> Add New -> Create New.
- Select Custom Post Type in the dropdown menu to create Custom Post, and Custom Taxonomy to create a custom category and tag.

- Provide the CPT name in the Label field and click Save Pod. A new CPT will be created, and it will be displayed in your WordPress dashboard.
- To create custom fields, click on Edit Pods in the WordPress dashboard. Select your Custom Post (to add custom fields) -> Fields -> Add the field group name and fields for the post in Save Pods.
That’s it! With PODS, you can easily create custom post types and custom fields for your WordPress site without writing any code.
How do I create custom post types using MetaBox?
Metabox is a powerful and flexible plugin that lets you easily create custom posts, custom fields, and custom taxonomies for your WordPress posts, pages, and custom post types. Whether you’re a developer building custom themes or plugins or a content creator looking to add more information to your posts, MetaBox is worth checking out.
- Install and activate the MetaBox to create custom fields and MB Custom Post Types and Custom Taxonomies in your WordPress instance.
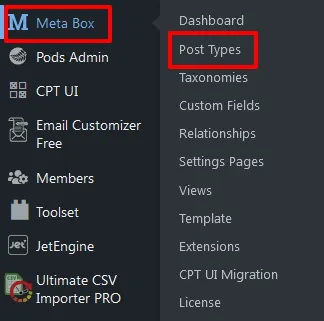
- Once the plugin is activated, you can see the new MetaBox menu in your WordPress dashboard.
- In your WordPress dashboard, go to MetaBox > Custom Post Types and click the “Add New” button to create a new custom post type.

- Fill in all required fields, such as name and slug, for your custom post. You can also select the post type’s capabilities, menu icon, and taxonomies and click Publish, and now your custom post will be created.
- Under MetaBox -> Custom Fields, you can add custom fields to your custom post type or existing post. You can choose from various field types such as text, textarea, select, checkbox, and more. Fill in all necessary details, like field name, field location, etc., and click Publish to see your custom fields displayed in the desired location.
That’s it! You have now created a custom post type and custom fields using the MetaBox plugin’s user interface without writing a single line of code.
How do I create custom post types using JetEngine?
JetEngine is a powerful plugin that allows you to create custom post types, custom fields, and custom taxonomies without any coding. For storing additional information in your post, you can create custom fields using the plugin. Now, we will walk you through the process of creating custom post types and fields with JetEngine.
- Install and activate the JetEngine plugin in your instance.
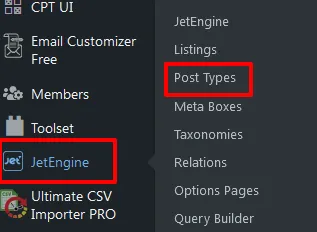
- Once it is activated, the JetEngine menu will be displayed in your WordPress dashboard.
- Click JetEngine ->Post Type -> Add New.

- Add your post name and slug, and fill in all necessary details. Customize your custom post by adding custom fields and taxonomies by clicking the Add Meta Field button under Meta Fields. Choose the field type you want to add, such as “Text”, “Number”, “Checkbox”, or “Image”. Fill out the field settings, such as the field label, meta key, and default value.
- Click “Add Post Type” to create a custom post with metadata.

WP Ultimate CSV Importer Pro
Get Ultimate CSV/XML Importer to import data on WordPress faster, quicker and safer.
Ultimate CSV Importer: WordPress Import CSV to Custom Post Types
It’s always nice to be on trend, isn’t it? Not only for lifestyle but also for business. The Ultimate CSV Importer always keeps up with the latest market developments. Interesting, right? Then try our demo now. So let’s see how to import data into a custom post using the plugin.
This involves a few steps,
- Import File Preparation,
- Upload File
- Field Mapping
- Media Handling Section
- Import Configuration Section
File Preparation
Ultimate CSV Importer will import both CSV and XML file formats. Ensure your CSV file is formatted correctly, with each column representing a different field in your custom post type. Also, we have provided a sample CSV or XML for your reference. If you are unclear, you can look for clarification.
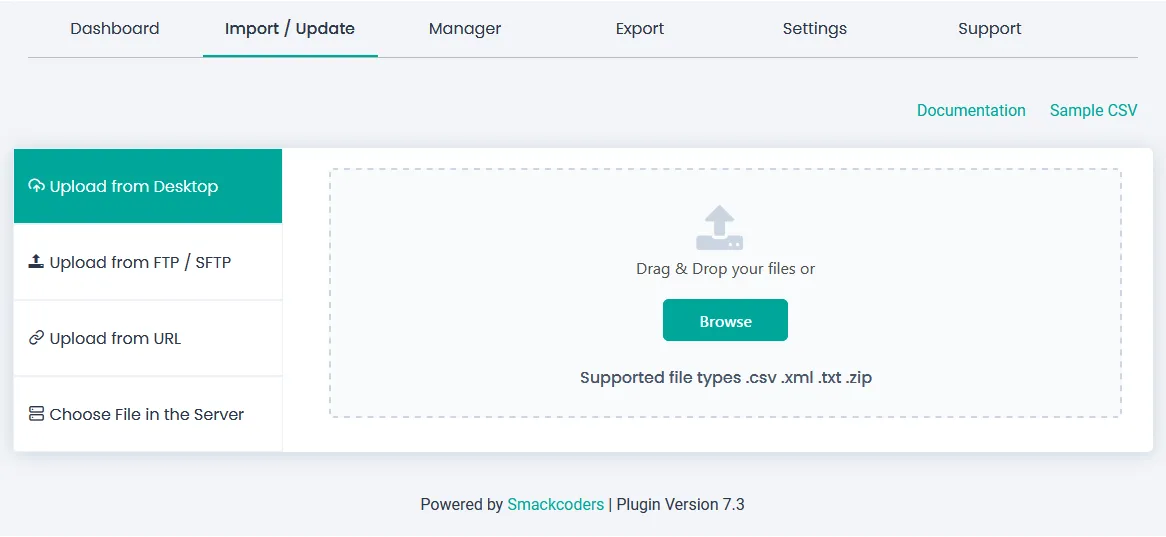
Upload File
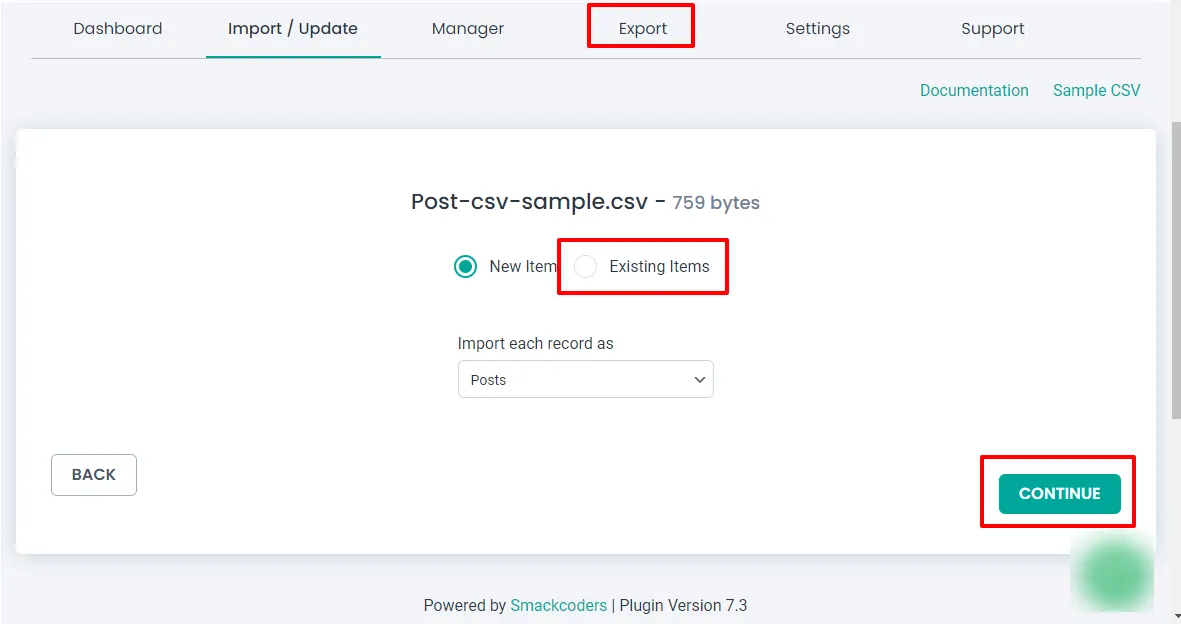
Install and activate WP Ultimate CSV Importer in your WordPress instance. Click the Ultimate CSV Importer plugin, navigate to the Import tab, upload your CSV or XML, and select the post type you want to import in the drop-down menu. Select New Items to import new data or Existing Items to update the old data.
Field Mapping
Field mapping in the Ultimate CSV Importer plugin allows you to map the columns in your CSV file to specific fields in your WordPress database, such as post title, post content, post meta fields, custom fields, and taxonomy terms. Field mapping is essential because it tells the plugin where to place the data from each column in your CSV file. Once it is done, you can save the mapping as a template so you can use the same mapping in the future.
Media Handling Section
Download external images to your media. You can decide whether the image (inline image, featured image, or gallery image) imported with your post should be in the Media Library or not in this section.
Image Handling: Ultimate CSV Importer will handle your images perfectly by not allowing duplicate images inside the media library. If the images are already present inside the media and you want to keep them, you can do that or delete the old ones by overwriting the existing images or always creating fresh ones during the import process. Select anyone based on your needs.
Post Content Image Option: Enable to download the post content image to the Media Library.
Image Sizes: The image can be imported in different sizes, such as thumbnails, medium, medium large, and large. If you need a custom size, you can do it by specifying the image width and height.
Media SEO and Advanced Options: You can import images along with the SEO fields like image name, description, ALT text, and caption. Map the desired CSV header to the fields. Click Continue to proceed with the import process.
Import Configuration Section: In this section, you can take a safe backup before importing. Also, you can notify your visitors that the site is in maintenance mode. Then kick off the duplicates while importing the data based on title or name. Schedule your import at your own time in this section. Once done, click Import to import all your data into the WordPress instance.
How to export custom post types in WordPress using the Ultimate CSV Importer?
To export custom post types in WordPress, Click on Ultimate CSV Importer, navigate to the Export Tab, and click Custom Posts. The created custom post will be listed in the dropdown; select the desired post and click Continue.
Give the name of the file to be exported and download the file in the format you need, like CSV, XLS, or XML/JSON. And the advanced filters allow you to export the data you need. (Refer to the Ultimate Exporter documentation for more details.)
Update your data using the Ultimate CSV Importer
Both import and update are the same process, and they only differ in two steps. In the first step, select Existing Items, upload your CSV, map all the necessary fields, and click Continue.
In the final step Select Update based on the fields the records need to be updated such as title, slug, or ID
WordPress Export Custom post type without a Plugin
Below is the step-by-step guide to WordPress export custom post type without a plugin that involves creating a custom function to fetch the data and generate a CSV file.
Create a Custom Page Template: Start by creating a new page template. Duplicate your theme’s existing page template and give it a unique name, such as template-export-csv.php.
- Modify the Template Header: Add the following lines at the beginning of your new template file to set up the header.
php
<?php
/* Template Name: Export CSV */
get_header();
?>
Fetch and Export Data: Below the header, add PHP code to fetch the custom post-type data and generate a CSV file.
<?php
global $post;
$args = array(
‘post_type’ => ‘your_custom_post_type’, // Replace ‘your_custom_post_type’ with your actual custom post type
‘posts_per_page’ => -1,
);
$posts = get_posts($args);
if ($posts) {
$csv_output = “ID,Title,Content\n”;
foreach ($posts as $post) {
$csv_output .= ‘”‘ . $post->ID . ‘”,”‘ . esc_html($post->post_title) . ‘”,”‘ . esc_html($post->post_content) . “\”\n”;
}
$filename = ‘exported_data_’ . date(‘Ymd’) . ‘.csv’;
header(“Content-type: text/csv”);
header(“Content-Disposition: attachment; filename=$filename”);
header(“Pragma: no-cache”);
header(“Expires: 0”);
echo $csv_output;
exit;
} else {
echo ‘No data to export.’;
}
get_footer();
- Replace ‘your_custom_post_type’ with the actual name of your custom post type. This code fetches all posts of the specified custom post type, constructs a CSV-formatted string, and then sends it to the user for download.
- Create a New Page in WordPress Admin: In the WordPress admin, create a new page and assign the “Export CSV” template to it. This page will be used to trigger the CSV export.
- Visit the Export Page: Visit the newly created page on the front end of your site. You should see a CSV file download prompt, and the CSV file will contain the data from your custom post type.
Please note that this is a basic example, and you might need to customize the code based on the structure of your custom post type and the specific data you want to export. Additionally, consider adding security measures and error handling to ensure the script runs smoothly.
WordPress Import CSV to custom post type
Importing CSV data into custom post types in WordPress without a plugin involves a multi-step process. Here’s a basic guide on achieving this:
- Prepare the CSV File: Ensure that your CSV file is properly formatted and includes columns corresponding to the data you want to import into your custom post type. For example, if your custom post type has fields like title, content, and custom fields, make sure your CSV file has columns for these.
- Create an Import Page Template: Similar to the export process, you can create a custom page template to handle the CSV import. Duplicate an existing page template or create a new one, and add the necessary header lines.
php
<?php
/* Template Name: Import CSV */
get_header();
?>
Handle CSV Import: Below the header, add PHP code to handle the CSV import. Use the wp_insert_post() function to create new custom post-type entries based on the CSV data.
php
<?php
if ( isset( $_FILES[‘csv_file’] ) && $_FILES[‘csv_file’][‘error’] == 0 ) {
$file = $_FILES[‘csv_file’][‘tmp_name’];
$handle = fopen($file, “r”);
while (($data = fgetcsv($handle, 1000, “,”)) !== FALSE) {
// Assuming the CSV columns are in the order: title, content, custom_field
$post_data = array(
‘post_title’ => $data[0],
‘post_content’ => $data[1],
‘post_type’ => ‘your_custom_post_type’, // Replace with your custom post type
‘post_status’ => ‘publish’,
);
$post_id = wp_insert_post($post_data);
// Set custom field values
if (!empty($data[2])) {
update_post_meta($post_id, ‘custom_field’, $data[2]);
}
}
fclose($handle);
echo ‘CSV data imported successfully!’;
} else {
echo ‘Please upload a CSV file.’;
}
get_footer();
- Adjust the code according to the structure of your CSV file and custom post type. Ensure that the CSV columns align with the order you specified in the wp_insert_post() function.
- Create a New Page in WordPress Admin: In the WordPress admin, create a new page and assign the “Import CSV” template to it. This page will be used to trigger the CSV import.
- Visit the Import Page: Visit the newly created page on the front end of your site. You should see a file upload form. Use this form to upload your CSV file and trigger the import process.
WP Ultimate CSV Importer Pro
Get Ultimate CSV/XML Importer to import data on WordPress faster, quicker and safer.
Frequently Asked Questions( FAQ)
Can you create custom post types in WordPress?
Yes, you can create custom post types in WordPress You can define custom post types using code in your theme’s functions.php file by using the plugins like Metabox and JetEngine.
How to create custom post types programmatically?
Here’s an example of how you can create a custom post type programmatically in WordPress by adding code to your theme’s functions.php file:
php
function create_custom_post_type() {
register_post_type(‘books’,
array(
‘labels’ => array(
‘name’ => __(‘Books’),
‘singular_name’ => __(‘Book’)
),
‘public’ => true,
‘has_archive’ => true,
‘rewrite’ => array(‘slug’ => ‘books’),
// Add more parameters as needed
)
);
}
add_action(‘init’, ‘create_custom_post_type’);
This code creates a custom post type named “Books”. You can customize the labels, slug, and other parameters as needed.
How to import custom post types in WordPress?
To import custom post-type data in WordPress, you can use plugins like WP Ultimate CSV importer to handle the import process. You’ll typically need to convert your data into a format that WordPress understands, such as XML or CSV, and then map the data fields to the appropriate custom post-type fields.
How do I get all custom post types in WordPress?
In WordPress, it is easy to get all the custom post types with the simple function get_post_types() function. Below is the code to retrieve or display all the custom post types that are public.
<?php
$args = array(
‘public’ => true,
‘_builtin’ => false
);
$output = ‘names’; // ‘names’ or ‘objects’ (default: ‘names’)
$operator = ‘and’; // ‘and’ or ‘or’ (default: ‘and’)
$post_types = get_post_types( $args, $output, $operator );
if ( $post_types ) { // If there are any custom public post types.
echo ‘<ul>’;
foreach ( $post_types as $post_type ) {
echo ‘<li>’ . $post_type . ‘</li>’;
}
echo ‘</ul>’;
}
?>
How do I import a CSV file data to WordPress post type with custom fields?
You can easily import CSV file data to a WordPress post type with custom fields using plugins like WP Ultimate CSV Importer or by writing custom code. With this plugin, importing is just a breeze of browsing the csv files and mapping CSV columns to custom post-type fields during the import process. With few clicks, the WP CSV importer efficiently imports the WordPress post type with its appropriate custom fields.
How to add or create custom post types in WordPress without a Plugin?
Follow the below steps to create a custom post type in WordPress without a plugin.
- Navigate to the WordPress source file-> themes-> functions.php
- Copy the below code and paste it into the functions.php file.
[php]
/********************Custom Post Type****************************/
function BookPostType() {
register_post_type(
‘books’,
// CPT Options
array(
‘labels’ => array(
‘name’ => __( ‘Books’ ),
‘singular_name’ => __( ‘Book’ ),
‘add_new_item’ => __( ‘Add New Book’, ‘text_domain’ )
),
‘supports’ => array(‘title’,’editor’,’author’,’thumbnail’ ),
‘public’ => true,
‘has_archive’ => true,
‘rewrite’ => array(‘slug’ => ‘books’),
‘show_in_rest’ => true,
‘menu_position’ => 5,
‘menu_icon’ => ‘dashicons-book’,
)
);
}
// Hooking up our function to theme setup
add_action( ‘init’, ‘bookPostType’ );/**********************Custom Post Type****************************/
[/php]
- Save the file and Refresh the browser
- The New custom Post type Books has been created in your WordPress
How do I import a post into a custom post type?
The simple steps to import your wordpress posts into the custom post by following the below steps:
- Install the WP Ultimate CSV importer Pro which is an all-in-one tool to import and export your WordPress content
- First export your post with the plugin in an XML format. (The export step has been mentioned above in this blog post)
- Open the XML file.
- Search for the term <wp:post_type>post</wp:post_type>
- Replace it with <wp:post_type>books</wp:post_type>
- Now all of my posts in the Posts section will be moved on to my custom post type called books.
- Then Import this into the new site with a custom post type called books
How do I export posts from a custom post type in WordPress?
Exporting posts from a custom post type in WordPress can be done using various methods, but here’s a general approach:
- Using Built-in WordPress Export Tool:
- Navigate to the WordPress admin dashboard.
- Go to Tools > Export.
- You’ll see a list of content types available for export. Custom post types are usually included here.
- Select the custom post type you want to export.
- Click the “Download Export File” button.
- This will generate an XML file containing the selected custom post type’s data.
2. Using a WP CSV Exporter:
- Install and Activate the WP Exporter plugin
- Access the plugin and Navigate to the Export option.
- Select the content type that you want to export. That is, select Custom posts from the lists.
- Provide the file name and file type that you want to export.
- The file type includes XML, CSV, JSON, and XLS.
- You can also export your post based on the advanced filter
- Once done click on Export.
Now all your custom posts have been successfully exported.
3. Manual Export via Database:
To manually export custom post types in WordPress via the database, you’ll need to access your WordPress site’s database using a tool like phpMyAdmin. Here’s a step-by-step guide:
Access Your Database:
- Log in to your web hosting control panel.
- Look for an option called phpMyAdmin or any other database management tool provided by your hosting provider.
- Open phpMyAdmin and log in using your database username and password.
Identify Your Custom Post Type Table:
- Custom post types in WordPress are stored in the wp_posts table (with ‘wp_’ being the default WordPress database table prefix).
- However, if you have created a custom post type, it might have a different prefix or a different table altogether. You need to identify the correct table associated with your custom post type.
Export Custom Post Type Data:
- Once you’ve identified the table associated with your custom post type, you can run an SQL query to select and export the desired data.
- Here’s a basic SQL query to export all posts from a custom post type named ‘your_custom_post_type’:
sql
SELECT * FROM wp_posts WHERE post_type = ‘your_custom_post_type’;
Replace ‘your_custom_post_type’ with the name of your custom post type.
Export the Results:
- After running the SQL query, you’ll see a list of posts from your custom post type.
- To export this data, click on the “Export” tab in phpMyAdmin.
- Choose the format you want to export the data in (e.g., CSV, XML, etc.).
- Click the “Go” button to download the exported file containing your custom post-type data.
Save and Review:
- Once the export is complete, save the file to your computer.
- You can then review the exported data to ensure it includes all the posts from your custom post type.
Regardless of the method you choose, always remember to back up your site before making any significant changes, especially when dealing with the database directly.
How do I add custom post types to my main RSS feed in WordPress?
You can add custom post types to your main RSS feed in WordPress by using the pre_get_posts hook to modify the query for the main feed. Let’s see an example:
php
function add_custom_post_types_to_feed($query) {
if ($query->is_feed && !is_admin()) {
$query->set(‘post_type’, array(‘post’, ‘books’)); // Replace ‘books’ with your custom post type slug
}
}
add_action(‘pre_get_posts’, ‘add_custom_post_types_to_feed’);
This code modifies the main query for the feed to include both regular posts and the custom post type “Books”. Adjust the post-type slug as needed.
How do I create a custom Post Type dynamically?
Creating a dynamic custom post type in WordPress involves several steps, including defining the post type, registering it in your theme or plugin, and configuring its attributes. Here’s a step-by-step guide to creating a dynamic custom post type:
- Define Your Custom Post Type:
- Decide on the name of your custom post type. For example, let’s create a custom post type named “Books”.
- Determine the labels, capabilities, and other settings for your custom post type. This includes attributes like title, editor, thumbnail support, etc.
- Register the Custom Post Type:
- You can register your custom post type by using the register_post_type() function. This function should be called during the init action hook.
- Open your theme’s functions.php file or create a custom plugin file.
- Use the register_post_type() function to register your custom post type.
Here’s an example:
php
function custom_register_book_post_type() {
$args = array(
‘public’ => true,
‘label’ => ‘Books’,
‘supports’ => array( ‘title’, ‘editor’, ‘thumbnail’ ), // Add support for title, editor, and featured image
);
register_post_type( ‘book’, $args );
}
add_action( ‘init’, ‘custom_register_book_post_type’ );
3.Configure Additional Settings (Optional):
You can further customize your custom post type by adding more arguments to the $args array in the register_post_type() function. These arguments include ‘labels’, ‘description’, ‘menu_icon’, ‘rewrite’, etc. Refer to the WordPress Codex for a full list of available arguments and their descriptions.
- Flush Rewrite Rules:
- After registering your custom post type, you may need to flush the rewrite rules to ensure that WordPress recognizes the new URL structure for your custom post type. You can do this by visiting the Permalinks settings page in the WordPress admin dashboard and clicking the “Save Changes” button.
- Start Adding Content:
- Once your custom post type is registered, you can start adding content to it by navigating to the WordPress admin dashboard and selecting “Books” (or whatever you named your custom post type) from the sidebar menu.
By following these steps, you can create a dynamic custom post type in WordPress and start using it to organize and display your content.
