You can import and export JetEngine’s Custom Fields(MetaBox), Custom Post Types, Taxonomies, Relations, and Custom Content Types. WP Ultimate CSV Importer supports all the fields created with the JetEngine plugin. You can import JetEngine Fields linked to the following post types:
Posts, Pages, Custom Posts, Users, WooCommerce, WP eCommerce, Categories, Tags, and Taxonomies.
Download the sample file below to know the value formats for JetEngine fields.
Try this CSV to test the import in WP Ultimate CSV Importer using our demo or trial(private instance).
Please note: Not just a CSV format, the plugin also supports various file types to import JetEngine fields like XML, Google Sheets, Dropbox, TSV, Excel, and Zip files.
JetEngine Fields you can import with WP Ultimate CSV Importer
WP Ultimate CSV Importer supports all the JetEngine plugin fields. We will update our plugin to support future JetEngine fields as well. So if you find that we have missing fields to add the import export support, please let us know at [email protected]. We value your feedback. Supported JetEngine Fields are:
- Text
- Date
- Time
- Datetime
- Textarea
- WYSIWYG
- Checkbox
- Switcher
- Iconpicker
- Media
- Gallery
- Radio
- Repeater
- Select
- Number
- Colorpicker
- Posts
- Html
How to Import Data to JetEngine Fields #
Step 1: Begin your import by uploading the prepared file
To start the import process, you need a file in CSV/XML/Excel or other format that includes post-type fields and values, plus the JetEngine fields and values.
Visit Ultimate CSV Importer in your WordPress dashboard. It will take you to the Import/Update section. Here, enter your import file, choosing any one source like desktop, ftp/sftp, url, or server.
Next, choose the post type where you assigned the JetEngine fields and click Continue.
Step 2: Map Import file headers to JetEngine fields
Use the drag-and-drop mode for easy field mapping or utilize the simple dropdown advanced mode to match the fields. Make sure to map the JetEngine widget fields. If you’ve added repeaters, you can see a separate widget for those fields. Map them too.
Provide the template name at the end of the page, and click Continue.
Step 3: Hit Import
Configure one media uploads option to handle the images import to WordPress, like using existing images if needed.
Set up the import settings provided in the Import Configuration settings. Learn why and what options to configure in the import settings.
Once all is set, just hit the Import button to send the file header values to the JetEngine fields.
Next, verify the imported records. Check the Import Log and summary file after import to view each record’s status.
Pro Tip
- Enable the option “Delete data from WordPress” from Settings > General Settings to import only the records present in your import file and delete all the records available in your WordPress.
How to Export JetEngine Fields
You can export your JetEngine Fields data associated with any post types. See the supported modules listed above, or reach out to us if you have any questions about the supported modules list.
Step 1: Choose a module to export JetEngine fields
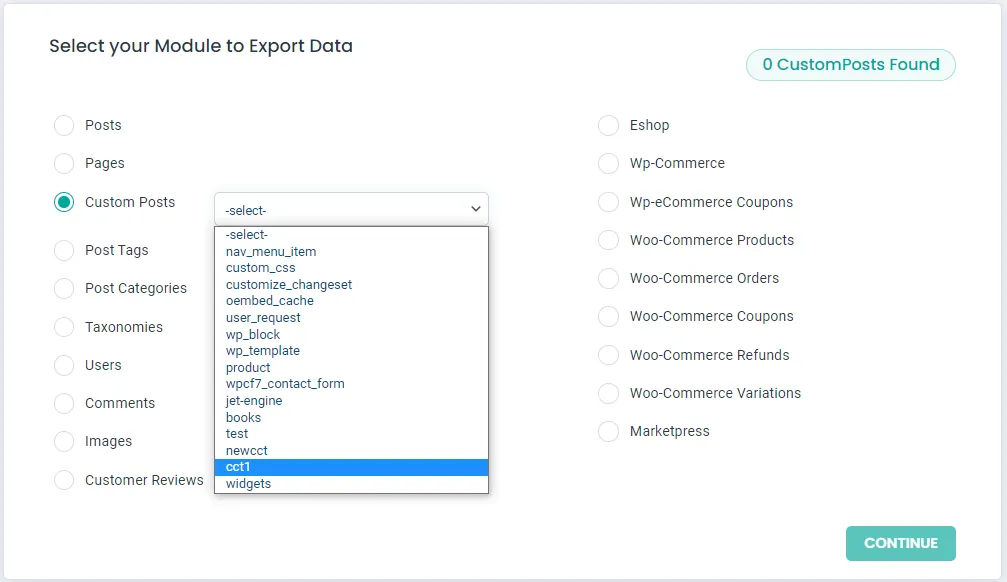
Visit the Plugin’s Export tab. This page will display modules to choose for export. Select any one module, that is, the post type where you’ve associated your JetEngine fields. For example, posts, pages, WooCommerce Products, or custom posts. For custom posts, choose a name from the dropdown.
After you choose a module, the importer will fetch and display the count of records available in that particular module or post type at the top right side of the screen.
Click Continue.
Step 2: Export File Settings
Start by providing a name for the export file inside the Export File Name field’s textbox. Add a name that is understandable to you. Example: Posts(1).
Choose one export file type. The plugin supports multiple types like CSV, XLS, XLSX, XML, JSON, and TSV.
If you want to export Jetengine fields to an Excel file, choose XLSX.
You can also export your JetEngine fields data to Google Sheets. For that, configure the Google OAuth client ID, secret, and URL inside the Google Sheets section under the Settings menu. Then, in the export settings page, just enable the option “Export CSV data to Google Sheets”.
Check the split records option and provide a number to split records during export, if you have bulk records.
Step 3: Export Advanced Filters
Apply the needed filters provided under the Advanced Filters section. You can use these filters to fiter out your export data. Below are a few common filters:
- Export data with auto delimiters – to export a CSV file with specific delimiters.
- Export CSV data to the Google Sheet – this will export the records to the configured email’s Google Sheet.
- Export data for the specific period – this is to export only the records created during that chosen period.
- Export data with the specific status – for example, choose publish to export only the published records in that post type.
- Export data by specific authors – To export records created only by the chosen author.
- Export data by specific post_id – Enter the post IDs.
- Export data by specific category – Choose the categories.
- And many more filters. Visit the WordPress export guide to know more about using filters during export.
Step 4: Export and Download your file
After you set up all, click Export and your export file will begin to ready. Once it is prepared, you will see a download button. Click on it and save the export file to your desktop.
How to Import JetEngine Custom Post Types #
Create custom post types with JetEngine and add meta fields inside them to store extra information. Prepare a file to import records to JetEngine CPT. It should contain post-related fields and JetEngine meta fields with values. Download the CSV file we’ve provided above to know the value formats of JetEngine Custom Fields.
Next, follow these steps to Import JetEngine Custom Post Types.
- Upload your prepared import file to the WP Ultimate CSV Importer plugin.
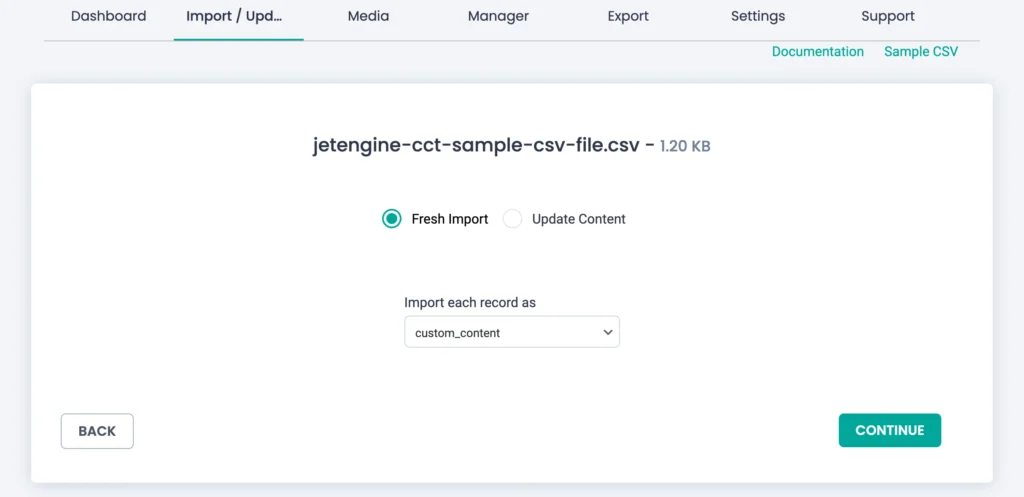
- Choose a post type(CPT name) from the dropdown and select an import type: Fresh Import or Update Content.
- Click Continue.
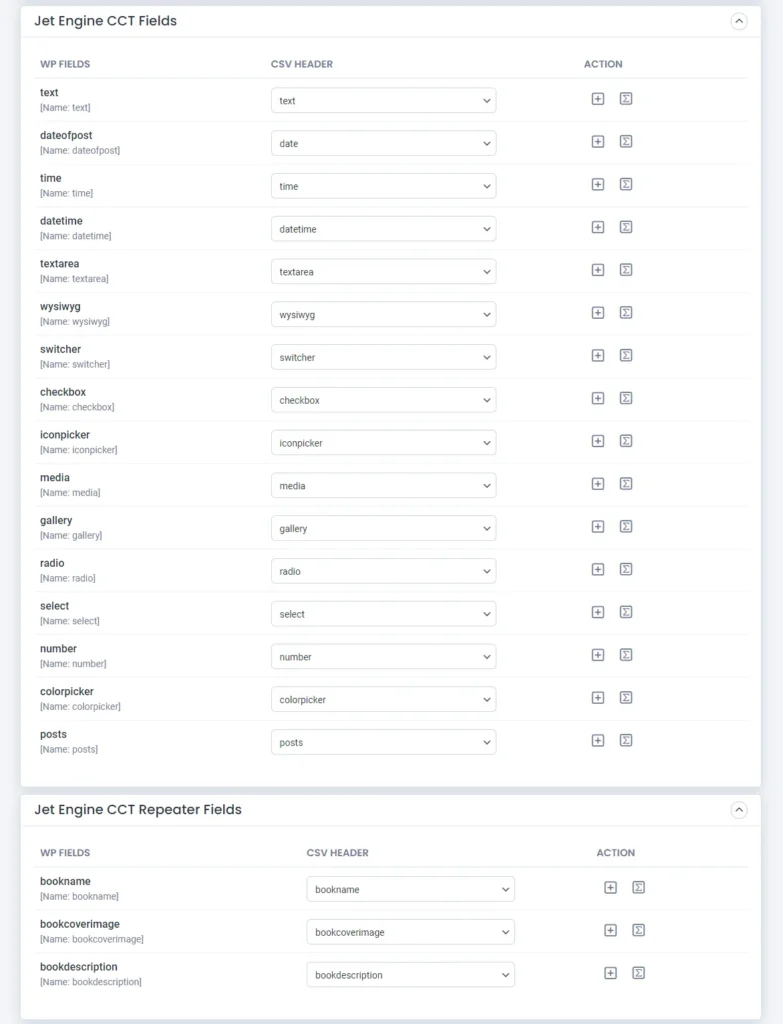
- Match your import file columns with the appropriate WP fields. Ensure to match fields inside the JetEngine CPT Fields widget(this displays all the meta fields created inside CPT to map them).
- Scroll to the end of the page to provide a unique name for the mapping template. Enter it and click Continue.
- Configure media settings by choosing an option, or let it be. Also, configure the essential import settings, like duplicate import handling or filter by category.
- Click Import. Your file data will be imported to the target Custom Post Type created with JetEngine.
Check out the detailed import steps of WP Ultimate CSV Importer.
How to Export JetEngine Custom Post Types
Exporting JetEngine Custom Post Types is as simple as exporting JetEngine custom fields.

- Visit the Export menu inside the WP Ultimate CSV Importer plugin.
- Choose Custom Posts as the module and from the dropdown select your JetEngine Custom Post Type name.
- The importer will fetch the count and show the record count in the right corner of the window.
- Click Continue.
- Provide a name for the file and pick an export file type. For example: Books-test as a file name and Excel(XLSX) as a file type.
- If you have bulk records, select split the records option to split and export records. This will ask for a number to configure. If you have added a number value ‘100’ for your 1200 records, the importer will split the files into 12, and each file will have 100 records. When you download, you will download a zip file containing all these records..
- Enable required export filters to extract only desired records from your JetEngine CPT.
- Click Export, and the file will be prepared to download.
- Click Download to save the exported JetEngine CPT records file to your local device.
You can also schedule the export. Refer to this guide for running a scheduled export.
Import JetEngine Repeater Fields
The CSV Importer plugin fully supports importing JetEngine’s repeater field type. To include repeater field values in your CSV or XML, or other file, use the pipeline (|) separator between values.
For instance, if you have two repeater fields:
- Author Name(a text field)
- Post Publish Date(a date field)
You should add two columns to your import file, one for the author names and the other for the post-publish date. Then list the repeater values using the pipeline as shown below:
Author Name – Jack|Harry|Clara
Post Publish Date – 2020-12-04|2020-12-31|2021-01-02
This format ensures that the repeater field data is properly imported into JetEngine. Follow the import steps explained above to import JetEngine Repeater Fields.
You can export JetEngine repeater fields along with any post type. Simply follow the export steps for JetEngine custom fields explained above.
Note that all the import and export steps are identical for every JetEngine import export, but very few configurations only change.
JetEngine Relations Import & Export
Relations in JetEngine let you build connections between post types. It is categorized in three ways: one-to-one, one-to-many, and many-to-many.
One-to-one relation
A one-to-one relation is used when you want to relate a single post from one post type to only one post from another post type. One post type acts as a child and the other acts as parent.
For example, Bus(B1, B2, B3) and Driver(D1, D2, D3) – Each bus will have unique drivers, and each driver can only drive one bus.
Post Title(B2) – Any required information
Slug – bus-and-drivers
Post Relation – D2
Download the JetEngine one-to-one relation sample file by clicking the link.
One-to-many Relations
This is used to relate a single post from one post type to be connected to multiple posts from another post.
For example, Sports (Football, Cricket) and Players(Lionel Messi, Cristiano Ronaldo, Neymar, Dhoni, Virat Kohli, Sachin Tendulkar). Each sport has many players, but no player can be in two sports.
Post Title(Football) – Your necessary info
Slug – sport-players
Post relation – LionelMessi,CristianoRonaldo,Neymar
Get the JetEngine one-to-many relation sample file.
Many-to-many Relations
The many-to-many relation is typically used to relate many posts from one post type to many different posts from another post types.
Ex: Sportshoes(Nike, Puma, Adidas) and Color(White,Green,Red) – Each Brand shoe will be in multiple colors, and each color can be available in multiple shoe brands.
Post Title(Adidas) – Your necessary info
Slug- shoe-color
Post relation – White,Green,Red
Simply click the JetEngine many-to-many relation sample file link to download and access it.
How to Import JetEngine Relations #
JetEngine refactored the relationship field from scratch. Inside the relation, you can create meta fields that can be assigned to parent or child relations or both. You can use CSV Importer to import data to the JetEngine Relations and their fields.
To import relations, include additional fields in your import file along with the existing field’s columns. One is to specify the relation post, and the others are relation meta fields.
First one, add the field ‘jet_related_post’ and give the related post ID as a value to relate the post from one post type with the post from another post type.
The above is applied to one-to-one relations. Sometimes, you may have to relate multiple posts from one post type to a post from another post type. Then this relation must be a ‘one-to-many’, or ‘many-to-many’ relation. For that, mention IDs in your import file separated with pipeline separator like below:
124|212|347
Secondly, in relations, you can create meta fields for each related post. If you want to add values to the meta fields created for the relations, specify the field headers and include appropriate values inside the import file. JetEngine supports 9 field types for the Relations. The field types are text, date, time, datetime, textarea, checkbox, media, radio, and select.
For multiple child posts relation, follow the meta fields value format in the sample file. Separate each value with commas.
Step 1: Prepare Your Import File
Create a file(CSV/Excel/other) with all the Relations fields and values. Make sure to include a field named jet_related_posts where you specify the child post IDs as values. Save the file and upload it to the CSV Importer plugin.

WP Ultimate CSV Importer Pro
Get Ultimate CSV/XML Importer to import data on WordPress faster, quicker and safer.
Step 2: Configure Post Type and Map Field Headers
Select the post type you need to import from the dropdown ‘import each record as’. Let the import type be ‘Fresh Import’ if you are only importing new records. Otherwise select ‘Update Content’ to update available records. Map the field headers from your CSV/XML/other type file to the corresponding WP Core and JetEngine fields to ensure accurate data import. Ensure to map all the fields inside the JetEngine Relations field.
Step 3: Run the Import and Verify Results
Click Import to begin the import. Once the import is completed, review the log to verify the status. Check each record to ensure all your field data are imported. Download the summary log shown in the Import Completed popup window, to identify records that wasn’t imported or failed to import. If necessary, reimport Relations data for missed records or update incorrect values.
Export JetEngine Relations
Exporting JetEngine Relations data is straightforward and similar to other data exports.
Step 1 – Select the Module you configured the relations
On the export page, choose the module you wish to export. For Custom Post Types (CPT) or Custom Content Types (CCT), select the ‘Custom Posts’ module option and then pick the CPT or CCT name from the dropdown. For taxonomies, choose ‘Taxonomies’ and select a taxonomy name from the dropdown.
Step 2: Set Export Options
Enter a name for the export file and select the desired file type (CSV, XML, etc.). Use advanced filters for more refined exports. Refer to our export documentation for details.
Step 3: Export and Download
Click Export to instantly generate the file. Download the exported file, which will include post relations data, relations metafields, and other associated fields. Meta fields and post-relation headers will also display the relation ID for easy reference.Exporting JetEngine Relations data is straightforward and similar to other data exports.
Import JetEngine Taxonomies
WP Ultimate CSV Importer enables you to import custom categories or taxonomies created with the JetEngine plugin, along with default field information.
Step 1: Prepare Your Import File
Create an import file containing all the necessary field information for the taxonomy you want to import. Ensure the file is correctly formatted and includes all required data.
Step 2: Upload and Map Fields
Upload your prepared file to the WP Ultimate CSV Importer. Select the taxonomy name. Click Continue and use the mapping interface to link the taxonomy fields in your import file to the corresponding WordPress and JetEngine fields.
Step 3: Launch the Import
Click Continue. Start the import process by clicking the Import button. Review the log to verify that the data has been successfully imported. Check your taxonomy directly to confirm that the terms have been added correctly.
How to Export JetEngine Taxonomies #
Step 1: Navigate to Export
Go to the CSV Importer plugin, then switch to the Export tab.
Step 2: Choose the Module
Select ‘Taxonomies’ from the module list and then choose the taxonomy name you created with the JetEngine plugin from the dropdown.
Step 3: Proceed with the Export
Click the Continue button to proceed. Configure file name, file type, and advanced filters, and click Export.
Step 4: Download the File
Once the export is complete, download the file to your local desktop. The file will include the JetEngine taxonomy fields and their values.
WP Ultimate CSV Importer Pro
Get Ultimate CSV/XML Importer to import data on WordPress faster, quicker and safer.
How to Update JetEngine Custom Fields, CPT, Relations, and Taxonomy #
Step 1: Modify Your CSV File
Make the necessary updates to your existing CSV file, especially for JetEngine Fields if needed.
Step 2: Upload the Updated File
Upload the modified CSV file to the importer.
Step 3: Choose Update Content
Select the Update Content option to update current data. Choose the relevant post type or taxonomy type from the ‘Import each record as’ dropdown.
Step 4: Map the Fields
Map the fields in the updated CSV to the corresponding JetEngine fields.
Step 5: Replace Old Data
Click the Update button on the next screen to replace the old JetEngine field data with the new data. Verify the log to confirm that the updates were successful on your WordPress website.
Custom Content Types data Import Export #
JetEngine Custom Content Types import/export helps make your website faster and also keeps your website convenient for users. With WP Ultimate CSV/XML Importer you can import and export Custom Content Types of JetEngine easily into and from your WordPress website. Below you will learn how to import and update CCT CSV/XML to WordPress, and how to export Custom Content Types data of JetEngine plugin from WordPress using the WP Ultimate CSV Importer plugin. If you want to learn more about CCT please refer to official JetEngine documentation.
Once you manually create a Custom Content Type and fields inside JetEngine, the next step is to add or import values into it.
Import/Update JetEngine Custom Content Types
Step 1: Prepare Your CSV/XML File
Ensure your CSV/XML file is ready with values for CCT fields. Refer to the sample file provided in the documentation for correctly formatting the values.
Step 2: Access the Importer
Navigate to your WordPress dashboard. Open the Ultimate CSV Importer Pro plugin.
Step 3: Upload Your File
Upload your CSV/XML file to any preferred location. Select ‘Fresh Import’ to import new CCT data. ‘Update Content’ to update existing CCT data.
Step 4: Choose JetEngine Custom Content Type
From the dropdown menu, select the JetEngine Custom Content Type you want to import or update. Click Continue.
Step 5: Map CSV Headers to WP Fields
Map the CSV headers with WordPress fields, ensuring you map all JetEngine CCT fields. Save the mapping under a name using ‘Save this mapping as’ for future use. Click Continue to proceed.
Step 6: Import or Update Data
For importing new CCT content, click the ‘Import’ button to complete the import process.
If you’re updating existing content, enable the ‘Do you want to handle duplicates for existing records?’ option. Select ID to identify the records to update. Click the ‘Update’ button to replace the old data with new values.
Export JetEngine Custom Content Types data
Step 1: Open the Export Tab
Go to the WP Ultimate CSV Importer plugin and select the Export tab.
Step 2: Select Custom Posts
Choose Custom Posts as the module. Select your JetEngine Custom Content Type from the dropdown menu.
Step 3: Configure Export Settings
Provide a file name for the export file. Select the file type (e.g., CSV, XML, etc.). Use advanced filters to refine the data for export, if necessary.
Step 4: Export Data
Click the Export button to start the export process. Download the exported file to your local desktop.
Step 5: Schedule Exports
If you want to automate exports, refer to the scheduling guide in the documentation for detailed instructions.
WP Ultimate CSV Importer Pro
Get Ultimate CSV/XML Importer to import data on WordPress faster, quicker and safer.
Related Articles
1. Troubleshooting FAQs for WP Ultimate CSV Importer
2. Import WooCommerce Products from a CSV File
3. Import Images into WordPress
4. How to Import Variable Products in WooCommerce using Single CSV File
Other Useful “How-to Videos”
JetEngine Meta Fields Import and Export
Import Export JetEngine Custom Taxonomy with Custom Fields
FAQs (Frequently Asked Questions) #
1. How do I export my JetEngine listing?
To export your JetEngine listing, you typically need to use the built-in export functionality provided by the JetEngine plugin. Here are the step-by-step instructions on how to do it:
- Access your WordPress Dashboard: Log in to your WordPress website where JetEngine is installed.
- Navigate to JetEngine Listings: Look for the “JetEngine” menu item in the WordPress dashboard. Hover over it, and then click on “Listings”.
- Select the Listing to Export: Choose the listing you want to export from the list of available listings.
- Export the Listing: Look for an option to export the listing. This could be in various formats such as CSV, XML, JSON, etc. The exact method may vary depending on the version of JetEngine you’re using and any additional plugins or extensions you have installed.
- Follow Prompts: Once you select the export option, follow any on-screen prompts or instructions to complete the export process.
- Download the Exported File: After the export process is complete, you’ll typically be given a link to download the exported file. Click on this link to download the file to your local computer.
- Verify the Exported File: Before you proceed, it’s a good idea to verify that the exported file contains all the data you need. You can open it using a text editor or spreadsheet software to ensure that the data is intact.
- Save the Exported File: Save the exported file to a safe location on your computer for future reference or for importing into another system if needed.
Remember, the exact steps may vary slightly depending on the version of JetEngine you’re using and any customizations you’ve made to your WordPress website.
2. How do I import taxonomy into WordPress?
To import taxonomy into WordPress, you typically have a few options depending on the complexity of your taxonomy structure and your technical expertise:
- Manual Entry: If you have a small number of taxonomy terms, you can manually enter them using the WordPress dashboard. Simply navigate to the “Posts” or “Custom Post Types” section, click on “Categories” or “Tags” (depending on the taxonomy you want to add), and then click on “Add New” to create individual terms.
- CSV Import: If you have a large number of taxonomy terms or want to import them from an external source, then install the WP Ultimate CSV Importer Pro plugin that supports importing taxonomy terms from CSV files. These plugins allow you to map CSV columns to taxonomy fields and import terms in bulk.
- Custom Script: For more advanced users, you can write a custom script using WordPress functions like wp_insert_term() to programmatically import taxonomy terms from an external source. This method requires some coding knowledge but provides more flexibility and control over the import process.
3. How do I export a WordPress listing?
To export a WordPress listing, you can follow these steps:
- Navigate to the Listings Section: Log in to your WordPress dashboard, and go to the section where your listings are managed. This could be a Custom Post Types import/export or managed by a specific plugin like JetEngine or another directory plugin.
- Select the Listings to Export: Choose the listings you want to export. You may have options to filter or select specific listings based on categories, tags, or other criteria.
- Export Listings: Look for an export option within your listings management interface. Depending on the plugin or method you’re using, this could be a built-in export feature or a third-party plugin that allows you to export listings to a CSV, XML, or JSON file format.
- Choose Export Format: Select the desired file format for your export. CSV is commonly used for exporting data that can be opened in spreadsheet applications like Excel. At the same time, XML and JSON are more suitable for structured data that may be imported into other systems or websites.
- Confirm and Export: Follow any on-screen prompts or instructions to confirm the export process. Once confirmed, the plugin or tool will generate the export file containing your listing data.
- Download Exported File: After the export process is complete, you’ll typically be provided with a download link or option to save the exported file to your computer.
4. How do I export taxonomy from WordPress?
You can export taxonomy from WordPress using plugins or custom scripts.
- Taxonomy Export Using Plugins: Install and activate the WP CSV importer pro plugin. Navigate to its settings, and select the taxonomies you want to export. Provide the file name and the file format. You can also export the file using an advanced filter. Then, initiate the export process to generate the export file.
5. Difference between JetEngine CPT and CCT?
Both Custom Post Types (CPTs) and Custom Content Types (CCTs) in JetEngine allow you to create custom data structures in WordPress. However, they differ in how they store and manage data, which directly impacts performance and flexibility.
Custom Post Types (CPTs)
CPTs are a core WordPress feature, storing their data within default WordPress database tables such as wp_posts and wp_postmeta. Each CPT item is saved in the wp_posts table, while its custom fields are stored in wp_postmeta. While CPTs are well-integrated with most plugins, they may not be ideal for large datasets. Since metadata is stored in a separate table (wp_postmeta), this can lead to database overload and performance issues when managing extensive amounts of data.
Custom Content Types (CCTs)
CCTs, on the other hand, are a JetEngine-specific feature. They create separate database tables for each CCT, storing each item and its associated data within a single row in that table. This approach enhances database performance and is better suited for handling large datasets with numerous custom fields.
6. How to Create Meta Fields in JetEngine?
To create meta fields,
- Navigate to JetEngine > Meta Fields and click Add New to create the new Meta Box.
- Provide a title and configure for which post type you want to associate the Meta Box with.
- Start to add fields by using the New Meta Field button under the Meta Fields section.
- At last, after adding the fields, click ‘Add Meta Box’ to apply the changes.
7. What JetEngine Fields are Supported in WP Ultimate CSV Importer?
WP Ultimate CSV Importer supports all the field types the JetEngine plugin offers. If you think we’ve missed something, or you need additional features, just reach out to us at [email protected] We’ll add that for you.