WP Ultimate CSV Importer Pro allows you to seamlessly import and export custom field suite (CFS) fields into WordPress. CFS provides an easy way to create custom fields for your posts, pages, custom post types, events, and event recurring. This step-by-step guide helps you import CFS fields using a CSV file with WP Ultimate CSV Importer Pro.
Requirements
Before proceeding, make sure you have:
- WP Ultimate CSV Importer Pro installed and activated on your WordPress site.
- The Custom Field Suite (CFS) WordPress plugin is installed and activated.
- A CSV file for CFS field import.
Step 1: Create CFS Data #
- First Download the free Custom Field Suite plugin from the WordPress plugin repository.
- To create new custom fields in CFS, navigate to the Settings menu and select Custom Field Suite.
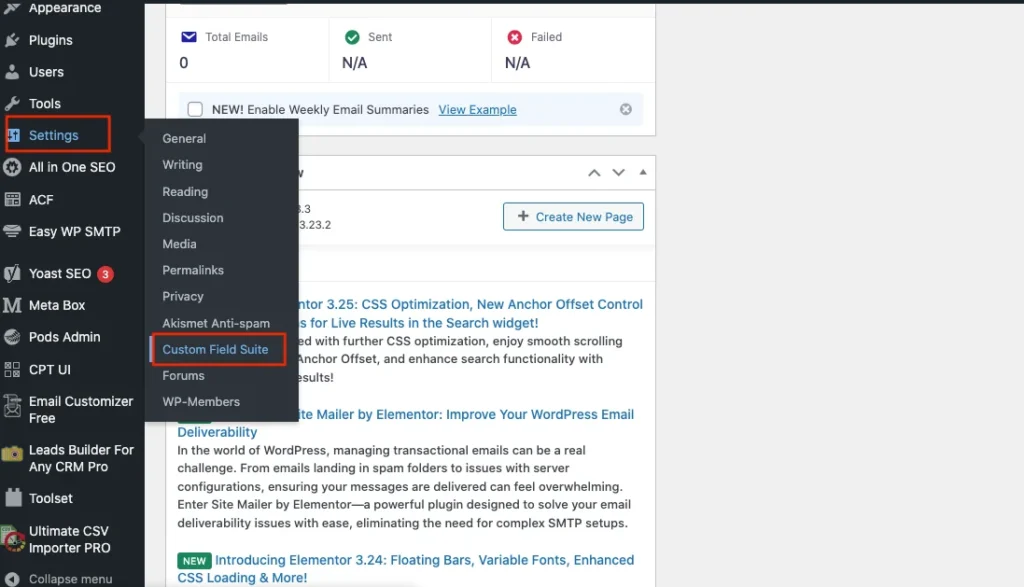
- Click on “Add New field group” at the top of the page.
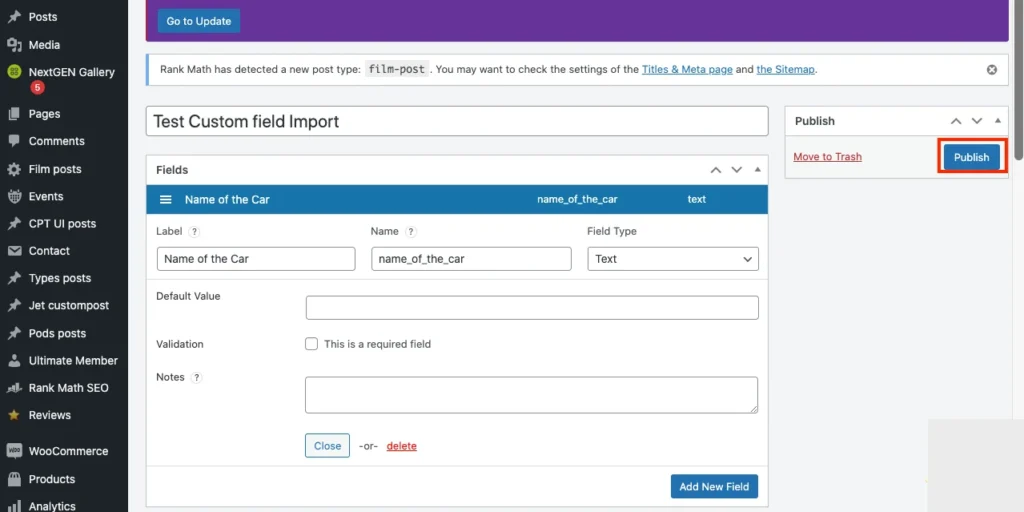
- Provide the post name, field label, and field name.
- Select the desired field type from the drop-down.
- Now click on ‘Add New field’.
- Click on Publish to add respective fields to the post/page.
Step 2: Prepare Your CSV File #
Your CSV file should have the following structure for successful import:
- Columns for Custom Fields: Each custom field created with the CFS plugin should have its column in the CSV. The column names should match the field names exactly (case-sensitive).
- Post ID or Title: Include a column with a unique identifier for each post (either Post ID or Post Title). This will help the importer associate the custom fields with the correct posts.
We offer sample CSV files for importing CFS fields. You can easily download it from here and test it on your trial instance to ensure a smooth integration process
Step 3: Import the CSV File #
- Navigate to the WordPress Dashboard > Plugins > Add New.
- Search for WP Ultimate CSV Importer Pro and install it.
- Once installed, click Activate.
- In your WordPress Dashboard, navigate to WP Ultimate CSV Importer Pro -> Import.
- Select Choose File and upload the CSV file containing your CFS data.

WP Ultimate CSV Importer Pro
Get Ultimate CSV/XML Importer to import data on WordPress faster, quicker and safer.
Step 4: Map Columns to Post Fields #
- After uploading your CSV file, choose the data type. That is posts, pages, or custom posts you need to import.
- For new data import, click on New Import.
- Map the appropriate WP core fields and the CSV fields with the advanced mode or drag-and-drop method.
- In the advanced mode, you can map the desired fields from the drop-down. In drag and drop mode, you can map the desired fields by dragging from the right-side menu and dropping it in the appropriate place.
- Map the ‘Post Title’ or ‘Post ID’ column to the appropriate WordPress field (usually the Post Title or Post ID).
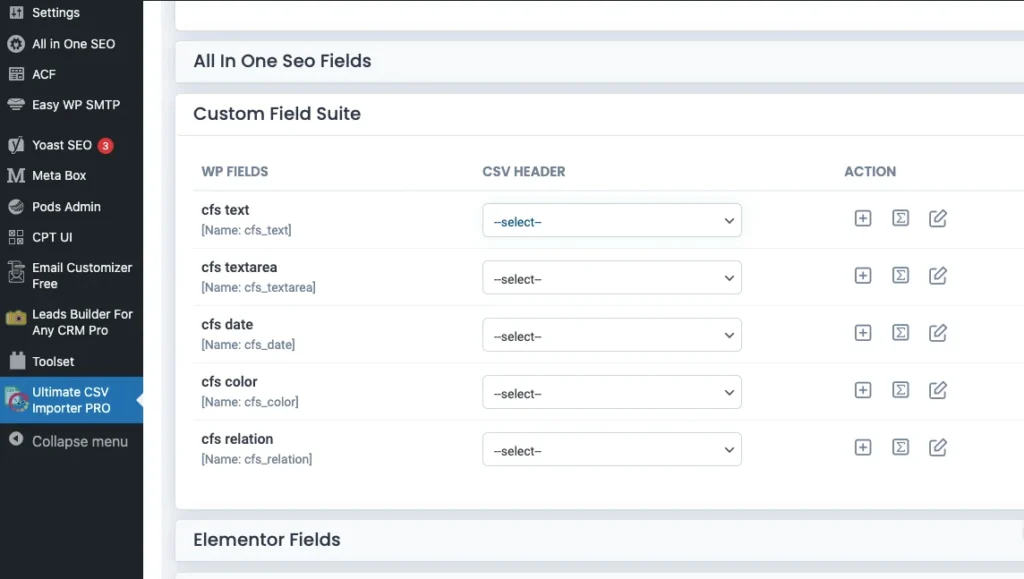
- On the Custom Field Suite section, Map each column corresponding to a CFS custom field to the relevant CFS field. The plugin will list all the custom fields available through the CFS plugin. You will need to map the columns from your CSV to the corresponding CFS fields. Ensure that the column headers in your CSV match the custom field names in CFS.
For Example:
- For a text field, select the appropriate CFS text field from the dropdown.
- For a date field, ensure the CFS field type is set to Date and the CSV data is formatted correctly (e.g., YYYY-MM-DD).
Step 5: Run the Import #
- Once all fields are mapped, click Continue to proceed to the next step.
- The import configuration window will be displayed. Configure the import settings based on your unique business needs.
- Click Run Import to begin importing your CSV data into WordPress. The CFS custom fields will be populated with the corresponding data from the CSV file.
- WP Ultimate CSV Importer Pro will display a summary of the import.
Step 6: Verify the Import #
- Once the import process is complete, go to the WordPress Dashboard and view the posts or pages you imported.
- Open each post to verify that the CFS custom fields have been populated correctly.
- If needed, you can make manual adjustments in the CFS field values.
Advanced Topics: #
Loop field import
The WP Ultimate CSV Importer Pro supports importing various Custom Field Suite (CFS) field types. Below is a list of supported CFS fields and instructions for importing them through a CSV file.
Loop Field Import
Loop Field allows users to create a set of repeating fields. This allows dynamic and flexible content creation, where each loop iteration can contain multiple sub-fields.
Importing Loop Fields
With WP Ultimate CSV Importer Pro, you can import the Loop Fields through a CSV file, where the values are correctly separated using the pipe (|) symbol for each iteration of the loop. Each value within a loop corresponds to a sub-field for each row in the loop, which can then be assigned to the respective posts or custom post types.
CFS Field Types and CSV Sample Values
Below are examples of how to structure your CSV data for various CFS field types:
Text Field
For Text Fields within a loop:
You can import multiple values in a single row, separated by a pipe symbol (|):
Text 1 | Text 2 | Text 3
This would create a loop with 3 iterations, each containing one of the text values (“Text 1”, “Text 2”, and “Text 3”).
Date Field
Similarly, if you have a Date sub-field in your Loop Field, you can import multiple dates as follows:
For Date Fields within a loop:
2024-12-12 | 2024-12-12 | 2024-12-12
This would create 3 loop items, each with the date 2024-12-12 as the value.
Hyperlink Field
For Hyperlink Fields, the format is as follows:
https://demo.smackcoders.com/wordpress/wp-admin/,test,_self
Here:
- The first value is the URL.
- The second value is the link text.
- The third value is the link target (_self, _blank, etc.).
Key Notes for CSV Import:
- Pipe-separated values (|) are used for Loop Fields and other multi-item fields (like Text, Date, Select, etc.).
- Ensure that any file-based fields (like File) include the correct file paths or URLs.
- For True/False fields, use 1 for True and 0 for False.
- Use post IDs, slugs, or titles to reference related posts when dealing with relationship fields or post-based data.
Update WordPress data with CFS fields
WP Ultimate CSV Importer lets you update the existing WordPress fields with the help of CFS custom fields.
The update step is the same as that of the import process. Follow the above import steps to update your existing WordPress data.
In Step 4, After uploading your CSV/XML file, click the Update Content option as the data import type. Select your desired post_type from the dropdown.
This plugin also lets you update the existing WordPress CFS fields. So while you’re in the import configuration section, enable the Do you want to update the records based on Fields? option and enter the Post_Title/ ID/Post_Name
Export Custom Field Suite (CFS) fields from WordPress
With WP ultimate CSV importer, you can also export CFS fields that are assigned to Posts, Pages, or Custom Posts data export. To export data,
- Navigate to the Export tab and select the post type that the CFS fields are assigned which can be Pages, Post
- Create the export file by mapping the desired WP fields and CSV fields.
- Provide the file name and select the file type you want to export.
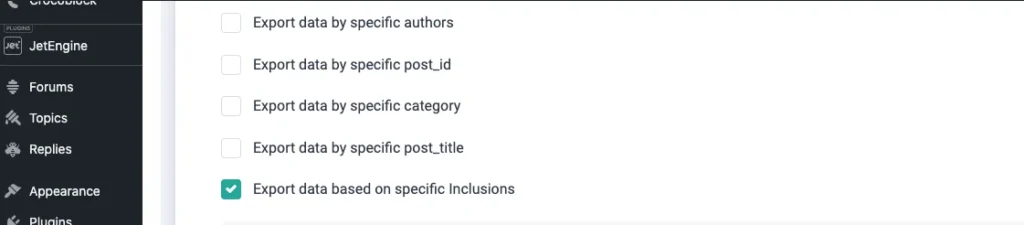
- With the advanced filters for exporting WordPress data, you can export specific CFS fields from your desired post by enabling the Export data from the specific inclusion and selecting the desired Custom field Suite you need to export.
- To know more about advanced filters, refer to our export data with CSV Importer documentation.
- Click Export.
- After the file is ready to export. Click ‘Download’ to save the backup to your local desktop.
WP Ultimate CSV Importer Pro
Get Ultimate CSV/XML Importer to import data on WordPress faster, quicker and safer.