Importing images into WordPress is simple with WP Ultimate CSV Importer. This guide is especially useful if you are planning to import images alone into your WordPress either from another website, or have large volumes of images as a zip file.
Prerequisites
Before import images into WordPress, make sure you have the following:
- A WordPress website with the WP Ultimate CSV Importer plugin installed.
- Enable the Cron entry on your website for seamless image import. Refer here to enable the Cron.
- Access to the media files you want to import (either on your local computer or accessible via a URL).
- Your CSV file contains the basic image details, URLs, or paths to be imported.
Import File From Desktop(Having images as a zip file) #
Step 1: Prepare Your Import File
Prepare a ZIP file containing all images and a CSV file with basic image details.
Your ZIP file may contain a single folder, more than one folder, or no folders at all, but with image files.
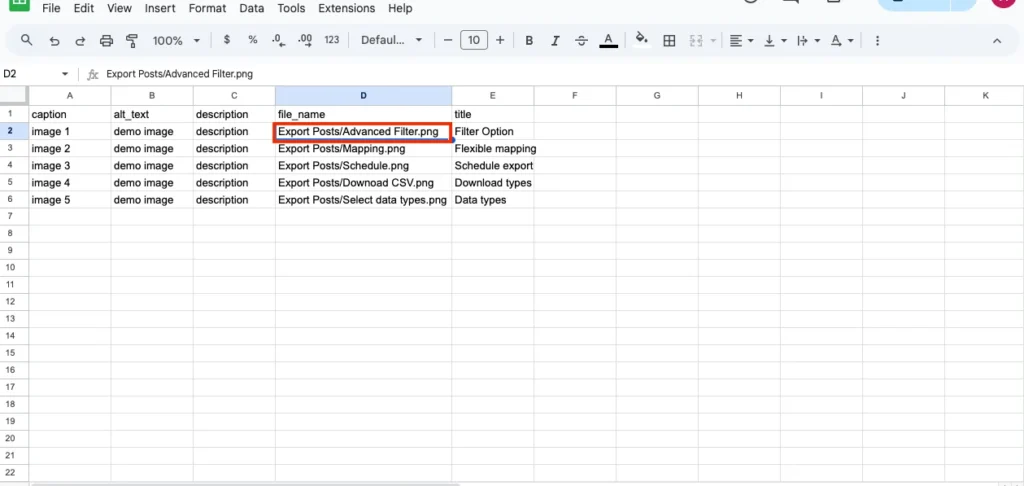
Prepare a CSV file with the image details such as File name, Title, Caption, Alt Text, and Description.
The ‘file name’ field in the CSV should be in formats like: Folder name of your Zip file/ image name with an extension like.png (or) just the image name with an image extension (if your zip file contains image files directly and within folders).
For Example, if your Zip folder name is Export Posts and the specific image name is Advanced Filter, then the file_name field value on your CSV for that particular image should be Export Posts/Advanced Filter.png. You can import images using an XML or CSV file.
Step 2: Upload Your Zip & CSV Files
- Navigate to the WP Ultimate CSV Importer in your WordPress dashboard.
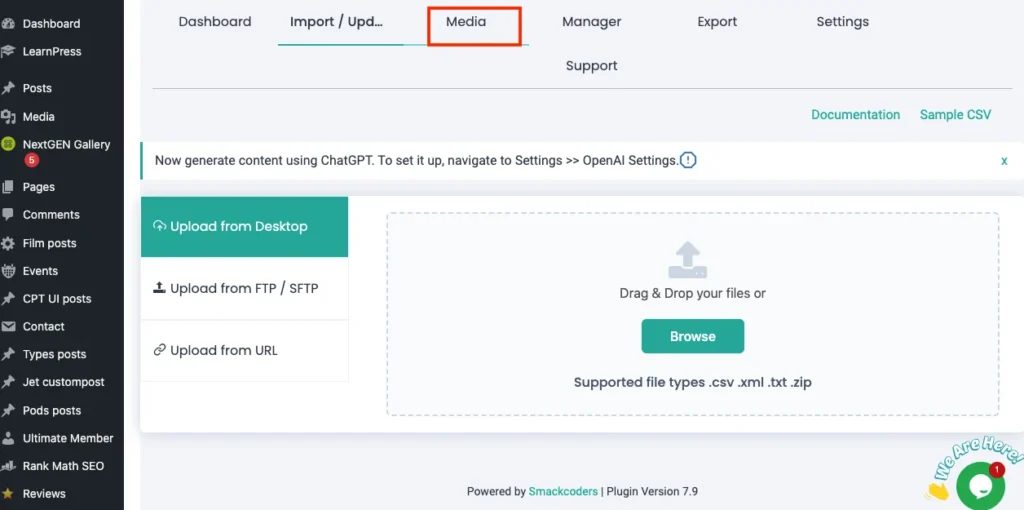
Click on the Media tab to open the media import wizard.
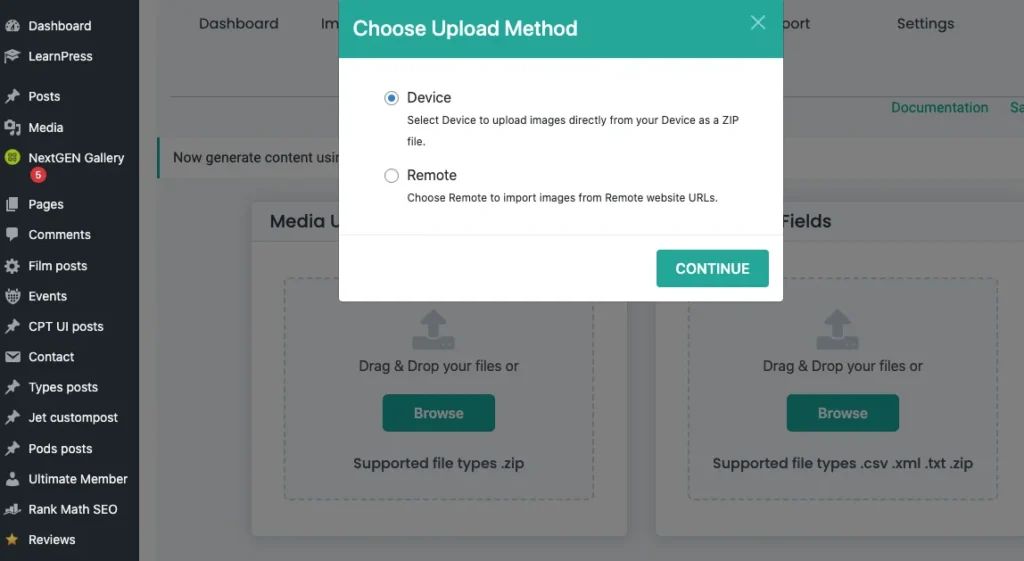
3. Choose the Upload method, as Device, as we are going to import media files from the Desktop. Then click on Continue.
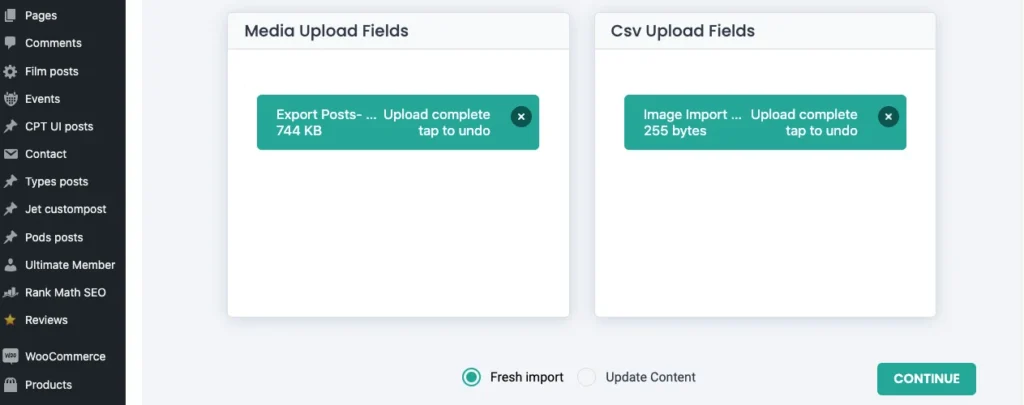
4. Upload the Zip file of the Images by clicking on the Browse button of the Media upload fields.
5. Once you upload your zip file, it will display all the image details contained in the Zip folder to select for import. Select all the images and click Ok. If you don’t want to upload any specific image to the Zip folder, then uncheck the checkbox corresponding to the desired image.
6. Next, upload your CSV file containing image details by clicking on the Browse button on the CSV upload fields area.
7. For a new import, click on the Fresh import icon.
8. To update the images, click on Update Content. Then click on Continue.
Step 3: Map Your CSV Field Headers
After uploading your zip and image files, the next step is to map the file field headers to the appropriate Media fields.
- If you have already done the image import, you can use the saved template or choose to create a new mapping.
- Map the field headers that contain the image fields of CSV, such as file_name, alt_text, title, caption, description, etc., with their appropriate Media fields in WordPress.
- In this Mapping step, find the column in your CSV that contains the image paths (e.g., FolderName/ImageName.png). Map this CSV column to the ‘File Name’ field in your WordPress mapping section.
- Save the import template with a name so it can be used later.
Step 4: Import Your Images
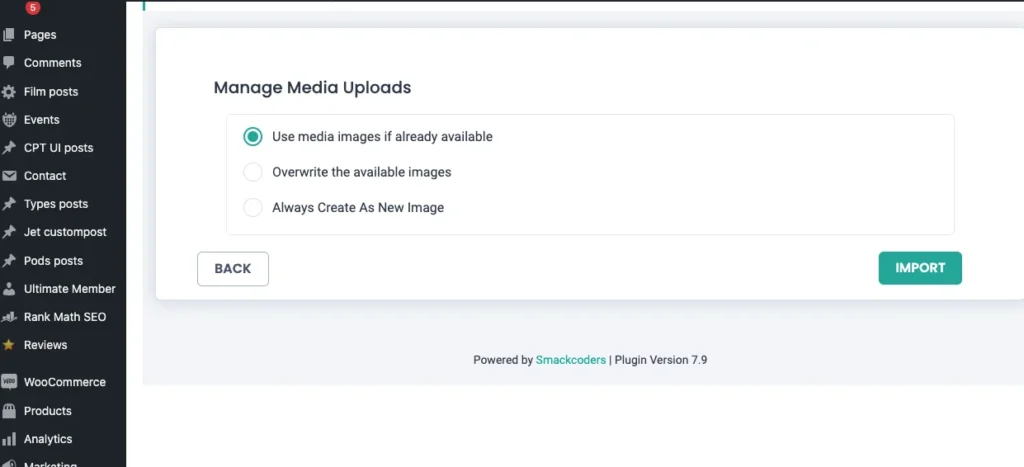
- Once you have mapped the image columns, continue to Manage media uploads. Choose one option from the below:
- Use media images if already available
- Overwrite the available images
- Always create new images
- Once done, you are ready to begin the import process. Now, Click on Import.
- Once the import is complete, you will see a summary of the import process, including the number of images successfully imported
Step 5: Verify the Import
After the import is complete, you can verify the success/failure statuses of the imported image by clicking on the View log or Import Summary buttons in the Import Completed message pop-up. You can verify the image import in your WordPress site directly by navigating to your Media Library and checking that the images have been uploaded correctly.

How to Import Images from URL #
The Import of images from URLs is similar to importing images from the desktop. However, here you only need the CSV file and not the ZIP file.
Prepare the CSV file with fields like title, caption, alt text, description, file name, and the actual URL field(mandatory field).
Note: The actual URL is the URL of your desired images that are hosted elsewhere or within your website. Ensure these images are publicly accessible.
Once you have prepared the CSV file, follow the steps below to import images from the URL.
- Navigate to WP Ultimate CSV Importer > Media section.
- Select the upload type as Remote, as we import images from the external URL.
- Browse and upload your CSV file containing all image URLs to import.
- Map the columns of the CSV headers with the appropriate image fields.
- Configure the import settings and click on the Import button to import images from external URLs into your media library.
- Verify that the images are imported into your Site’s Media library.
Troubleshooting #
- Image Not Displaying: Ensure that the URLs in your CSV or XML file are correct and publicly accessible.
- File Permissions: If you’re importing local images, make sure the file permissions on your server allow the plugin to access and upload the files.
- File Size: Large image files may be rejected depending on your hosting server’s file upload limits. Try increasing the upload_max_filesize and post_max_size in your server’s PHP configuration if necessary.
Additional Tips #
- If you’re importing a large number of images, consider splitting your import file into smaller chunks to avoid timeouts or errors.
By following these steps, you’ll be able to import images to your WordPress site with ease and ensure your content is complete with media.
Frequently Asked Questions #
1. How can I import featured images to WordPress Posts or Pages? But I also have images separately as a zip file
To import images as a zip file into WordPress and set it as your posts or pages featured image, you might need to do two imports.
1. Import images separately, following the “Import File From Desktop” method. Once imported, you will now get the image links from the media library.
2. Add those image links to the featured images fields of your prepared posts or pages CSV, XML, or Excel file. Then import following these import steps.
2. How to Import Posts with Featured Images?
With WP Ultimate CSV Importer, you can import featured images to bulk posts in a single import. Just follow these steps:
1. Prepare an import file(CSV/XML/Excel) with the necessary post fields along with featured images and their meta fields(title, caption, alt text, description, and file name).
2. Add your image links to the featured images field and complete preparing the import file.
3. Navigate to WP Ultimate CSV Importer > Import/Update.
4. Upload the prepared posts import file and configure the post type as posts and import type as ‘Fresh Import’ for importing new post records.
5. Match all the fields provided in your import file with the WordPress fields. Ensure to map featured images and the fields in the Featured images meta widget.
6. Next, configure the manage media uploads to handle how the images should be imported into WordPress like either as new images or to overwrite existing.
7. Hit Import. All your posts will be imported with featured images.
Related Guides #
How to Import, Update, and Schedule WordPress Data
Contact FAQs #
If you have any queries related to image import, need more information, or face any issues during media import, you can contact us at [email protected].