Managing Customers is essential for a WooCommerce store, especially if you are moving data from another platform, consolidating multiple stores, or simply bulk updating multiple customer records. This is where you need the help of the WP Ultimate CSV Importer plugin. It simplifies your bulk WooCommerce customers import, update, and export. This guide will walk you through the steps to import, export, and update WooCommerce Customers’ data in detail.
| Important: Free plugin now required for all Pro packages. Starting from CSV Importer Pro 8.15, CF Pro 8.3, and WPML Pro 6.2, the free WP Ultimate CSV Importer plugin must be installed and active on your site before any Pro package will work.If the free plugin is not detected, the Pro package will auto-deactivate and display a setup notice in your WordPress admin. |
Download the sample CSV file for WooCommerce customers and try the import in our trial instance.
Step 1: Start a New Import for WooCommerce Customers #
Before that, you need to prepare a file with WooCommerce Customer fields like username, password, first name, last name, email, url, role, biography, billing address, shipping address, etc.
Navigate to your WordPress dashboard. If you’ve installed WP Ultimate CSV Importer, locate the plugin from the menus on the left sidebar and click on it. In the Import/Update tab, upload your prepared WooCommerce customers file. On the next page, select WooCommerce Customer as the import post type from the dropdown. Above, leave the Fresh Import selected if you are importing new customer records or select Update Content to update existing customers’ data.
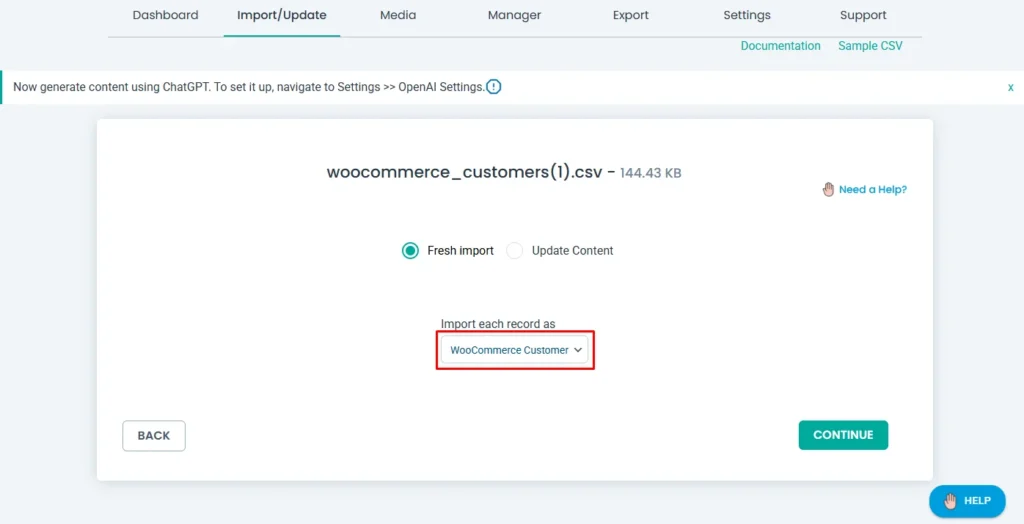
Click Continue to proceed.
Step 2: Mapping WooCommerce Customer Fields #
Next, map the fields in your CSV or XML file to the corresponding WooCommerce customer fields in WordPress. If the file headers match the WordPress fields, the plugin will auto-map them. Otherwise, you can manually map fields using the dropdown menu in Advanced mode or the drag-and-drop method in the Drag & Drop mode.
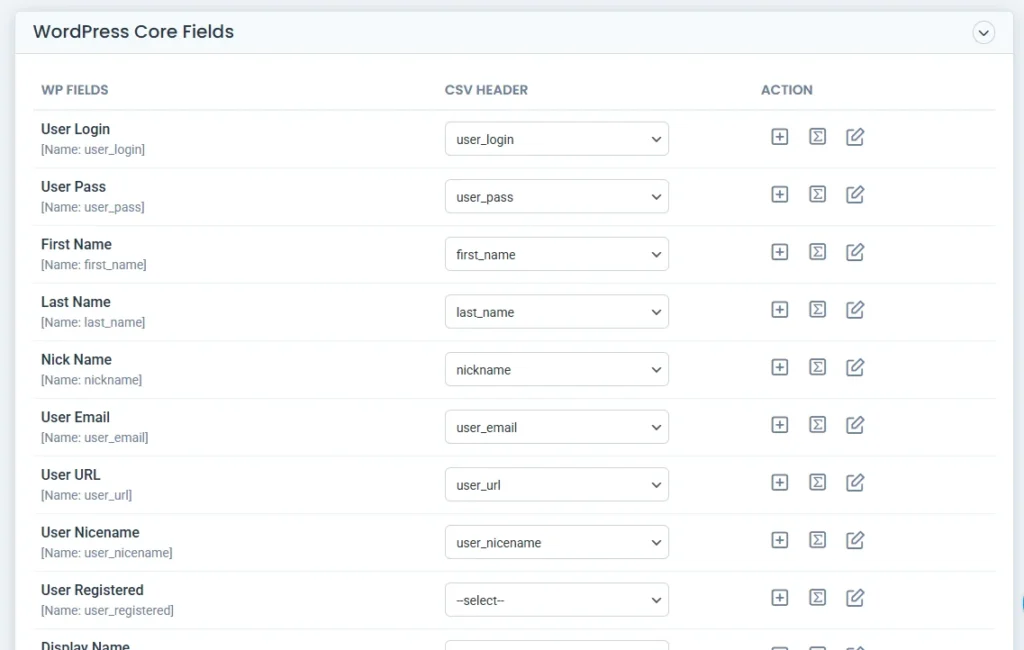
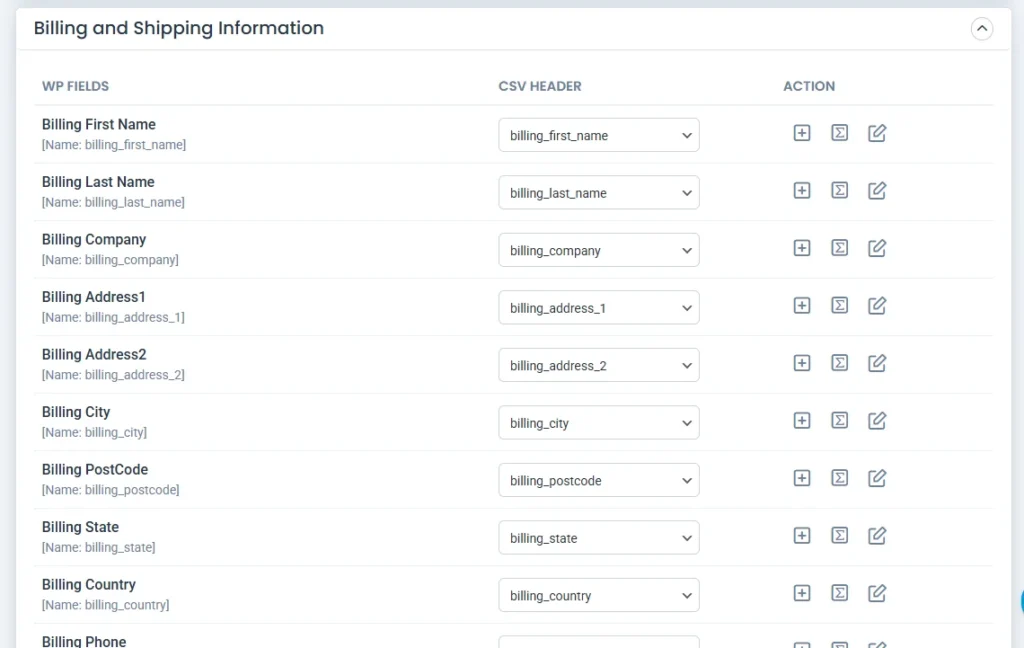
Ensure you’ve mapped all customer fields added in your import file, including the billing and shipping fields.
Once done, save the mapping as a template with a name inside the “Save this mapping as” textbox at the bottom of the page and click Continue.
Step 3: Import Settings Configuration #
Scroll down to the import configuration section, where you can configure important import settings such as rollback(for safe rollback to the previous step if issues occurred after import), maintenance mode(to notify users), and handle duplicates(choose a field here to handle duplicates based on it). The importer will prevent importing entries that already exist on your WordPress site.
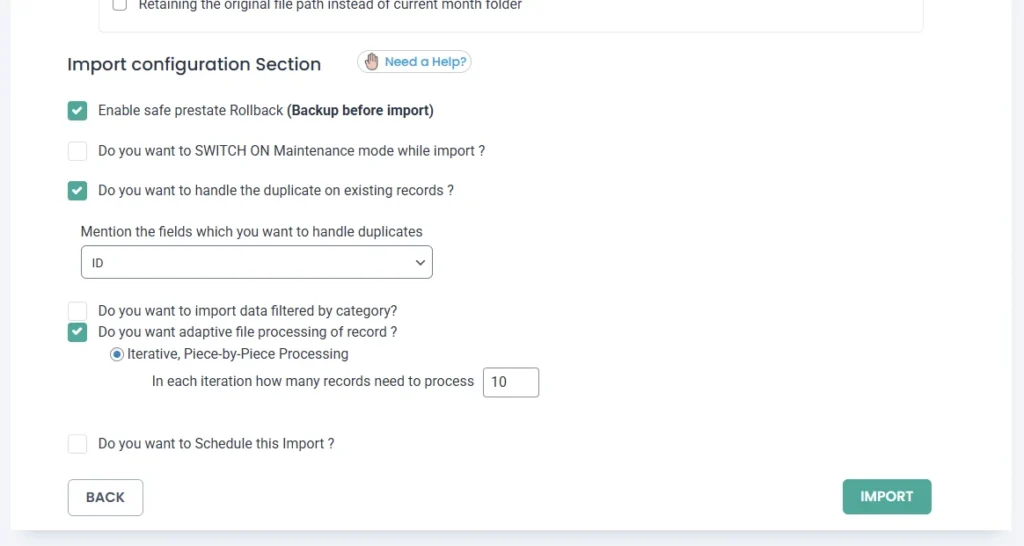
Enable the “adaptive file processing of record” to import bulk records in batches. This will avoid server timeouts during import.
Enable “Do you want to Schedule this Import?” to schedule the WooCommerce Customers import.
Now, click Import, and the plugin will begin importing all customer records into WooCommerce. The import process will take some minutes to complete.
Once the import is finished, a pop-up window will appear, prompting you to download the import log file to verify the status of each imported customer record.
Alternatively, you can check the WooCommerce > Customers page in your dashboard to view the imported records.
If you close the pop-up, you can check the status of each customer record import in the import log screen.
Export WooCommerce Customers Data #
To export customers from WooCommerce, select WooCommerce customers from the Export tab, specify a filename, and click Export. Follow the instructions below for detailed steps.
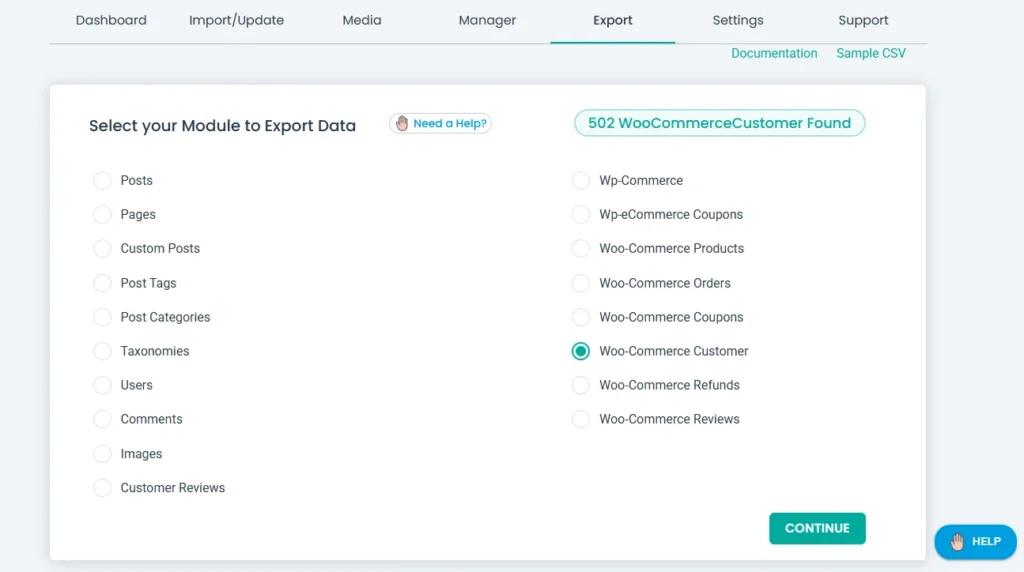
Step 1: Choose the WooCommerce Customers module to Export
Go to WP Ultimate CSV Importer > Export. This page will display all supported post types from WordPress to select for exporting. Click Woo-Commerce Customer from the list. The plugin will fetch and display the total count of WooCommerce Customers at the top right, as shown in the screenshot below.
Step 2: Configure Export File Settings
Click Continue. On the next page, start by providing a filename for the WooCommerce customers export. For example: Woo-Customer(24). You can provide any name you want.
From the multiple options of file type, choose one. The plugin supports CSV, XML, XLS, XLSX, TSV, and JSON formats to export the data.
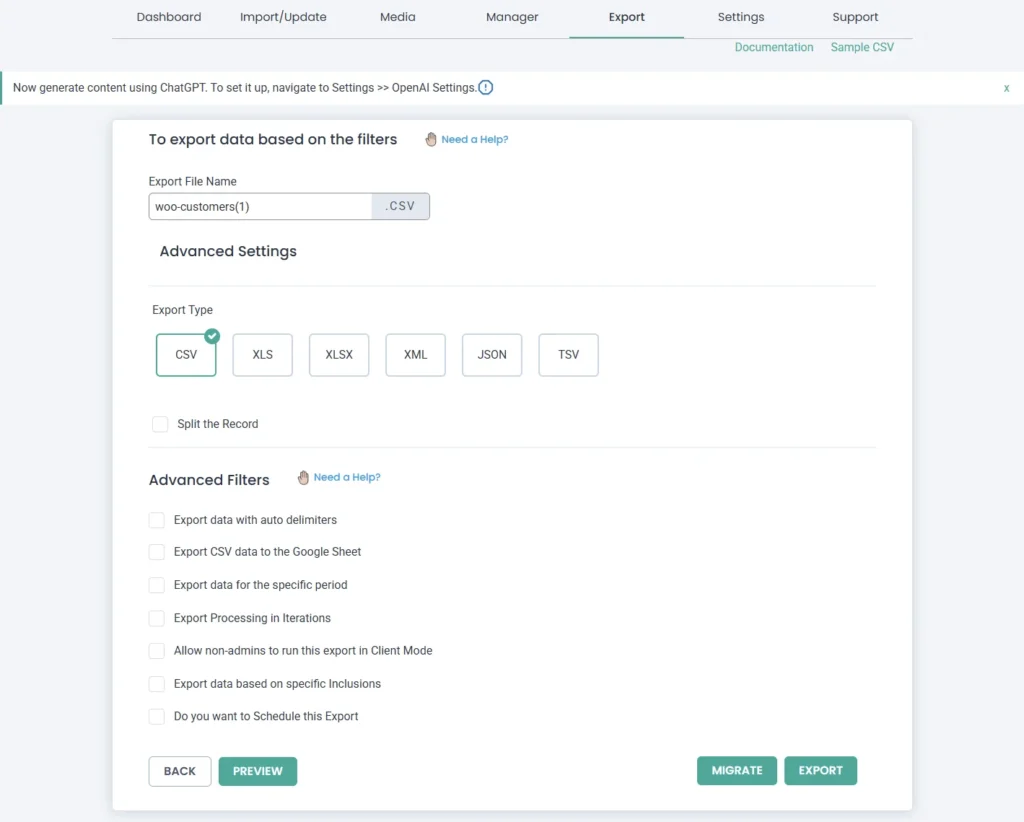
If you have a large dataset, enable the “Split the records” option to divide the WooCommerce Customers records into multiple files, which will be compressed into a ZIP file for easier handling.
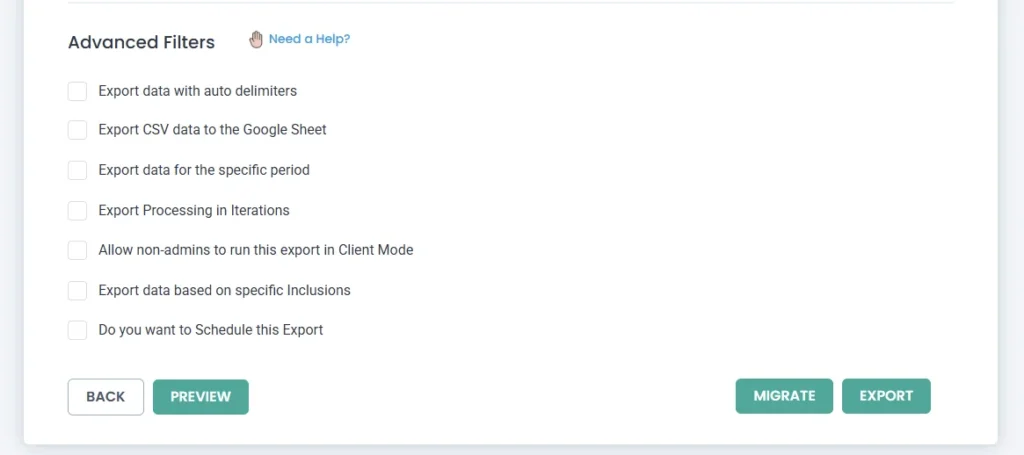
Step 3: Apply Advanced Filters to Export WooCommerce Customers
You can configure the advanced filters listed in this section to export only the WooCommerce Customers records you want. If you apply filters, the plugin will extract only the records that match your criteria. Below are some filters to apply for WooCommerce customers export:
- Export data with auto delimiters – Add a delimiter to include in your export file. This is useful especially for CSV format exports.
- Export CSV data to the Google Sheet – Enable it to export your WooCommerce customers’ data to Google Sheets. But you must configure the Google Sheets inside the Settings > Google Sheets with client ID, client secret, and redirect URL details.
- Export data for the specific period – Choose a from and to period here to export customer records created during that period.
- Export Processing in Iterations – Provide a numeric value to export records in batches to avoid server timeout issues. This is helpful, especially if you have bulk records.
- Allow non-admins to run this export in Client Mode – Enable it and select a user role to provide access for non-admins to export WooCommerce customers. Learn more about how to provide export access to non-admins here.
- Export data based on specific Inclusions – Select fields to export. The plugin will export only the data of selected fields.
- Do you want to schedule this Export – Enable it to schedule the WooCommerce customers export. Provide necessary details like schedule date, time, timezone, and frequency. Also, configure the FTP/SFTP hosting details to store your exported file. If you’ve configured Google Sheets, then your exported WooCommerce customers’ data will be stored there. Once configured, click Scheduled Export. The export will be scheduled. You can see all scheduled export events inside Scheduled Export under the Manager tab.
Step 4: Export WooCommerce Customers Data
Click Export to instantly generate the WooCommerce customer data file in your selected format. Once the file is generated, you’ll see a Download button. Click it to download the exported WooCommerce customers data file.
FAQs for WooCommerce Customers Import & Export #
1. How to Schedule WooCommerce Customer Imports?
You can schedule customer imports directly from the import configuration settings. Enable the “Do you want to schedule this import?” option. Configure the schedule time, date, frequency, and time zone. Before scheduling, make sure you have set up a cron job in WordPress. For detailed instructions, refer to this guide on how to enable and configure WP Cron Jobs.
2. WooCommerce Customers vs. Users Import
WooCommerce customers and WordPress users are related but have key differences:
WooCommerce Customers: Customers who have purchased from your store or registered via WooCommerce. Includes details such as billing/shipping addresses, order history, and account roles.
WordPress Users: Covers all user roles (Administrators, Editors, Authors, Contributors, and Subscribers), beyond just WooCommerce customers.
When importing:
Select WooCommerce Customer if importing store customers.
Select Users if importing other WordPress roles.
3. Can I import WooCommerce customers along with their past orders?
The WP Ultimate CSV Importer plugin allows you to import customer data, but orders are stored as a separate post type in WooCommerce. This means customer details and order history must be imported in two separate steps. You can first import customers, then use the WooCommerce orders import option to assign past orders to those customers using unique identifiers such as email address or user ID. This way, both customer profiles and their purchase history remain properly linked in WooCommerce.
4. What happens if my import file contains duplicate customer emails?
WooCommerce requires each customer’s email address to be unique. If your import file includes duplicates, the WP Ultimate CSV importer will handle them based on your selected Handle Duplicates setting. For example, you can choose to skip, update existing records, or insert as new entries. It is recommended to use the email or username field as the unique identifier during import to avoid conflicts and ensure accurate customer data in your store.