WP Ultimate CSV Importer Pro makes importing your taxonomies (categories and tags), and custom taxonomies into your WordPress site quick and easy. Not just importing categories, tags, and taxonomies, you can export them with the plugin. Follow the guide below to learn how to do them.
Understanding WordPress Categories, Tags, and Custom Taxonomies #
In WordPress, taxonomies are the terms used to organize content into groups based on common themes. The two main taxonomies are Categories and Tags.
- Categories: Used to organize content into broad, hierarchical topics.
For example, your Food blog can have categories like “Breakfast”, “Lunch”, “Dinner”, and “Desserts”.
You can divide the categories into multiple subcategories to organize your content further.
For example:
- Dinner (Parent category)
- Vegetarian (Subcategory)
- Vegan (Child subcategory)
- Vegetarian (Subcategory)
In this example, “Vegetarian” is a subcategory of “Dinner”, and “Vegan” is a child subcategory of “Vegetarian”.Tags: It describes more specific details about the content. For example, your recipe post for chocolate cake may have tags like “Chocolate”, “Cake”, “Dessert”, and “Baking”.
Custom Taxonomies in WordPress #
Custom taxonomies are taxonomies created using any plugins. For example, when you add WooCommerce to your WordPress website, it introduces its own custom taxonomies, such as:
- Product Categories (to group products like “Electronics”, “Furniture”, or “Clothing”)
- Product Tags (to describe specific features of products, such as “Sale”, “New Arrivals”, or “Discounted”)
- Product Attributes (for specifics like color, size, or brand)
Many plugins and themes can also create their custom taxonomies for specific purposes. For example, you can use a custom fields plugin like JetEngine to create custom taxonomies for travel blogs(CPT), like:
- Destination (for grouping posts about different places, e.g., “Paris”, “Tokyo”, “New York”)
- Travel Type (for categorizing posts about types of travel, e.g., “Adventure”, “Luxury”, “Budget”)
They might also use tags like “Solo Travel”, “Family Vacation”, or “Backpacking” to describe travel experiences in more detail.
In this way, taxonomies in WordPress help you keep your content organized and accessible for users, whether it’s through broad categories, specific tags, or custom taxonomies for unique content.
Now, let’s see how to import taxonomies like categories, tags, and custom taxonomies using WP Ultimate CSV Importer Pro.
Download the Sample CSV for categories and tags here.
Check the list of plugins we support for importing custom taxonomies here.
Note: You can import categories, tags, and custom taxonomies individually or along with any post types.
How to Import Categories, Tags, and Custom Taxonomies with WP Ultimate CSV Importer #
Step 1: Prepare Your Import File #
Before importing taxonomies into WordPress, first prepare the import file like a CSV with columns for categories like title, slug, description, and parent. For tags like title, slug, and description.
If you are importing taxonomies along with other post types, add columns like categories and tags. If custom taxonomies are used, add the custom taxonomy name in the import file and provides values; for multiples, separate with commas.
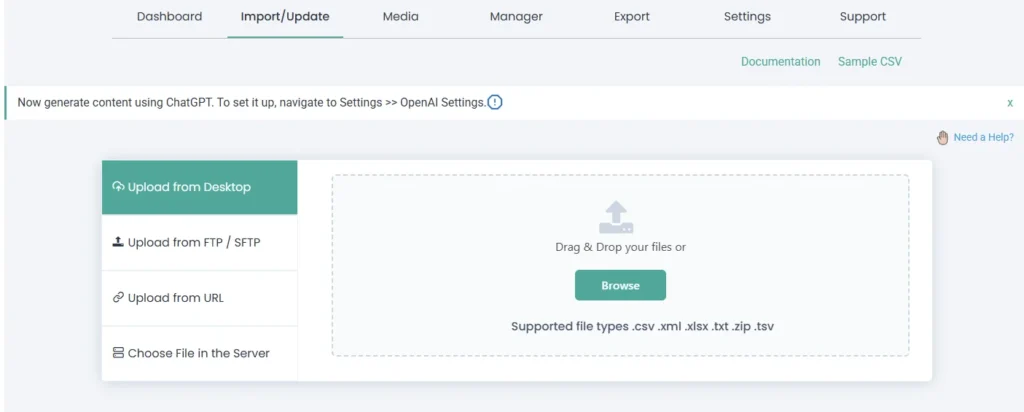
Step 2: Upload Your CSV File #
Make sure you have the WP Ultimate CSV Importer Pro plugin installed and activated on your WordPress site.
- Go to Ultimate CSV Importer > Import/update in your WordPress dashboard.
- Click on browse and select the import file you prepared. You can use other sources to upload the file too.
Step 3: Select Import Type #
In this step, you will choose what kind of content you’re importing. To import a new record, select ‘Fresh Import’. To update content, select ‘Update Content’. Select your Categories or Tags, or Taxonomies name from the dropdown to import:
- For Custom Taxonomies, select the specific custom taxonomy (e.g., product_category, portfolio_type, etc.) from the dropdown.
- Choose Categories if you’re importing WordPress default categories.
- Choose Post tags to import default tags to assign to posts.

Or if you import taxonomies with post types, choose their name from the dropdown, for example, posts.
Step 4: Map File Columns to Taxonomy Fields #
After uploading the file, you’ll need to map the columns in your import file to the corresponding WordPress taxonomy fields.
- Map the categories and tags fields inside the Terms and Taxonomies widget if importing with other post types.
- If importing individually, map fields like title, slug, description (and parent for categories).
- Map Custom Taxonomies: If importing custom taxonomies, map each CSV column to the appropriate custom taxonomy field.
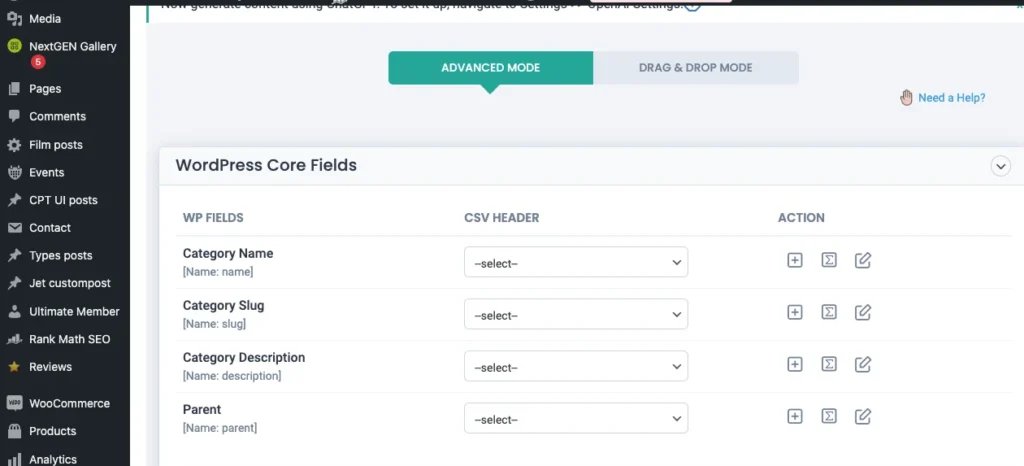
For example, if your CSV contains a “Product Categories” column, map that column to the custom taxonomy field for “Product Categories.”
Step 5: Configure Import Settings #
Hit the import button to import categories, tags, and taxonomies to WordPress.
If you are importing along with any post type:
- You can enable the rollback options, maintenance mode, and efficient duplicate handling of records based on your import needs.
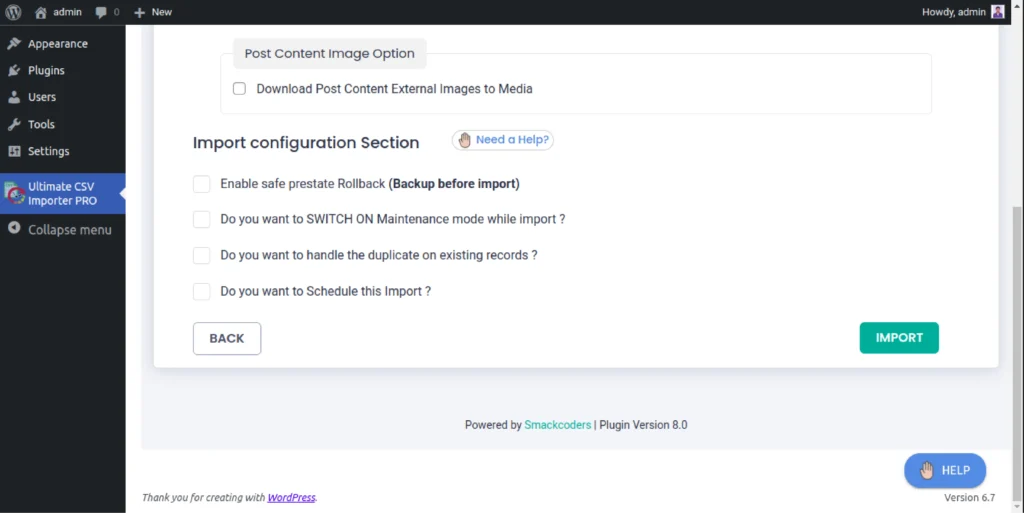
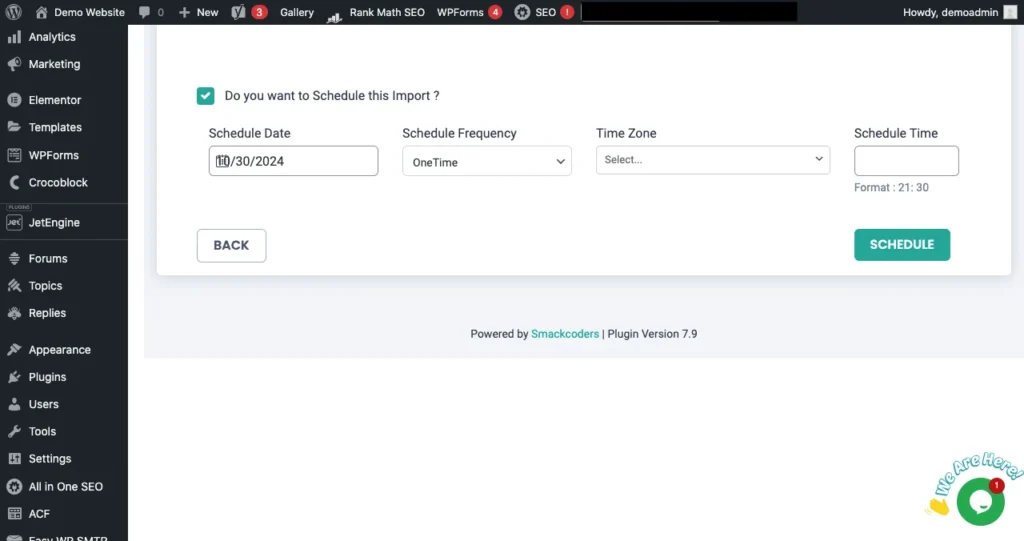
- Also, you can schedule your data import at your desired time by simply enabling the “Do you want to schedule import?” option. Then provide the desired time, date, time zone, etc, on which you need to import your records and click Schedule.
You can monitor the progress of the import, and once it’s complete, you’ll receive a summary of the imported categories and taxonomies.
Step 6: Review the Imported Data #
After the import is finished:
- Visit the posts, categories, tags, or custom taxonomies to verify the import.

WP Ultimate CSV Importer Pro
Get Ultimate CSV/XML Importer to import data on WordPress faster, quicker and safer.
How to Export WordPress Categories, Tags, and Custom Taxonomies? #
To export categories, tags, and custom taxonomies from WordPress:
- Navigate to WP Ultimate CSV Importer > Export.
- Choose the export module as:
- Post Categories for exporting post categories only.
- Post Tags for exporting tags.
- Taxonomies to export custom taxonomies. Choose the name of your taxonomy from the drop-down.
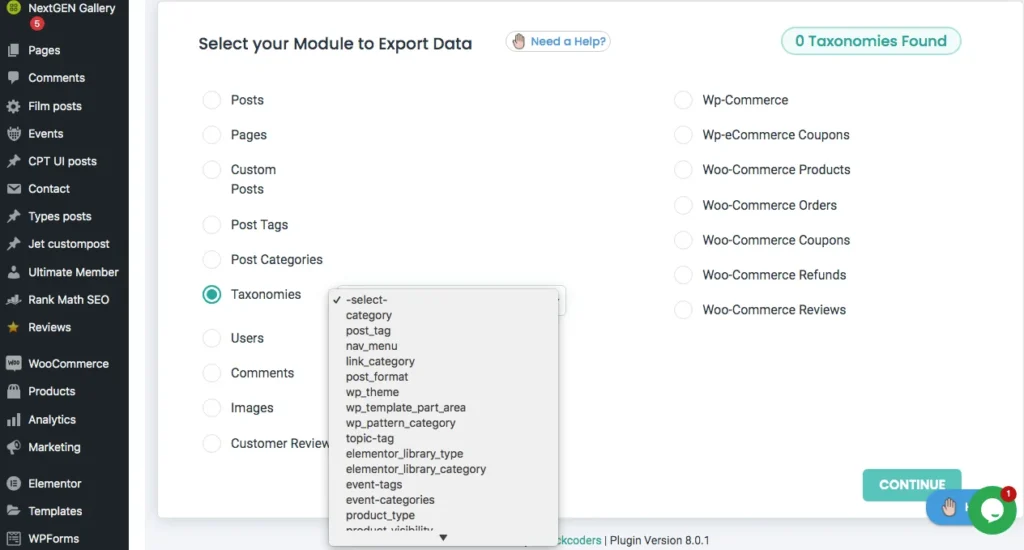
3. Click Continue and provide the file name and its file format type(Excel/CSV/ or type).
4. Use the advanced filter to export your data more specifically. That is, you can export only the selected taxonomies. Refer to know more about the export advanced filter here.
5. Run the export by clicking Export and next hit Download to download the file and save it to your local for further use or migration.
Topics to consider #
Hierarchical Taxonomy #
With WP Ultimate CSV importer, you can easily maintain structured and easily navigable websites by organizing WordPress posts and other content under specific categories. To efficiently handle this categorization in an import file, such as a CSV (Comma-Separated Values) file, you can follow a particular format that allows you to specify multiple categories and even nested categories for each post. Add this ‘>’ symbol between fields in your CSV(import file) for nested categories or tags. Below we have explained this.
Category Import with Post data #
In your CSV file, you would define a column for categorizing each post or product. You can then assign one or more categories to each product using commas to separate multiple categories. For products that belong to subcategories, you can use the “>” symbol to indicate the parent-child relationship.
1. Multiple Categories
If you want to import a post belonging to more than one category, you can separate the category names with a comma (,).
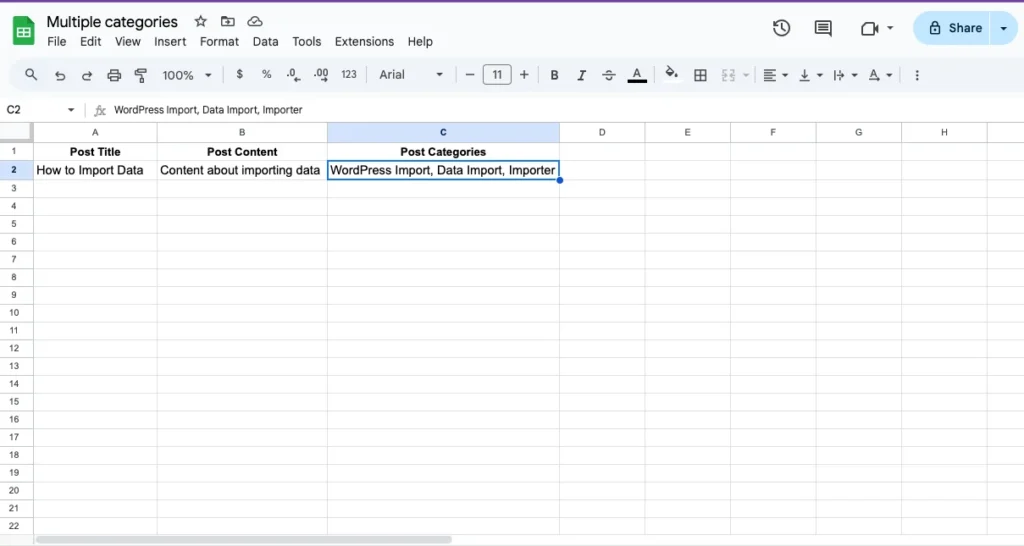
In this example, the post titled “How to Import Data” will be assigned to three categories: WordPress Import, Data Import, and Importer. The categories are separated by commas.
2. Nested Categories
Sometimes, you may want to organize your categories into a hierarchical structure, where one category is a subcategory of another. This can be achieved using the greater-than symbol (>). In this case, the category values will reflect the parent-child relationship.
For example, if you have a parent category called “WordPress Import” and a subcategory under it called “CSV Import,” you would format it as follows:
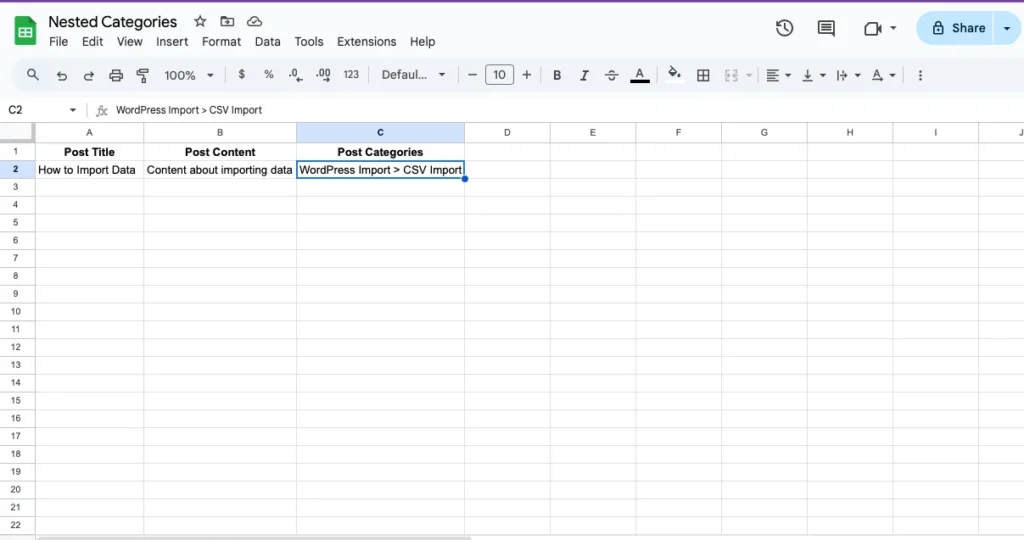
Here, the post is assigned to the “CSV Import” subcategory, which is nested under the parent category “WordPress Import.”
3. Multiple Nested Categories
In some cases, a post might belong to multiple categories, some of which are nested. To represent this, you would use a combination of the comma and greater-than symbols. Each nested category is indicated with the > symbol, and multiple categories are separated by commas.
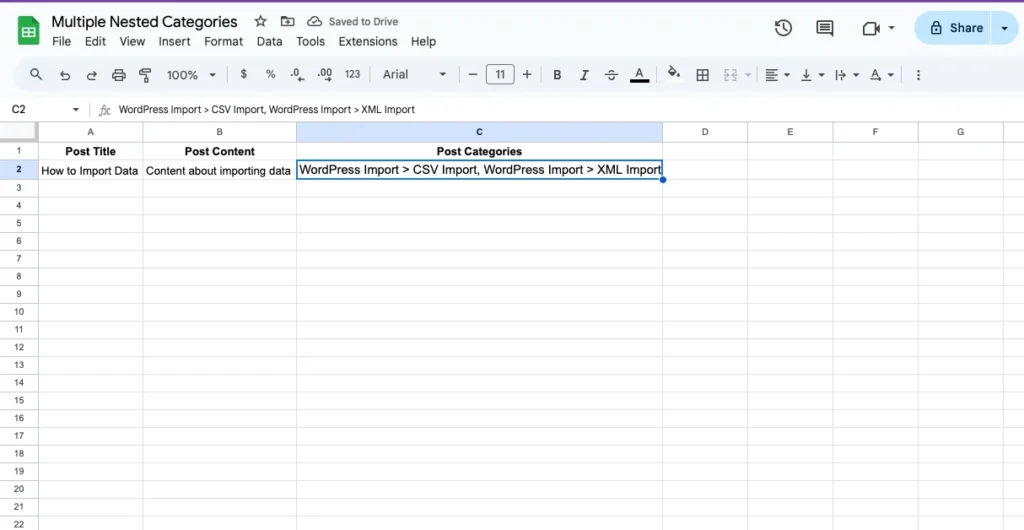
In this example, the post titled “How to Import Data” will be assigned to two categories:
- WordPress Import > CSV Import (which means the CSV Import subcategory under the WordPress Import parent category)
- WordPress Import > XML Import (which means the XML Import subcategory under the WordPress Import parent category)
The categories are separated by commas, while the > symbol is used to indicate that one category is nested under the other.
Frequently Asked Questions #
1. What is the Difference Between Categories and Tags? #
Categories and tags are both part of WordPress taxonomies, used to classify and organize posts. However, they serve different purposes:
– Categories are broader and more hierarchical. They help group posts into general sections (e.g., “News”, “Tutorials”, “Products”).
– Tags are more specific and used to describe the details of a post (e.g., “WordPress tips”, “SEO”, “Tutorial”).
2. How Do I Import Posts with Categories in WordPress? #
To import posts with categories:
1. Follow the import process of WordPress post import as usual.
2. In the Drag & Drop interface, find the Taxonomies, Categories, and Tags section. 3. Specify how you want to handle incoming categories and tags by mapping your CSV data to the appropriate fields.
3. Complete the import process.
4. Review the imported categories and tags to ensure accuracy.
3. How Do I Import Categories with a Hierarchy in WordPress? #
To import categories with a hierarchy, refer to the Hierarchical Taxonomy for Nested and Multiple categories import sections explained above.
4. How Do I Import Categories from CSV to WordPress or WooCommerce? #
To import categories from a CSV file:
1. Upload your CSV file.
2. WP Ultimate CSV Importer Pro will automatically detect the file type and adjust the interface accordingly.
3. Choose the Post type as WooCommerce Products and the import type as Fresh Import/Update Content based on your import needs.
4. Map the appropriate category fields in the CSV file to WordPress taxonomy fields.
5. Complete the import process.
6. The process is the same regardless of whether you are importing data to a standard WordPress site or a WooCommerce store.
5. How Do I Bulk Upload Categories? #
To bulk upload categories:
1. Follow the regular import process, but upload multiple categories in your CSV file.
2. WP Ultimate CSV Importer Pro will handle them as bulk uploads.
3. The bulk upload process is straightforward and doesn’t require any special steps other than ensuring that multiple categories are present in your CSV.
6. How Do I Import Tags into WordPress? #
To import tags:
1. Navigate to WP Ultimate CSV importer Pro> Import/Update and upload your CSV file.
2. Choose post tags as the import post type.
3. Map the incoming data elements(title, url, description) to the appropriate WordPress tags fields.
4. Run the import and check that the tags were correctly imported.
7. How Do I Migrate WordPress Categories or Tags to Another Website? #
To migrate categories or tags between WordPress sites:
1. Export the categories or tags from the source site with WP Ultimate CSV Importer.
2. Download the export bundle file, which includes both the data and mapping settings.
3. On the target site, use the import functionality to upload the bundle file.
4. Run the one-click import and verify that the categories or tags have been successfully transferred.
Learn more about migrating data with WP Ultimate CSV Importer in this guide.