Installation
- Extract the zip QuickBooks_SuiteCRM_Integration_local_encode.zip downloaded from your My Account page.
- Unzip Install.zip file inside the Install folder from your SuiteCRM root directory.
- Then, upload the qb_suitecrm.zip file inside the Import folder as you import your SuiteCRM modules.
Note:
- The module requires ionCube loader version 4.0 0r above.
- Licensed only for single domain.
Configuration
To configure QuickBooks with SuiteCRM, Choose All -> Suite QuickBooks Integration.
- If you are installing the package for the first time, you will be prompt to connect to QuickBooks. Click on the button to connect with your QuickBooks.
- Sign into your QuickBooks account and authorize to complete the connection.
Settings
Based on this Products, Contacts and Accounts information will be bidirectionally synchronized between your SuiteCRM and QuickBooks.
- Product Type – To sync Products, product type field is mandatory. If any of your existing product record has an empty product type, our tool checks the settings and sync the products based on the value you have chosen here. You can choose the desired value(either Inventory or Non Inventory or Service) from the drop down.
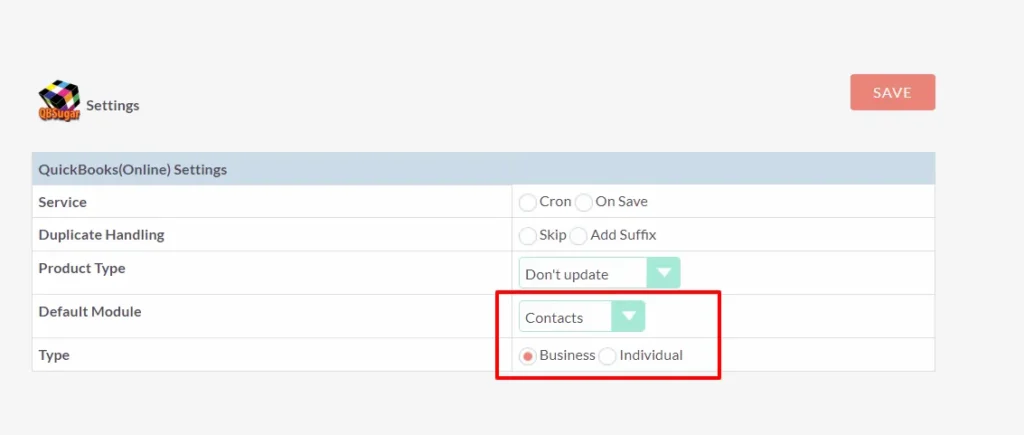
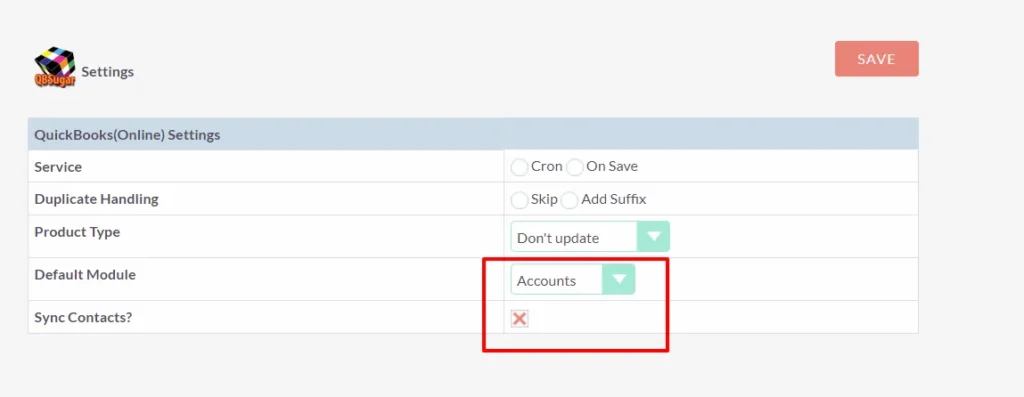
- Default Module – Based on these value, the Contacts and Accounts information will be synchronized between your SuiteCRM and QuickBooks. (Note: These values are configurable only once. After the initial configuration the values can’t be changed.)
- Contacts – If you’ve chosen Contacts in the dropdown, you can sync the contacts based on the two type in QuickBooks – Business and Individual.
- Business – If you’ve chosen business, you can sync the contacts and it’s related accounts to QuickBooks Business customers.
- Individual – If you’ve chosen as individual, you can sync the contacts in SuiteCRM to QuickBooks Individual Contacts and vice versa.
- Accounts – The information of Accounts module will synced as QuickBooks Business Customers from SuiteCRM and Vice versa. To sync contacts related to the accounts enable the Sync contacts checkbox.(If the account is related to multiple contacts, the contacts will not be sync.) Note: If you’ve chosen accounts, the values of QuickBooks Individual customer are not synced.
Features of QuickBooks SuiteCRM Integration
- Bidirectionally sync Contacts, Products, Quotes and Invoices between SuiteCRM and QuickBooks.
- Secured sync with QuickBooks API.
- Instant sync and schedule sync with Cron to keep your application updated with latest information.
- Sync all your records or send selective records from SuiteCRM to QuickBooks.
- Field mapping to relate QuickBooks field with their corresponding SuiteCRM.
- Save mapping as a template and customize when needed for Quote & Invoice.
- Log audit to completely track the record sync information.
- Queue to add the sync list to execute one after the other.
Limitations
- Bundled products can’t be synced from QuickBooks to SuiteCRM.
- Services in Invoice’s line item alone will be synced. The sync cannot be performed like other Products/Contacts, because there is no Service module in SuiteCRM.
Note
- Shipping tax in SuiteCRM will be added as Tax in QuickBooks.
- Deposit amount in QuickBooks cannot be synced back to SuiteCRM. Because there is no option to add deposit in SuiteCRM.
- Tax codes from QuickBooks can be synced to SuiteCRM. The previously added Tax codes in SuiteCRM will be disabled. Adding new tax codes in SuiteCRM will cause an error in calculation.
- If contact and Product is not related with Invoice, the Invoice will not be synced to QuickBooks
Module Sync Rules for QuickBooks Integration
To sync the Contacts, Invoices and Products the following rules and mandatory requirements need to be followed. The rules & mandatory information listed are the standards & limitations of QuickBooks.
Contact Module Requirements:
- The DisplayName, Title, GivenName, MiddleName, and FamilyName attributes do not have colon (:), tab (t), or newline (n) characters.
- The DisplayName attribute must be unique across all other customers, employee, and vendor objects.
- The PrimaryEmailAddress attribute must have (@) at sign and (.) dot.
- For Title, maximum 15 chars allowed.
- For GivenName, maximum 25 chars allowed.
- For Middle Name, maximum 25 chars allowed.
- For Family Name, maximum 25 chars allowed.
- For, Suffix maximum 10chars allowed.
- Company Name do not exceed 50 charts.
- Phones should have only numbers & should not exceed 21 characters.
Product Module Requirement:
- Name can have 100 characters at the maximum.
- SKU can have alpha numeric characters with maximum 100 chars.
- IncomeAccount in SuiteCRM is mandatory for Inventory and Service Item Type in QuickBooks
- ExpenseAccount in SuiteCRM is mandatory for Inventory, Non Inventory and Service Item type in QuickBooks.
- AssetAccount is mandatory in SuiteCRM.
Note:
If you have mapped the Account incorrectly then you will be receiving a error report from QuickBooks.
Invoice Module Requirement:
- An Invoice must have at least one Line either for a sales item or inline subtotal.
- An Invoice must have Customer populated.
- Invoice must be related with Products and Customer.
- If you haven’t mentioned ShipAddr, BillAddr, or both then the appropriate customer address from the referenced Customer object is used to fill those values.
Work flow & Log for QuickBooks Integration
SuiteCRM and QuickBooks field mapping
After connecting your SuiteCRM with QuickBooks, the fields of SuiteCRM need to be mapped with their corresponding QuickBooks fields. Choose the Field Mapping menu in the left sidebar.
- Select the module you want to sync, all the modules that you are going to sync should be mapped individually.
- QuickBooks SuiteCRM enables to sync all or chosen records from SuiteCRM to QuickBooks.
- You can choose all to sync all the records in the SuiteCRM to QuickBooks.
- If you want to sync selective records choose Enable QB Sync. To mention the records you wan to sync, in the edit view of the record under LBL_SUGARQUICKBOOKS section check on LBL_ADD_TO_QB
- In the map fields section, relate the fields of SuiteCRM with the QuickBooks fields.
QuickBooks SuiteCRM Integration Sync
QuickBooks SuiteCRM Integration enables to sync the records both manually and automatically. To start the sync, go to Control Panel menu in the sidebar.
- Click on the Sync button to start the sync immediately.
- Click on Queue to schedule the sync to run at non peak hours.
- The schedule is performed with CRON and it has to be enabled. To enable Cron do the following

2. The scheduled record sync are listed under Queue menu in the sidebar
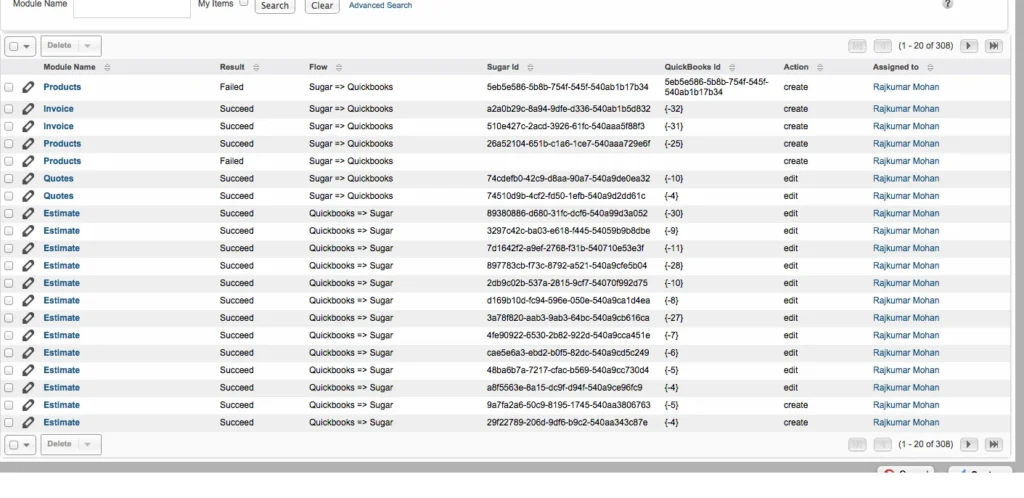
- The sync information are listed in the Sync Result table.
Detailed Log
The Log section gives you the information of successful and failure record sync. You can have a quick look at the sync information and never lose any import record.
Video Tutorials for QuickBooks Integration
Contact and Product Sync
Get to know how to sync Contacts and products infromation between SuiteCRM and QuickBooks Integration.