Table of Contents
SuiteCRM is a popular open-source customer relationship management (CRM) software. Its main features include sales force automation, marketing campaigns, support cases, and calendaring. In this blog, we will see the step-by-step instructions for SuiteCRM installation.
SuiteCRM is free
SuiteCRM is released under the Affero General Public License (AGPL). It means that it is free to download and use. But, if you make any changes to the code, you must share these changes with the community.
Suppose you’re looking for an easy-to-use CRM system with plenty of features. Then SuiteCRM could be a good option.
SuiteCRM offers free versions of its software. However, the paid versions have some different features.
Why choose SuiteCRM?
- It provides a 360-degree view to know all about your customer
- It acts as a central repository and gives key insights into your customer data to improve the business relationship
- It provides complete freedom to customize your CRM as it is Open-source.
- It provides an open Rest API that allows you to integrate with the core business. With this, you can collaborate across boundaries.
We will explain the following steps in this guide
- 1. How to install the SuiteCRM latest version
- 2. How-to tips for using SuiteCRM
How to Install SuiteCRM? And What are SuiteCRM Requirements?
To install SuiteCRM, you will need to meet the minimum system requirements.
SuiteCRM system requirements are as follows
– A web server with PHP 5.4 or later installed
– A database server like MySQL, MariaDB, or SuiteCRM PostgreSQL
– The Apache mod_rewrite module enabled
– Apache – 2.2, 2.4
Other Requirements
- PHP
- JSON
- XML Parsing
- MB Strings Module
- Writable SugarCRM Configuration File (config.php)
- Writeable Custom Directory
- Writable Modules Sub-Directories and Files
- Writable Upload Directory
- Writable Data Sub-Directories
- Writable Cache Sub-Directories
- PHP Memory Limit (at least 128M)
- ZLIB Compression Module
- ZIP Handling Module
- PCRE Library
- IMAP Module
- cURL Module
- Upload File Size( Minimum 10 MB)
- Sprite Support
If these requirements are satisfied, you can proceed with the next step. What is that?
Before downloading SuiteCRM in Windows, it is important to install WAMP or XAMPP.
Reason to install WAMP or XAMPP
To test your site on the local server before publishing it to the real server is the most important thing. In order to do so, installing the WAMP and XAMPP is good practice.
This local web server frees you from learning and remembering the toughest coding and commands of PHP, MySQL, and more. You have to run the control panel of that web server. And that’s it . Using the control panel you can manage all the inclusive components. For the beginners, it is important to understand the significance of WAMP and XAMPP.
WAMP is a significantly used platform specifically designed only for Windows users. However, XAMPP is also having equal functionality as WAMP. It can be used for Windows, LINUX, and Mac OS as well. You can choose any platform depending on your objectives.
Have you complete installing WAMP or XAMPP?
Then what next? Are you ready to install SuiteCRM? Before installing SuiteCRM make a check over the pre-installation requirements of your system. This was explained above in this guide. Verify whether you have an updated version of PHP. Also check the XAMPP version and PHP version are mutually oriented. Come on. Let’s begin
The XAMPP installation was completed successfully. Then what next? Are you ready to install SuiteCRM? Before installing SuiteCRM make a check over the pre-installation requirements of your system.
This was explained above in this guide. Verify whether you have an updated version of PHP. Also check the XAMPP version and PHP version are mutually oriented. Come on, Let’s begin.
How to install SuiteCRM on Windows
Follow the below steps to download and install SuiteCRM 8 installation.
Step 1
After installing XAMPP or WAMP, you can download the latest version of SuiteCRM (https://suitecrm.com/download/) from the official website.
Be sure to choose the “Community Edition” option.
Register with the SuiteCRM and download the SuiteCRM Zip File
(You can Proceed to Login if you are an existing User)
Step 2
You can find the Zip folder in your “Downloads”.
Once you download the zip file, unzip or extract the file
Step 3
And Copy all the extracted files of SuiteCRM.
Step 4
Then Go to the XAMPP folder (from the location where you have downloaded the XAMPP).
Step 5
Click on the xampp file. There you can find a folder called htdocs. Go through the folder.
Step 6
On the htdocs folder, you should create a new folder as SuiteCRM
Paste all the files that you copied before(i.e all the extracted SuiteCRM files) into this new folder
Step 7
Now open the XAMPP control panel
Step 8
Click “Start” on the corresponding Apache and MySQL
Step 9
Wait until the number for PID(s) and port appear(i.e the status of Apache and MySQL turns green)
Then minimize the control panel screen.
Note
Don’t forget to run the XAMPP control panel. Unless the SuiteCRM can’t be installed.
Now you have minimized your XAMPP control panel screen. Right?
Then Open your web browser
Go to the address bar and enter localhost/SuiteCRM.(SuiteCRM is the name of the folder where we paste the extracted files of SuiteCRM)
Or you can enter localhost/SuiteCRM/install.php
Then you need to change the ownership of the SuiteCRM directory to Apache users and groups.
The operating system decides the features of the system user. That is, the system user of your web server varies depending on your operating system. The commonly used web server includes:
– Apache(Linux/Apache)
– IUSR_ComputerName(Windows/IIS)
If you are using Linux, then set the below-mentioned permission on your SuiteCRM directory:
custom modules themes data upload config_override.php. ( To make your folder writable 775 is used)
sudo chown -R www-data:www-data
sudo chmod -R 755
sudo chmod -R 755 cache
Now you have completed the downloading process of SuiteCRM. Next, we will learn the SuiteCRM 8 installation guide(SuiteCRM’s latest version)
Installation Process of SuiteCRM
The local host/SuiteCRM redirects you to the installation page.
Otherwise, you can open your browser and then go to SuiteCRM.
SuiteCRM redirects you to the installation page if you have already installed the file.
(If you are new to installing the SuiteCRM, then it redirects you to the Login page)
Follow the below steps for SuiteCRM installation:
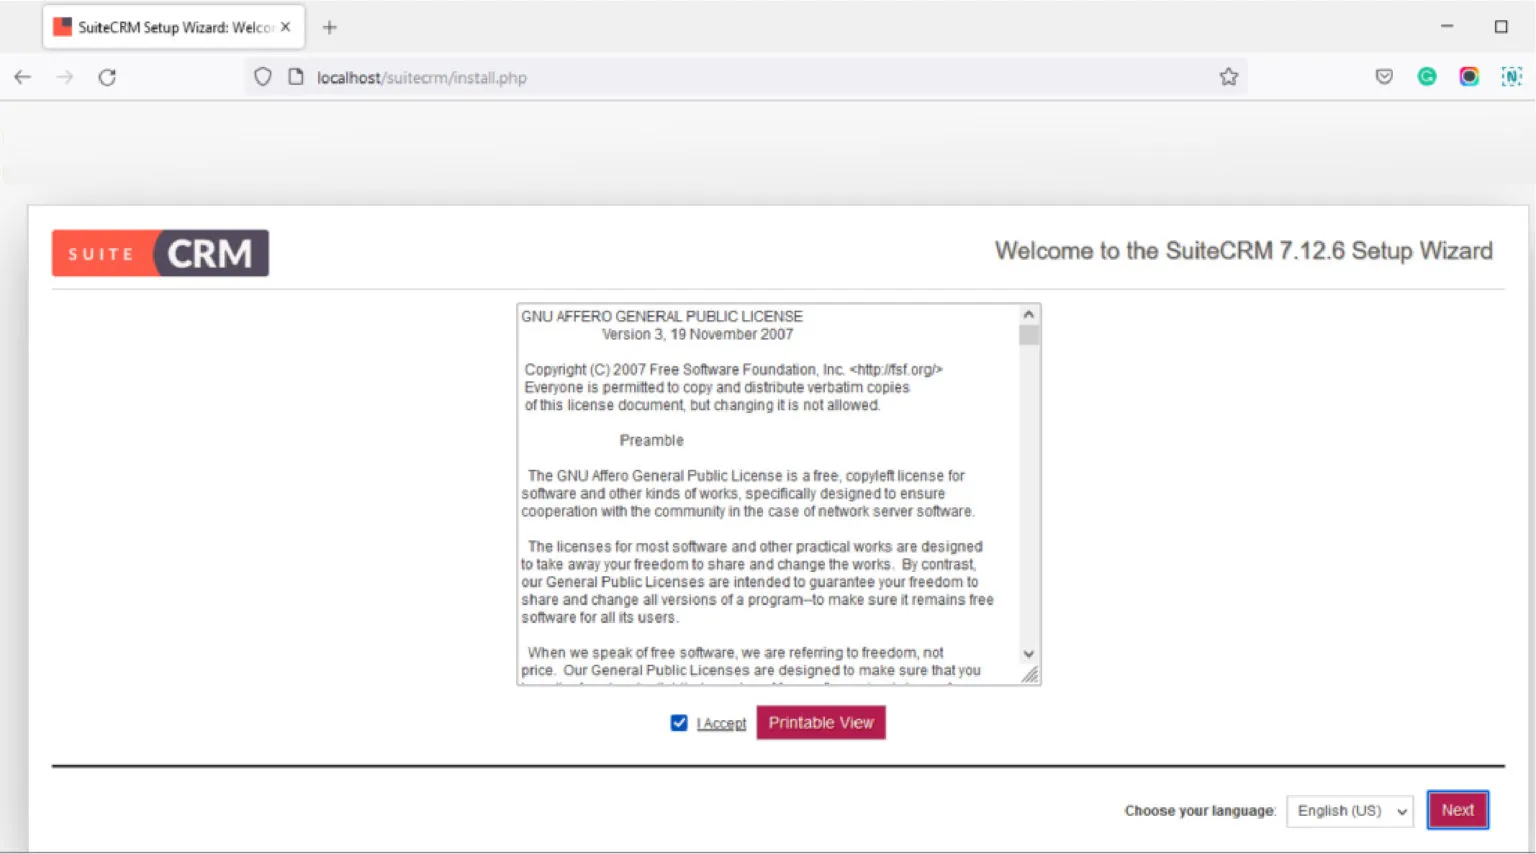
Step 1
On the installation page, you will find the License Agreement. That is GNU Affero General Public License.
Accept the License Agreement. Then Click Next
Step 2
SuiteCRM verifies all the server’s prerequisites to ensure the file runs correctly.
If you find any error, then it needs to be resolved. So that the functionalities of your module work.
If you have no errors, then click Next.

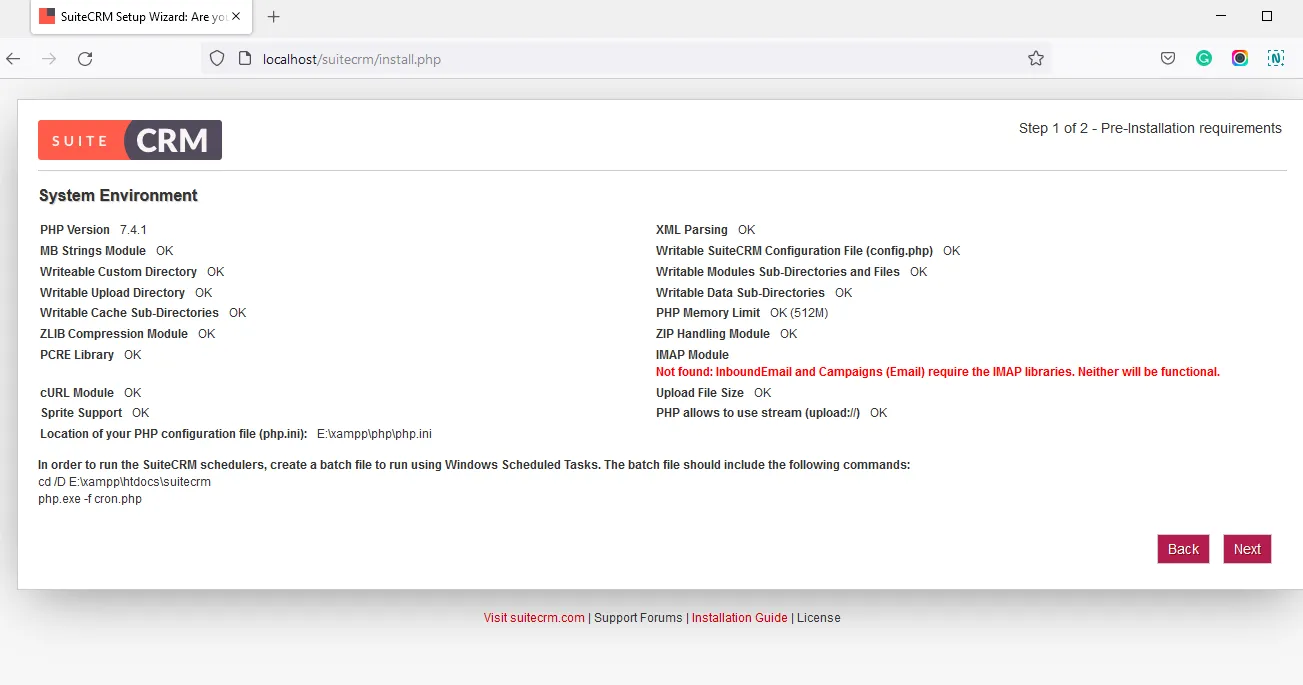
You will move to the configuration page now.
Creating a Database
Before entering into this configuration you have to create a database first. It is the better option to create the database once you run the XAMPP control panel. Don’t be confused about how to create a database. Here are a few easy steps to create a database.
Open local host on the address bar
On the next tab Open http://localhost/phpmyadmin/
The phpMyAdmin page will open
Click on “Create Database” in the database section.
You have to enter the name of the database as suitecrm and select the language.
Click “Create”
A new database was created with the name suitecrm.
Now come into the installation process of SuiteCRM
Configuration Page
The configuration page includes database configuration and site configuration the following.
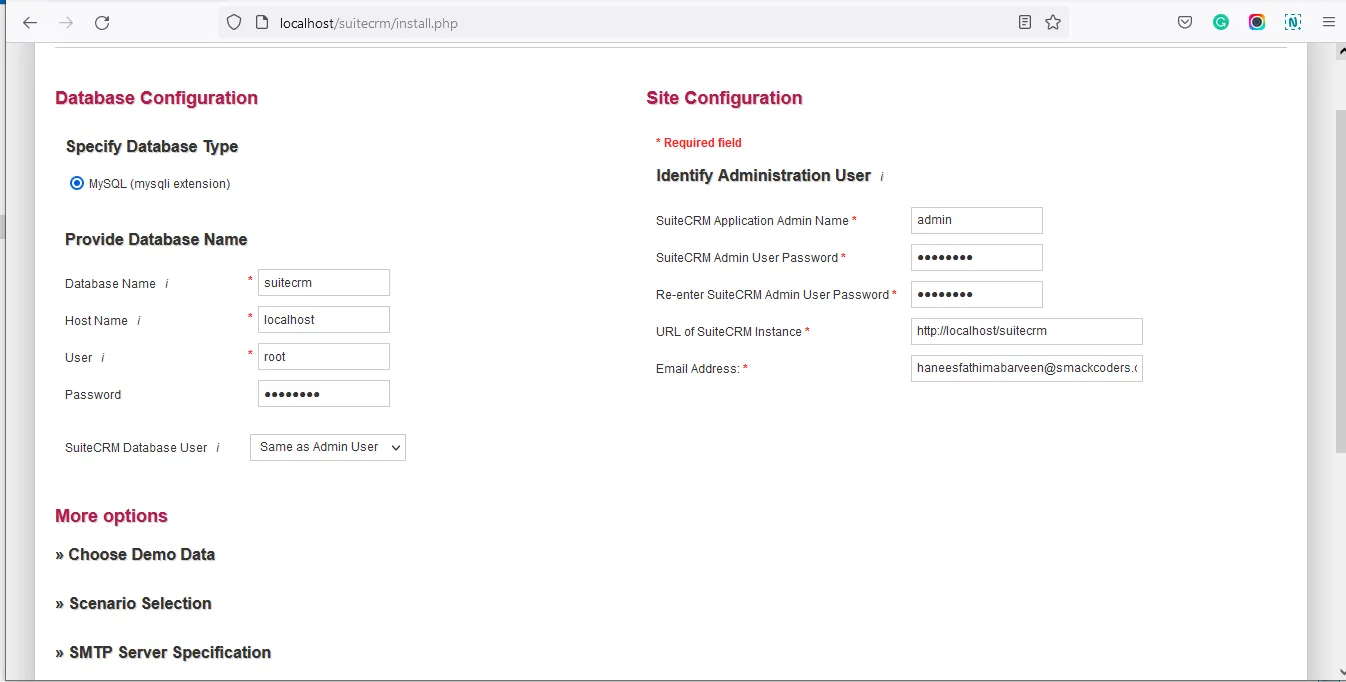
SuiteCRM Database Configuration
Enter the Database type(Select MySQL)
– Hostname: You must type the database server hostname in this field. (by default, it is set as localhost)
– Database name( The default name is suitecrm(it is the name of the database that we have created before in phpMyAdmin) CRM. You can also create a custom name)
– User name (username having database access. (By default, it is set as root )
– Password(Not needed for MySql. You may leave this section empty)
Site Configuration
Enter the login user name in “Suite CRM Application Admin Name.” (Administrator account name).
Enter the administrator account’s password in “Suite CRM Admin User Password.” Then re-enter the password for confirmation.
In “URL of Suite CRM instance,” enter the URL path to SuiteCRM appears. It was entered by default.
In “Email address,” enter the administrator’s email address.
Note
It is only mandatory to provide the required information in the Database configuration and Site configuration.
The more options section is optional. You may fill it now or leave it for later. That is up to your choice.
If you want to skip the more option section then Click the “Next” icon at the bottom of the page. And move to Step 7
If not then proceed with Step 6.
More Options Section(Optional)
Install and Set up Your SuiteCRM in 2 Hours.
Customize the CRM for your needs
What is in the More Option Section?
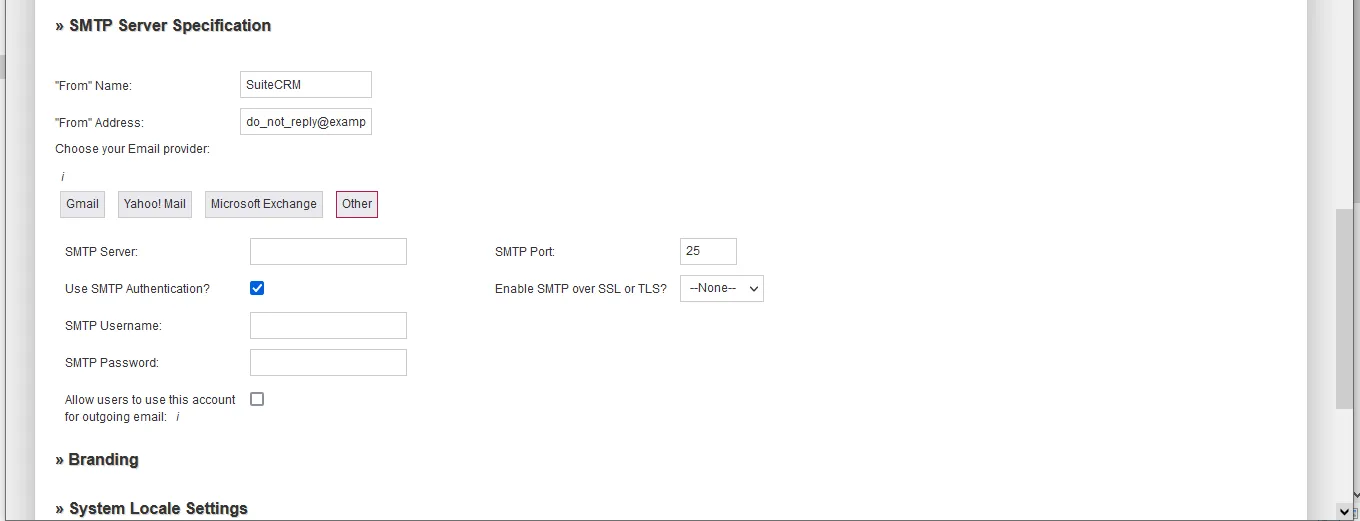
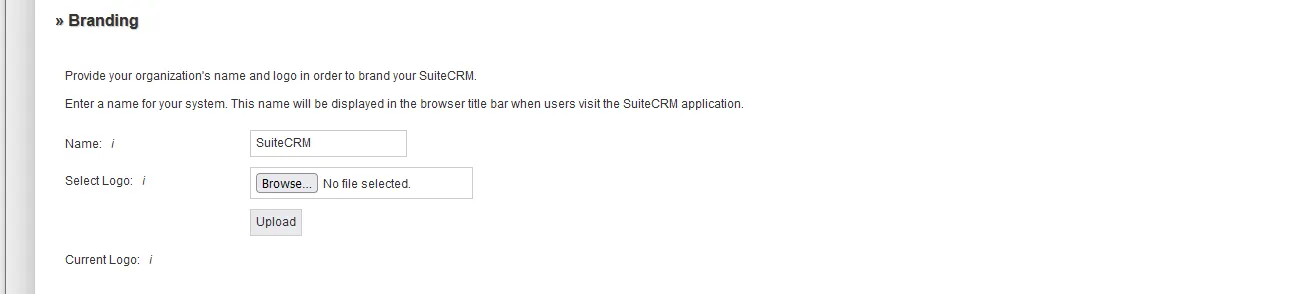
The More Options section includes SMTP server specifications, Branding and Logo, System and Locale Settings, and Site Security.
Enter the full details of your SMTP server in the “SMTP Server specifications” section
Insert your company logo and brand in the “Branding and Logo” section
Set your organization’s date, time zone, and currency in the “System and Locale Setting” section. Modify these values based on regular users.
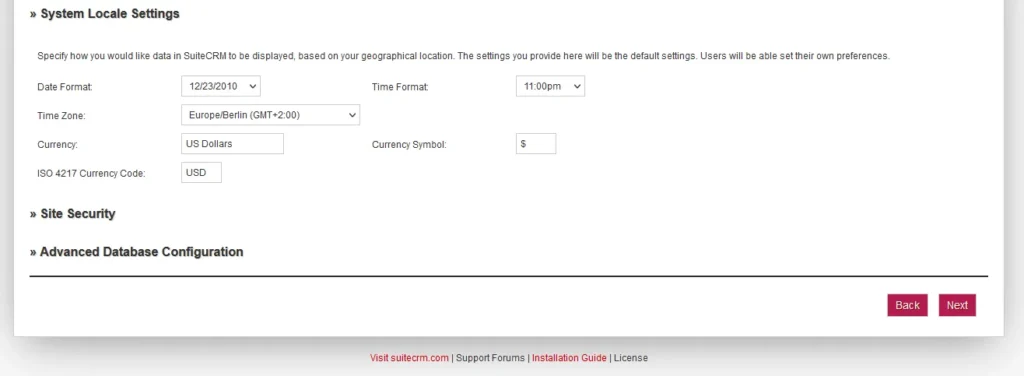
Select the “Site Security” parameters to secure the application. Or (You may also leave all the sections disabled)
After filling in the data mentioned above, Click “Next.”
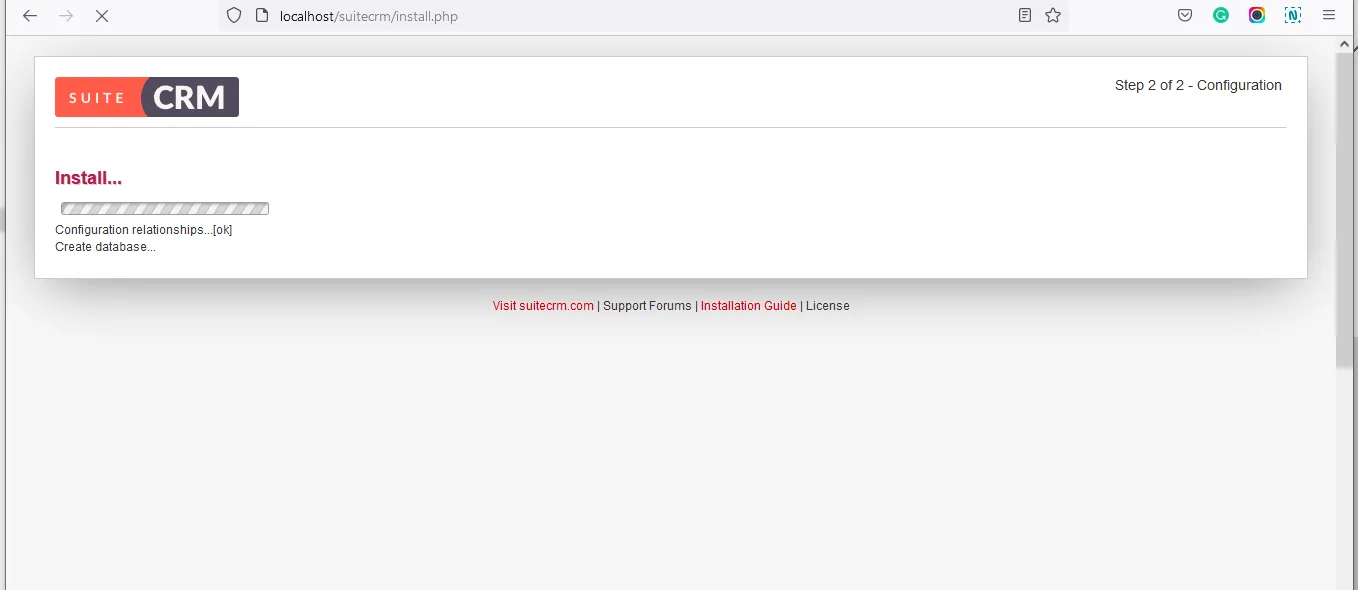
Installation Page
The installation screen checks the credentials specified by the administrator. If the database name already exists, then a dialog box will appear. That shows whether to change the database name or to accept the database name.
The database tables are dropped if you use the existing database name. Then click Accept to drop the current database table.
Or click “Cancel.” And specify a new database name.
Now SuiteCRM starts Installing.
Installation Complete
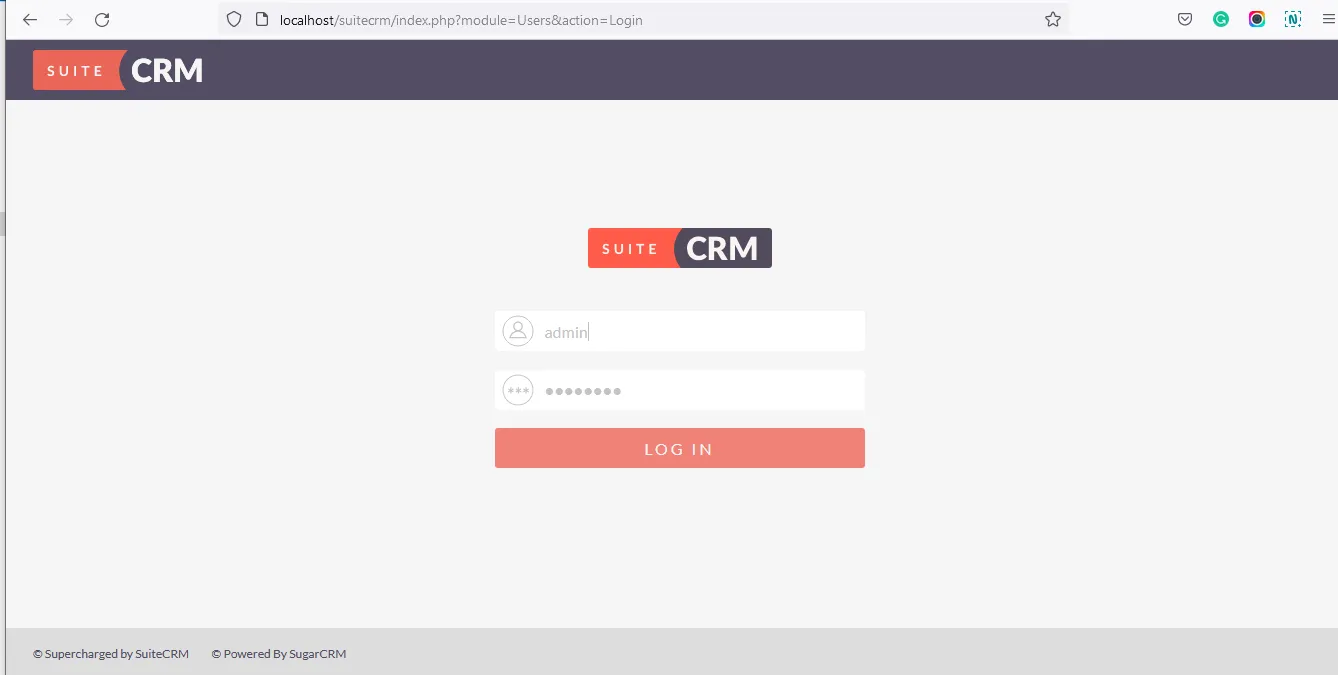
After installation, it will lead you to the login page.
On the login page, enter your username and password (you have set them in the site configuration)
Now the Suite CRM dashboard will open.
You have successfully installed the SuiteCRM. Then waiting for what? Start working with your SuiteCRM.
If you are new to SuiteCRM you have to learn some modules and the management of suiteCRM. Let us discuss that to improve our knowledge of SuiteCRM.
Administration
Under the administration section, options like user management and system settings are available. The administrator can change the SMTP email server, add users or view logs, and different configuring options as below.
Let us discuss user management and system settings.
User Management:
- In this section, you can manage the username, and password as well as all the user details..
- In the user list view, you will see the Administrator User(by default)
- You can create the user by clicking the “Create User” icon.
- Fill in all the required fields to create a user.
- For each user, you can set a theme. Suite CRM has three themes by default.
- Configure the basic user settings. That includes:
- Set email notification for assigning a new record for that user
- Set date, time, and currency settings for the user
- Display only the required modules of that user.
After completing this, the user will get an email notification to set a password. Now the user creation is complete.
Then the Admin will set up a role for the user. You can view the Role management under the sub-menu of the Admin section.
System Settings
The system settings include
-User Interface
-Branding and Logo of your organization
-Number of records to be displayed in the list view
Advanced Settings:
-You can change ON/OFF of the developer mode
-Log configuration, which includes slow log time taking queries
Logger Settings:
-Change the name and size of the Log.
-Select the level of the Log
-You can also refer to [the official guide for detailed instructions (https://docs.suitecrm.com/admin/installation-guide/downloading-installing)
-Once installation steps are completed, you can begin using SuiteCRM! Be sure to explore all its features and familiarize yourself.
FAQ
How to clear the cache
After the installation, if you want to clear the cache in SuiteCRM, there are a few steps you need to follow.
First, log into your SuiteCRM account by entering localhost/SuiteCRM on your browser.
The SuiteCRM dashboard will open
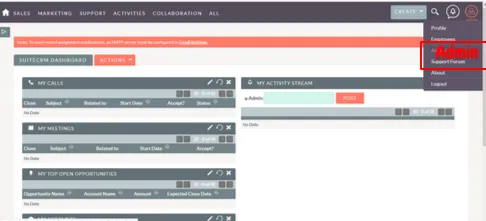
Click the icon “admin” on the top right corner of the page. Click “Admin” on the submenu.
The Administration page will open. Scroll down until you find Admin tools.
On the Admin tools section Click on “Repair and Rebuild”
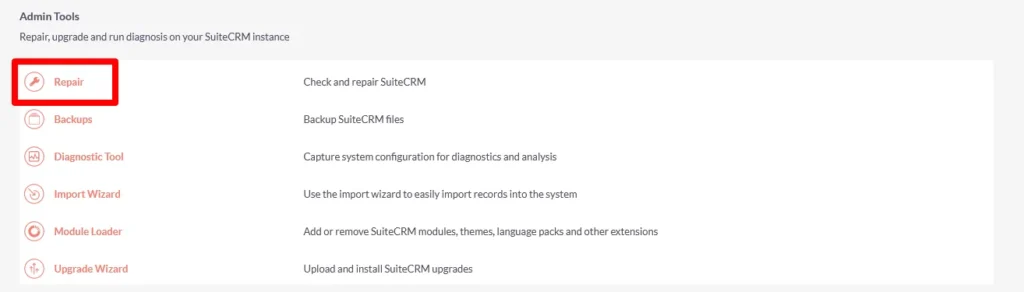
Now you are entered into the Repair Window. Click “Quick Repair and Rebuild”
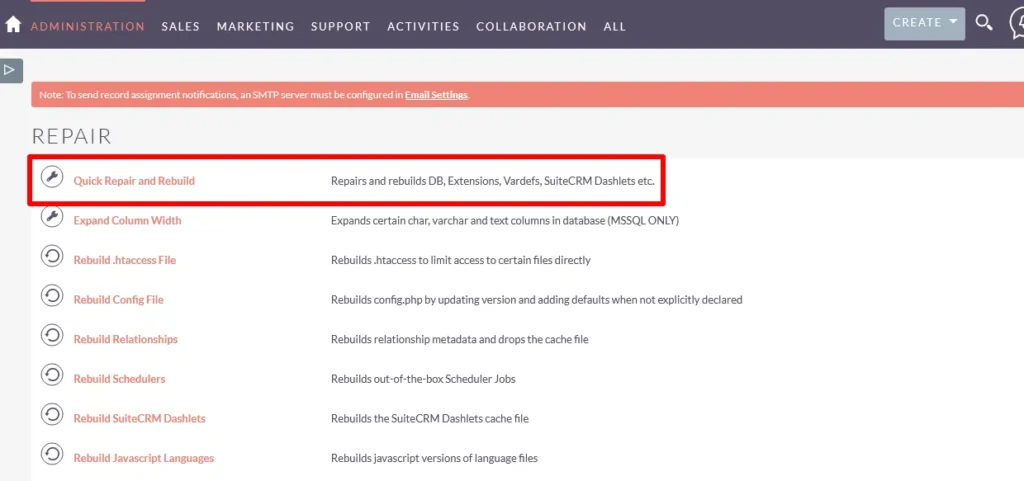
Then it starts clearing the cache and rebuilding extensions & tables.
After clearing the cache files you can go to the administration page by clicking “Return to administration page” at the bottom of that clear cache window.
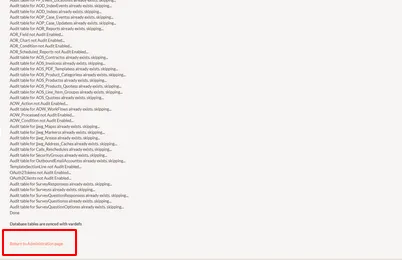
It will ensure that all cached data is removed from your SuiteCRM account. And that your system is up-to-date.
How to add a field
Adding fields in SuiteCRM is a simple process, completed in just a few steps.
Step 1
To add a field, login to your SuiteCRM account and navigate to the “Admin” section.
Click “admin” on the submenu of “Admin”
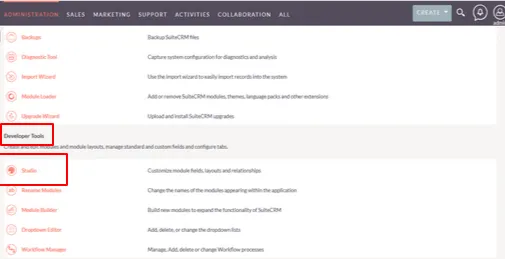
Step 2
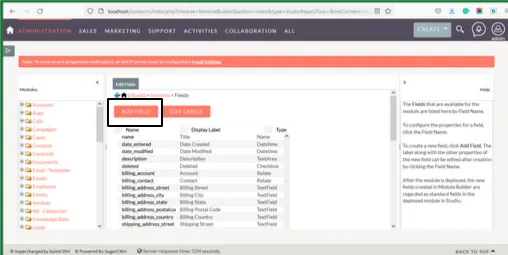
The administration page will open. Scroll down on the administration page to find developer tools. On the developer tools, Click “Studio”.
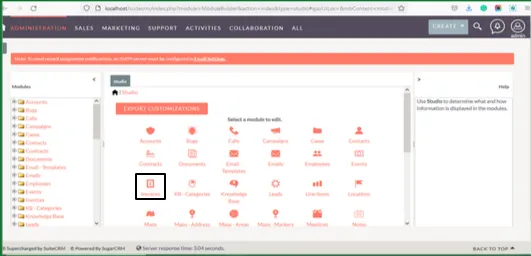
Step 3
The Studio section contains the Export customization icon and the Modules to edit
You can add fields to any of the modules that you need to add
Select the modules to which you need to add fields
For example, Select the module invoices
Step 4
Then click on the “Add fields” icon
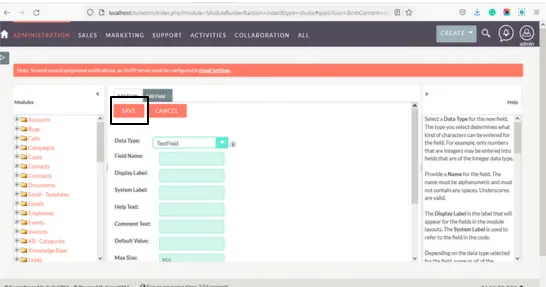
Step 5
In the “Add Field” popup window, you will need to enter the following information:
Data type: Select the data type of the new field. The data type you selected determines what type of character needs to be entered for the new field. For example, If you need to enter only numbers in the new field, select integer datatype.
Choose the data type of field you wish to add from the dropdown list. The most common types are text, number, and date.
Field Name: Enter the name of your new field here. This name will be displayed in the field list and on any forms where the field appears.
Help Text: The help text appears temporarily while a user hovers over the field. It can be used to prompt the user for the type of input desired.
Comment Text: It is seen only in the module builder and the Studio tab. It can be used to describe the field for administrators.
Default Value: If a new record is generated, then the default value will be pre-populated in the field. You can use the default value or you can enter the new value as you wish.
Max Size: It determines the maximum number of characters entered in the field.
Required: Enable the checkbox if you require the field. Unless I leave it disabled. You should provide a value to save the records of the field.
Audit: Enable the checkbox to track changes to the field in the Change log.
Importable: Select Yes on the dropdown box of importable will allow, disallow, or require the field to be imported into the Import Wizard.
Duplicate Merge: You can enable or disable this Duplicate Merge field to find the duplicate features.
Step 6
Click the “Save” button to add the new field
How to install the zip folder ( zip support for compressed files) in SuiteCRM?
Zip support for Windows:
The Zip folder support file has already been installed when using Xampp/Wamp for SuiteCRM installation.
Zip support file for Ubuntu
To install the zip support file on Ubuntu, enter the below command on the control panel and run the command line.
sudo apt install php-zip
Zip support file for Mac
To install the zip support file for Mac, enter the below command on the control panel and run the command line.
sudo yum install php-zip
Note: Before installing suitecrm ensure that you have all the supported files to run php of your supported version.Ensure that all the prerequisites are installed.
To install the basic requisites to install the supported files, enter and run the below command on the terminal
sudo apt install php-{gd , imap,curl,mbstring,common,xml,xmlrpc,cli,mysql,zip}
Creating Custom Module: A How-To Guide for SuiteCRM Developers
If you’re a developer working with SuiteCRM, you may need to create a custom module.
We explain the steps to create a basic custom module in SuiteCRM. Creating a custom module is quite simple in SuiteCRM with these easy steps.
Go to the administration page by clicking admin<<Admin
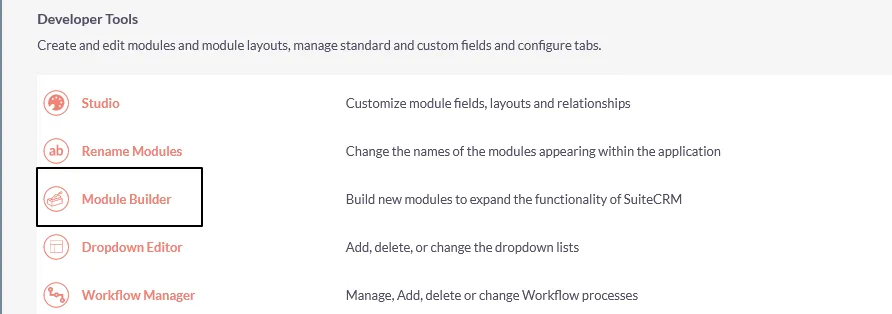
On the administration page scroll down for the Development tools. And then click “Module Builder” on it
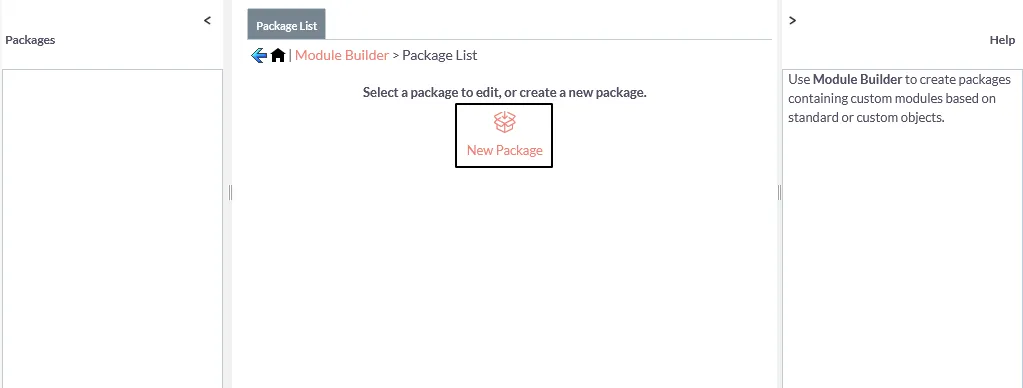
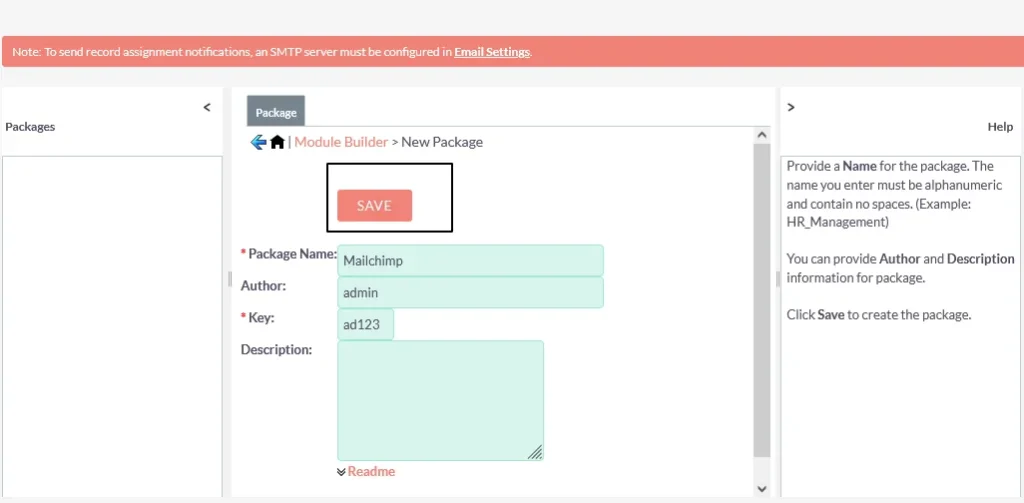
On the Module Builder page click the “New package” icon
Then a new package window will appear.
On that new package window, you have to enter:
Package Name: The name should be alphanumeric. Starts only with letters. And the package name should not contain spaces.
Author name: You should provide the author name of the packages.
Key: Use only alphanumeric keys.
Click “Save”.
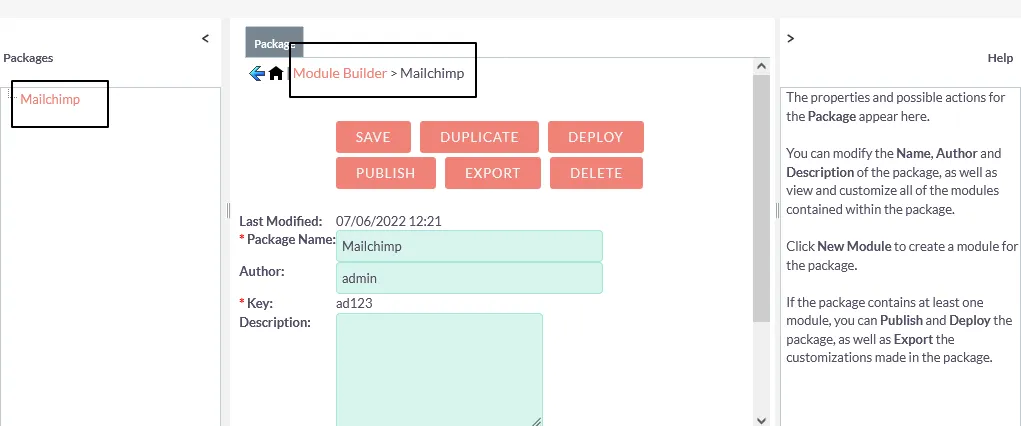
Now the Mailchimp module is available near the new package icon.
Then you can Export the new module created by clicking “Export”.
Your file will be exported successfully and saved as a zip folder on your downloads.
Thus you can download the custom module. For installing the custom module you have to follow the instructions.
How to install Custom modules in Suitecrm?
Installing the custom modules on the developer portal site of SuiteCRM is easy. Before learning the installation process, you need to know: Are there any modules un-supported?
Yes. Following are the unsupported modules. The installation is blocked on the developer Portal.
- backup_migrate
- content_sync
- delete_all
- devel_themer
- domain
- php
- simple HTML mail
- swift mailer
- theme_editor
Now we will learn how to install custom modules in SuiteCRM.
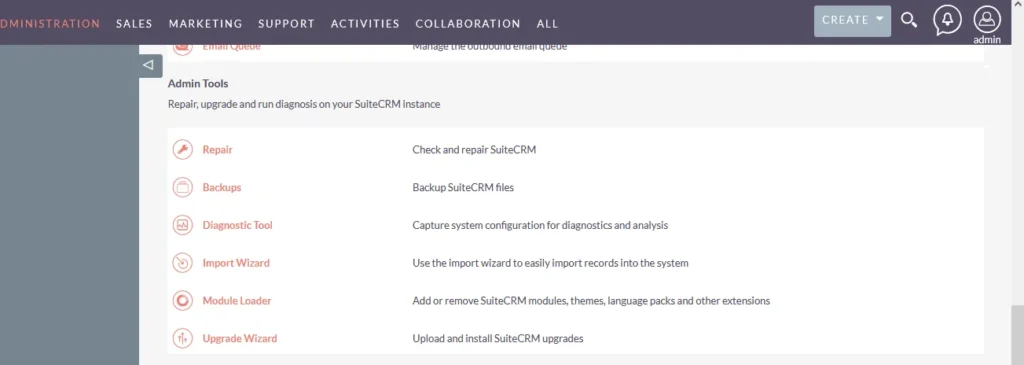
Go to the administration page. Scroll down to the bottom, where you find
“Admin Tools”.
Click “Module Loader” on the Admin Tools
On the Module Loader page Click the “Install” icon near the package name
And that’s all you have successfully installed the custom module
You can also delete the package by clicking “Delete package”. If you delete the package, then it will disappear from the new package section
How to uninstall SuiteCRM?
First, go to the directory where SuiteCRM is located.
For Windows:
From your database server, delete the database schema. As we already said, the default database name is Suite CRM. However it may vary if you change the database name during installation.
For LINUX:
First, remove the Suite CRM directory. Use the following command:
rm -rf <suite directory> – To delete the directory
We are at the end of the guide. So far we have learned a detailed explanation of SuiteCRM installation. And of course, you have learned how to handle Suite CRM. It is very simple to install the Basic custom module in your SuiteCRM.
Though there are many more that include integration of mail, google calendar, Duplicate merger, and the list goes on. Don’t worry about that. We provide customization for these exclusive extensions for SuiteCRM that meets your business needs. Our custom Modules will definitely help you increase your sales growth and business efficiency
You can easily get our custom module by clicking on the following link.
https://www.smackcoders.com/suitecrm.html
We also provide customization for SuiteCRM custom module installation based on your request. If you need our support or service you can contact us at [email protected]
SuiteCRM Migration Guide
Suite CRM is an open-source and more flexible CRM. And it is absolutely free with no hidden costs. So it is more beneficial to migrate from proprietary software like Salesforce, Microsoft Dynamics, and more. You can migrate from any CRM irrespective of size, age, version, etc. SuiteCRM has the same features as others. But with the added advantage that it saves money and also provides full ownership of your data.
An award-winning CRM with 500,000 downloads shows the efficiency of SuiteCRM.
Why should you Migrate to SuiteCRM?
- It reduces the sales cycle and improves the Return on Investment. It provides easy access to centralized data. It includes sales, marketing, and customer support services. It plays a vital role in the internal and external collaboration of organizations.
- It increases sales growth and business productivity. And also it delivers a better decision-making process.
We will be covering the following in this guide,
- Upgrade SuiteCRM from the older version to the latest version. Migrating SuiteCRM Server to Server.
- Migrating Any CRM to SuiteCRM.
Migrate or Upgrade SuiteCRM from Older to the latest version
Are you running an older version of SuiteCRM? Then You’ll need to upgrade to the latest version to take advantage of new features and bug fixes.
Upgrading is a relatively straightforward process. But there are a few things you’ll need to keep in mind.
This article will cover everything you need to know about upgrading SuiteCRM. We’ll walk through the process step-by-step. Also we explain what you need to do before, during, and after the upgrade.
Before You Upgrade
Few things you need to check before upgrading your SuiteCRM installation:
- Make sure your current installation is up-to-date. Upgrade to the latest release within your current major version (for example, from 7.12 to 8.1).
- Back up your database and files. It is always a good idea before making major changes to your website if something goes wrong.
- If you’re running SuiteCRM on-premises, ensure your server meets the minimum system requirements for the latest version.
- Note these changes if you’ve customized any core code or built custom modules. You’ll need to migrate these changes after upgrading.
- Download the latest version of SuiteCRM from the official website.
The Upgrade Process
Now you’ve prepared for the upgrade, Right? It’s time to do it. The process is relatively simple.
Step 1
Log in to the SuiteCRM as the administrator user. Enter username as admin
Step 2
Select admin at the top right corner of the page. Then click on Admin on the submenu. It will display the Administration panel.

Step 3
Scroll down to find Admin tools. Click on “Upgrade Wizard”.
Step 4
The Welcome to the Upgrade wizard window will be opened.
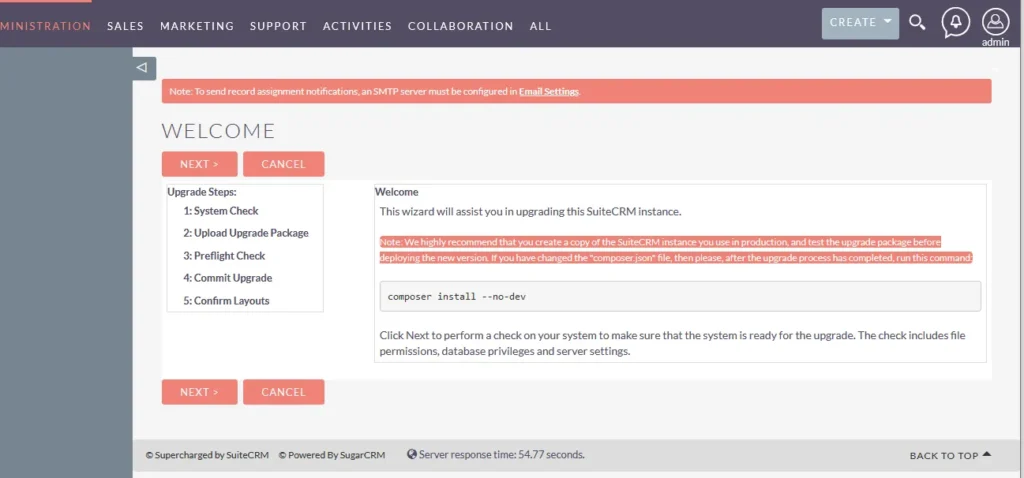
Step 5
It will execute the System Check-the first step of the upgrade process.
Step 6
If you have no issues then click “Next”.
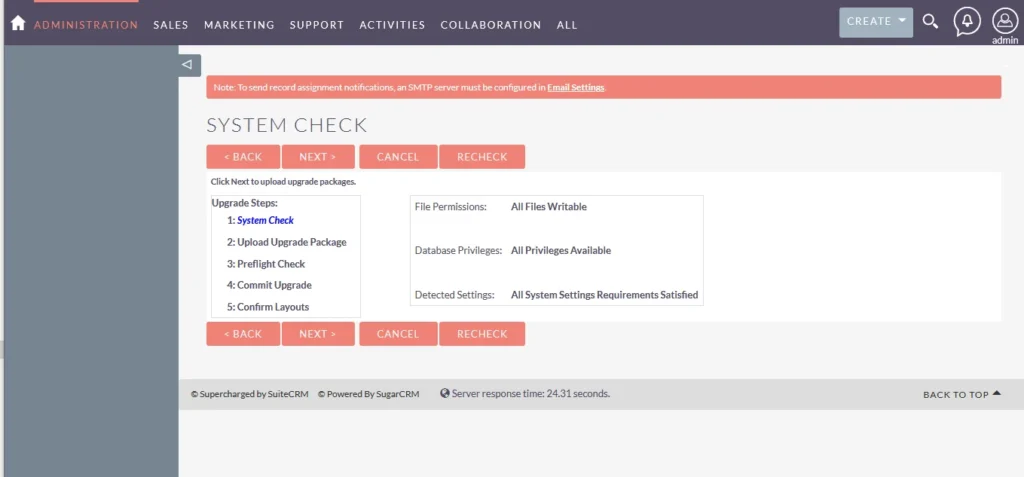
Step 7
Now it’s time to upload the downloaded upgrade package. For that select “choose file” and open the appropriate files on your computer. Then click “Upload Package”

Step 8
The script for Pre-Flight Check will appear. Click “Next”
Step 9
Finally click on Commit Upgrade and then “Next”
That’s it! You have successfully completed the upgrade installation. Once the upgrade process is complete, you will be running the latest version of SuiteCRM. To check your current version select the Admin menu >> About.
Facing Trouble on Existing CRM?
Migrate to SuiteCRM
Server to Server Migration
If you’re looking to migrate your SuiteCRM installation to a new server? There are a few things you’ll need to keep in mind.
Benefits of SuiteCRM migration
- It effortlessly manage the Sales pipeline.
- It can save 80% of the CRM costs by means of SuiteCRM Comparison table.
- It is easily integrated with PayPal, Chat tool, ERP systems and more.
- It is highly flexible until it meets your business requirements.
In this article, we’ll explain the process of migrating your SuiteCRM instance to a new server. To get started few things you should have on hand as below:
Analyze the data provided by the client. And remove all unnecessary data. This will increase your system’s memory space.
Next, you need to extract, transform and load files to the SuiteCRM database. Develop a customized script with a lot of accuracies to undergo SuiteCRM migration.
Validate the migrated data. In this step, you can correct any issues of the client.
Though we are carefully following the migration steps, there may be a chance for some technical issues arising at times. So back up the database, to deal with the situation effectively.
Perform UAT and another testing to check if any issues exist.
Back up your current SuiteCRM database, and your site’s files(including any customizations or add-ons).
Your SMTP settings (if you’re using external mail service).
With these things in hand, you’re ready to begin.
Steps to migrate SuiteCRM to a new Server
- Export your current database.
- Create a new database on the new server, and import the data from your old database.
- Copy your site’s files to the new server.
- Configure your SMTP settings on the new server (if applicable).
- Edit your SuiteCRM config file(config.php) to point to the new database. Following are the steps to change site_url:
- First, change the directory by giving the command ‘cd’ to your SuiteCRM directory in which all the files are located.
- Then backup all the files.
- After file backup, give the command ‘sudo nano config.php’.
- To search features by “control+w” using nano. Enter ‘site_url’ and click enter. This brings you to the line ‘site_url’ => ‘https://wrongurl.com’.
- Now change the wrong url to the correct url of your new server name.
- Then click Ctrl+X and select yes to the save changes.
- To clear cache stuff, click on ‘Repair and Rebuild’ in Admin tools.
That’s it! Your SuiteCRM installation should now be up and running on your new server.
Any CRM to SuiteCRM Migration
There are many reasons why you might want to migrate from your CRM to SuiteCRM. Maybe you’re unhappy with your CRM’s licensing model (or) you are attracted to SuiteCRM’s community-driven development.
For your reasons, migrating from one CRM to another can be complex and time-consuming. But planning the right tools can make the transition so efficient.
Here are the basic steps you’ll need to take to migrate from other CRM to SuiteCRM:
Step 1: Export your data from the CRM you are currently using
- You’ll need to export your data as a CSV file so you can import it into SuiteCRM.
- To do this, go to any of the default modules(Leads, Contacts, etc.,). Then click on the “Export” button in the upper right-hand corner.
For an example, if you are selecting the Leads module and clicking export. All the leads are collected and downloaded as a CSV file.
Step 2: Import your data into SuiteCRM
- Once you download the CSV file, you can import it into SuiteCRM. For that, go to the Administration panel and click “Data Loader.”
- Click on the “Import” button and select your CSV file.
Step 3: Migrate your customization
- Do you’ve specific customized modules or extensions to fit your specific business needs? Then you’ll need to migrate those customizations to SuiteCRM.
- Depending on the level of customization involved, this can be a complex process. So it’s best to consult with a developer familiar with both CRM.
Do you want to speed up your sales growth?
Do you have many users and are searching for a fantastic CRM?
Whatever your CRM is, you can migrate to SuiteCRM. Data transfer or Data migration is not an easy task. Even a loss of single data may lead to heavy financial loss for your business. Both the CRM has different fields, relationships, and modules. It is important to match the terms accordingly in SuiteCRM. That is the task. And the tricky task too.
Don’t worry. We are there to help you. We, the Smackcoders, will make it as simple as you imagine. We have the expert team for CRM.
Each and every client’s data is a treasure. We can carefully import and export your data with our efficient technical expert.
Using the best ETL tools we make the data migration process so cautious and confidential. And we will make sure that every single data are mapped to the correct destination properly.
Following these steps will help you migrate from Other CRM to SuiteCRM. And with minimal disruption to your business. You can make the transition smoothly with little planning and the right tools. We ensure that we will migrate your current CRM to SuiteCRM without losing any data. And also we include and install your custom modules from any CRM to your new SuiteCRM.
Post Migration Checklist
After the migration process of SuiteCRM, it is important to undergo some post-migration activities listed below:
- Ensure that all the data has moved accurately to the appropriate places.
- Ensure that the filters are set up as appropriate for the reporting and workflow tools.
The difficult task in migrating the CRM is User adoption. It is hard for the employees to switch over new technology. It takes some months to adapt to the new CRM and use its full potential.
It is important to provide staff training to work with new CRM.
How to train staff?
Once you’ve migrated your data you’ll need to train your employees on how to use SuiteCRM. Many resources are available online. You can hire a trainer to come to your office and provide hands-on training.
First, let them understand the difference between the old and new CRM.
Show them how the sales growth attained using the new CRM.
Provide online training or tutorial for the users. For example, you may create a youtube channel and make the user thorough in the new CRM.
Encourage the staff by presenting various awards. Appreciate those who provide the best result. This will boost learning.
And that’s it. You are ready to work with your new SuiteCRM.
Do you want the best customization and migration of SuiteCRM? You can contact us at [email protected]. We provide efficient technical support for migrating your bulk data. We are responsible for the efficient data transfer from your current CRM to SuiteCRM.
Fear of Losing Data in Migration?
Get our Expert help