Table of Contents
Installing WAMP or XAMPP lets you create a local server environment on your computer, so you can run PHP-based applications like WordPress without live hosting. Both tools bundle Apache, MySQL, and PHP into a single installer, giving you a real web server on your machine that’s perfect for development, testing, and troubleshooting.
In this guide, you’ll learn what WAMP and XAMPP are, how they differ, and which one is right for your operating system. We cover step-by-step installation for Windows, macOS, and Linux, the most common setup errors and how to fix them, and a clear WAMP vs XAMPP comparison so you can make the right call before you download anything. By the end, you’ll have a fully working local server ready for WordPress development, testing, and migration work.
Key Takeways:
- WAMP Server is Windows-only. Mac and Linux users should use XAMPP instead.
- Both tools include Apache, MySQL/MariaDB, PHP, and phpMyAdmin, all in a single free installer.
- WAMP makes switching PHP versions easier on Windows, one click from the system tray menu.
- XAMPP is cross-platform, open-source, and works on Windows, macOS, and Linux.
- The default Apache port is 80. If it conflicts with another app, switch to port 8080.
- Access your local server at http://localhost after installation.
- phpMyAdmin is available at http://localhost/phpmyadmin, default username is root with no password.
- Never use WAMP or XAMPP for live production hosting both are local development tools only.
Note: WAMP Server is available for Windows only. If you’re on a Mac or Linux machine, skip to the XAMPP installation section below, it covers step-by-step setup for macOS and Linux as well.
What Is WAMP?
WAMP stands for Windows, Apache, MySQL, and PHP. It’s a free software stack that installs all three components together on your Windows machine, turning it into a local web server. Once installed, you can run PHP-based applications like WordPress, Joomla, or any custom PHP project entirely offline, no hosting account needed.
The WAMP Server control panel sits in your system tray and lets you start, stop, and restart Apache and MySQL services with a single click. It also lets you switch between multiple PHP and Apache versions without reinstalling anything, which is genuinely useful when you’re working on projects with different PHP version requirements.
WAMP includes: Apache web server, MySQL and MariaDB databases, PHP (multiple versions), and phpMyAdmin for database management.
What Is XAMPP?
XAMPP stands for Cross-Platform, Apache, MariaDB, PHP, and Perl. Developed by Apache Friends, it’s a free, open-source local server stack that runs on Windows, macOS, and Linux. If you’ve ever searched for WAMP on Mac and hit a dead end, XAMPP is the answer, it’s the go-to local development tool for non-Windows users.
The XAMPP Control Panel is beginner-friendly. You start and stop Apache and MySQL with dedicated buttons, no tray icon hunting required. Most users only ever need Apache and MySQL running for standard WordPress or PHP development.
XAMPP includes: Apache, MariaDB (MySQL-compatible), PHP, Perl, phpMyAdmin, FileZilla FTP, Mercury Mail, and Apache Tomcat.
WAMP vs XAMPP — Which One Should You Choose in 2026?
Both tools do the same fundamental job, they give you a local server to develop and test web applications. But they’re built for slightly different users. Here’s a straight comparison so you can make the right call before you download anything.
| Feature | WAMP Server | XAMPP |
| Operating System | Windows only | Windows, macOS, Linux |
| Ease of Installation | Very easy on Windows | Easy on all platforms |
| PHP Version Switching | Built-in, one click | Manual (separate installs) |
| Interface | Minimal system tray icon | Full control panel with buttons |
| Includes Perl | No | Yes |
| FTP Server (FileZilla) | No | Yes |
| Mail Server | No | Yes (Mercury) |
| Portable (USB) | No | Yes |
| Database | MySQL / MariaDB | MariaDB (MySQL-compatible) |
| Open Source | Free to use, not open source | Fully open source |
| Best For | Windows-only PHP developers | Cross-platform developers, beginners on Mac/Linux |
So which one should you pick?
Choose WAMP if: You’re on Windows, you only need PHP (not Perl), and you want the cleanest, lightest setup possible. WAMP’s ability to switch PHP versions from the tray menu is a genuine time-saver for Windows developers managing multiple projects.
Choose XAMPP if: You’re on Mac or Linux (WAMP won’t run on these), you want a portable setup you can run from a USB drive, or you need a more complete stack that includes FTP and mail server tools.
If you’re a beginner just starting out: Either works fine for running WordPress locally. XAMPP has a slightly friendlier control panel and is the better choice if you’re not sure which OS you’ll be working on long-term.
System Requirements Before You Install
WAMP Server Requirements (Windows only)
- Windows 11 (64-bit), Windows 10 support ended October 2025; Windows 11 is now recommended
- Visual C++ Redistributable packages: VC11, VC13, and VC17 (2015–2022), install all before running the WAMP installer
- At least 2 GB RAM (4 GB+ recommended for running WordPress locally)
- 1 GB free disk space
- Administrator privileges on your machine
- 32-bit Windows is not supported, WAMP is 64-bit only as of 2023
XAMPP Requirements (Windows / Mac / Linux)
- Windows 10/11, macOS 12 (Monterey) or later, or any modern Linux distribution
- At least 512 MB RAM (1 GB+ recommended)
- 300 MB free disk space
- Administrator or sudo privileges
Important: Don’t run WAMP and XAMPP at the same time. Both use port 80 for Apache and port 3306 for MySQL by default. Running them simultaneously causes port conflicts and neither will work correctly.
How to Install WAMP Server on Windows (Step-by-Step)
Step 1: Download WAMP Server
Go to the official WampServer website at wampserver.com and click Start Using WampServer. Download WAMPSERVER 64 BITS (x64), WampServer 3.4.0 is 64-bit only and no longer offers a 32-bit version.
Before downloading, install the required Visual C++ Redistributable packages: VC9, VC10, VC11, VC13, VC14, and VC17 (2015–2022). If you’re on 64-bit Windows, install both the 32-bit and 64-bit versions of each package. Right-click each installer and select Run as Administrator, otherwise WAMP won’t launch correctly.
Tip: The fastest way to install all required VC++ packages at once is to use Visual C++ Redistributable Runtimes All-in-One by TechPowerUp. It installs everything needed with a single batch file, no hunting for individual packages.
Step 2: Run the WAMP Installer
If you have an older version of WAMP already installed, uninstall it completely before running this installer. Installing over an existing version will break the installation.
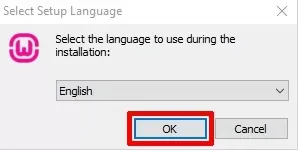
- Locate the downloaded .exe file and double-click it to start the installer.
- Select your language and click OK.
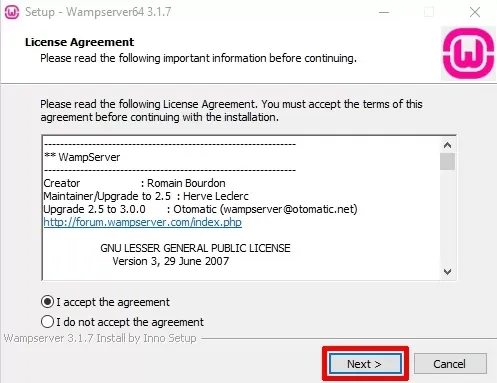
3. Accept the license agreement and click Next.
4. Read the WAMP information screen and click Next.
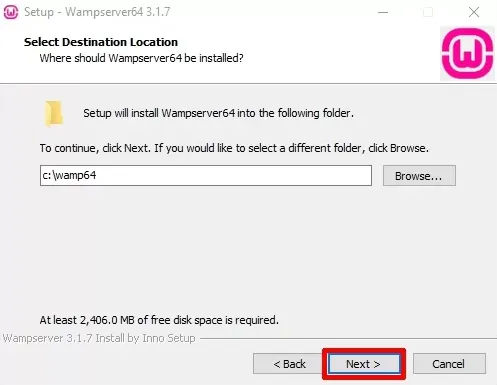
5. Choose your installation folder. The default is C:\wamp64, stick with this unless you have a specific reason to change it. Click Next.
6. Select whether you want a desktop shortcut and quick launch icon added to your taskbar. Make your selections and click Next.
7. Select your default browser when prompted. Choose whichever browser you normally use.
8. Choose a default text editor for editing config files. Notepad works fine.
9. Leave the PHP mail SMTP setting as localhost and click Next.
10. Check Launch WampServer now and click Finish.
Step 3: Verify WAMP Is Running
Look for the WampServer icon in your system tray (bottom-right of the taskbar). The icon color tells you everything:
- Green – All services (Apache and MySQL) are running. You’re good to go.
- Orange – One service started but the other didn’t. Usually a port conflict. See the Troubleshooting section below.
- Red – Neither Apache nor MySQL started. Check that your Visual C++ packages are installed correctly.
To test your installation, open a browser and go to http://localhost. You should see the WampServer homepage. If localhost doesn’t load even when the icon is green, check that no other services like XAMPP, Skype, or WebDAV are running on port 80.
Step 4: Access phpMyAdmin
phpMyAdmin is WAMP’s browser-based database manager. Access it by going to http://localhost/phpmyadmin in your browser. If localhost doesn’t resolve, try http://127.0.0.1/phpmyadmin directly, both point to the same place. The default username is root and the password field is blank, just click Go to log in.
Security note: The default root account has no password, which is fine for local development. If you’re running WordPress locally, create a dedicated MySQL user with a password via phpMyAdmin’s User Accounts tab instead of using root directly.
How to Install XAMPP on Windows (Step-by-Step)
Step 1: Download XAMPP
Go to apachefriends.org and download the latest XAMPP installer for Windows. As of 2026, XAMPP ships with Apache 2.4.58, PHP 8.2.12, MariaDB 10.4.x, and phpMyAdmin 5.2.1. Choose the PHP version that matches your project requirements, most modern WordPress sites need PHP 8.0 or higher.
Tip: Temporarily disable your antivirus before running the installer. Some antivirus applications interfere with the XAMPP installation process and can cause it to fail silently.
Step 2: Run the XAMPP Installer
- Double-click the downloaded installer (.exe file).
- If UAC (User Account Control) is active, a warning will appear, click OK to continue.
- The Setup Wizard will open. Click Next.
- Select the components you want to install. For WordPress development, Apache, MySQL, PHP, and phpMyAdmin are all you need. Leave the rest unchecked unless you specifically need them.
- Choose your installation folder. Avoid C:\Program Files if UAC is enabled, use C:\xampp instead to prevent permission issues.
- On the Bitnami for XAMPP screen, uncheck the Learn more about Bitnami box unless you want to use it for one-click app installs.
- Click Next and wait for the installation to complete.
- When prompted by Windows Firewall, click Allow Access to let XAMPP modules through. If you cancel this, Apache won’t start correctly.
- Click Finish. The XAMPP Control Panel will open automatically.
Autostart Tip: In the XAMPP Control Panel, click Config, tick the Apache and MySQL checkboxes under Autostart of modules, and click Save. This way both services start automatically every time you open XAMPP no manual clicking required.
Step 3: Start Apache and MySQL
In the XAMPP Control Panel, click the Start button next to Apache and then MySQL. Both status indicators should turn green. If either one stays red, check the Troubleshooting section below.
Open your browser and go to http://localhost. You should see the XAMPP dashboard, your local server is up and running.
Step 4: Access phpMyAdmin on XAMPP
Navigate to http://localhost/phpmyadmin. Log in with the default username root and no password. From here you can create and manage databases for your local projects.
Common WAMP Server Errors and How to Fix Them
While WAMP Server is easy to install on Windows, users may face a few common issues during setup or while running WordPress on localhost. Most WAMP errors are simple to fix if you know the right steps.
1. WAMP Server Not Turning Green
Issue: WAMP icon stays red or orange instead of green.
Cause: Apache or MySQL services are not running.
Fix steps
- Close Skype, Zoom, or IIS (they often block ports)
- Right-click WAMP → Restart All Services
- Run WAMP as Administrator
2. Apache Port 80 or 443 Already in Use
Issue: Apache fails to start in WAMP.
Cause: Another application is using Port 80 or 443.
Fix steps
- Open httpd.conf and change – Listen 80 to – Listen 8080, then restart WAMP services
3. MySQL Not Starting in WAMP
Issue: MySQL service won’t start.
Cause: Port conflict or corrupted MySQL files.
Fix steps
- Check if another MySQL service is running
- Change MySQL port in my.ini
- Restart MySQL from the WAMP control panel
4. PHP Version Compatibility Issues
Issue: WordPress or plugins show errors.
Cause: Incorrect PHP version enabled.
Fix steps
- Click WAMP icon → PHP → Version
- Select a PHP version compatible with WordPress
- Restart services
5. Localhost Not Opening in Browser
Issue: http://localhost is not loading.
Cause: Services stopped or browser cache issue.
Fix steps
- Ensure the WAMP icon is green
- Clear browser cache
- Try http://localhost:8080 if the port changed
How to Install XAMPP on macOS (Step-by-Step)
WAMP doesn’t run on Mac, but XAMPP does, and the setup is straightforward. Here’s how to get your local server running on macOS.
Step 1: Download XAMPP for Mac
Go to apachefriends.org and navigate to Other Downloads, do not click the “XAMPP for OS X” button directly on the homepage, as that downloads a Virtual Machine version which requires extra configuration and uses an IP address instead of localhost. Download the standard .dmg installer file instead. As of 2026, XAMPP for Mac ships with PHP 8.2.4 and MariaDB 10.4.x.
Step 2: Run the Installer
- Open the downloaded .dmg file and double-click the installer to begin.
- If macOS blocks the file, go to System Settings > Privacy & Security, scroll down to find the blocked app, and click Open Anyway. This is normal for apps downloaded outside the App Store.
- The XAMPP Setup Wizard will open. Click Next.
- Choose your installation folder. The default is /Applications/XAMPP, keep this as-is.
- Click Next and wait for the installation to complete.
- Click Finish. The XAMPP Control Panel (manager-osx) will launch automatically.
Step 3: Start Apache and MySQL on Mac
Open the XAMPP Control Panel from Applications > XAMPP > manager-osx, or find it via Launchpad if you can’t locate the Applications folder. Click the Manage Servers tab. You’ll see three services listed, Apache Web Server, MySQL Database, and ProFTPD. Select Apache Web Server and MySQL Database, then click Start All. Both should show a green running status. ProFTPD is an FTP server included with XAMPP, you don’t need to start it for WordPress development.
Open your browser and go to http://localhost. The XAMPP dashboard confirms your local server is running.
Mac Tip: If Apache won’t start, macOS’s built-in Apache server is likely occupying port 80. Run this command in Terminal to stop it: sudo apachectl stop Then return to manager-osx and start Apache again.
How to Install XAMPP on Linux (Step-by-Step)
XAMPP is the most widely used local server solution for Linux developers. Here’s how to install it using the terminal.
Step 1: Download XAMPP for Linux
Go to apachefriends.org and scroll down to the Linux section. You’ll see three packages listed, the main difference between them is the PHP version. As of 2026, XAMPP for Linux ships with Apache 2.4.58, MariaDB 10.4.32, PHP 8.2.12, and phpMyAdmin 5.2.1. Choose the version that matches your project’s PHP requirement. The downloaded file will be a .run installer, for example: xampp-linux-x64-8.2.12-installer.run.
Step 2: Make the Installer Executable
Open your terminal with Ctrl + Alt + T and navigate to your Downloads folder:
cd ~/Downloads
Then make the installer executable:
chmod +x xampp-linux-x64-8.2.12-installer.run
Step 3: Run the Installer
Run the installer with administrator privileges:
sudo ./xampp-linux-x64-8.2.12-installer.run
The Setup Wizard will open. Click Next through the screens. When prompted to select components, XAMPP Core Files are mandatory and cannot be deselected, type Y for everything to keep the default installation. Keep the default installation path /opt/lampp and click Finish.
Step 4: Start XAMPP on Linux
Start all XAMPP services using this command:
sudo /opt/lampp/lampp start
You’ll see a confirmation in the terminal that Apache and MySQL have started. Open your browser and go to http://localhost to verify the XAMPP dashboard loads. To verify phpMyAdmin is also running, go to http://localhost/phpmyadmin.
Step 5: Launch the XAMPP Control Panel on Linux
If you prefer a GUI over the terminal, navigate to the XAMPP directory first and then launch the manager:
cd /opt/lampp
sudo ./manager-linux-x64.run
From the Manage Servers tab, click Select All and then Start All to launch Apache and MySQL together.
Linux Tip: To stop XAMPP, run:
sudo /opt/lampp/lampp stop
Always stop XAMPP before shutting down your machine to avoid database corruption.
XAMPP Error Fixing: Common Issues and How to Resolve Them
XAMPP errors usually occur due to port conflicts, missing permissions, corrupted files, or system restrictions. To fix most XAMPP issues, check your Apache/MySQL error logs, change the default ports (80, 443, 3306), run XAMPP as an administrator, or reinstall missing components. Below is a simple, complete guide to identifying and fixing XAMPP errors on Windows, macOS, and Linux.
1. Why XAMPP Fails to Install
XAMPP may not install due to the following reasons
– System requirements don’t match
– Antivirus blocks the installation
– The installer file is corrupted
– UAC (User Account Control) restricts permissions
How to Fix XAMPP Installation Issues
Follow these steps to resolve most installation problems
- Run the installer as Administrator
- Disable antivirus temporarily
- Download a fresh installer from Apache Friends
- Avoid installing under “C:\Program Files.”
2. How to Identify XAMPP Errors
Before fixing any issue, check the error logs.
Where to check Apache errors
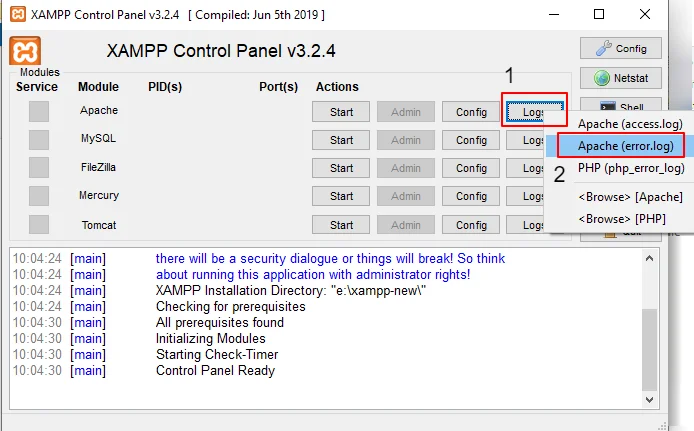
- Open XAMPP Control Panel
- Click Logs under Apache
- Select error.log
This file shows the exact reason Apache is failing.
Where to check MySQL errors
- Go to Logs → MySQL
- Select mysql_error.log
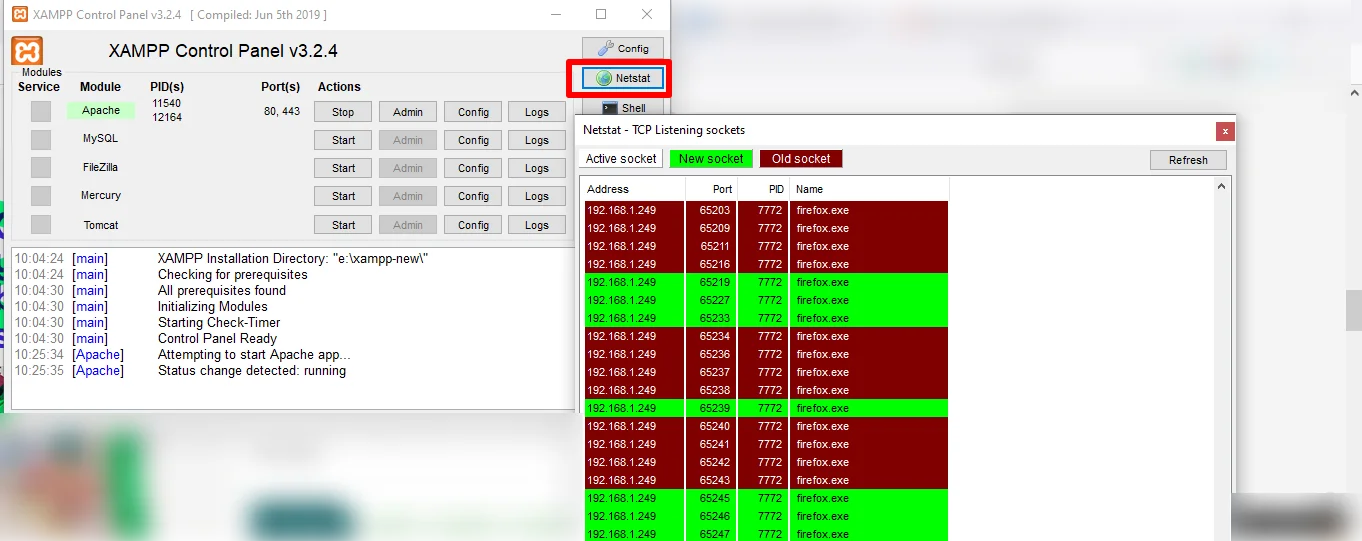
3. Fixing Apache Port Conflict (Port 80 or 443 in use)
This is the MOST common issue in XAMPP
How to verify the port conflict
- Open XAMPP Control Panel
- Click Netstat
- View which application is using Port 80 or Port 443
How to fix the conflict
There are 2 ways
Method A: Stop the conflicting application
Common apps that use Port 80
- Skype
- IIS
- VMware
- Windows Services: Web Deployment, W3SVC, and stop them if possible.
Method B: Change Apache Port to 8080
- Open XAMPP Control Panel
- Click Config (Apache)
- Open httpd.conf
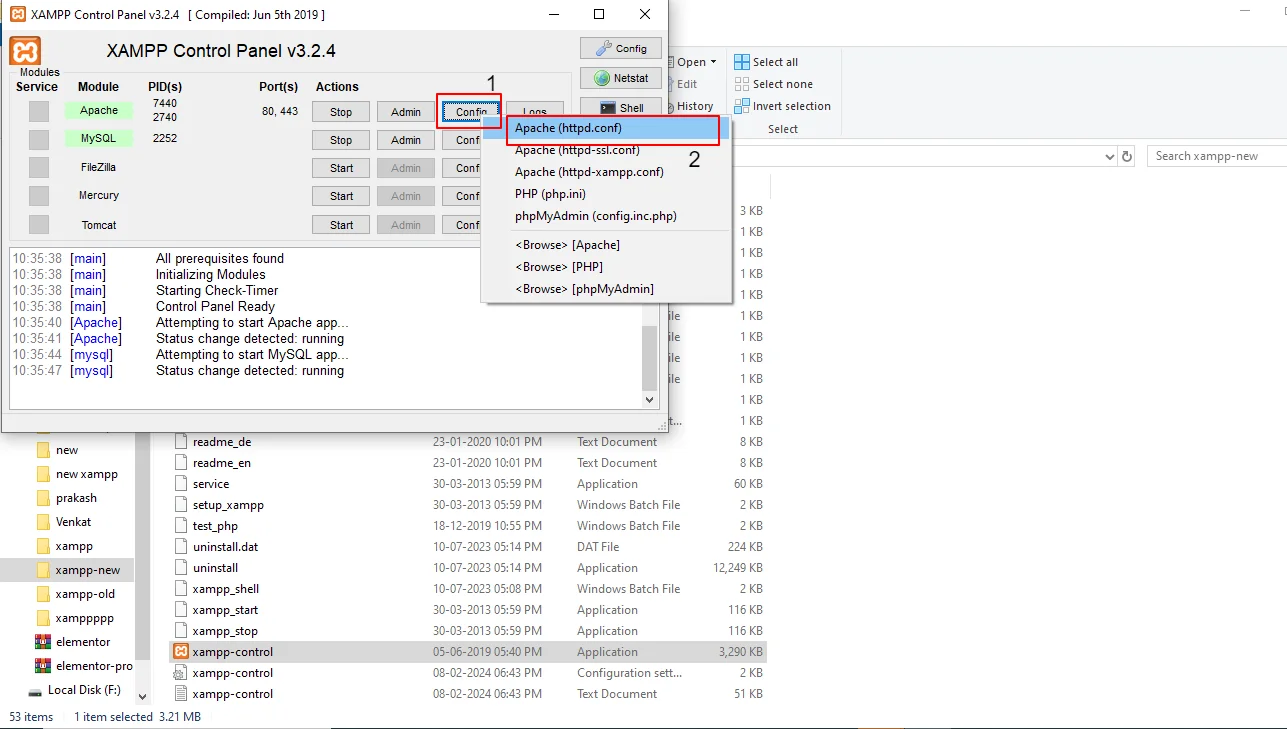
Find: Listen 80
ServerName localhost:80
Change to: Listen 8080
ServerName localhost:8080
- Save and restart Apache
Then open your WordPress site at http://localhost:8080/
Mac Users
Open Finder → Applications → XAMPP → Apache folder → open httpd.conf. Make the same port updates as Windows.
4. Installation Errors: How to Check If XAMPP Is Installed Properly
To confirm XAMPP is installed correctly
- Go to C:\xampp (Windows) or /opt/lampp (Linux)
- Open XAMPP Control Panel
- Start Apache and MySQL
- Open browser → enter: http://localhost/
If the dashboard loads, installation worked.
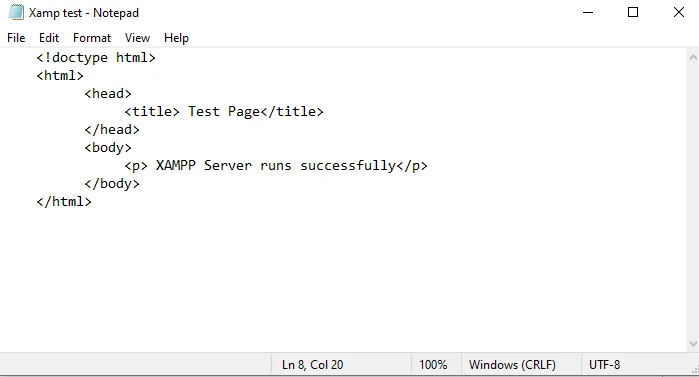
5. Test File Method: Verify XAMPP Configuration
Create a small PHP file to test the server
<!doctype html>
<html>
<head>
<title> Test Page</title>
</head>
<body>
<p> XAMPP Server runs successfully</p>
</body>
</html>
Save as: test.php under htdocs
Open: http://localhost/test.php. If you see the message, XAMPP is working correctly.
6. Fix MySQL Errors (Port 3306 issues or “MySQL stopped unexpectedly.”
Reason for MySQL failure
- Port 3306 is already used
- Corrupted MySQL files
- Permission issues
Fix 1: Change MySQL port to 3307
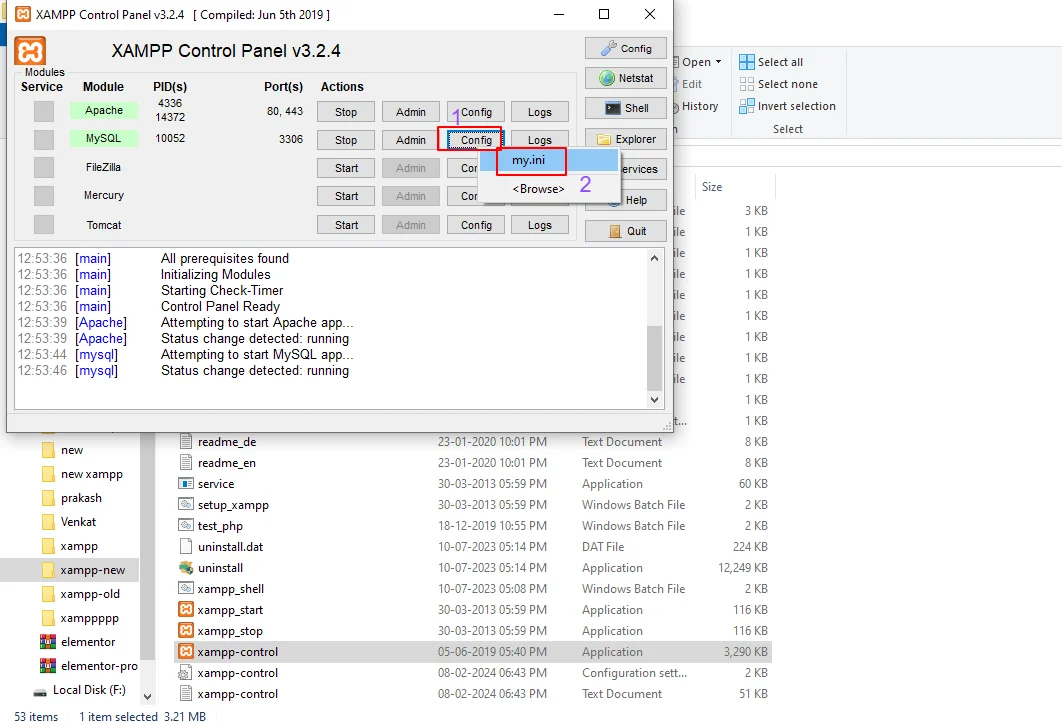
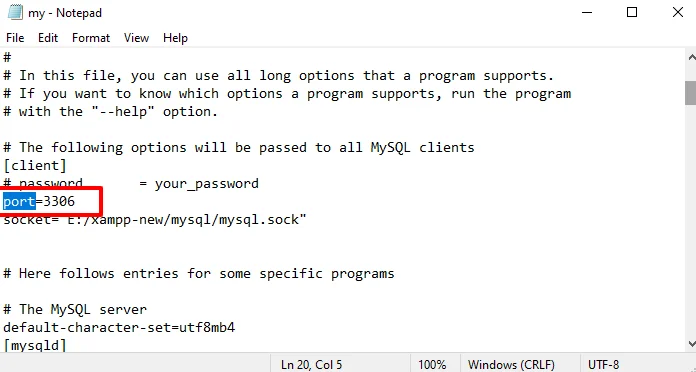
- Open the XAMPP control panel
- Ensure that you have stopped all the running modules such as Apache and MySQL.
- Go to Config → my.ini
- Replace Port=3306 with Port=3307
- Save and restart XAMPP
Fix 2: Run XAMPP as Administrator
Right-click → Run as administrator
macOS
- Right-click XAMPP
- Get Info → Sharing and Permissions
- Set all users to “Read and Write.”
- Enter admin password
How to Install WordPress on Localhost (WAMP or XAMPP)
Once your local server is running, installing WordPress takes about five minutes. The process is identical whether you’re using WAMP or XAMPP, the only difference is the folder you paste WordPress into.
Step 1: Download WordPress
Go to wordpress.org and click Get WordPress, then click Download WordPress. You’ll get a .zip file containing the latest version of WordPress. As of 2026, the current stable release is WordPress 6.x.
Step 2: Move WordPress to the Correct Folder
Extract the downloaded .zip file. You’ll get a folder named wordpress. Copy that folder into the correct directory depending on your local server:
- WAMP:
C:\wamp64\www\ - XAMPP (Windows):
C:\xampp\htdocs\ - XAMPP (Mac):
/Applications/XAMPP/htdocs/ - XAMPP (Linux):
/opt/lampp/htdocs/
Rename the folder to whatever you want your local site URL to be, for example, rename it mysite and your local URL will be http://localhost/mysite.
Step 3: Create a Database in phpMyAdmin
Open your browser and go to http://localhost/phpmyadmin. Log in with username root and no password.
- Click the Databases tab at the top.
- In the Create database field, type a name for your database, for example
wordpress_local. - Leave the collation as-is and click Create.
Your database is ready. Keep this tab open, you’ll need the database name in the next step.
Step 4: Run the WordPress Installation Wizard
In your browser, go to http://localhost/mysite. WordPress will detect it’s not configured yet and launch the installation wizard automatically.
- Select your language and click Continue.
- You’ll see the Before We Get Started screen listing the database details you’ll need. Click Let’s Go.
- Fill in your database details:
- Database Name:
wordpress_local(or whatever you named it) - Username:
root - Password: leave this blank
- Database Host:
localhost - Table Prefix: leave as
wp_unless you’re running multiple WordPress installs on the same database
- Database Name:
- Click Submit.
- WordPress will test the connection. If successful, click Run the Installation.
Step 5: Set Up Your WordPress Site
Fill in your site details:
- Site Title: whatever you want to call your local site
- Username: create an admin username (avoid using “admin” it’s a security risk even locally)
- Password: create a strong password
- Your Email: enter your email address
- Click Install WordPress
Step 6: Log In to Your WordPress Dashboard
Once installation completes, click Log In. Enter the username and password you just created. You’ll land on the WordPress admin dashboard at http://localhost/mysite/wp-admin.
Your local WordPress site is now fully set up and ready to use.
WP Ultimate CSV Importer Pro
Get Ultimate CSV/XML Importer to import data on WordPress faster, quicker and safer.
Frequently Asked Questions
1. How do I download XAMPP on Windows?
To download XAMPP on Windows, visit the official Apache Friends website and choose the Windows installer. Select the latest version and follow the setup wizard to install Apache, MySQL, PHP, and phpMyAdmin on your system.
2. How do I install XAMPP and WAMP on Windows 10 and 11?
To install XAMPP or WAMP on Windows 10, download the installer from their official websites, run the setup file, choose the required components, and follow the on-screen instructions. After installation, start Apache and MySQL from their control panels to activate the local server.
3. How do I install XAMPP and WAMP on a Mac?
WAMP cannot be installed on macOS because it is designed only for Windows. However, you can install XAMPP on Mac by downloading the macOS version from the official Apache Friends website and completing the installation using the setup wizard.
4. Can I run WAMP and XAMPP at the same time?
Technically yes, but not simultaneously. Both use the same default ports, port 80 for Apache and port 3306 for MySQL. Running them at the same time will cause conflicts and neither will work. You can have both installed and switch between them by stopping one before starting the other.
5. How do I install XAMPP and WAMP for PHP development?
Both XAMPP and WAMP come with PHP pre-installed. To begin PHP development, install either tool, start Apache and MySQL, and store your PHP files inside htdocs (for XAMPP) or www (for WAMP).
6. How do I install XAMPP on Ubuntu or Linux?
Download the Linux installer from the Apache Friends website, make the file executable using the terminal, and run it with administrator privileges.
7. Where can I download WordPress for local installation?
Download WordPress from the official WordPress.org website. After downloading, extract the WordPress folder into the htdocs (XAMPP) or www (WAMP) directory, create a database via phpMyAdmin, and run the installation through local wordpress setup.
8. How to activate XAMPP?
XAMPP doesn’t require activation. Once installed, you can start the XAMPP Control Panel and manually start the Apache and MySQL services to activate them.
9. Will I lose everything if I reinstall XAMPP?
No, Reinstalling XAMPP will overwrite the existing installation but won’t affect your website files or databases if you keep them outside the XAMPP installation directory. However, it’s always a good practice to back up your data before reinstalling.
10. Why is my WampServer not working?
WampServer might not be working due to several reasons such as port conflicts, service failures, or misconfigurations. Check the WampServer error logs for any specific error messages to troubleshoot the issue.
For Apache port conflict, the solution is the same as that for Xampp as explained above. Change the Apache port name from 80 to 8080 and Server name localhost to Server name localhost: 8080 in the httpd.conf file (Xampp’s control panel -> Apache -> Config-> httpd.conf)
Sometimes, port 8080 may also be busy. In that case, you can use the port 7080.
If still you have an error in running Wamp Server in the local host, here is a simple solution
Navigate to My Computer. Right-click on it and select Properties->Device Manager
Now click on View-> Show Hidden Devices-> Non-Plug and plug devices-> HTTP -> Disable.
Now Restart your computer. Now you can run your Wamp Server effectively to access the WordPress site.
11. How do I reinstall WampServer?
To reinstall WampServer, first, uninstall the existing installation, then download the latest version from the official website and run the installer. Follow the on-screen instructions for installation.
12. What is the forbidden error in Wamp?
The forbidden error in WampServer typically occurs when you try to access a directory for which the Apache server doesn’t have proper permissions. You can fix it by adjusting the directory permissions in the Apache configuration files.
13. How do I know if my WampServer is working?
You can check if WampServer is working by opening your web browser and typing localhost in the address bar. If you see the WampServer homepage or the default Apache page, it indicates that the WampServer is running correctly. Additionally, for beginner users, you can check the status of Apache and MySQL services in the WampServer icon in the system tray. This process is easy and helps ensure that your server is functioning properly.
14. Can I use WAMP or XAMPP for production hosting?
No. Both tools are designed for local development only. They are not configured for production security, default settings leave databases accessible without strong passwords and services exposed on the local network. For live websites, use a proper hosting provider with a managed server environment.
15. Is WAMP or XAMPP better for WordPress development?
Both work equally well for WordPress on Windows. WAMP has the edge if you need to switch PHP versions frequently, its tray menu makes it a one-click operation. XAMPP is better if you’re on Mac or Linux, or if you want to run your local environment from a USB drive.
Installing XAMPP or WAMP gives you a clean, reliable environment to build and test without risk. With a local server in place, you can develop WordPress sites, run PHP scripts, and troubleshoot issues freely, without touching your live website. That means no unexpected downtime, no data integrity issues, and no costly mistakes on a production server.
A well-configured local environment gives you full control over your stack, faster iteration, and a safe space to experiment until everything works exactly the way you need it to.
If you’ve followed this guide and your local server is up and running, you’re already ahead. The next step is setting up WordPress locally and starting to build. If you run into any issues or have questions along the way, we’d love to hear from you at [email protected].
