Table of Contents
WordPress is legendary among other CMS with many commercial & blogging websites built on it. Content Management is more powerful because it allows extending functionality in all dimensions. With Custom Post Types, you can create a different format of content than usual Posts and Pages. Creating Custom Post Types lets you extend your blogging platform into a fully-fledged CMS.
WP Ultimate CSV Importer is the plugin that you can use to import your Pods Custom Posts data into WordPress. It imports values in the format of CSV into WordPress. Import all your custom post data into WordPress using WP Ultimate CSV Importer. In the upcoming, we will discuss how to import and export Pods data into WordPress with WP Ultimate CSV Importer.
Pods
Before that, let’s see about Pods. Pods is one of the third-party custom post creation plugins in WordPress. It is a framework used to create and maintain any type of custom post as the user needs. In addition to that, you can create a custom post, page, or taxonomy by clicking on ‘Add New’ in the post admin dashboard. To create custom fields , click on ‘Manage fields→ Labels’.
Types of field formats in PODS
Text and Number Format
Plain text
You can add single-line text or words in this field type
Eg: WP Ultimate CSV file
Plain Paragraph
Add your paragraph content by using this field type. You can add multiple plain texts.
Eg: Import all your Pods information into your WordPress from any CSV/XML file. Upload your file, Map the CSV fields with the desired WP fields and import your content.
Phone
In this field, you can mention the phone number.
Eg: 1234567890
WYSIWYG Editor
Add any type of text in WYSIWYG Editor field format.
For Example:
WP Ultimate CSV Importer
- Import/update of any Pods custom field information.
- Import all your CSV/XML data instantly or schedule it to run at periodic intervals.
Code
Specify the text field with syntax via code mirror.
Date and Time Format
Mention the date and time in the standard format – yyyy/mm/dd hh: mm am
Eg: 2018/10/09 01:50pm
Date:
Specify the date in the below format – yyyy/mm/dd.
For Example: 2018/10/09
Time:
Mention the time in the standard format – hh:mmam
Eg: 01:50pm
Plain Number
Specify Numeric data in this field
Eg: 123
Currency
Mention the currency value.
Eg: 684
Link Format
Email:
Provide your email using the standard @ and dot format.
Website:
Provide a website link in this field.
Eg: https://www.smackcoders.com/wordpress.html
Images / Video / Audio / Text
Specify the image or file or video URL of your WordPress Media gallery. For images, you can use a publicly accessible external URL. Use Comma(,) separator to add multiple values.
For example:
https://cdn.smackcoders.com/wp-content/uploads/2023/11/WordPress_Ultimate_CSV_-XML_Importer_Pro.webp, https://cdn.smackcoders.com/wp-content/uploads/2023/11/WP-logo-Helpdesk-Integration-logo.webp
oEmbed
Mention the Youtube URL. WP Ultimate CSV Importer Pro Get Ultimate CSV/XML Importer to import data on WordPress faster, quicker and safer.
For example: https://www.youtube.com/watch?v=6tdiOjw4EDk
Selection Format
Relationship (Checkbox, Multiselect, Radio button, Autocomplete, ListView)
Specify the desired value. To select multiple value use Comma(,) separator.
Eg: Yellow, Green, Blue
Mention the Youtube URL.
For example: https://www.youtube.com/watch?v=6tdiOjw4EDk
Yes/ No
Specify the desired value to select. 0 – No,1 – Yes
Eg:1
Color Picker
Mention the color code.
Eg: #ffffff
Pods Custom Post Import in WordPress using WP Ultimate CSV Importer
Initially, to import the Pods Custom Post Types and its meta-data into WordPress, install WP Ultimate CSV Importer Pro Plugin and Pods Plugin. Later activate those plugins to create and import data.
CSV Import procedure for Pods:
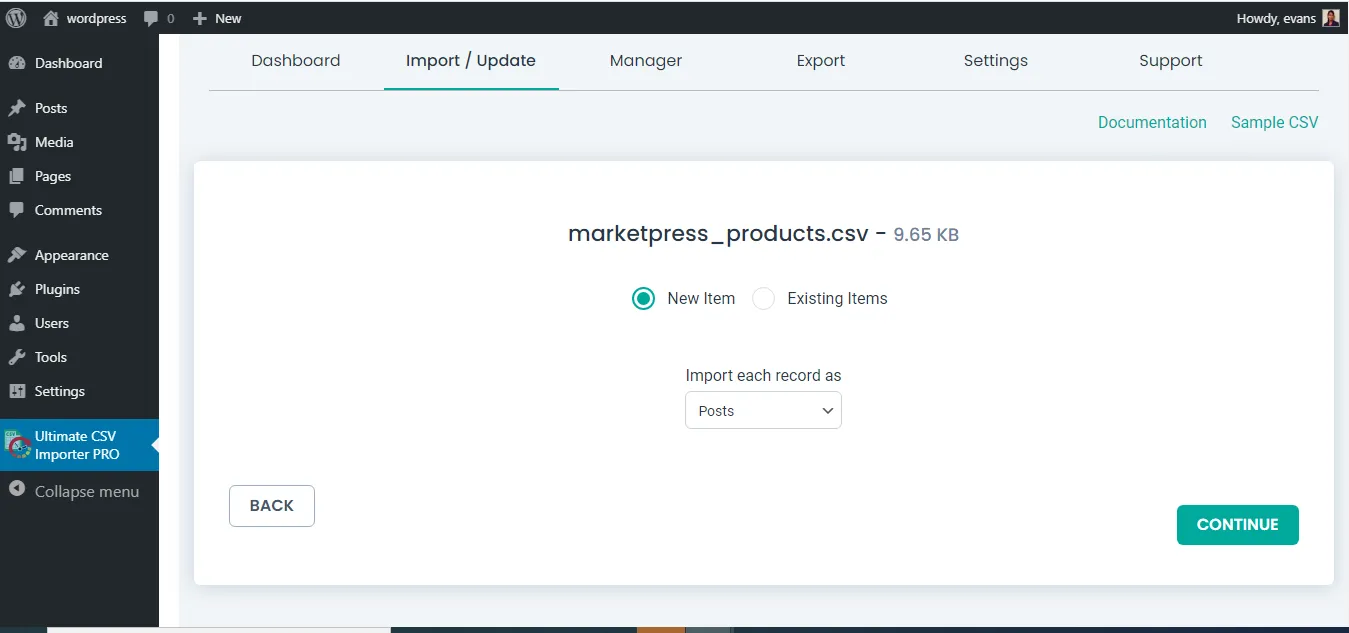
To import the CSV/XML file, navigate to the ‘Import/Update’ tab on the WP Ultimate CSV Importer Pro plugin.
After that, start uploading the CSV/XML file. You can upload the CSV/XML file from 4 locations: Desktop, FTP/SFTP, External URLs, and Server.
After you upload the file, choose the post type from the dropdown.
For Update & Fresh update:
You can update the before-created record by selecting the “Existing items” option. It will redirect you to the page with saved templates that are available for you to choose from. The option to choose the existing templates is only available if you save mapping templates for the same post-type. Else for importing new data, use the ‘New item’ option as the default.
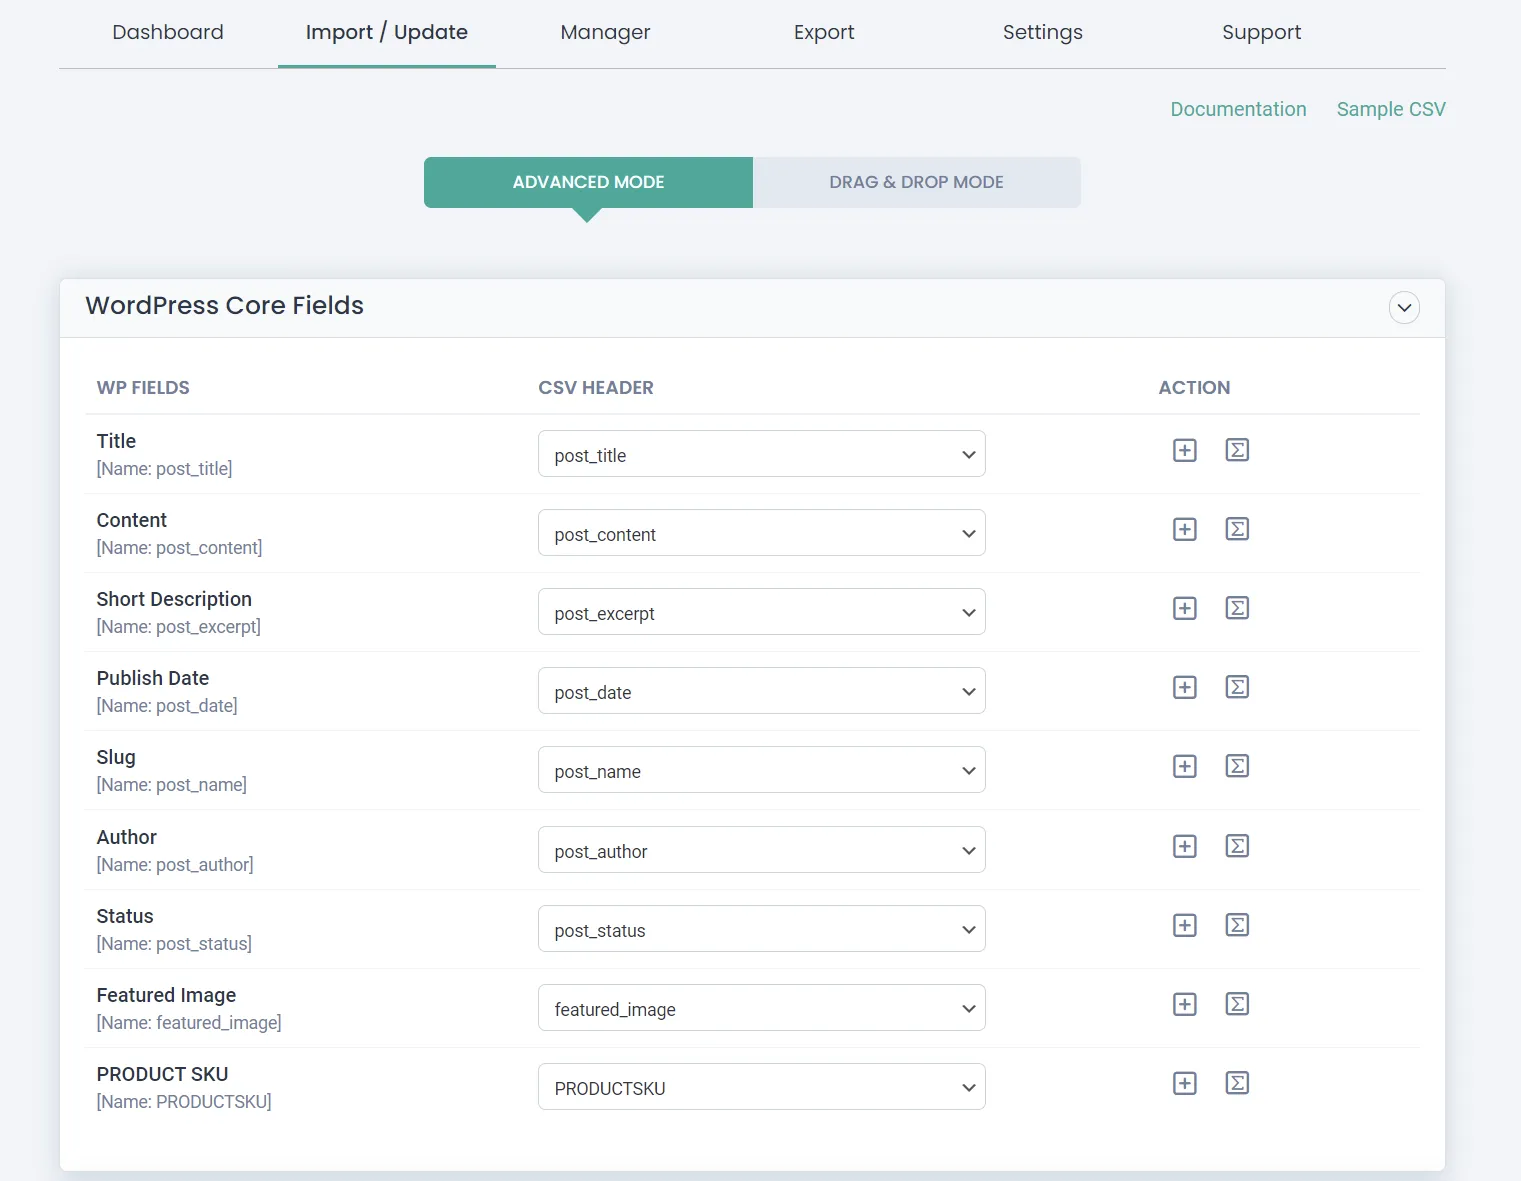
Map the WP fields to the CSV header in the core fields. Map WP fields to the CSV header in the core custom fields. When you’re adding the custom fields in pods, please refer below.
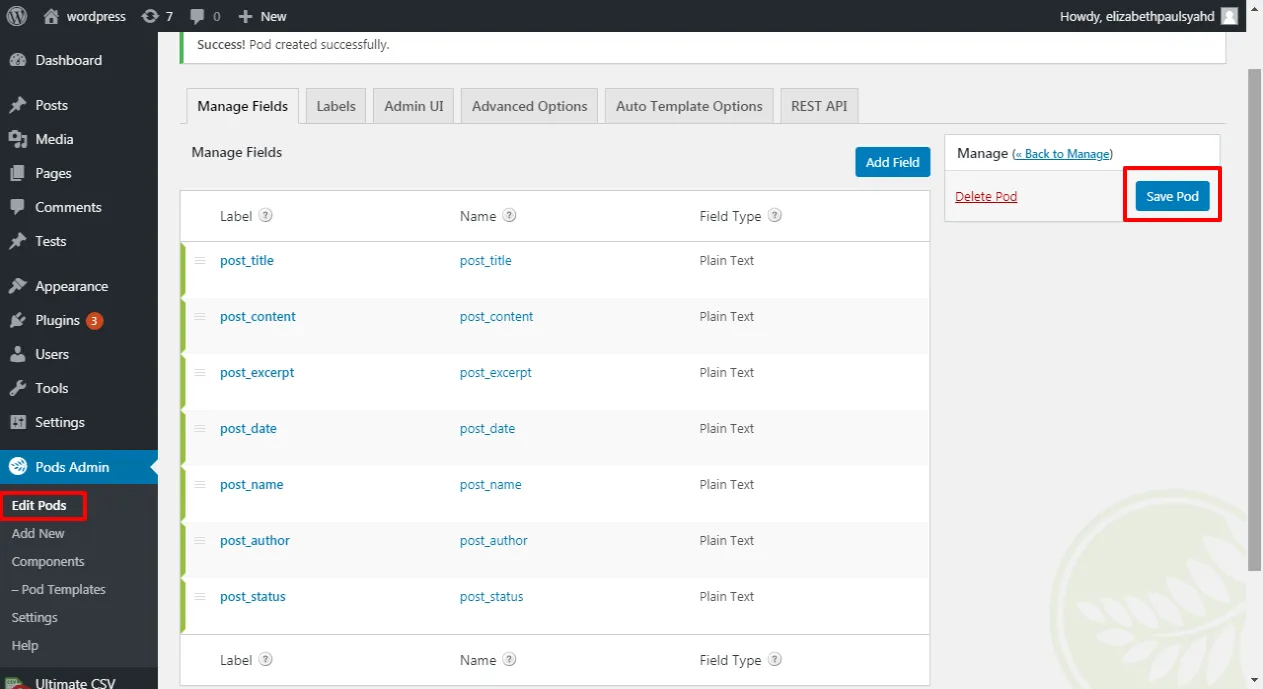
Activate “Pods” add-ons in your WordPress Website . Hit the “Pods” menu in the WP Admin sidebar. There you can tap the “Add New” button.
- Label – Label represents a caption for an item. And it is used to display in order.
- Name –Represents the name of the item to be displayed.
- Type – In the field, Type select the fields related to the name of the item as you need.
- Storage – Helps to store bulk items.
- Number of Fields – List of Fields you’ve created in.
Label and Name are the required fields. Without completing them we can’t proceed.
After this, you can get through the “post type” which you’ve created before. Therein you can create a custom post type of your own.
Ways to upload CSV/XML file:
Now move to WP Ultimate CSV Importer Pro plugin to import the already created “Pods custom post types”. Upload a CSV/XML file from the respective 4 ways. Then choose the post type.
Map the CSV header with WP fields. Click the continue button.
You’re directed to the “Media Handling” section. Enable “Download external images to your media” . Click on continue and you’ll be navigated to the “Import Configuration” section.
- You can enable maintenance mode. It notifies your visitors that your website is under maintenance.
- To detect the duplicates and skip from importing, enable the “Do you want to handle the duplicate on existing records ?” option.
- If you want to revert the importing to the previous state, use the “Enable safe prostate Rollback (Backup before import)” option.
Click Import to immediately import the content.
Enable the ‘Do you want to Schedule this Import ?’ option in the ‘Import Configuration Section’. Give the details of the scheduled date, schedule time, and schedule frequency. When it reaches a particular time, the CSV file gets imported automatically.

After importing the CSV file, you can verify the import in the admin view or web view by clicking on the ‘View log’ button.

The custom fields creation and import are the same as the above-mentioned steps.
Export Pods Custom Post data from WP Ultimate CSV Importer
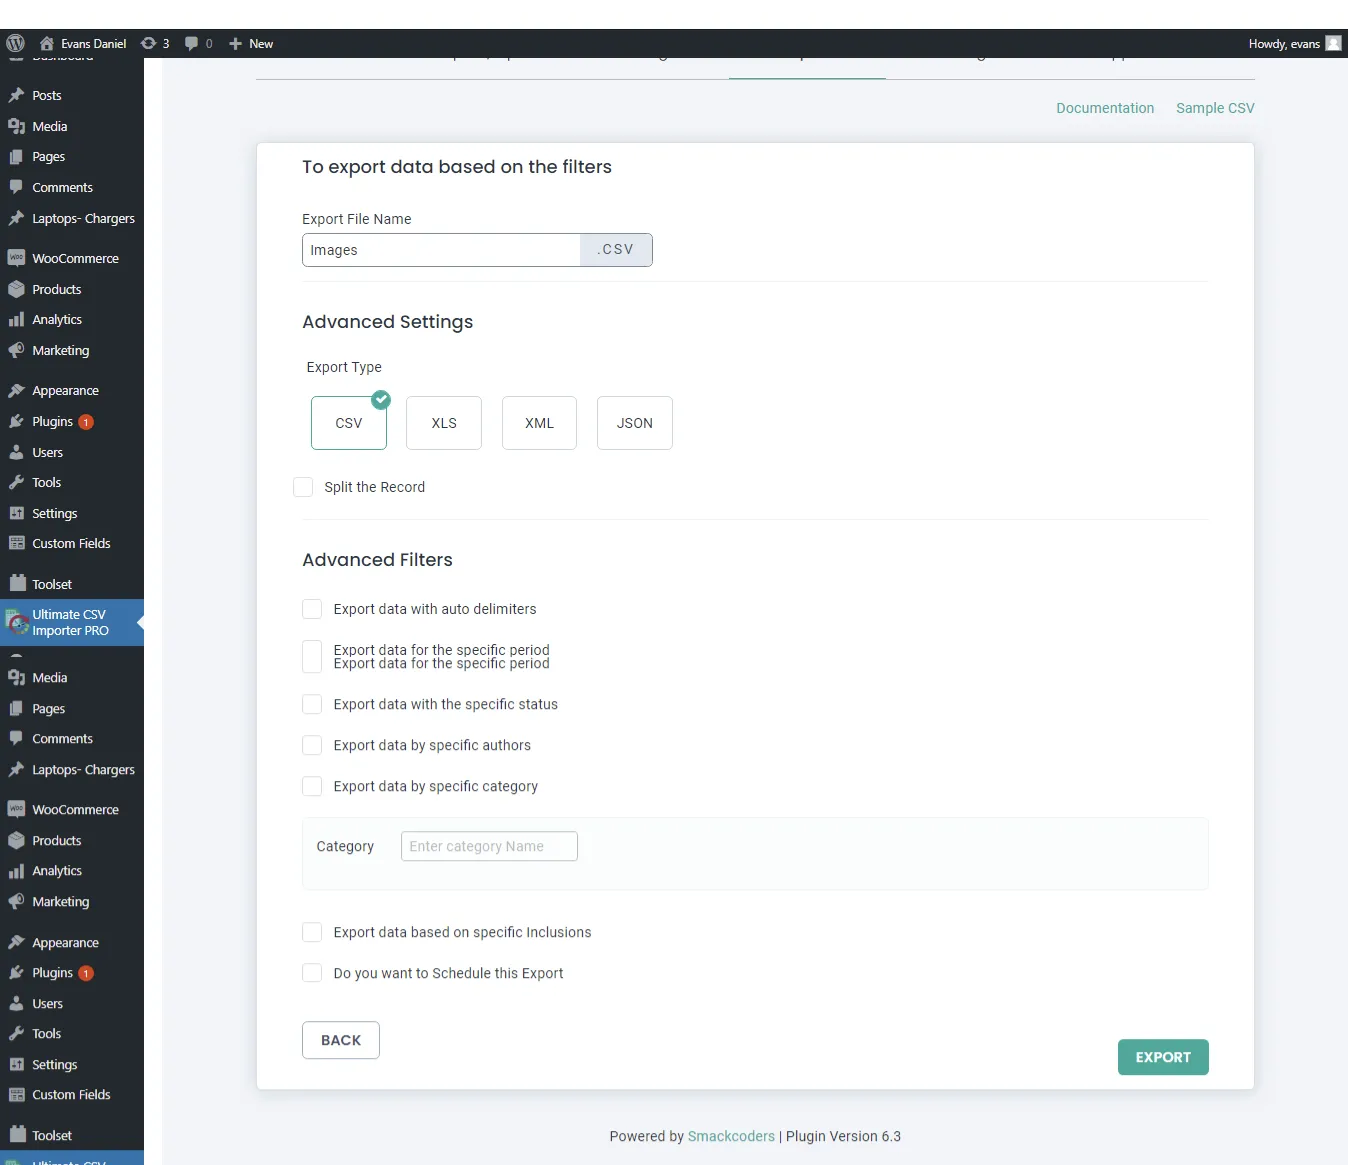
In the export section, click on the ‘custom post’ option and then choose the custom post name from the drop-down that you have to export.
On the next page, add a title to your export file and select the file format. You can export data with the specific delimiter, author, status based on your needs. Also, split and export the records for large content. You can schedule your export which means that you can select from and to date for your data. Please refer to our documentation for a detailed explanation of data exporting with WP Ultimate CSV Importer.
Wrapping Up
Hope this guide is helpful for you to know how to import and export the CSV files using WP Ultimate CSV Importer. Still, worried about Custom Post Type import using WP Ultimate CSV Importer? Contact our technical support team at [email protected]. Get better assistance from our team quickly.