Vtiger Asterisk Integration – A simple Asterisk Connector for Vtiger CRM. Vtiger Asterisk Connector allows you to make and receive your calls within Vtiger CRM. All incoming and outgoing calls are recorded and can be downloaded for any kind of future analysis or reference. You can dial or reject your customer calls through a softphone. You can get your call pop-up right inside your CRM to manage it effectively. You can also visualize the complete call history which includes call status, call duration, contact details, and much more on a single unified window. Vtiger Asterisk Connector helps you to engage with your Prospect or Customers easily. You can give complete quick support with all your customers’ information in hand. With the CRM’s interrelated nature, you can easily get access to any relevant data you are discussing in your call. Vtiger Asterisk Integration brings all to your desk. All the calls made through Vtiger Asterisk Integration are recorded. The record backup will be helpful for any future reference on the call. It will help you to make your sales flow smooth even in the absence of anyone.
The call history report gives you the frequency of contacting your Prospect or Customers. The time of call that has successfully reached your customers can help you make better decisions. Vtiger Asterisk Connector, a Vtiger CRM integration makes complete customer communication simple.
Vtiger Asterisk Integration Pre-requisites
- Asterisk version 1.8.* or 7.x
- Oracle Java 1.8
- Vtiger CRM version 6.5
- Vtiger Details
- Vtiger Server URL
- Vtiger Secret Key – Copy this detail from Vtiger CRM Settings. Integration→ PBX Manager page.
PBX Manager Suite Configuration #
Vtiger Asterisk Connector Installation #
- Download and unzip VtigerAsteriskConnector.zip
- Now, unzip PBXSuiteLite.zip & PBXSuite.zip files inside the Import folder from anywhere.
PBXManager Suite Module #
With the Asterisk Module for Vtiger CRM- PBXManager Suite you can edit or delete the internal peer and dial plan configuration of the asterisk. Additionally, you can customize various settings to suit your specific needs and optimize performance. Click Settings → CRM Settings → Integration → Vtiger PBX integration. Configure your sip.conf and extension.conf using the following steps,
SIP CONFIGURATION
Configure your sip to provide user access for your CRM users to manage call logs, inbound and outbound calls, and much more. Edit your SIP Configuration file as follows,
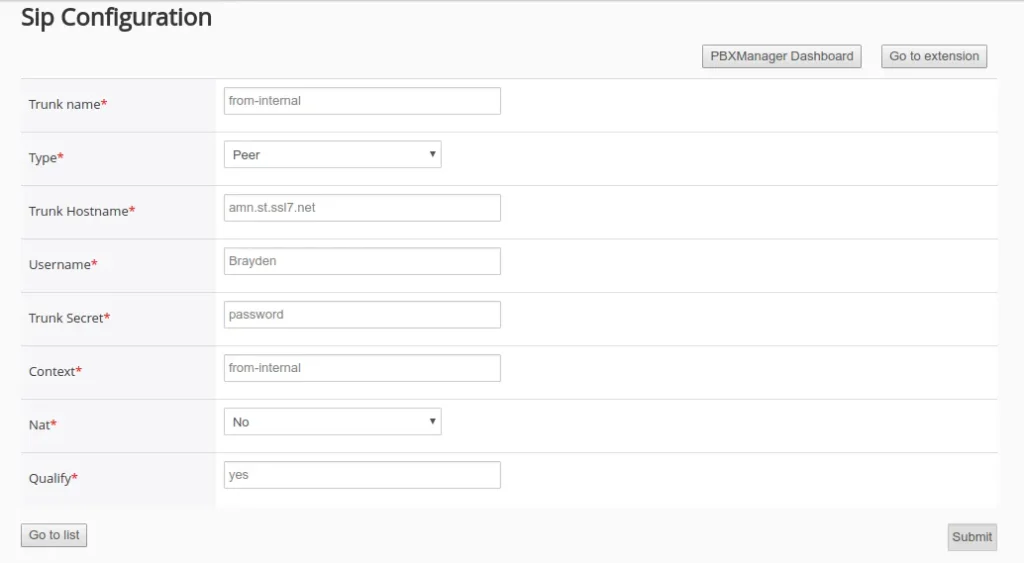
- Trunk Name – Enter name or number on your own.
- Type – Select your type from the drop-down menu containing peer, user, and friend. The asterisk default type is peer.
- Trunk Hostname – Provide a hostname based on your sip provider.
- amn.st.ssl7.net for North America and more
- Username & Trunk Secret – Enter the username and password of the sip provider.
- Context – Mention the call name according to your dial plan function. Eg:from-internal or any name.
- Nat – Set by default as No to work behind a firewall for asterisk.
- Qualify – Set your default time setting as 60 seconds for call rings by selecting Yes. Then Click Submit. You can add more user entries by clicking the Add Sip button.
Extension Configuration
With this module you can easily maintain the dial plan functions like Hang up, Receive, Dial, and Transfer your calls. You can edit or delete the extension configuration based on your sip provider details. Configuration steps are as follows,
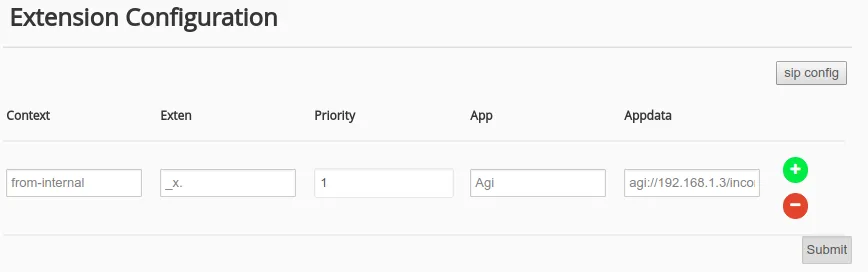
- Context – Enter the context name as you provide in the sip configuration.
- Exten – Provide_x. as common for all the Vtiger users to make outgoing calls.
- Priority – Set priority 1 as default for app agi.
- App – Set default as Agi to connect an asterisk dial plan.
- Appdata – Used to connect asterisk connector applications. Provide your Appdata in this format. Eg: agi://your_connector_running_ip/incoming.agi
- Then click ‘Submit’.
VtigerCRM Asterisk Configuration #
Vtiger Asterisk Integration module – PBXManager Suite requires a few configurations that need to be made in Asterisk Server. The Vtiger Asterisk Server can be one or they can be installed in 2 different servers. If the Vtiger and Asterisk Server are in different locations, then MySql needs to be open to connect Vtiger and Asterisk.
Asterisk side basic configuration #
Configure your Asterisk Server to make PBXManager Suite to work properly,
Before configure the asterisk files, Take backup of sip.conf and extensions.conf file in /etc/asterisk folder
sss@users:/etc/asterisk$ sudo cp sip.conf old-sip.conf
sss@users:/etc/asterisk$ sudo cp extensions.conf old-extensions.conf
To configure sip.conf:
sss@users:/etc/asterisk$ vi sip.conf
[general] context=set as your own ex:from-internal
allowguest=yes
allowoverlap=no
bindport=5060
srvlookup=no
dtmfmode=rfc2833
disallow=all
allow=ulaw
allow=alaw
allow=gsm
allow=speex
qualify=yes
rtcachefriends=yes
/ register your sip-provider credential as following/
register => username:password@hos/domain
Example:
register => 31961:8f6LrYd(@amn.st.ssl7.net
Note: 31961 is your sip credential username
8f6LrYd( is your sip credential password
amn.st.ssl7.net is your provider host/domain name
To configure extensions.conf:
sss@users: /etc/asterisk$ vi extensions.conf
[general] [globals] ;
[from-internal] /[context] same as like in sip.conf/
switch =>Realtime
To configure manager.conf:
sss@users: /etc/asterisk$ vi manager.conf
[general] enabled=yes
;webenabled=no
port=5038
bindaddr=0.0.0.0
[username] secret=password
deny=0.0.0.0/0.0.0.0
permit=asterisk_ip/255.255.255.0
permit=vtiger_ip/255.255.255.255
permit=127.0.0.1/255.255.255.0
read=all,system,call,log,verbose,command,
agent,user,config,dtmf,reporting,cdr,
dialplan,originate,message
write=all,system,call,log,verbose,command,
agent,user, config,dtmf,reporting,cdr,dialplan,
originate,message
To configure cdr_manager.conf:
sss@users: /etc/asterisk$ vi cdr_manager.conf
[general] enabled = yes
To configure Res_config_mysql.conf:
[general] dbhost = localhost
dbname = vtiger database name
dbuser = mysql username
dbpass = mysql password
dbport = 3306
dbsock = /var/run/mysqld/mysqld.sock
;dbcharset=latin1
;requirements=warn ; or createclose or createchar
To configure Extconfig.conf:
Copy and paste in this conf as following:
[settings] sipusers => mysql,general,vtiger_sipconf
sippeers => mysql,general,vtiger_sipconf
extensions => mysql,general,vtiger_extensionsconf
PBX Manager Module For Asterisk Integration #
Configure your PBX Module to connect your Asterisk with CRM using the following steps. You can configure your Asterisk server details after installing Vtiger Asterisk Connector in your Asterisk Server.
- Click Settings → CRM Settings → Integration → PBXManager.
- Provide your Asterisk Server details using the Edit option.
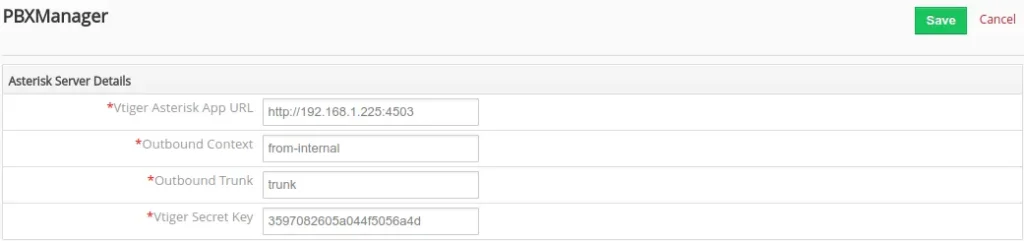
- Edit Asterisk Server Details.
- Vtiger Asterisk App URL – Enter your server name, where Vtiger Asterisk Connector is installed. Eg: Protocol://Asterisk_Server_IP:Connector_Port.
- Outbound Context – Enter the context that you Vtiger configured in sip.conf. Eg:vtiger_outbound
- Outbound Trunk – Enter the Trunk name that you configured in your asterisk sip.conf. Eg: Trunk name
- Vtiger Secret Key – Enter your Unique key generated for authentication, that has been configured in Vtiger Asterisk Connector. Then click Save.
Softphone #
You can use a softphone as an interface to dial or receive your customer calls from mobile and Skype. For quick communication, you can get an instant call pop-up right inside your CRM.
Softphone Installation Steps
- Download any Softphone.
- Extract your tar file.
- Set your Trunk Name and Password of sip configurations to activate it.
Call Logs
Vtiger Asterisk Connector keeps track of all your call records in the call logs with the call status like Ringing, Completed, Hangup, and much more. You can get the contact details of your customers inside your log. You can record, download, or replay your conversations for future analytics. Also, visualize the time duration of your customer calls with the exact time. For the Call Logs module click All → PBXManager.
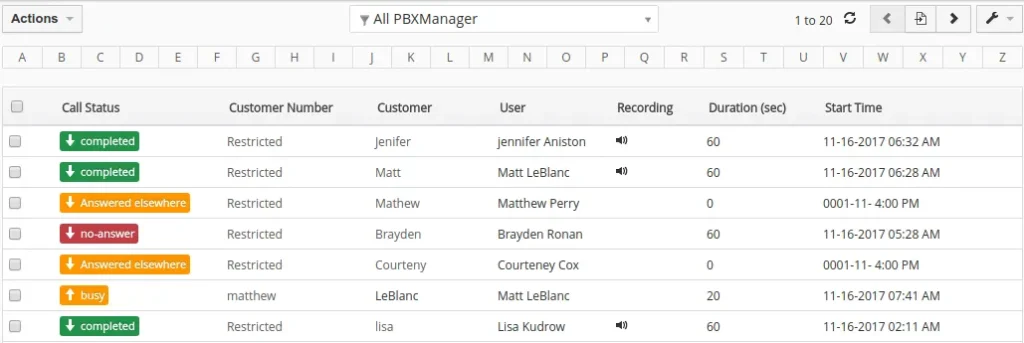
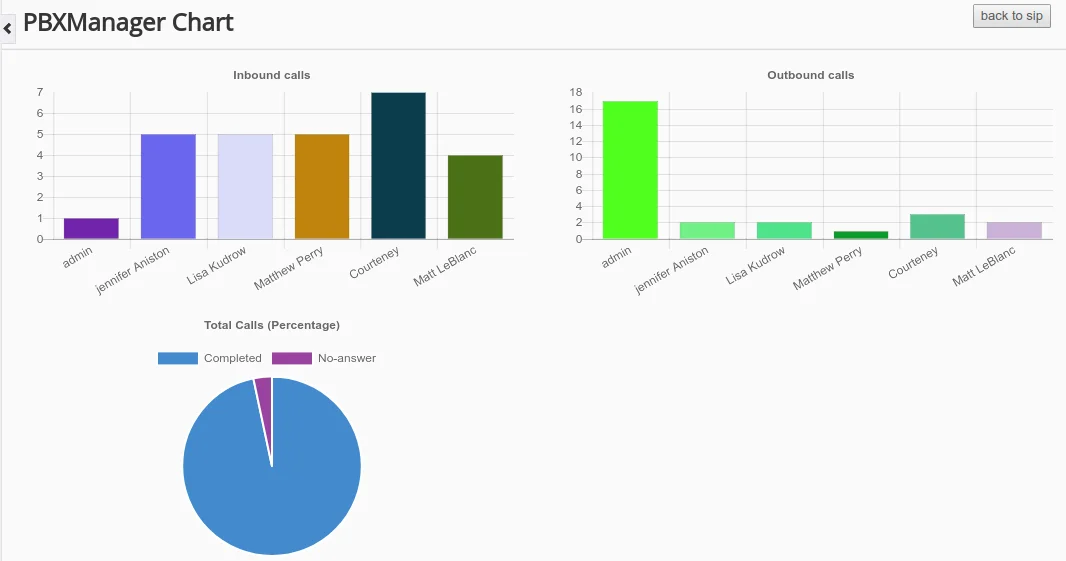
PBXManager Dashboard
With Vtiger Asterisk Integration you can easily monitor and analyze your call records in a single unified window. It shows you the reports of both incoming & outgoing calls and also no answer calls.