WP Ultimate CSV Importer reduces your effort and time taken to develop a WooCommerce website as it simply imports all the content in bulk onto WordPress. The plugin lets you schedule your import as well as updates the WooCommerce metadata and other information into WordPress by processing based on your own UTC time and zone. The import will automate run at the chosen date and time. For that first install and activate WooCommerce and WP Ultimate CSV Importer plugins.
Table of Contents
How to Import WooCommerce Metadata into WordPress?
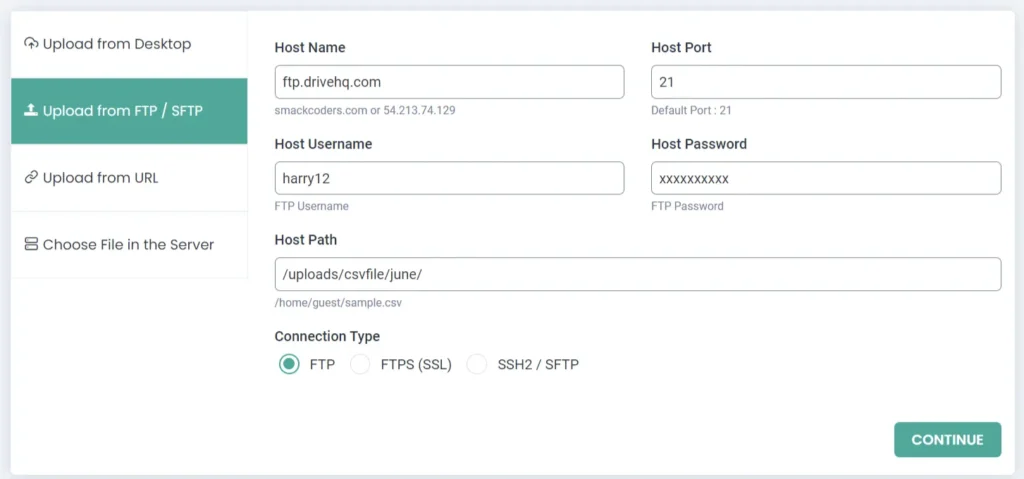
To import and update the WooCommerce products and meta data automatically, you need FTP or SFTP, or FTPS server credentials. The user has to give the host name or IP, port number, username, password, and the path to download the file. Once a host path is set in the plugin, the importer downloads the file from that path. The user changing the file name will stop the import from recurring frequently. So a user should use the same file name for the CSV and XML files that are set up for the import and update program. Users can use CSV or XML files to achieve the import and update. Below image is the example for the user to know how to apply the credentials in the plugin:

After clicking the continue button, the file will start to download from the user server. Then you will get the below page:

Users need to choose existing items and WooCommerce products from the drop-down. If you choose existing items, it will import the new records in the file and update the existing records. The update function will work based on the title or ID or Slug or SKU of the product.
Field Mapping
In the mapping section, users will map the CSV or XML headers with WP-fields. Once complete the mapping process, the user can move to the next step. You can save the mapping by providing a name in the ‘Save this mapping as’ textbox and use it as a template later on the next import.
Image handling
Enable this section, if you have used any external images and to download that images into your WP Media library. In the image handling page, users can handle the images with SEO meta tags.

WP Ultimate CSV Importer Pro
Get Ultimate CSV/XML Importer to import data on WordPress faster, quicker and safer.
Schedule Process
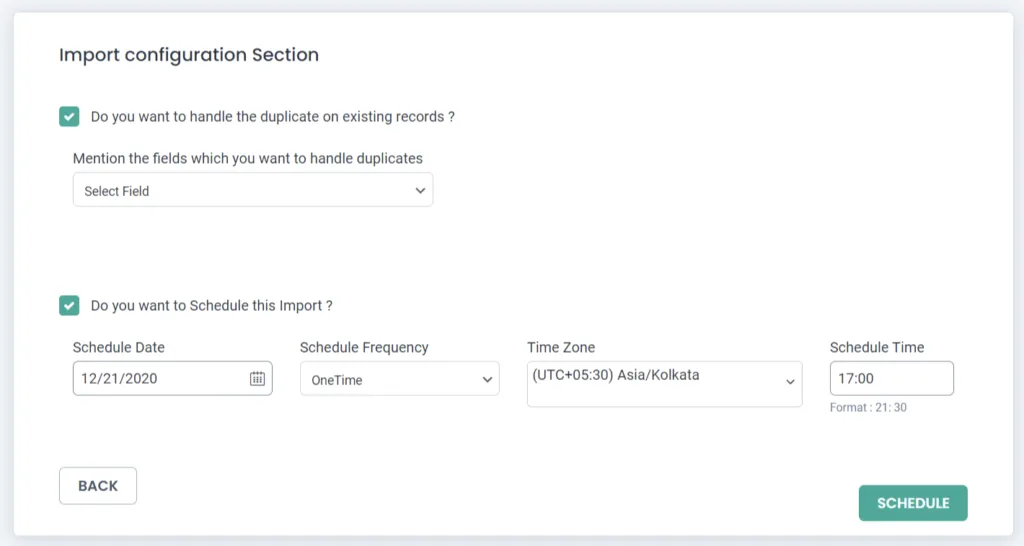
In the final step of import, the user should choose the update condition. When a user chooses SKU for the update, our importer will check the server file and update the records based on the SKU. If new entries that un-match the SKU are available in the CSV or XML file, those records will get imported into the WooCommerce products.
Users can set the schedule frequency based on their needs. If set to 1 hour, every 1 hour the records in the server will get checked and updated automatically.
Before setting the time zone for the automatic update, check the time in the “Settings > General” option in WordPress. Give the UTC time relevant to that time in the importer. Finally, set the scheduled time and complete the set-up.

How to delete the scheduled files?
Go to the Manager tab, choose the Smart Schedule option in the plugin. You will be able to see the number of files scheduled already. You can delete anything you want.
How files get updated?
Users can schedule an infinite number of files for the automatic schedule. Once the scheduling process gets done, all the user needs to do is modify the stock status, quantity, price value, and other metadata of WooCommerce products in the scheduled CSV file available on the server. Based on the changes made in the server file, the product and its metadata gets updated in the WooCommerce store.
How to set the values?
Try exporting the ‘WooCommerce Products’ data on your WordPress as a CSV file using our WP Ultimate CSV Importer plugin before start importing. Then use the exported WooCommerce products CSV to prepare a new CSV for your use case.
How to export WooCommerce Products data
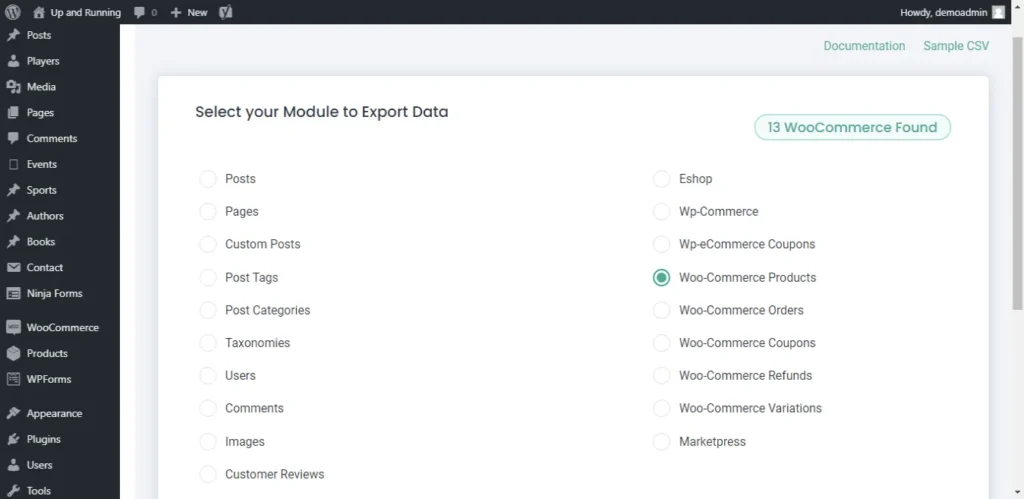
To export WooCommerce Products, navigate to ‘Ultimate CSV Importer’ plugin menu -> Export tab. Choose the ‘WooCommerce Products’ module. You can view the total count value of the products on the right top like shown in the below screenshot:

Proceed next by clicking ‘Continue’. Provide the export file name, and choose export file type as CSV. You can export data with some advanced filters.
Click on ‘Export’ and after the export is finished you can download that CSV file on your desktop.
How to get the sample file?
To get the sample CSV file, use the below link Sample CSV File.
Wrapping Up
Want to know more about the plugin, visit our product page and explore our documentation to know how the WP Ultimate CSV Importer plugin works. To need more clarifications, please Write to us
