Vtiger QuickBooks Integration is a tool to bidirectionally sync your records between Vtiger CRM and QuickBooks accounting software. You can either sync all or selected records from Vtiger CRM to QuickBooks. The sync can be triggered at a instant or can be scheduled to execute periodically without any manual intervention.
Here is the introduction for Vtiger Quickbooks Integration. With Vtiger QuickBooks Integration, you can set email notifications to get the reports of your sync process, optimize the sync settings for your specific needs, and improve the efficiency of your synchronization process. The sync can be performed securely with QuickBooks API version 3. You can get the complete log of your instant and scheduled sync process separately.
Pre-Requisites
- Compatible with Vtiger versions 6.* – 7.4
- Download the appropriate ionCube loader based on your server’s version of php.
- Enable CRON on your server by adding the following entry
Installation for QuickBooks Integration #
Module Installation #
- Click on Settings icon -> CRM Settings -> Module Manager -> Install from zip
- Upload the QBTiger.zip, QBQueue.zip, QBLog.zip file and click Import and then click yes to finish.
- Extract Install.zip in root directory.
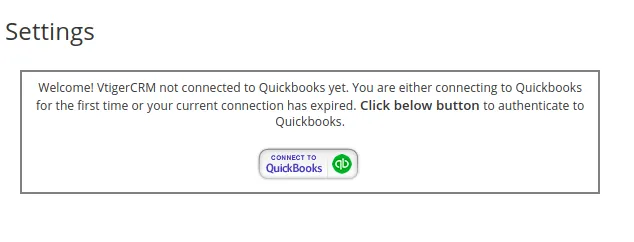
Integrate QuickBooks in Vtiger CRM #
To integrate your QuickBooks account in Vtiger CRM,
- Go to projects -> QBTiger -> settings -> click on Connect to QuickBooks
Email Setup #
Email notification lets you to monitor the data transfer between Vtiger CRM and QuickBooks with ease. You can receive mails periodically with the details of previously executed sync process. The mails can be triggered at the instant of sync, everyday, weekly once and monthly once

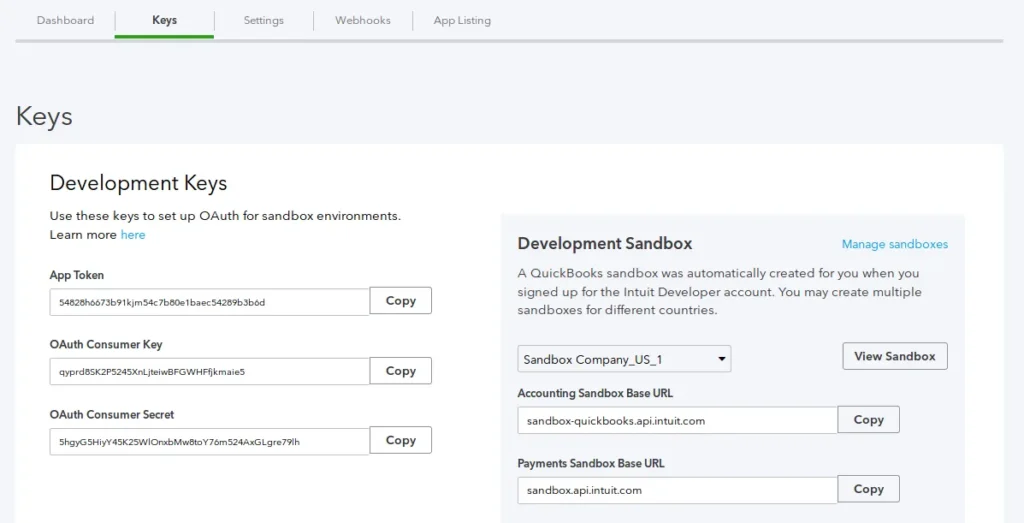
QuickBooks API Generation #
API generation #
- Login to your QuickBooks Account
- Click MyApps -> Create new app -> Select APIs
- Choose Accounting and click Create app
- Select Keys to get the API key, Consumer Key and Secret

Module Sync Information of Vtiger QuickBooks #
Module Sync Information #
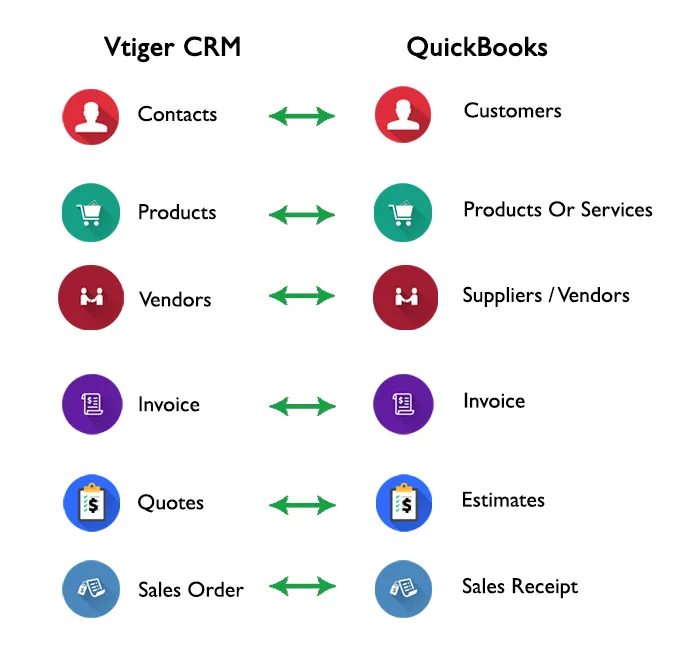
Synchronization flow #
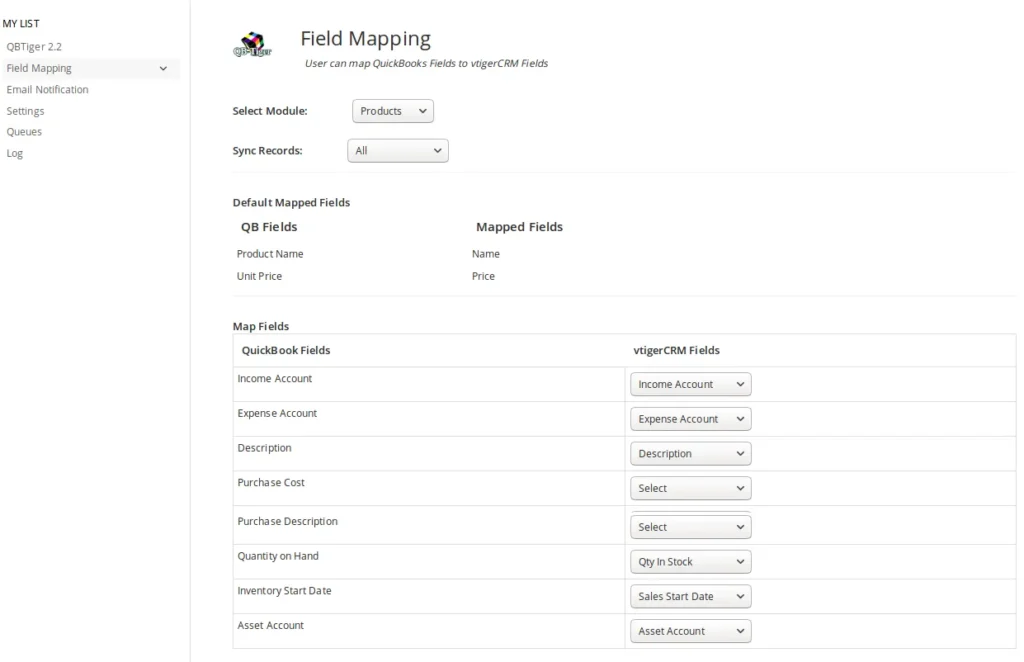
Field Mapping #
Mapping section helps you to map your Vtiger CRM fields with the appropriate QuickBooks fields. You can define your own mapping template structure for your Vtiger Modules. With Vtiger QuickBooks Integration, you can replicate the mapping of one inventory modules to other inventories. You can sync all or selective records of your inventory modules.
- Choose the module from the Select Module dropdown
- The most common fields are mapped by default.
- The remaining fields are auto mapped.
- If additional fields are added in your modules, select the appropriate fields from the dropdown.
- To replicate mapping, click on the Apply Field Mapping
Selective record sync #
Vtiger QuickBooks Integration lets you to sync selected records from your Vtiger CRM to QuickBooks in two ways
- Select record
- Record Status
To sync selective record, Choose Enable QB Sync from the Sync Records dropdown.

Select record:
You can select specific records from your inventory modules that need to be synced with Vtiger QuickBooks Integration. To select the record, check on the Allow QB Sync in the QB Information table.

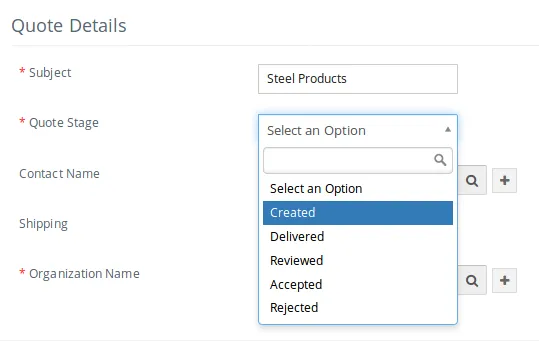
Record Status:
You can also sync records based on their status. In Quotes module, the Quote Stage field is considered. To select the records, Choose the required statuses in the Status multi-select box.
Smart Sync and Logs for QuickBooks Integration #
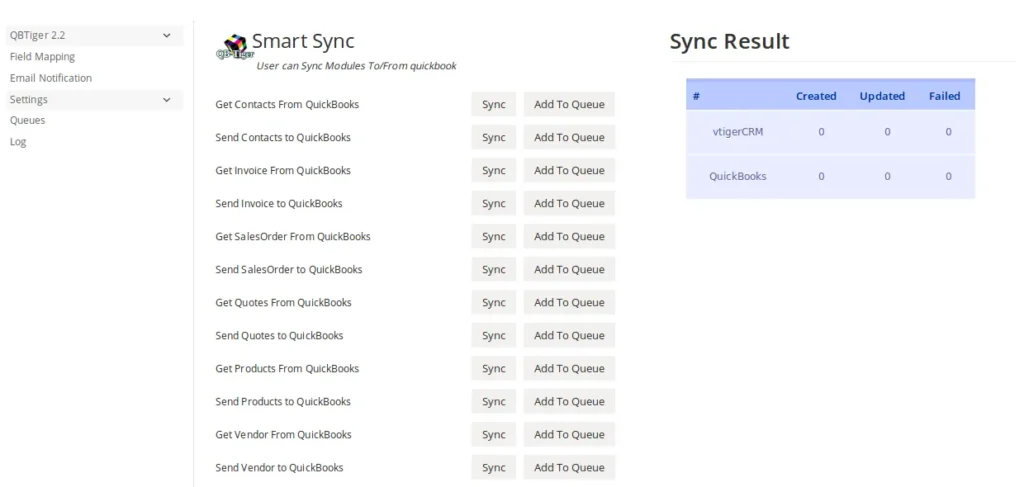
Vtiger QuickBooks Integration lets you to sync your records either manually or schedule your sync between your Vtiger CRM and QuickBooks.
Instant Sync #
With Vtiger QuickBooks Integration, you can sync your records manually whenever you need to update your Vtiger CRM or QuickBooks with the latest record information. The records are synced based on the configuration in Field Mapping. Click on Sync to trigger data transfer at the instant.
Schedule Sync #
You can also schedule your sync at the regular intervals based on your cron runtime. Click on Add To Queue to trigger data transfer periodically based on the scheduled time and frequency.
Logs #
Queue
Vtiger QuickBooks Integration lets you to maintain a separate list for scheduled sync. Queue contains both the list failure and success sync. The previously failed records added in the list will be resend based on the order in the queue.
Log
Logs contain the overall list of records that are sync between Vtiger CRM and QuickBooks. With Vtiger QuickBooks Integration, you can audit the entire workflow with the detailed list of success and failure logs. You can also get the Vtiger & QB Id of the records along with their action log and Mail status.
Help Tips For Vtiger QuickBooks #
How to configure CRON?
| String | Definition |
|---|---|
| @reboot | Run once, at startup |
| yearly or annually | Run once a year, “0 0 1 1 *” |
| monthly | Run once a month, “0 0 1 * *” |
| weekly | Run once a week, “0 0 * * 0” |
| daily or midnight | Run once a day, “0 0 * * *” |
| hourly | Run once an hour, “0 * * * *” |
Sample
| Minute(0-59) | Hour(0-23) | Day of Month(1-31) | Month(1-12 or Jan-Dec) | Day of Week(0-6 or Sun-Sat) | Result |
|---|---|---|---|---|---|
| 0 | 5 | 10 | * | * | Runs on 10th of every month @ 5AM |
Crontab Entry #
Windows :
All Programs -> Accessories -> System Tools -> Task Scheduler
Mac/Unix/Linux :
- Open the terminal.
- Execute the command, crontab -e
- Add the Cron entry.
Cron entry steps in cPanel :
- Log in to your account and click Web Hosting.
- Next to the hosting account, click Manage.
- In Advanced section, click on Cron Jobs.
- Call the script in the command line field ‘/usr/local/bin/php -q /home/[username]/[path to the file] or copy and paste the cron entry in the field next to the command field.
- Select the frequency of times you want the Cron to execute the command.
- Click on Add New Cron Job to save your changes.
Cron entry steps in Plesk :
- In Parallels Plesk Panel, Go to Domain or Websites & Domains section.
- Select Domain -> Scheduled Tasks (under Additional Tools) -> System User -> Schedule New Task.
- Specify the frequency of times you want the Cron to execute the command.
- Specify the Cron entry in the Command input box.
Cron entry steps in DirectAdmin :
- In DirectAdmin Panel, Go to CronJobs.
- Specify the frequency of times you want the Cron to execute the command.
- Specify the Cron entry in the Command input box.
- Click on Add to save the changes.
Cron entry steps for InterWorx:
- In InterWorx Panel, Click on Server -> CRON -> Choose User -> Simple Interface.
- Specify the frequency of times you want the Cron to execute the command.
- Specify the Cron entry in the Command input box.
- Click on ‘Add’ to save the changes.
Cron entry steps for iMSCP :
- In iMSCP, Click on Web Tools -> Cron Jobs.
- Specify the frequency of times you want the Cron to execute the command.
- Specify the Cron entry in the Command input box.
- Click on Add to save the changes.
Cron entry for Vesta :
- In Vesta, Click on CRON.
- Specify the frequency of times you want the Cron to execute the command.
- Specify the Cron entry in the Command input box.
- Click on Add to save the changes.
Cron entry in ZPanel :
touch /etc/cron.d/zdaemon
echo touch /etc/cron.d/zdaemon echo “/5 * root /usr/bin/php -q /etc/zpanel/panel/bin/daemon.php >> /dev/null 2>&1” >> /etc/cron.d/zdaemon chmod 644 /etc/cron.d/zdaemon