Magento Vtiger Bidirectional Connector plugin enables you to bidirectionally sync your Magento store data to Vtiger CRM. You can sync your records in three ways are On the Go Transfer, Prompt Transfer, Schedule Auto Transfer. With Magento Vtiger Bidirectional Connector, you can sync the Stores, Category, Products, Product Attributes, Customers, Cart data, Sales order and Invoice data. Let’s see the detailed introduction of Magento Vtiger Bidirectional Connector.
Pre-Requisites
- To Enable Cron in Magento, add an entry in the Crontab.
Note: If you’ve done any customization in any of the above mentioned modules either in your Vtiger CRM or Magento, the sync process may require some additional efforts to make
Installation & Configuration #
Module Installation in Magento #
- Upload the install.zip file from Install -> Magento -> Smackcoders_Vtmultistoreconnector – 2.2 to Magento root directory and unzip.
Module Installation in Vtiger CRM #
- Click Settings -> CRM Settings -> Module Manager -> Install from zip
- Upload the Category.zip, Stores.zip, Logs.zip file and click Import and then click yes to finish.
- Extract Install.zip from Install -> Multistore_vtiger -> Install.zip in root directory.
- Click Inventory -> Stores fields that will be created after the installation are listed. To proceed with installation click “Click Here To Install”.
Configuration in Magento #
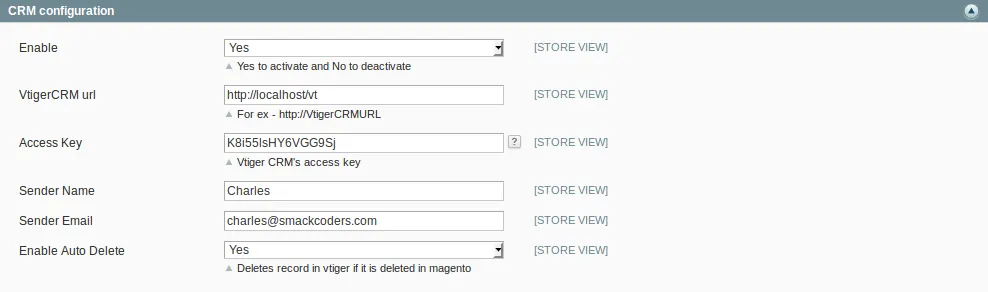
1. CRM Configuration:
- Click on System -> Configuration -> Vtiger CRM Configuration.
- Select Yes from Enable to add the Vtiger CRM URL and access key. Select the preferred mode of transfer. Each mode of transfer is explained in detail in the next section.
- To auto delete a record in Vtiger CRM once it is deleted in Magento, select ‘Enable Auto Delete’ as Yes.
2. Category Sync Configuration:
- To display Category details in Vtiger CRM select yes in ‘Enable Category Sync’.
- To automate the editing process in Vtiger CRM, Whenever a category is edited in Magento select yes in Category on the go.
- To create or update a category in periodic intervals select yes in Sync Category Through Cron. Specify the Sync interval time.

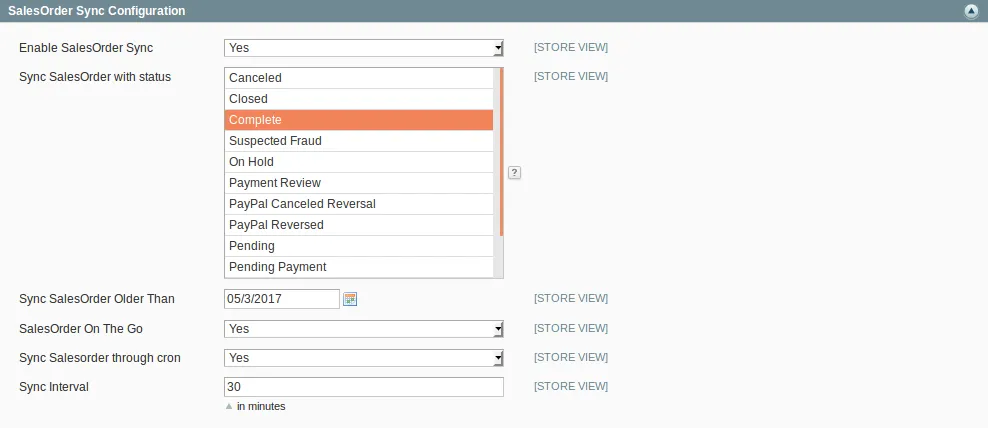
3. Sales order Sync Configuration:
- To display Sales order details in Vtiger CRM select yes in Enable Sales order Sync.
- To Sync Sales order based on the status, Select the preferred status field in Sync Sales order with Status.
- To Sync your Older records from Magento to Vtiger CRM, specify the date in Sync Sales order Older than.
- To automate the editing process in Vtiger CRM, Whenever an edit process takes place in Magento select yes in Sales Order on the go.
- To create or update sales order details in periodic intervals select yes in Sync Sales order Through Cron. Specify the Sync interval time.
4. Invoice Sync Configuration:
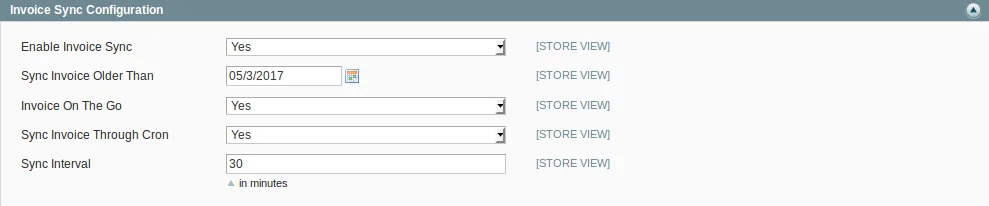
- To display Invoice details in Vtiger CRM select yes in ‘Enable Invoice Sync’.
- To Sync your Older records from Magento to Vtiger CRM, specify the date in Sync Invoice Older than.
- To automate the editing process in Vtiger CRM, Whenever an edit process takes place in Magento select yes in Invoice on the go.
- To create or update Invoice details in periodic intervals select yes in ‘Sync Invoice Through Cron’. Specify the Sync interval time.
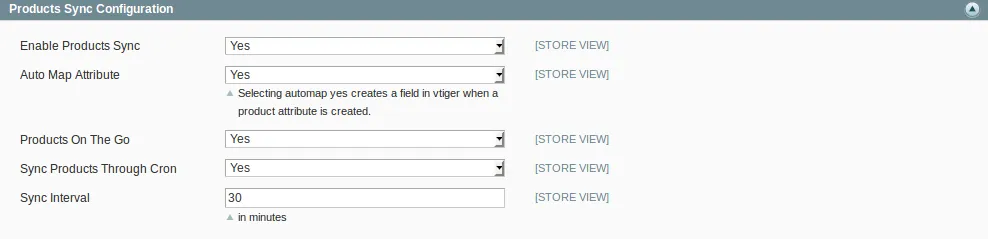
5. Product Sync Configuration:
- To display Product details in Vtiger CRM select yes in ‘Enable Product Sync’.
- To automate the creation of Product fields in Vtiger, when a product attribute is created in Magento select yes in Auto Map Attribute.
- To automate the editing process in Vtiger CRM, Whenever an edit process takes place in Magento select yes in Product on the go.
- To create or update Product details in periodic intervals select yes in ‘Sync Product Through Cron’. Specify the Sync interval time.
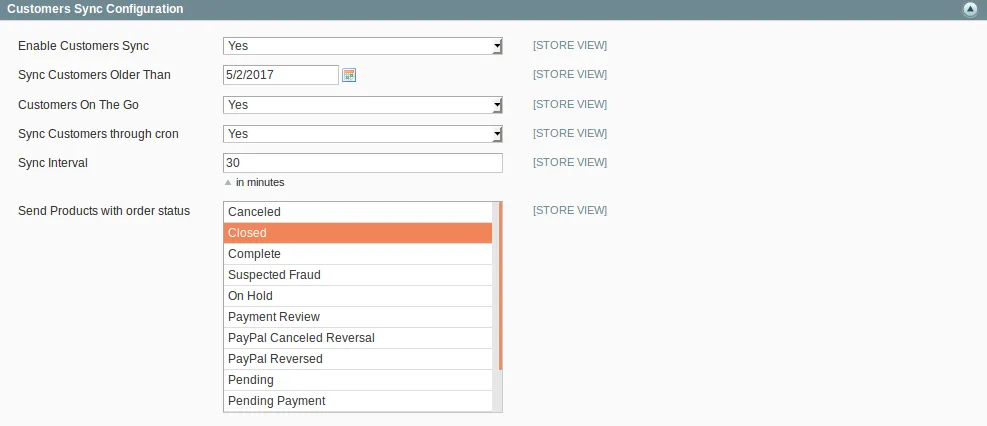
6. Customer Sync Configuration:
- To display Customer details in Vtiger CRM select yes in ‘Enable Customer Sync’.
- To Sync your Older records from Magento to Vtiger CRM, specify the date in Sync Customer Older than.
- To automate the editing process in Vtiger CRM, Whenever an edit process takes place in Magento select yes in Customer on the go.
- To create or update Customer details in periodic intervals select yes in ‘Sync Customer Through Cron’. Specify the Sync interval time.
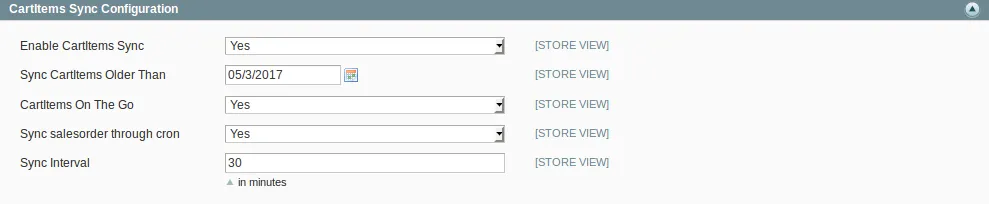
7. Cart items Sync Configuration:
- To display cart details in Vtiger CRM select yes in ‘Enable Cart Items Sync’.
- To Sync your Older records from Magento to Vtiger CRM, specify the date in Sync Cart Items Older than.
- To automate the editing process in Vtiger CRM, Whenever an edit process takes place in Magento select yes in Cart Items on the go.
- To create or update Cart details in periodic intervals select yes in Sync Cart Items Through Cron. Specify the Sync interval time.
Create a Role for API user Integration #
- Click on System -> Web Services -> SOAP/XML RPC Roles -> Add New Role.
- Add Role name and click Role Resources
- Select the “Select All” option in Resource Access and save the role.
Create a new API user with a Role #
- Click on System -> Web Services -> SOAP/XML RPC Users -> Api new user. -> Add New User.
- Click User Role and select the previously created role and click Save User.
Configuration in Vtiger CRM: #
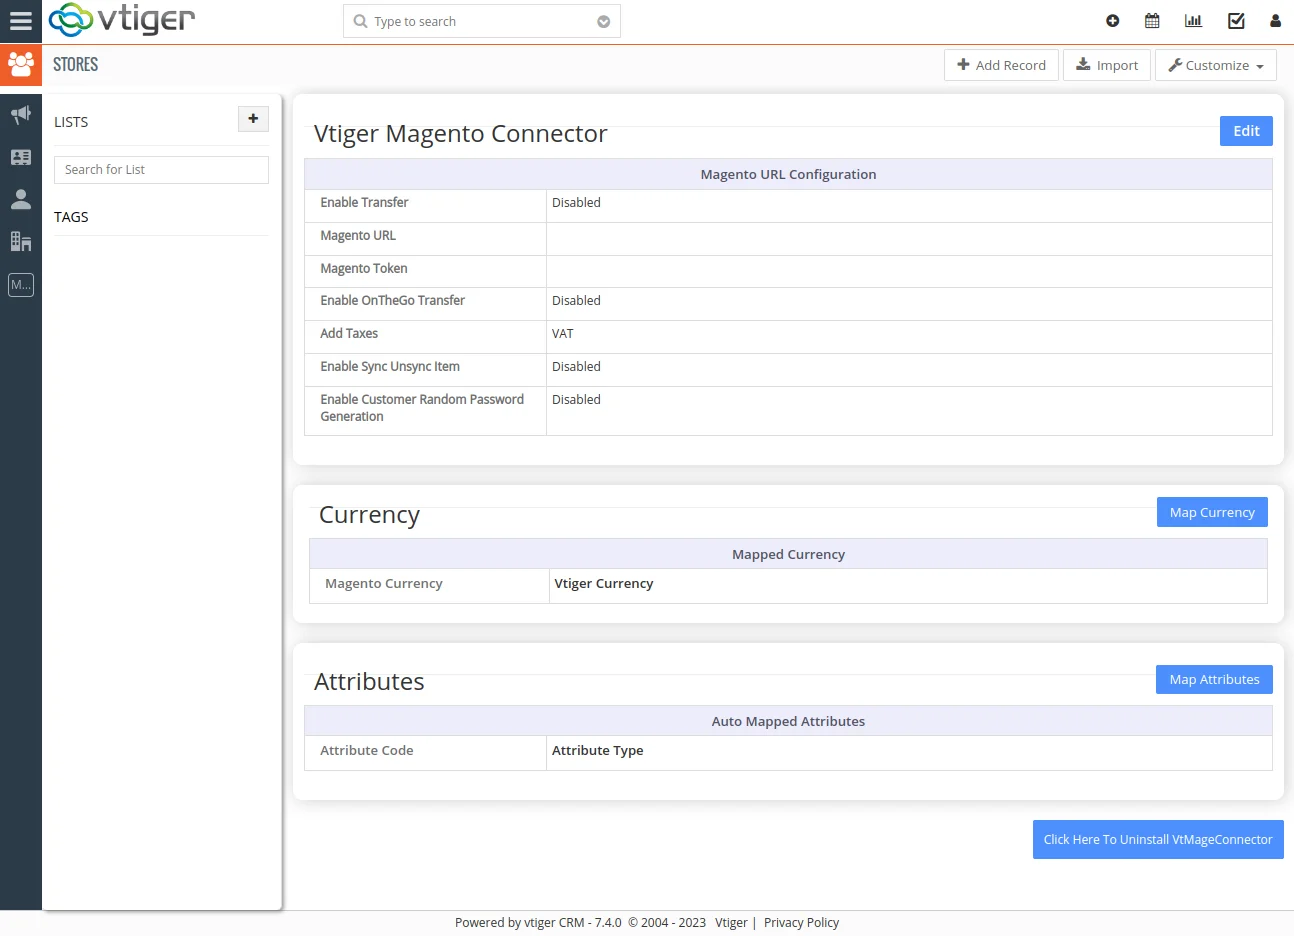
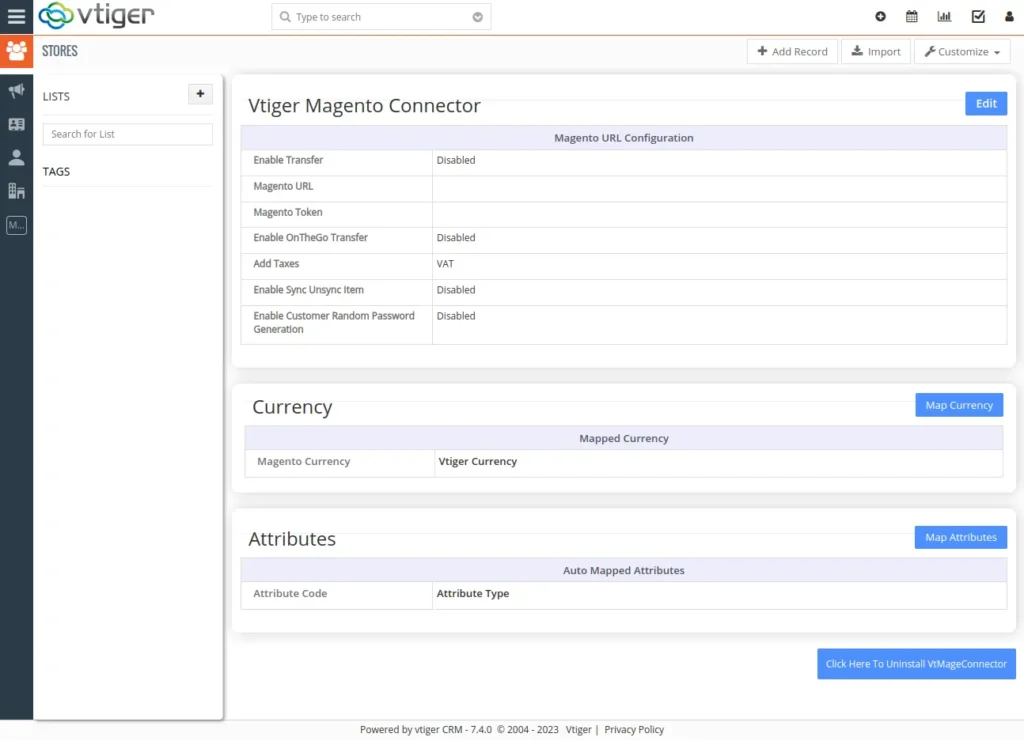
- Click on Settings -> CRM Settings -> Vtiger Magento Connector -> click Edit.
- Provide the necessary details and then click Save.
Field List by Magento Connector #
Vtiger and Magento Field List that are synced by default #
Noted with ↔ symbol are bidirectional
Noted with → symbol is one way from Vtiger to Magento only
Noted with ← the symbol is one way from Vtiger to Magento only
Contacts Module
↔First Name
↔ Last Name
↔ Website
↔ Date Of Birth
↔ Billing Address
↔ Shipping Address
‘From Vtiger to Magento only’
→ Password
Products Module
↔ Product Name
↔ Product Active
↔ Magento Visibility
↔ Product Type
↔ Price
↔ Quantity of product
↔ Description
↔ Product Image
‘From Magento To Vtiger only’
← Sku
and other mapped attributes. Due to Magento API restrictions editing sku in Vtiger creates a new product in Magento.
Category Module
↔ Category Name
↔ Parent Category
Stores Module
‘From Vtiger to Magento only’
→ Store Name
→ Website Name
→ Store View Name
Quotes Module
↔ Customer Name
↔ Store Name
↔ Product Name
↔ Quantity
↔ Price
↔ Currency
↔ Product Tax
↔ Discount
↔ Shipping Amount
SalesOrder Module
Due to Magento API restrictions, SalesOrder and Invoice are not allowed to edit.
So creating a Sales Order / Invoice in Vtiger creates a Sales Order / Invoice.
SalesOrder Number
Customer Name
↔ Store Name
↔ Billing Address
↔ Shipping Address
↔ Product Details
↔ Tax
↔ Shipping Amount
↔ Discount
↔ Total
Invoice Module
The invoice is similar to the Sales Order. If a sales order is selected while creating an invoice, products in the sales order will be created as invoices in Magento. If no sales order is selected, then it creates a sales order in Magento before creating an invoice because it’s mandatory to create a sales order before creating an invoice.
Features of Magento Bidirectional Connector #
- Bidirectional Connector.
- Can Sync Stores, Categories, Products, Product Attributes, Customers, Cart data, Sales Orders, and Invoices.
- Update SalesOrder in magento from vtiger..
- Multi-Currency Support.
- Map Magento attributes with vtiger custom fields.
- Three modes of sync, On The Go Transfer, Prompt Transfer, and Scheduled Transfer.
- Auto map attribute.
- Can delete the record in vtiger once it is deleted in Magento.
- Sync back needed unsync item from vtiger to Magento.
- Logs module in vtiger.
Synchronization Flow #
To sync records from Vtiger CRM to Magento Store, you need to map the Magento fields with the appropriate Vtiger fields.
Currency Mapping:
- Click ‘Map Currency’ to map the Magento Currency with Vtiger CRM Currencies.
Attributes Mapping:
- Click on Settings -> CRM settings -> Other Settings -> Vtiger Magento Connector.
- Click Map Attributes and select the listed attribute set.
- Map Magento fields with the appropriate Vtiger custom fields and Click save.
Sync from Magento to Vtiger CRM #
With Magento Vtiger Bidirectional Connector, you can sync the records in three ways.
- On The Go Transfer:
Magento Vtiger Bidirectional Connector enables the automatic sync of records between your Vtiger CRM and Magento Store. Whenever an event takes in one place it is automatically mirrored in another. To sync records based on On the Go Transfer, configure the module configuration as explained in installation & configuration.
- Schedule Auto Transfer:
With Magento Vtiger Bidirectional Connector, you can schedule your sync process between your Vtiger CRM and Magento Store. To enable scheduling, configure your Module configuration and the time interval to sync records in periodic intervals.
- Prompt Transfer:
Click on Vtiger CRM Connector >> Prompt Transfer.
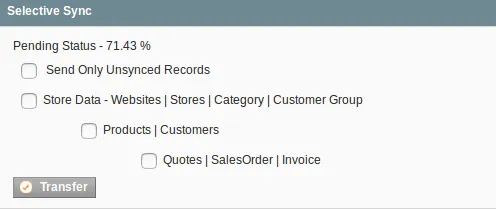
Selective Sync:
Magento Vtiger Bidirectional Connector enables you to sync selected set data from your Magento Store to Vtiger CRM.
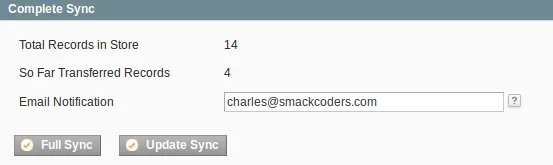
Complete Sync:
You can also sync your entire set of records to your Vtiger CRM from the Magento store.
Sync from Vtiger CRM to Magento #
To sync records, click on Settings icon -> CRM settings -> Other Settings -> Vtiger Magento Connector and click Full Sync.