Boost Productivity with G-Apps Integration for SuiteCRM. G-Apps Integration for SuiteCRM is a 3 in 1 suite google integration that enables you to bidirectionally sync your Google Calendar events and Google contacts into SuiteCRM, enhancing your productivity by organizing all your events and contact info in one place.You can also take the advantage of auto-filling the address fields in your SuiteCRM. As you start typing the address, it gets auto-populated with fully verified and location-based suggestions and you choose the appropriate option.
Installation #
- For secure installation, take a backup of your database and files.
- Download the package.
- Click Admin -> Module Loader -> Choose Import.zip -> Click Upload
- Unzip the install.zip in the root directory.
Configuration: #
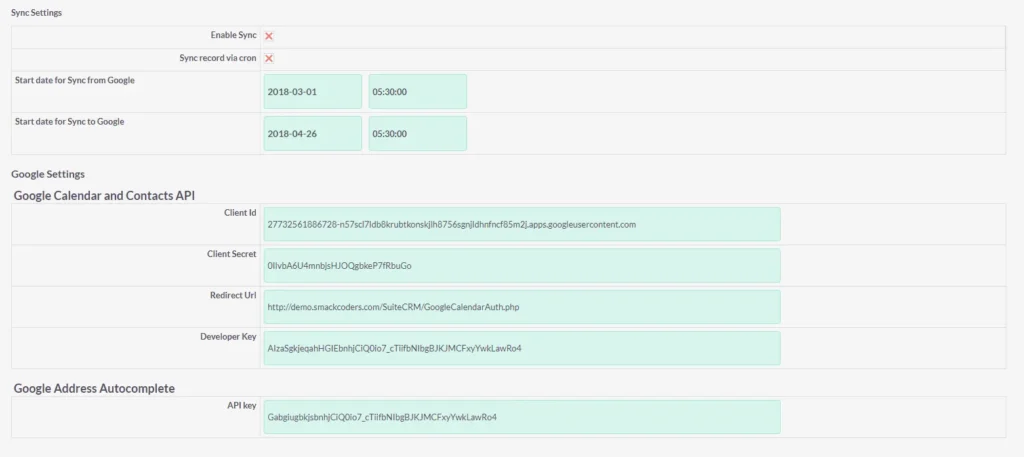
The sync of Google Calendar Events, Google Contacts, and the auto-completion of address fields are done securely with Google API. To get your Google API, kindly refer to Google API Configuration.
- To configure the API, Go to Settings
- Scroll down to Google Settings to configure the Google Calendar and Contacts API.
- Provide the Client ID, Client Secret, Redirect URL, and Developer API.
- For Google Address Autocomplete configuration, provide Google API.
- Once done, hit Save.
Cron Setup: #
- To setup cron add the following entry in your crontab
- Make sure that localhost/suitecrm is changed to your SuiteCRM URL.
- To perform scheduled sync, cron should be configured properly.
For Cron ->
- Unzip the Install.zip file in the SuiteCRM root directory which is located in the modules/sm_Google folder.
- Add cron entries for GoogleCalenderCron.php, GoogleEventSyncCron.php, VtigerCrmEventSyncCron.php files.
SuiteCRM Google Calendar Integration #
SuiteCRM Google Calendar Integration helps you to efficiently manage your SuiteCRM and Google Calendar events from one place. It allows 2-way synchronization between your SuiteCRM and Google Calendar. You can instantly sync all your events info with just a single click. You can also automatically run the sync periodically based on cron. It helps you to filter and sync specific events between your SuiteCRM and Google Calendar. You can easily organize both SuiteCRM and Google Calendar without having to jump between different tabs.
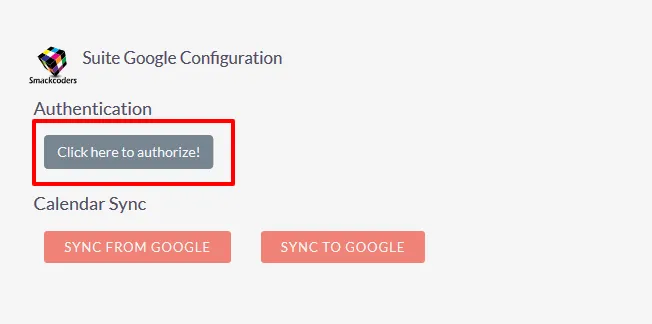
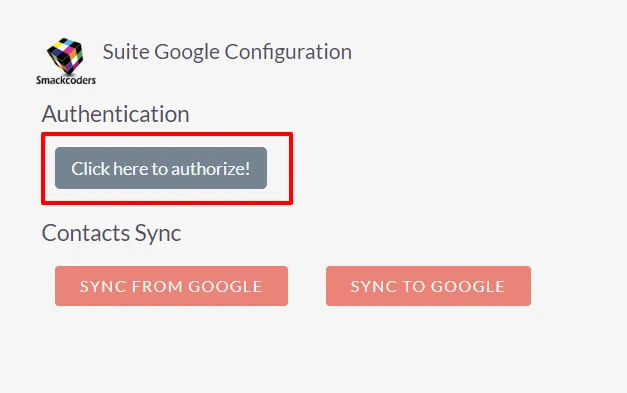
Authorization #
Once done with your configuration and settings part, navigate to the Google Sync option. Now click on the “Click here to authorize!” button. Choose your Google account and connect it with your SuiteCRM.
Settings #
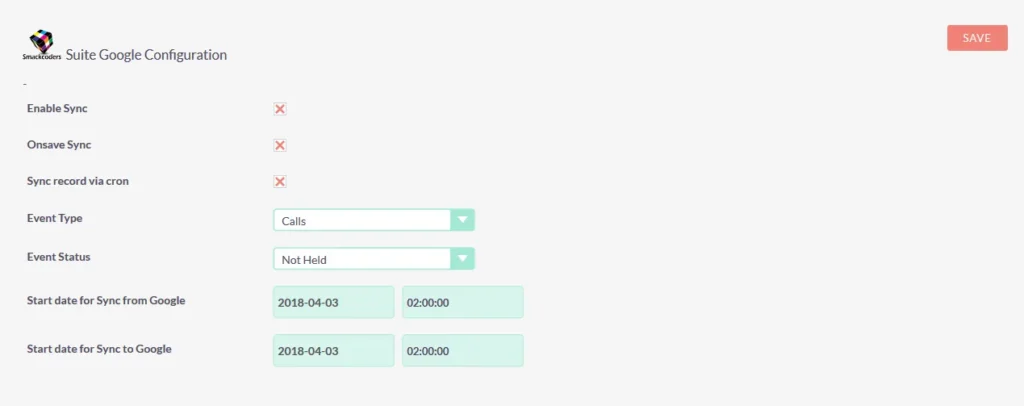
Navigate to Sync Settings options and click on Edit.
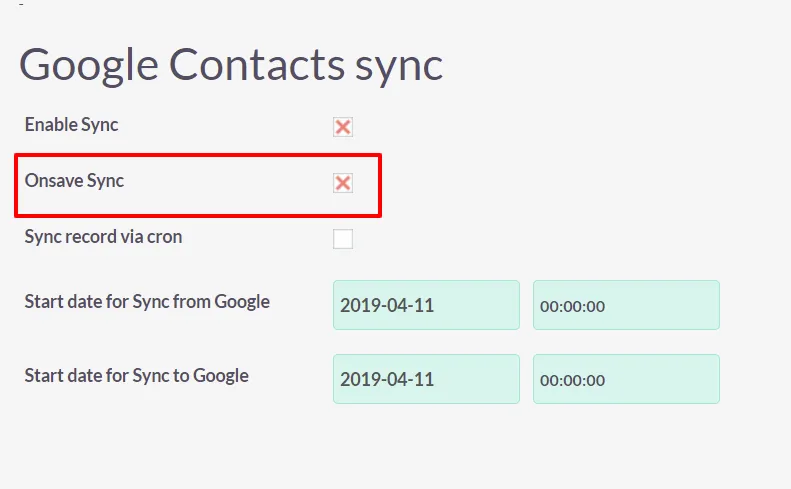
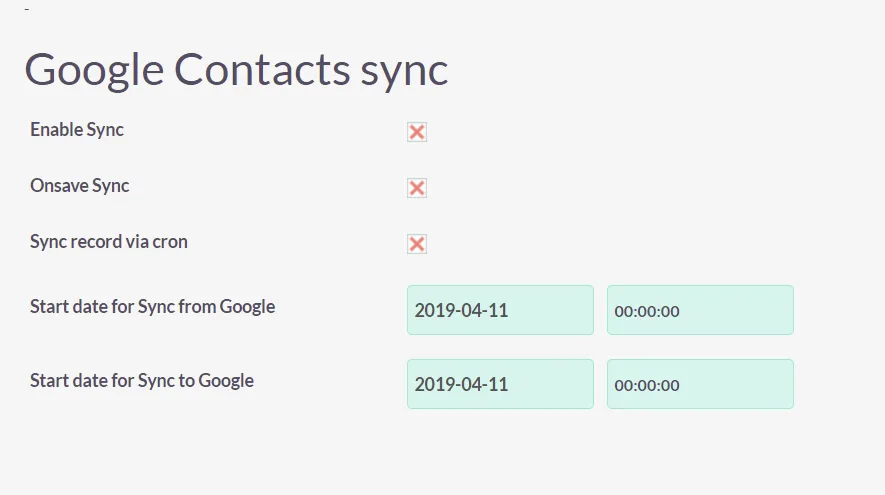
- Enable Sync – Enable the checkbox to sync the calendar events manually using the GoogleSync option.
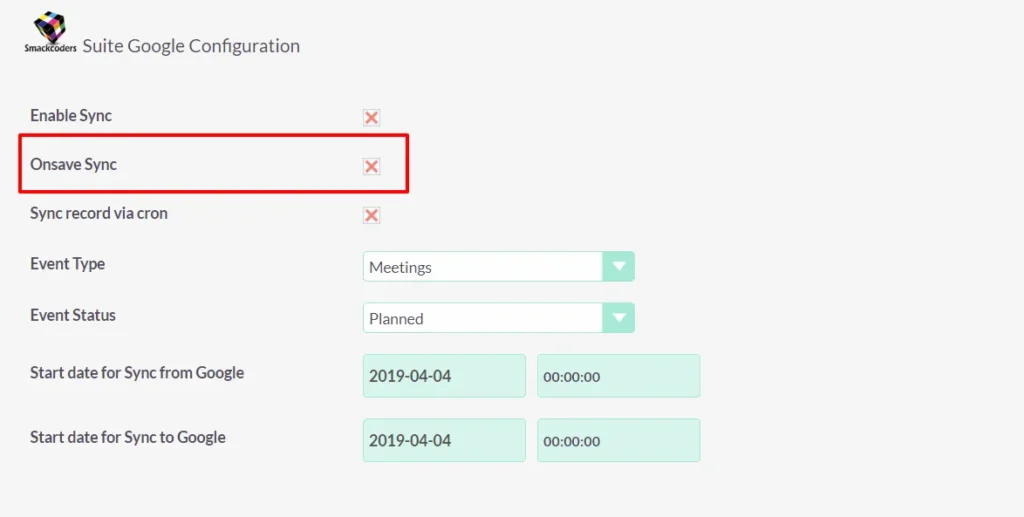
- Onsave Sync – When you add or edit an event in one location, this feature will automatically add the same information on the other. To allow this feature, enable the checkbox.
Periodic Sync
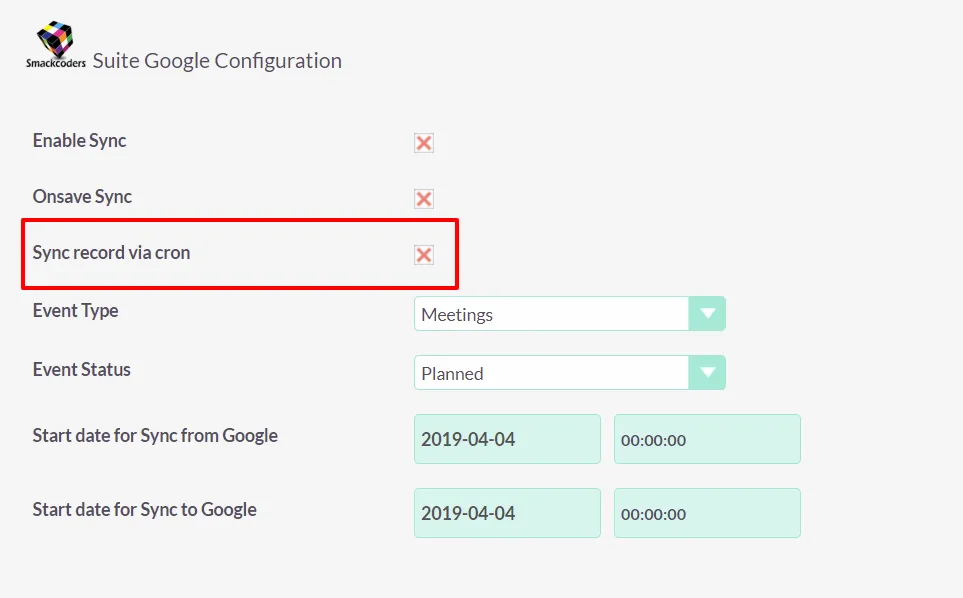
- Sync record via cron – Enable the checkbox to synchronize your calendar events based on your cron time. To know about the cron setup, refer to our CRON Setup.
Define the mandatory fields
- Even Type – It consists of three options – Calls, Meetings, Tasks. You can choose any one of the options from the dropdown. The events synchronized from your Google Calendar to SuiteCRM will have the Event Type, you have chosen from the dropdown.
- Event Status – It also consists of three options such as Planned, Held, Not held. You can choose your desired option from the dropdown. Once done, the events that are synchronized from Google Calendar to SuiteCRM are automatically set to the Event Status you have chosen.
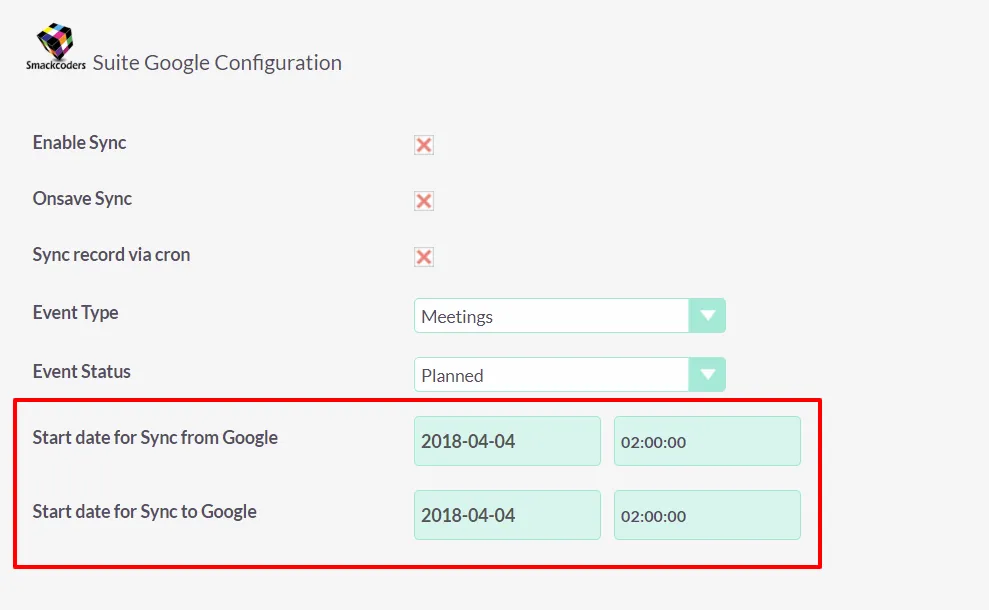
Sync specific events – Event filter
- Start Date for Sync from Google(Google Calendar to SuiteCRM) – This helps to synchronize only the events from a specified date and time.
- Start Date for Sync to Google(SuiteCRM to Google Calendar) – Specify your preferred date and time to synchronize only the specific events.
- Once done click on Save.
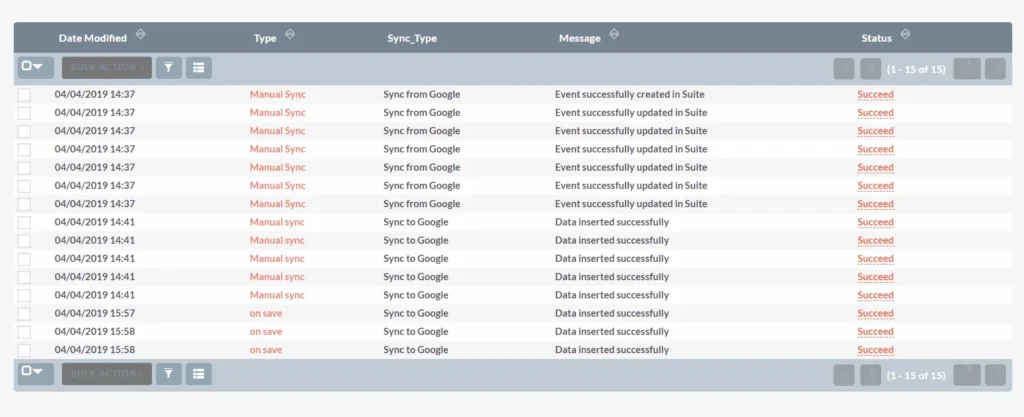
Synchronization & Logs #
With SuiteCRM Google Calendar Integration the synchronization can be done in three different ways.
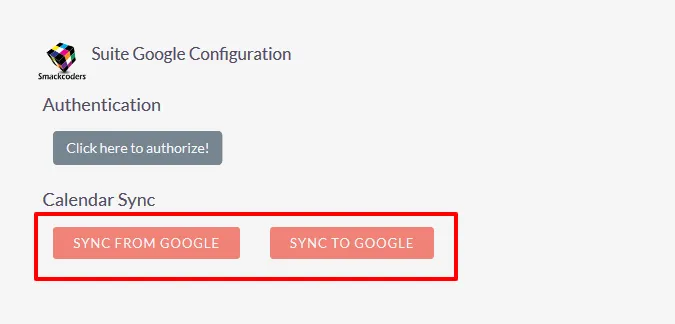
Manual sync #
To synchronize all your existing events you can sync all in one go using the manual sync options.
- NNavigate to the Google sync option.
- Click on SYNC FROM GOOGLE – To get all your Google Calendar events into SuiteCRM
- Click on SYNC TO GOOGLE – This allows you to sed all your SuiteCRM events to Google Calendar.
If you no longer need to synchronize all your existing events, use the specific date based filter to sync only the selective events from the specified date and time. To set your own date and time, refer to our Synchronization Settings.
On the Save sync #
This synchronization process runs automatically. When you create a new event in your Google Calendar or SuiteCRM, while you save the event it will be automatically added to the other. So you can easily maintain both your Google Calendar and SuiteCRM calendar up-to-date without any manual intervention.
Automated Sync #
This synchronization process runs in the background based on your CRON time without any manual intervention. Just set your preferred CRON time, refer to the document to set your CRON job.
Data Sync Logs #
Get to know about your synchronization process with logs. It offers you both success and failure synchronization details.
SuiteCRM Google Contacts Integration #
SuiteCRM Google Contact Integration helps you to keep your SuiteCRM Contacts and Google Contacts updated. The synchronization is performed bi-directionally to keep both applications fresh with all new entries. The sync can be triggered on save, manually sync with a click, or schedule in cron.
Google Contacts Authorization #
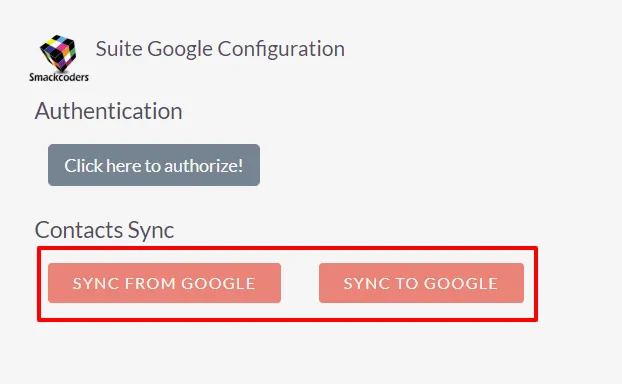
Once you have given the connection details, it has to be authorized. Click on GoogleSync(in left side menu panel) –> Click here to authorize.
Establishing the link between the two applications is imperative. This procedure must be carried out whenever modifications are made to a Google account.
Synchronization Setup #
The SuiteCRM Google Contact Integration enables it to sync instantly when a new record is created or manually in bulk on a single click or frequently on a defined time with cron. The settings provide complete flexibility in choosing the mode of sync.
To set up, Goto Sync Settings menu in the left panel.
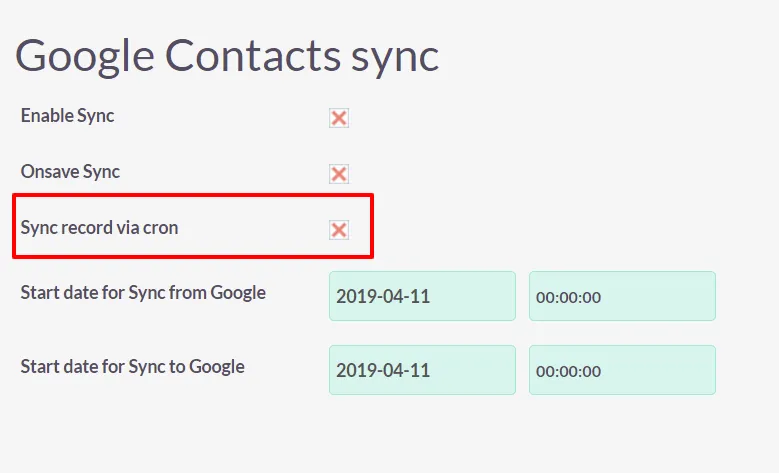
- Enable automatic synchronization upon saving – Ensure immediate data synchronization upon entry in either application by activating the OnSave Sync option.
- Bulk Manual Sync – To sync data manually or move your existing data, check on Enable Sync and make it Yes. And to trigger the sync, click on GoogleSync(in left side menu panel) –> “Sync from Google or Sync to Google”. You can also specify the date from which you want to sync Contacts, it works with reference to Contacts created time.
- Sync from Google – Google Contacts to SuiteCRM Contacts.
- Sync to Google – SuiteCRM Contact as Google Contacts.
- Schedule Synchronization – Enable scheduled synchronization by monitoring the synchronization record through cron. Once you confirm this action, ensure the presence of an entry in your CRON file.
Logs #
SuiteCRM’s integration with Google Contacts offers comprehensive logs for both successful and unsuccessful synchronization. These logs serve as a valuable tool for monitoring and maintaining records of updated data.

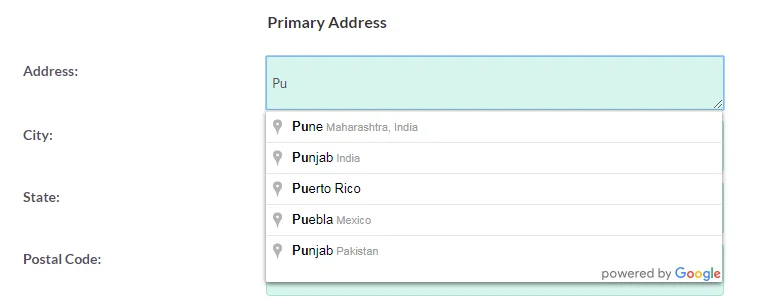
Autocomplete Address Fields #
It automatically completes the address fields of Leads, Contacts, Accounts, Quotes and Invoices as your start typing on the address fields. It provides you with a fully verified and location based search, that helps you to eliminate type errors.
- Once done your configuration, click on Mapping
- Choose the module and relate the fields like Street, Country, Postal code, etc,. The mapping need to be done separately for each module.
- If you have multiple address relation like shipping, billing and more, you can add any number of mapping field relation based on your requirement by clicking on the Add + below the mapping section.
- Once you are done with mapping, click on Save.
- You now can see that Addresses suggested while you start typing in one field of the configured module.