Table of Contents
If you want to share your WordPress plugin with the world, one of the best ways to do that is by submitting it to the WordPress Directory. This step-by-step guide will show you how to do that.
WordPress.org and Plugin Directory
WordPress.org is the official website of the WordPress software and is also home to the WordPress Plugin Directory.

The WordPress Plugin Directory is a library of plugins that can be installed in WordPress to add new features and extend the WordPress CMS’s functionality. WordPress.org offers free hosting for anyone who wants to develop a plugin in our directory. Anyone can submit a developed plugin to the directory, and users can browse and install plugins from the directory directly from their WordPress site. The plugins hosted on this site have access to various features, including statistics monitoring and user feedback and reviews. You can also provide support for your plugin on our free forum.
Submission Process: Basic Steps
The submission process for adding a plugin to the WordPress Plugin Directory is straightforward.
- First, create a plugin by writing code in PHP, JavaScript, or another programming language that interacts with WordPress.
- Read the Developer Handbook and Follow development Best Practices.
- Self-audit your plugin against the WordPress development guidelines
- Fix any issues as reported in the Audit
- Create a readme.txt as per the guided format and standardss
- Create an account with wordpress.org or login to your account
- Go to WordPress Developer plugin
- Next, register the plugin with the Plugin Directory and upload the plugin’s zip folder
- Note the plugin zip file size should not exceed 10MB
- Remove unnecessary files that doesn’t affect the plugin review process (like screenshot images etc.) to limit the size.
- Finally, submit the plugin for review.
- The WordPress Plugin Directory team will review the plugin and determine whether it meets the guidelines for inclusion in the directory.
If the plugin is approved, it will be added to the directory and made available for download by WordPress users worldwide.
WordPress Plugin Guidelines
The WordPress Plugin Directory team reviews plugins for various criteria, including coding quality, compatibility with WordPress, and security. A plugin must meet the guidelines to get approved for inclusion in the Plugin Directory. Some highlights are:
- The plugin code must be in a compatible language such as PHP, JavaScript, or another programming language that interacts with WordPress.
- The plugin must be compatible with the most recent version of WordPress.
- The plugin must not include any malicious code or spammy content.
- The plugin must be appropriately formatted and include all required information.
- The plugin must be updated regularly and respond to feedback from users.
Review these guidelines carefully if you’re interested in submitting a plugin to the WordPress Plugin Directory.
Following these guidelines will help increase the chances that your plugin will get approved for inclusion in the directory. Audit and fix your code against the details guidelines given in WordPress Plugin Developer Handbook.
Core Requirements
To submit a WordPress plugin to the WordPress Plugin Directory, you must ensure that it meets specific requirements. Namely, your plugin must be compatible with the GNU General Public License v2 or any later version and not do anything illegal or morally offensive. Additionally, you must use the Subversion repository to host your plugin on the wp directory. Finally, your plugin must abide by our list of detailed guidelines, which include not being a spammer and not abusing the systems.
Naming a WordPress plugin
When creating a plugin for the WordPress Plugin Directory, it’s essential to give your plugin a clear and concise name. That makes things easier for users to find and install the plugin from the directory. And help create a clear distinction between your plugin and other plugins.
When naming your plugin, be sure to use the following guidelines:
- The name should be short and easy to remember.
- The title should accurately describe the functionality of the plugin.
- The name should not include any trademarked terms without permission from the trademark owner.
- Check the Plugin Name and slug in the WordPress Directory for availability.
Be sure to give your plugin a clear and concise name, and follow these guidelines when naming it. It will help users find and install your plugin and will help to create a clear distinction between your plugin and other plugins in the directory.
Preparing Readme
When you create a plugin, it’s essential to include a readme file with all the information users need to install and use your plugin. The readme file should be in the correct format. Should have all the required information, which will help the WordPress Plugin Directory team to approve your plugin for inclusion in the directory.
The readme file is also an opportunity to introduce your plugin to users and explain it. Be sure to write clear and concise instructions for installing and using your plugin, and include any other relevant information such as contact info or credits.
If you’re unsure how to format a readme file or what information to include, many online resources can help. The WordPress Plugin Developer Handbook is an excellent place to start, as is the README standard on Github.
When creating a plugin, including a readme file with all the information users need to install and use your plugin is essential. The readme file should be formatted correctly and have all the required information. That will help the WordPress Plugin Directory team approve your plugin for inclusion in the directory.
We Have Built Some Awesome WordPress Plugins Take them with you
About WP Plugin Readme
The readme file for each plugin should explain any requirements that the plugin has, as well as other information about the plugin. That includes,
- The name of the plugin
- The version of WordPress that it is compatible with
- A short and detailed description of the plugin core features
- How to install it
- And any screenshots or other visual aids
- How to install it
As requested, you can use the free, user-friendly readme generator tool by filling out the crucial info in the multi-step form. The readme output created from the provided information into the tabs such as
- Plugin
- Versions
- Description
- Installation
- FAQ
- Screenshot
- Change Log
- Upgrade Notice
Once you have completed the readme file, you can put it through the readme validator tool to check it for accuracy.
If you need more visual assistance or a WordPress readme preview generated from your readme.txt, use the tool wpreadme.com. You can verify the preview and make changes as required.
Plugin Submission
If the plugin meets all of these requirements, proceed to submit it to the WordPress Plugin Directory to get exposure for your plugin.
Now bundle your plugin as a zip folder. Ensure to place the readme file. Check if the plugin name is correct or if any changes are required. Create an account with wordpress.org if you don’t have one. Choose the username wisely, and verify other users’ profile names before choosing one.
- Steps 1 : Login to your account,
- Steps 2 : Go to Add your plugin page to submit the plugin
- Steps 3 : Note that there should be a notice stating how many plugins are in the awaiting review process.
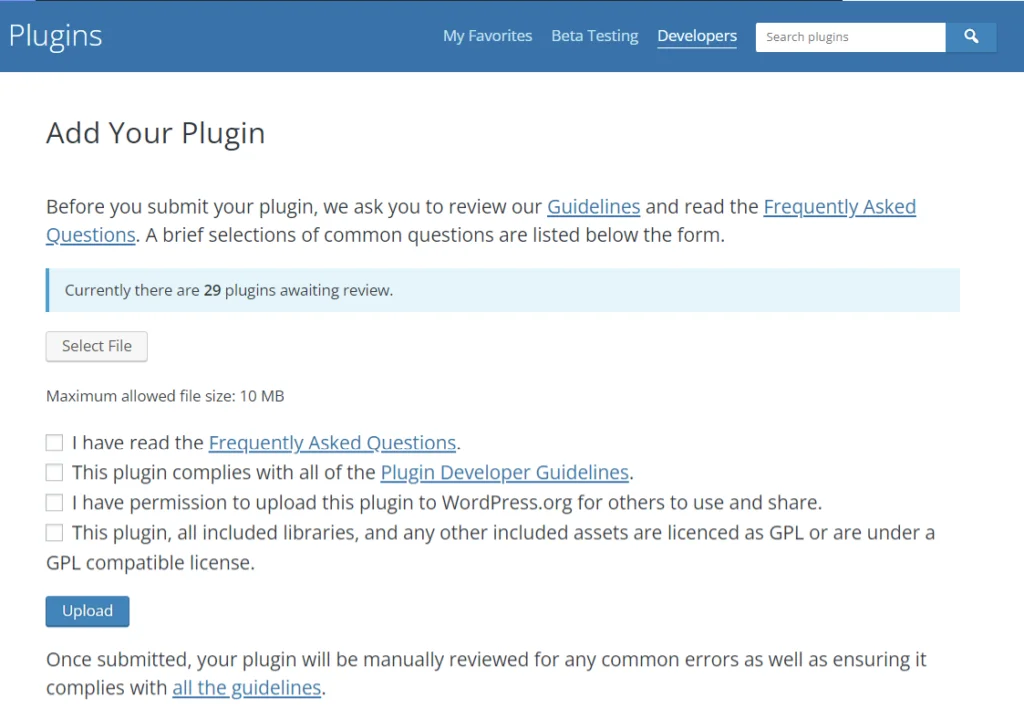
- Steps 4 : Your submission will be next that
- Steps 5 : Select the File button to upload the plugin’s zip folder.
- Steps 6 : Read and accept all the checkboxes and click upload.

All Done? Now WordPress team will review the plugin to see if it meets the guidelines, and the process may take 2-3 weeks.
A confirmation email is received, followed by the plugin review status and instructions. If the plugin has any issues with code, you will get a detailed email to rectify those. Make the necessary changes to the code and resubmit by replying to the email with the updated plugin zip as an attachment.
When the plugin submission is approved, you will get a confirmation email with svn repo details to commit your plugin code. The plugin will be made available to the public by uploading the code to the directory.
Example Links
- SVN repository: https://plugins.svn.wordpress.org//
- Development log: https://plugins.trac.wordpress.org/log//
- Browse the code: https://plugins.trac.wordpress.org/browser//
Adding a plugin to the WordPress Plugin Directory is a great way to make it available worldwide for download by WordPress users. And people can rate and comment on your plugin, and you will be able to track how many people have downloaded it. It is a great way to notice your plugin by the WordPress community.
We have Developed Finest WordPress Plugins Add them to your bag now
How to Update WordPress Plugins
A plugin is a software, which is used for enhancement purposes. It is called an add-on or extension. It can be installed in the program to extend its functionality.
There are thousands of WordPress plugins available in the WordPress directory. Including free or premium WordPress plugin versions. You can choose either of them.
The purpose of plugins is to add features to your website without the knowledge of any code. Developers periodically update things in order to fix bugs and for additional features. It is important to update the plugins properly and at the same time need to manage them.
To prevent bugs and to use newly developed features, you need to keep things up to date. You can make the updates automatically and manually. Let’s have a detailed look at how to update the plugins.
Steps to update wordpress plugins:
Firstly, you need to install the WordPress plugin that you want to install for your website. You can install it from the WordPress dashboard. Goto WordPress Dashboard and click plugins from the menu.
Then search the plugin in the search bar which is in the top right corner. After that, install the plugin and activate it with just a click.
You can also install the plugin by using drag and drop method. Get the zip file of the plugin you want to install. Then drag your .zip file from the location in your pc. After that, Click “install” to install the plugin. Now you can install and activate your plugin.
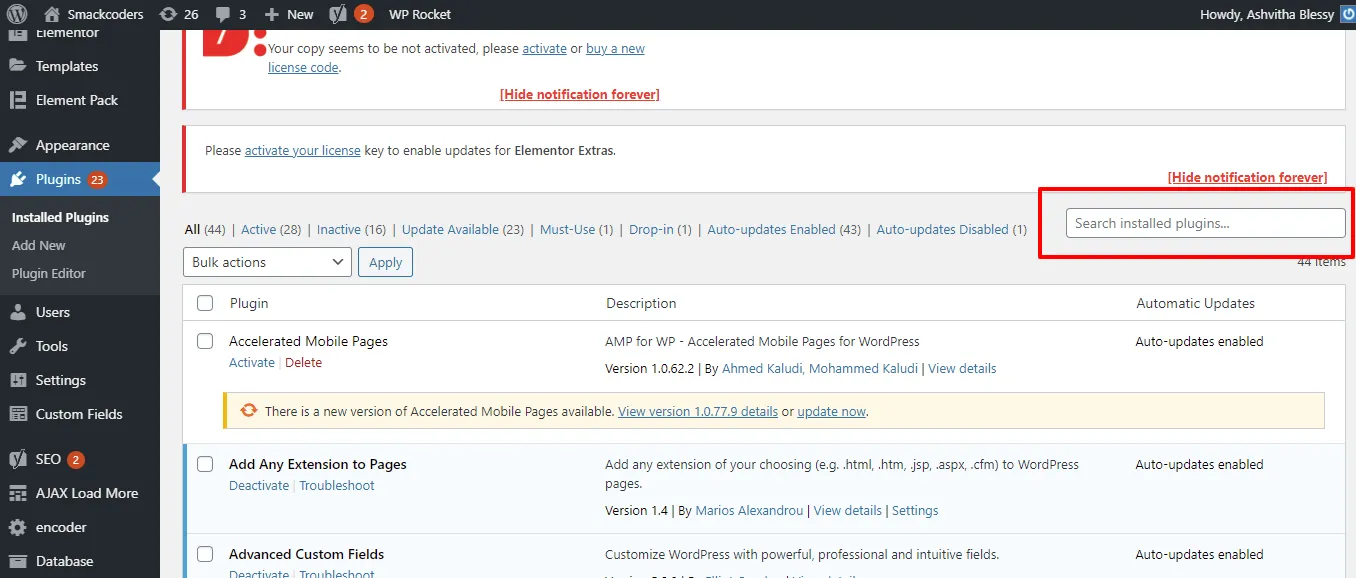
Once you activate the plugin, you can use it for your need. WordPress comes with a built-in update system. So that, it automatically checks for the update and you will get a notification in the plugin menu. It shows notifications for WordPress plugins, themes and WordPress core software. There is an option to update the plugin manually. So that, you can manually check for the updates by visiting the WordPress dashboard >> updates page.
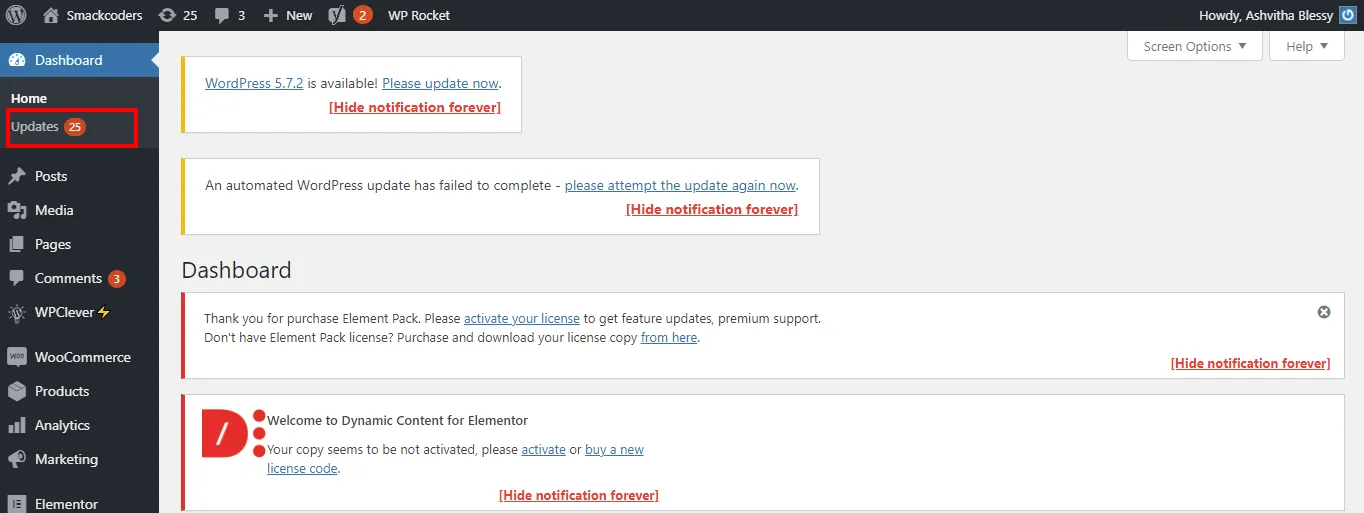
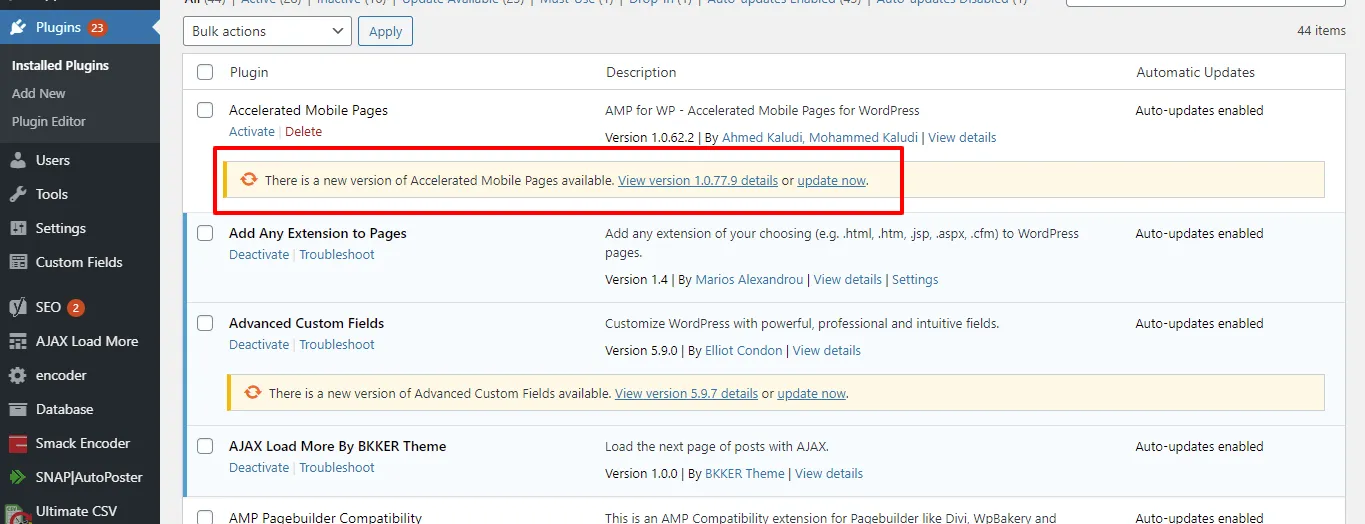
Visit the plugin page and check for the updates available. Now you can install these updated versions of the plugin. You will get a notification below each plugin. That, it has an update for you and install it now. All you need to do is just click the “update now” link to update the plugin. This is a simple process to update the plugin.
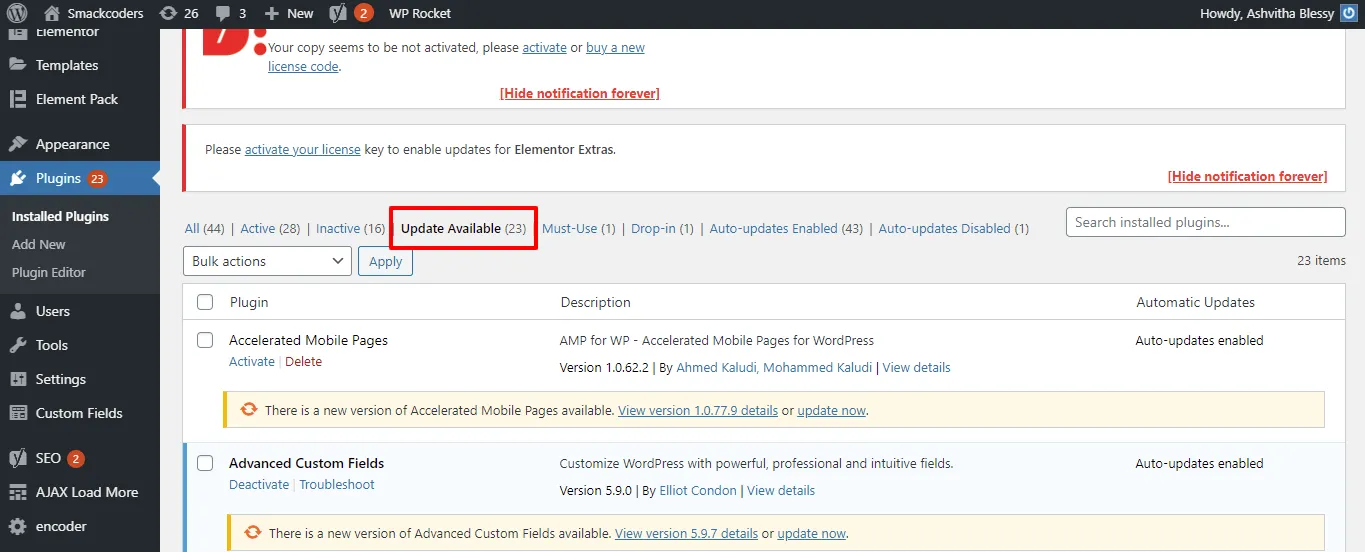
Also, you have a choice for the bulk updates. If you want bulk updates of plugins, you can follow the process. To check the bulk updates goto the plugins page and click the “updates available” link. It will show you all updates available for the plugins. Here you can select the plugin which you need to update. After selecting the plugin just click “Update”. Now your updated version of the plugins is ready to work.
The most important thing is before updating the plugin you need to check the details of the new version. So you will get an idea about the new version of the plugin. Also, you will know what are the changes made in this updated version. These are the process to update the plugin in WordPress. We are offering discounts for our WordPress plugins. Give it a try now!.
