WP Leads Builder for CRM is a WordPress plugin that automatically sends every web form submission, user registration, and abandoned WooCommerce cart from your website into your CRM as a lead or contact, eliminating manual data entry. It connects WordPress to six CRMs out of the box: Salesforce, Zoho CRM, Freshsales, Vtiger CRM, SugarCRM, and SuiteCRM. The plugin works with your existing forms (Contact Form 7, Gravity Forms, Ninja Forms, Elementor, WPForms) or lets you build new lead and contact forms directly from your CRM fields, with built-in duplicate prevention, Google reCAPTCHA, and automatic lead assignment to sales reps
Getting Started – Install the Leads Builder For CRM Plugin
When it comes to installing the plugin in WordPress, you can choose many different methods which are explained below. For installing the Leads Builder for CRM pro plugin, you need to purchase it and download the Pro plugin from MyAccounts page.
- General way to install a WordPress Plugin:
- Download the zip file from Myaccounts page.
- Visit WordPress admin dashboard. Go to Plugins → Add New → Upload
- Browse and Upload the downloaded zip file.
- Click ‘Install’ and then activate the plugin.
- Browse and Upload the downloaded zip file
- WordPress plugin install via FTP:
- Download and Extract the zip file.
- Upload the plugin to /wp-content/plugins/.
- Go to Plugins → Installed Plugins → Click Activate.
- Plugin installation via WordPress dashboard: ( for the Community Version)
- Go to Plugins → Add New.
- Search CRM WordPress Leads.
- Once you find the plugin, click Install Now → then Activate.
CRM Configuration – WP Leads Builder for CRM #
CRM Configuration tab helps you choose the CRM you are using and where you want to push your customer info.
- Choose your required CRM from the dropdown. Provide necessary credentials or keys based on the selected CRM.
- These options to be filled differ based on your CRM.
- For Salesforce CRM: provide your consumer key, consumer secret, and callback URL. The integration configurations need to be authenticated separately by clicking on Authenticate before saving.
- To get the details, login to your Salesforce account → setup(gear) icon → Setup.
- Click on Apps → App Manager → New Connected App and provide the required details.
- Check on the Enable OAuth Settings and paste the Callback URL given in Leads Builder for CRM.
- Select Full access(full) & click Add for Selected OAuth Scopes.
- Click Save and continue to get the consumer key and secret.
- For Freshsales: Provide your domain URL, username and password.
- Log in to your Zoho Account
- Visit the URL https://api-console.zoho.com/.
- Click Add Client.
- Click the ‘CREATE NOW’ button in Server-based Applications.
- Provide your Client Name, Homepage URL, and Authorized redirect URL (You can get the Authorized redirect URL from Leads Builder for the CRM configuration tab). Now click on the Create button.
- You will receive your Client ID and Client Secret key.
- Click the ‘SAVE AND AUTHENTICATE’ button in the CRM configuration tab, and accept the field information.
- Finally, click on the SAVE CRM CONFIGURATION to save the settings, and complete your integration configuration process.
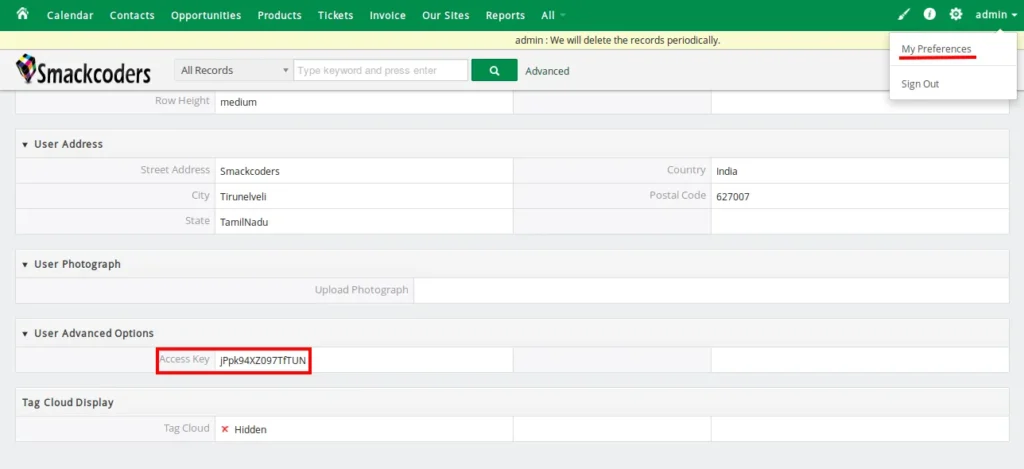
- For Vtiger CRM provide your CRM URL, username, and access key. To get the access key login to your CRM, click on Username → My Preferences → Under User Advanced Options → Access Key.
- For Salesforce CRM: provide your consumer key, consumer secret, and callback URL. The integration configurations need to be authenticated separately by clicking on Authenticate before saving.
For SugarCRM provide your CRM URL, username, and password.
For SuiteCRM provide your SuiteCRM URL, username, and password in SuiteCRM configuration.
If you wish to change to a different CRM in between you can do it with ease.
WordPress Leads Builder for CRM Forms #
CRM Forms is where you select the CRM fields to display on your form to collect customer information.
- Click “Create Lead Form” to create a form based on the fields in your CRM Lead Module.
- Click “Create Contact Form” to create a form based on the fields in your CRM Contacts Module.
- Select the “Use Existing Form” to capture CRM leads and contacts with the already embedded third-party forms built with Gravity Form, Ninja Form, and Contact Form 7.
- Click the edit icon in the Forms list to update or modify existing forms.
- Use the delete icon to delete a form from the Forms list. This will delete that form permanently.

To Create / Edit Form : When you click on the create or edit icon for a form, the list of fields in the corresponding module(Leads/Contacts) will be listed. You can customize the list based on your needs.
- Choose the list of fields which need to be modified.
- The “Bulk Action” dropdown has also the options to enable /disable fields, change order of display, renaming labels and make fields mandatory of the selected fields. Choose any one option from the dropdown and click on Apply to apply the changes to your form.

- The Form Options enables you to overwrite the settings for the individual form.
- Post Type: Choose where you want to embed the form – Post / Page / Widget using the dropdown. Select Post for Post & Pages and Widget for the Widget.
- Prevent Duplicate Leads : Create, update, or skip the duplicate entries possibly generated from the form. Duplicate handling works based on the default Email ID field in the CRM.
- Assign automatically: Select the CRM User (Salesman) to whom the captured lead needs to be assigned.
- Custom Messages: Customize the messages you want to show to the user on form submission. You can customize both success and failure messages.
- Enable URL Redirection – Configure this option to redirect to a page after the form submission. Hover over the OFF button and click on it. Then provide the page URL in the textbox.
- Enable Google Captcha – Setup recaptcha for your forms to avoid spam form submissions. Hover over the OFF button and click on it will enable the Enable Google Captcha option.
- Choose Third-Party Form – Choose any one of the supported third-party form builders’ names from the dropdown menu to convert the default form to that third-party form.
- Third Party Form Title – Specify the title of the Form you’ve created with the third party form builder tool.

After configuring everything, click “Save Form Settings”.
Existing Form
Leads Builder for CRM allows you to use your existing web forms to capture CRM Leads/Contacts for your CRM. The supported third-party WebForm builder add-ons are Gravity Forms, Ninja Forms, Contact Form7, Elementor Forms, WP Forms, and WP Forms Pro.
- To capture, click on Use Existing Form.
- Choose your module and form type from the dropdown.
- Click Configure.
- Select the existing form from the “Choose any one of the forms” dropdown.
- Duplicate Handling: Create, update, or skip the duplicate entries that are generated from the form. Duplicate handling works based on the default Email ID field in the CRM.
- CRM Leads/Contact Owner: You can assign the newly syncing CRM Leads and Contacts to a specific Salesperson in your CRM. Choose the Round Robin option to automate assigning the sales rep consecutively one after the other.
- Now, map the Form fields with the CRM fields in the dropdown.
- Finally, click ‘Configure’ to complete the mapping.

Form Settings
- The debug and notification enables you to get notifications on success and failure of your Lead and Contact sync. Choose any one option or select Both options from the “Which log do you need?” field to receive the notifications.
- Specify the email address in which you want to receive the error notifications.
- Enable the debug mode to receive the notifications.
- To prevent spam and abuse, enable Captcha and set the Public and Private Key.
- To create an account, visit Google reCAPTCHA for Lead Protection.
- Click Save after configuring everything.

WP Leads builder for CRM – Support for Third-Party Plugins
WP Leads Builder for any CRM Pro plugin supports you to integrate the forms created using third-party plugins for lead generation. Some of the supported third-party form creation plugins are as follows:
- Contact Form7
- WP Forms Free
- WP Forms Pro
- Gravity forms
- Ninja forms
- Qu forms
- Caldera Forms
It can be integrated with third party plugins in order to create custom fields for the WordPress user table. It lets you map and capture the data from WordPress to the Business CRM. Some of the supported third-party plugins are as follows:
- Ultimate Member
- WP Members
- Member Press
- ACF free
- ACF pro
WP Leads Builder Pro for CRM Integration also captures WooCommerce Cart Data for CRM Leads or Contacts.
Frequently Asked Questions #
What does WP Leads Builder for CRM do?
It captures leads from your WordPress website, including form submissions, registered users, and WooCommerce checkout data, and pushes them straight into your CRM in real time as new leads or contacts
Can I use my existing Contact Form 7 or Gravity Forms with this plugin?
Yes. The plugin supports Contact Form 7, Gravity Forms, Ninja Forms, Elementor Forms, WPForms, and WPForms Pro. Select Use Existing Form, pick your form, map the fields to CRM fields, and submissions will sync automatically
How does the plugin prevent duplicate leads in my CRM?
Duplicate handling is built in and works on the default Email ID field. For each form, you can choose to create, update, or skip duplicate entries, keeping your CRM database clean
What is the difference between the Free and Pro versions?
The Free version offers basic lead capture for a single CRM. The Pro version unlocks all six CRM integrations, WooCommerce cart capture, third-party form support, custom field plugins (ACF, MemberPress, WP-Members, Ultimate Member), and advanced features like Round Robin assignment and URL redirection.