WooCommerce to Shopify Sync (W2S) is a WordPress plugin that automates product, order, customer, and category synchronization between WooCommerce and Shopify. It eliminates manual data entry across both platforms and supports bidirectional sync, one-way transfers, real-time webhook updates, and scheduled automation. The Pro version adds multi-store management, AI-powered content optimization, SEO migration preservation, advanced product filters, pricing rules, and a real-time analytics dashboard.
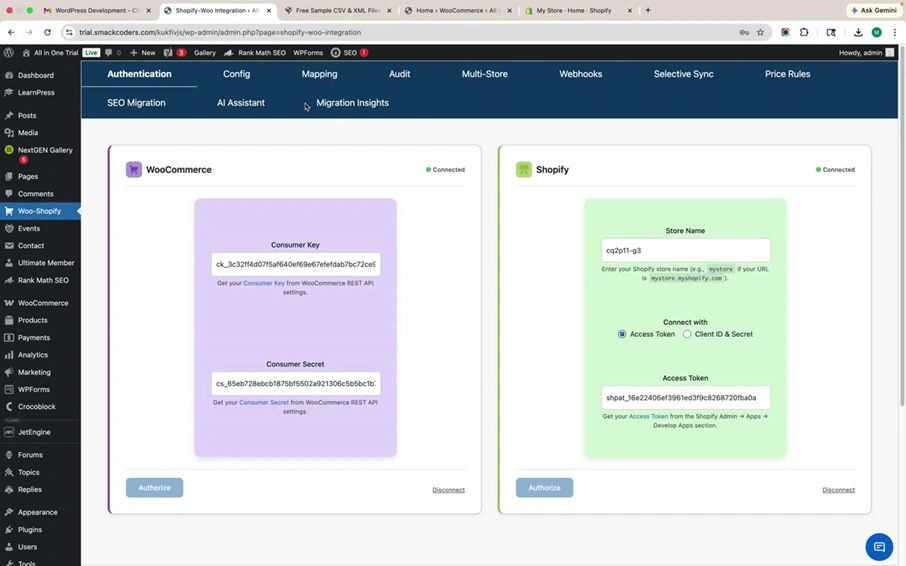
Step 1: Authenticate Your WooCommerce and Shopify Stores #
The Authentication tab is the first screen you see after activating the W2S plugin. It displays two side-by-side panels, one for WooCommerce and one for Shopify, where you enter your API credentials to establish a secure connection.
WooCommerce: Enter your Consumer Key and Consumer Secret. Generate these from WooCommerce → Settings → Advanced → REST API in your WordPress admin.
Shopify: Enter your Store Name and Admin Access Token. You can connect using either an Access Token or Client ID and Secret. Get the Access Token from Shopify Admin → Apps → Develop Apps.
Click Authorize on each panel. A green “Connected” badge confirms a successful connection.
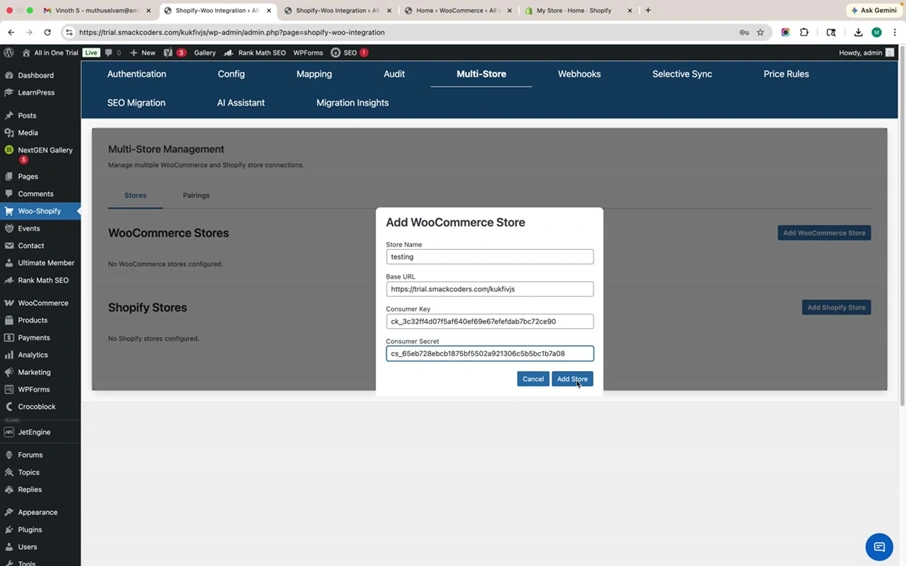
Step 2: Set Up Multi-Store Management (Pro) #
The Multi-Store tab allows you to register and manage multiple WooCommerce and Shopify store connections from a single WordPress installation. This is ideal for agencies, multi-brand businesses, and developers managing several storefronts.
Add a WooCommerce Store
Click Add WooCommerce Store. In the modal dialog, enter the Store Name (a label for your reference), Base URL (the full URL of your WooCommerce site), Consumer Key, and Consumer Secret. Click Add Store. The store appears in the list with a green “Connected” badge.
Add a Shopify Store
Click Add Shopify Store. Enter the Store Name, Shopify Domain (formatted as your-store.myshopify.com), and Admin Access Token. Click Add Store. Each registered store can be tested, deactivated, or deleted independently using the action buttons.

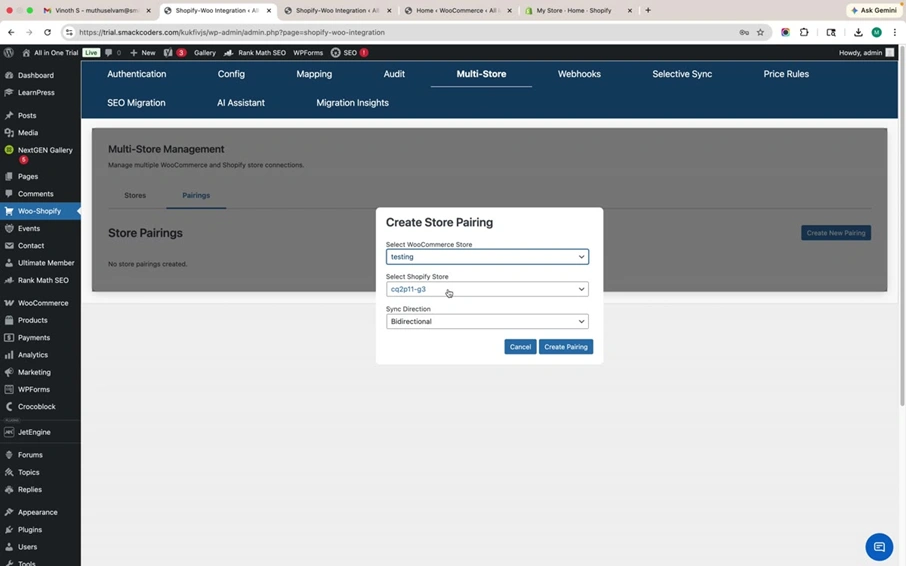
Step 3: Create Store Pairings for Bidirectional Sync #
Navigate to the Pairings sub-tab within Multi-Store. Click Create New Pairing to link a specific WooCommerce store with a specific Shopify store. Select the WooCommerce store, Shopify store, and initial sync direction (Bidirectional, WooCommerce → Shopify, or Shopify → WooCommerce).
Each pairing card displays its status (Active or Inactive), sync direction, and last sync timestamp. Action buttons let you configure, Sync Now, Deactivate, or delete any pairing independently. You can create multiple pairings with different sync strategies for different store combinations
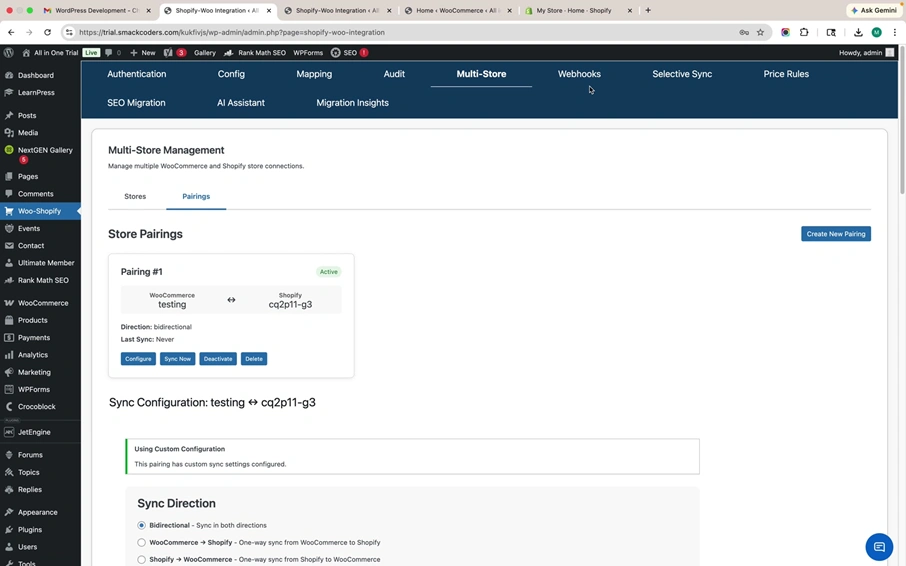
Step 4: Configure Sync Direction, Entity Types, and Operations #
Click Configure on any pairing to access its dedicated sync configuration. This is where you define exactly how data flows between the paired stores.
Sync Direction
Choose from three options: Bidirectional (sync in both directions), WooCommerce → Shopify (one-way push), or Shopify → WooCommerce (one-way pull). The bidirectional option keeps both platforms fully aligned at all times.
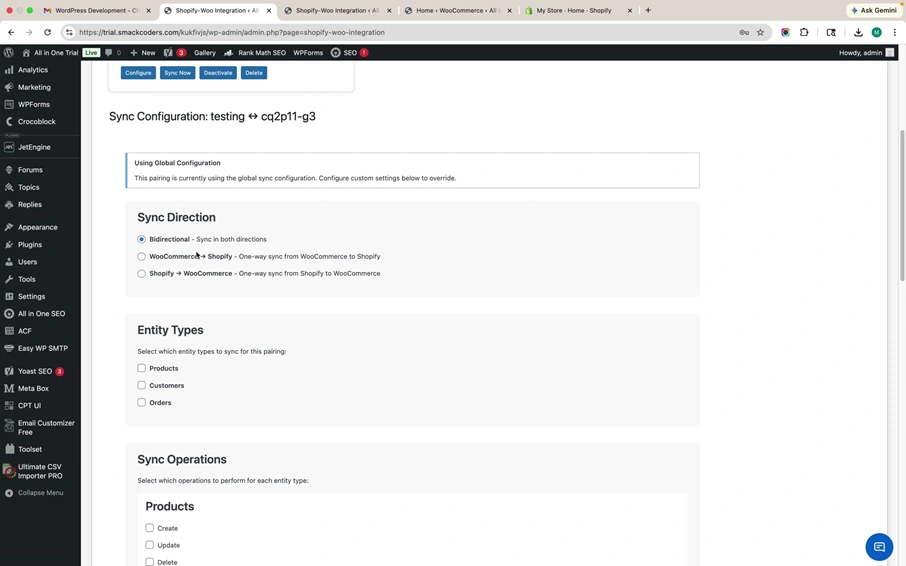
Entity Types and Sync Operations
Select which entity types to sync: Products, Customers, Orders, and Categories. For each entity, independently toggle Create, Update, and Delete operations. For example, enable Create and Update for Products but disable Delete to prevent accidental removal on Shopify. Set the Shopify weight unit and access Advanced Sync options for each entity
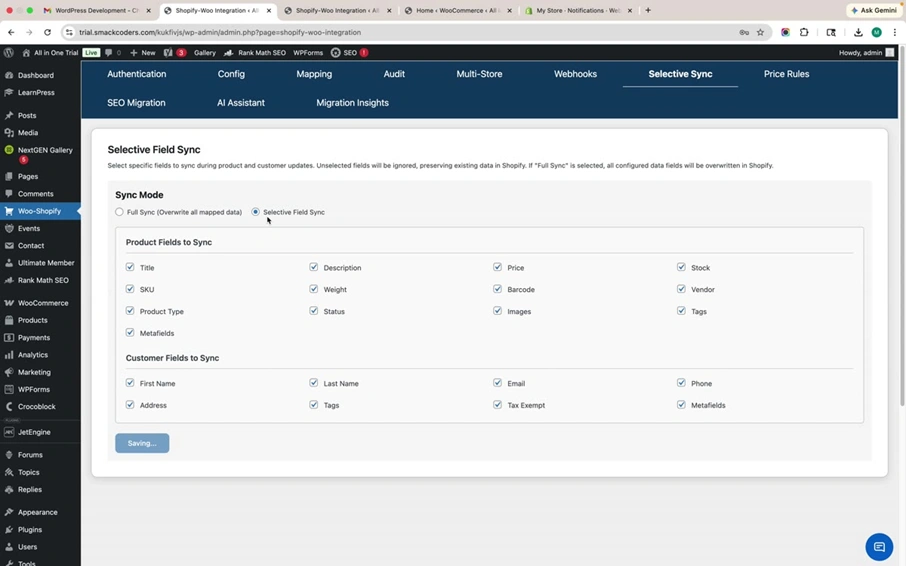
Step 5: Selective Field Sync to Control Which Data Gets Synced (Pro) #
The Selective Sync tab gives you field-level control. Choose between two modes: Full Sync (overwrites all mapped data) or Selective Field Sync (lets you pick specific fields to include while preserving other data in Shopify).
When Selective Field Sync is enabled, checkboxes appear for every product field (Title, Description, Price, Stock, SKU, Weight, Barcode, Vendor, Product Type, Status, Images, Tags, Metafields) and every customer field (First Name, Last Name, Email, Phone, Address, Tags, Tax Exempt, Metafields). Only checked fields are synced — unselected fields remain untouched in the destination store.
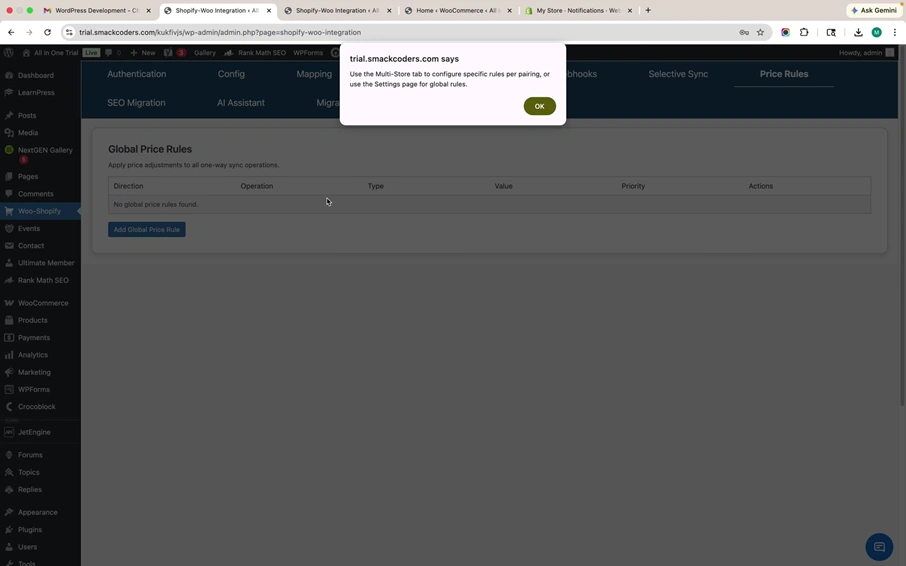
Step 6: Automated Price Rules for WooCommerce to Shopify Sync (Pro) #
The Price Rules tab enables automatic price transformations during one-way sync operations. You can define both global price rules (applied to all sync operations) and pairing-specific rules (configured within each store pairing).
Each rule is defined by Direction, Operation, Type (percentage or fixed), Value, and Priority (execution order when multiple rules exist). Use cases include currency conversions, marketplace fee markups, and regional pricing adjustments. Click Add Global Price Rule or Add New Price Rule within a pairing to create a new rule.
Step 7: Enable Real-Time Sync Using Shopify Webhooks (Pro) #
The Webhooks tab configures instant synchronization between Shopify and WooCommerce. Instead of waiting for scheduled sync intervals, Shopify pushes changes to your WooCommerce store the moment they happen.
How to Set Up Webhooks
The plugin generates a unique Shopify Webhook Endpoint URL. Copy it using the Copy URL button. Then follow these steps in your Shopify admin:
1. Go to Shopify Admin → Settings → Notifications
2. Scroll to the Webhooks section
3. Click “Create webhook.”
4. Select the event to sync (e.g., Product creation, Order creation)
5. Paste the webhook URL from the plugin
6. Select JSON format and save
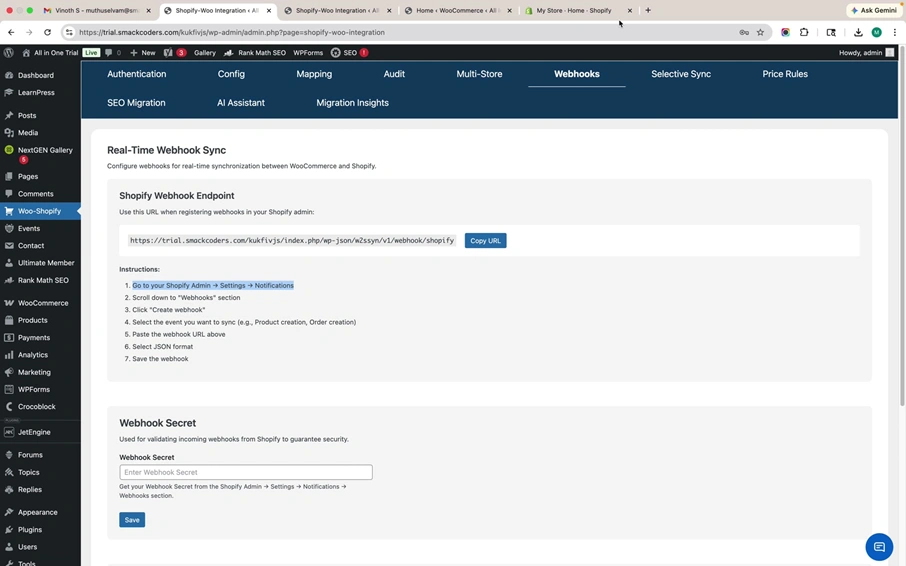
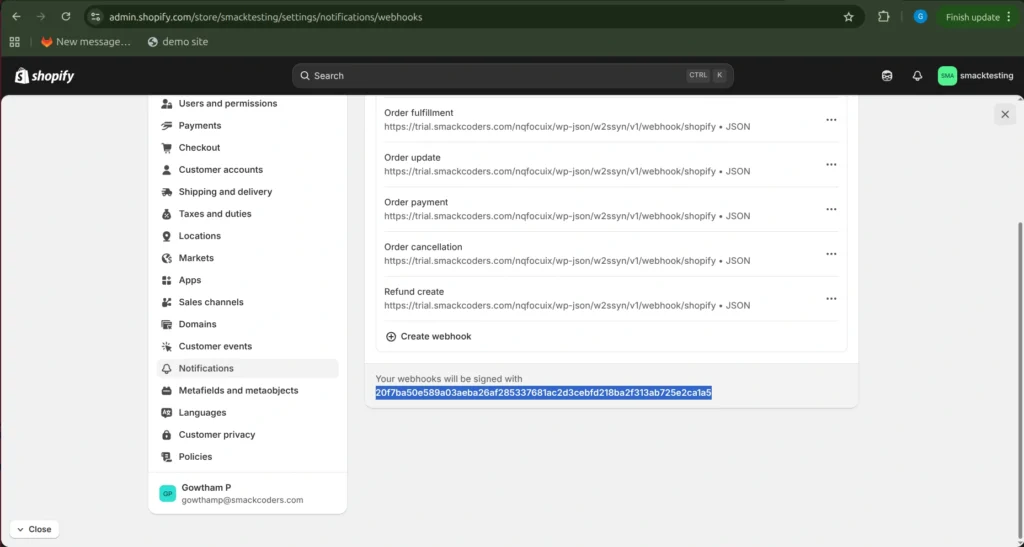
Webhook Secret Validation
Copy the Webhook Secret from Shopify’s notifications page and paste it into the Webhook Secret field in the plugin. This validates that only authenticated payloads from your Shopify store are processed.
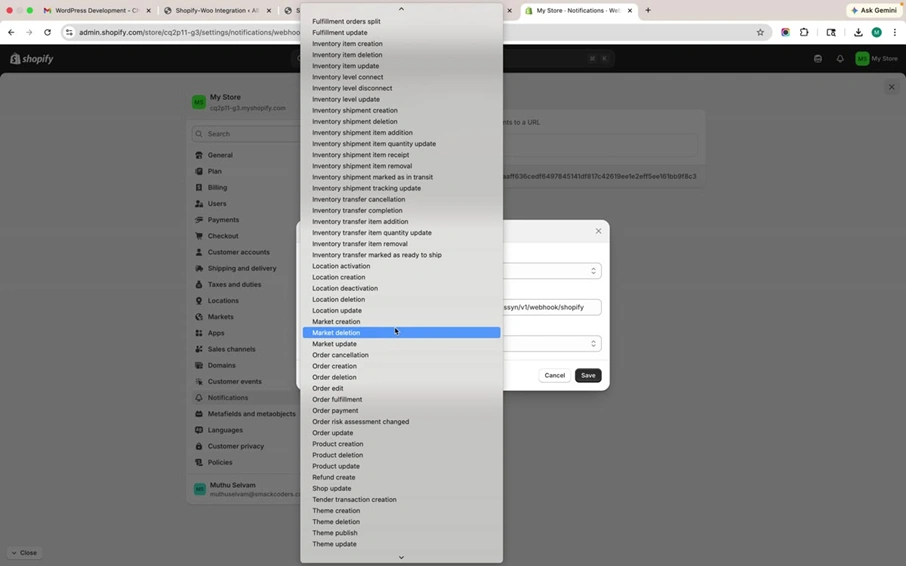
Supported Webhook Events
The plugin supports a comprehensive range of Shopify webhook events, including cart, checkout, collection, customer lifecycle, discount, draft order, fulfillment, inventory, location, market, order, product, refund, theme, and more.
Step 8: Configure SEO Migration Engine (Pro) #
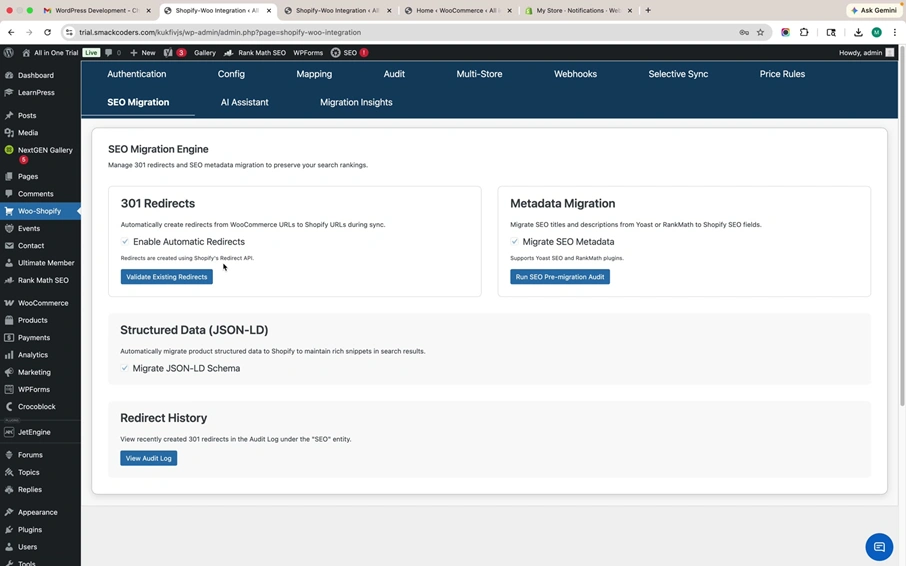
The SEO Migration tab protects your organic search traffic during the WooCommerce to Shopify migration with four components.
301 Redirects: Automatically creates redirect rules from WooCommerce product URLs to Shopify URLs using Shopify’s Redirect API. Enable automatic redirects and validate existing ones with the Validate Existing Redirects button.
Metadata Migration: Transfers SEO titles and descriptions from Yoast SEO and Rank Math into Shopify’s native SEO fields. Supports both plugins. Click Run SEO Pre-migration Audit to identify issues before migrating.
Structured Data (JSON-LD): Migrates product structured data schemas to Shopify to maintain rich snippets in search results.
Redirect History: View all created 301 redirects in the Audit Log for full traceability.
Step 9: AI to Enhance Product Data and Detect Sync Errors (Pro) #
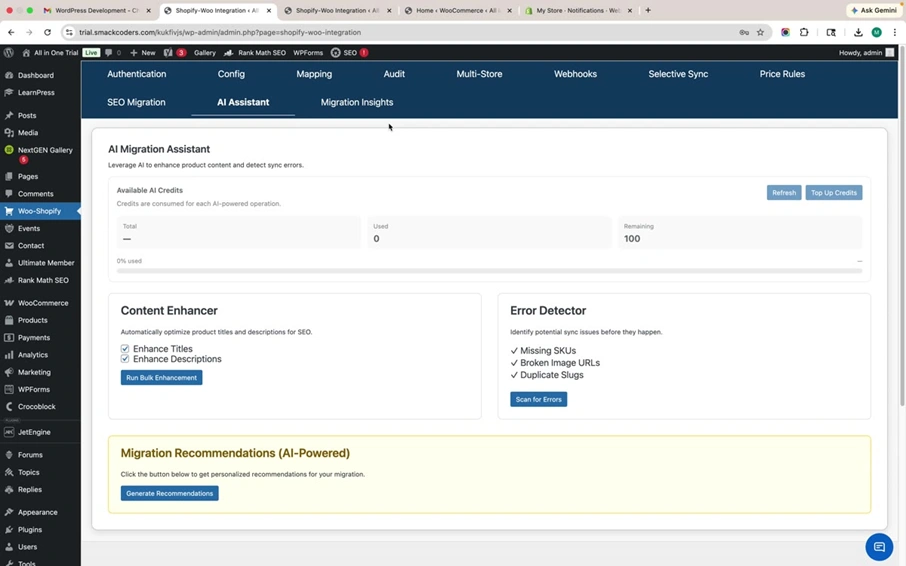
The AI Assistant tab brings artificial intelligence into your migration workflow. It operates on a credit-based system; the dashboard shows your total credits, used credits, and remaining balance with a progress bar.
Content Enhancer
Automatically optimizes product titles and descriptions for SEO. Toggle Enhance Titles and Enhance Descriptions independently. Click Run Bulk Enhancement to process your entire catalog in one operation.
Error Detector
Proactively scans for Missing SKUs (products without stock keeping units), Broken Image URLs (images that may not transfer correctly), and Duplicate Slugs (URL conflicts on Shopify). Click Scan for Errors for a comprehensive diagnostic.
Migration Recommendations
Click Generate Recommendations to receive AI-powered, personalized migration advice based on your store’s data structure, product count, and configuration.
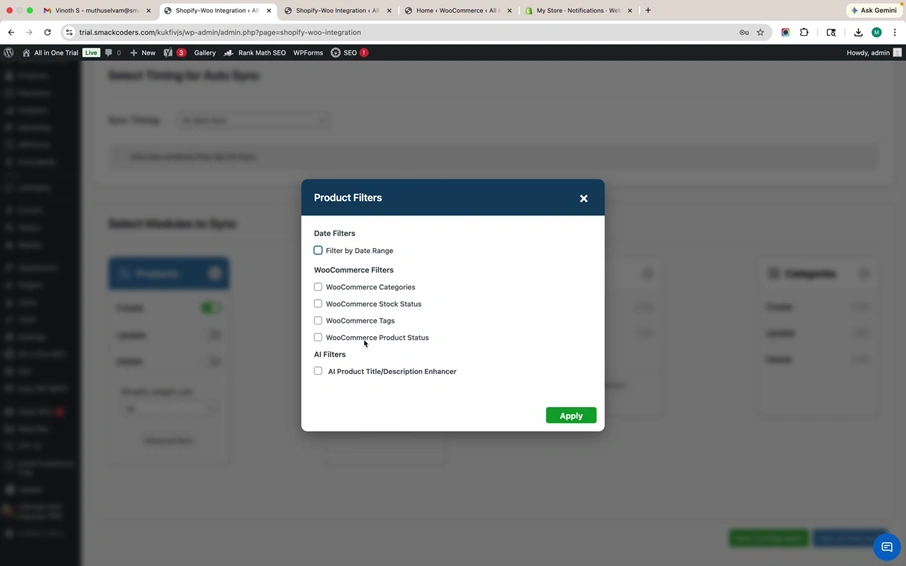
Step 10: Filter Products by Category, Tag, Stock, and Status Before Syncing (Pro) #
Access the Product Filters modal from the sync configuration screen to narrow exactly which products are included in each sync operation. Available filters include:
Date Filters: Filter by date range to sync only recently added or modified products.
WooCommerce Categories: Select specific product categories to include.
WooCommerce Stock Status: Filter by in stock, out of stock, or on backorder.
WooCommerce Tags: Filter by product tags for targeted sync.
WooCommerce Product Status: Include or exclude by draft, pending, or published status.
AI Product Title or Description Enhancer: Apply AI content enhancement during sync. Combine multiple filters simultaneously for precise control. Click Apply to activate
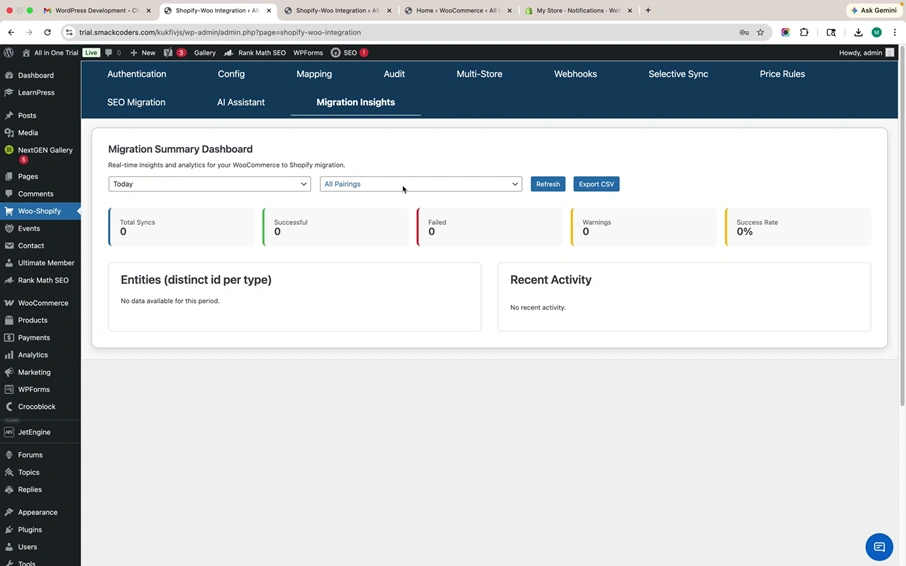
Step 11: Monitor Sync Performance with the Migration Insights Dashboard (Pro) #
The Migration Insights tab provides a real-time analytics dashboard for monitoring all sync activities. Filter by date range (Today, custom) and specific store pairings or all pairings.
Summary Metrics: Total Syncs, Successful, Failed, Warnings, and Success Rate are displayed in a color-coded metrics bar.
Entities by Type: Breakdown of distinct synced entities by product, order, or customer.
Recent Activity: Chronological feed of the latest sync actions.
Export CSV: Download all dashboard data for offline analysis or stakeholder reporting
Frequently Asked Questions #
Can I connect multiple WooCommerce and Shopify stores?
Yes. Multi-Store Management in W2S Pro allows you to register unlimited WooCommerce and Shopify stores, then create specific pairings between them with independent sync configurations, directions, and filters
How do I sync WooCommerce products to Shopify in real time?
Enable the Webhooks feature in W2S Pro. Copy the generated webhook endpoint URL, register it in Shopify Admin → Settings → Notifications → Webhooks, select the events you want to track, paste the endpoint URL, choose JSON format, and enter the webhook secret for validation. Changes in Shopify are then pushed to WooCommerce instantly
Does W2S Pro preserve my SEO rankings during migration?
Yes. The SEO Migration Engine creates automatic 301 redirects from WooCommerce URLs to Shopify URLs, migrates metadata from Yoast SEO and Rank Math, and transfers JSON-LD structured data to maintain rich snippets in search results
What does the AI Migration Assistant do?
It enhances product titles and descriptions for SEO, detects sync errors like missing SKUs or broken image URLs before they cause problems, and provides personalized migration recommendations based on your store data
What happens if a sync operation fails?
W2S Pro automatically retries failed sync tasks to prevent data loss from transient network errors or API rate limits. Failed operations are also logged for manual review in the Logs and Reports section.
Is the free version enough for a single store?
The free version handles product, order, and customer sync with scheduling, field mapping, and logs. It is suitable for straightforward single-store synchronization. Upgrade to Pro when you need multi-store connections, real-time sync, AI tools, SEO migration, or advanced filters
Related Document:
https://www.smackcoders.com/documentation/woocommerce-to-shopify-integration/w2s-pro-features