Table of Contents
Managing hundreds of Advanced Custom Fields (ACF) manually in WordPress can quickly become time-consuming and frustrating. With WP Ultimate CSV Importer Pro, you can bulk import, update, and export ACF fields using CSV or XML files in just a few clicks – no coding required.
The plugin supports all major ACF field types, including Repeater, Group, Gallery, Google Map, Relationship, and Flexible Content fields. Whether you are migrating websites, updating WooCommerce products, or managing large datasets, WP Ultimate CSV Importer Pro helps simplify the entire process while saving valuable time and reducing manual work.
ACF Field Types Explained
The WP Ultimate CSV Importer Pro plugin supports all major Advanced Custom Fields (ACF) field types. Use the table below to understand the correct CSV formatting for each field type before importing data into WordPress.
| ACF Field Type | CSV Formatting Rule | Example |
| Text / Text Area | Plain text string | WP Ultimate CSV Importer |
| Number | Numeric values only | 12345 |
| Valid email format | [email protected] | |
| URL | Full website URL | https://example.com |
| Image | External image URL or Media ID | image.jpg |
| Gallery | Comma-separated image URLs/IDs | img1.jpg, img2.jpg |
| Select / Checkbox | Comma-separated values | Premium, Importer |
| Radio Button | Single selected value | Premium |
| True / False | Use 1=True, 0=False | 1 |
| Google Map | Address|Latitude|Longitude | Chennai|13.08|80.27 |
| Post Object | Comma-separated Post IDs | 1,2,3 |
| Relationship | Related Post/Page IDs | 5,7,9 |
| Repeater Field | Comma or pipeline separated values | blue|black|red |
| Date Picker | DD/MM/YYYY format | 29/12/2025 |
Pro Tip:
Always use UTF-8 encoded CSV files to avoid import errors while handling ACF data in WordPress.
How to Import and Export ACF Fields Using CSV in WordPress
Importing your ACF field data into WordPress is simple and the same as importing posts, usually using CSV Importer. The first thing you need to do is install and activate the WP Ultimate CSV Importer plugin. Let’s take a look at the import and export of CSV files in WordPress using WP Ultimate CSV Importer.
CSV Preparation
Upon activation, you can simply go to ‘WP Ultimate CSV Importer → Import/Update.’ Now you will be prompted to upload your CSV file containing ACF field info in the UTF-8 file format.
The WP Ultimate CSV Importer fetches ACF field info based on the columns in your spreadsheet. The first row must have the column names, and you can have the name of your choice and there is no restriction in naming the ACF fields.
You can download the sample ACF CSV file for your reference. And you can open it in Microsoft Office, LibreOffice Calc, or Google Docs. While downloading the CSV file, make sure you use the comma(,) to separate columns, and the text delimiter is set to double quotes(“).
Import ACF Fields in WordPress from CSV
Before importing your CSV file, you have to create a custom post type in the ACF plugin. In the ACF dashboard, click on Create New, where you have to create a custom template based on your needs in ACF. You have to assign the template for the post, page, or any other field. This allows ACF fields to map correctly with WordPress fields during import.
Follow these simple steps to import or update ACF field data in WordPress using CSV files.
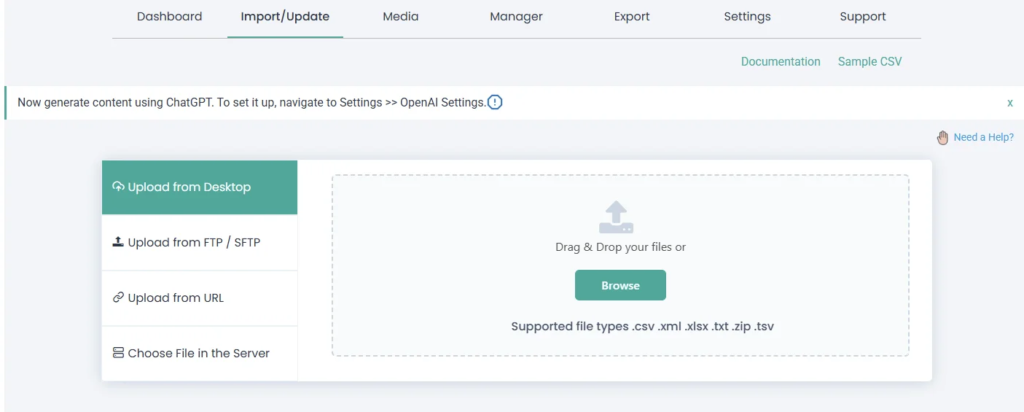
Step 1: Uploading the CSV file
Upload your CSV using any of these 4 methods:
- upload from Desktop
- Upload from FTP / SFTP
- Upload from URL
- Choose “File” in the server.
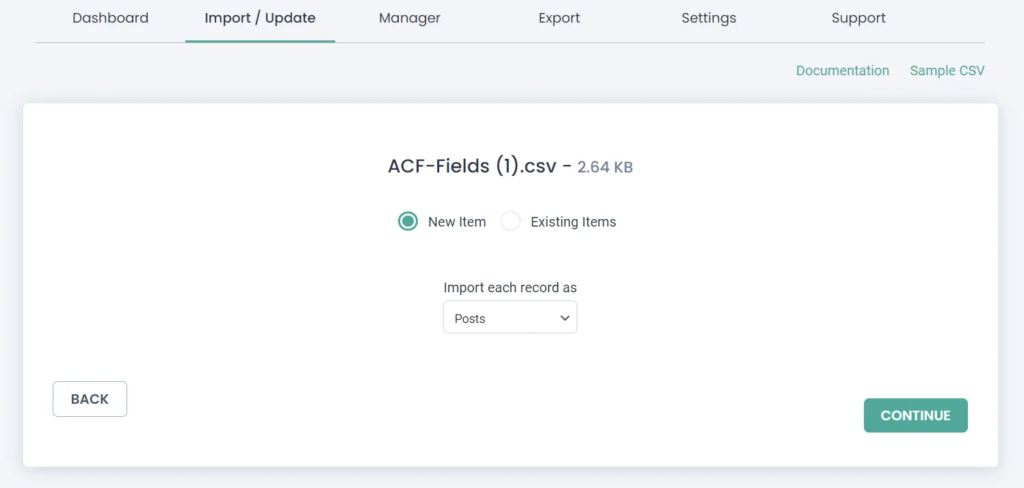
Then choose ‘New Items’ if the CSV file contains new items to import or ‘Existing Items’ to update the website content.
Step 2: Mapping the Header fields
Relate the CSV headers with WordPress fields. You can use the ‘Advanced Mode’ with a dropdown or simply use the ‘Drag & Drop’ mode to match the CSV headers with WordPress fields.
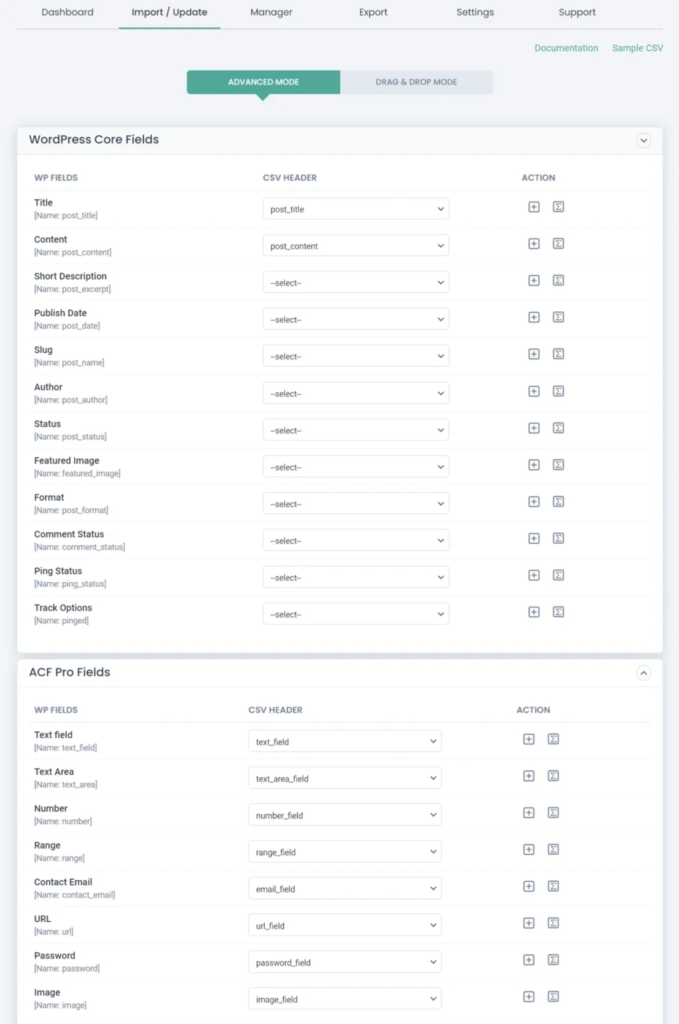
Once you map the fields, give a name in the ‘Save this mapping as’ field to use this mapping as a template later. Then proceed to the next with Continue. Skip the featured media handling section if you don’t upload any images.
Explore the complete CSV Importer documentation for advanced import settings and automation features.

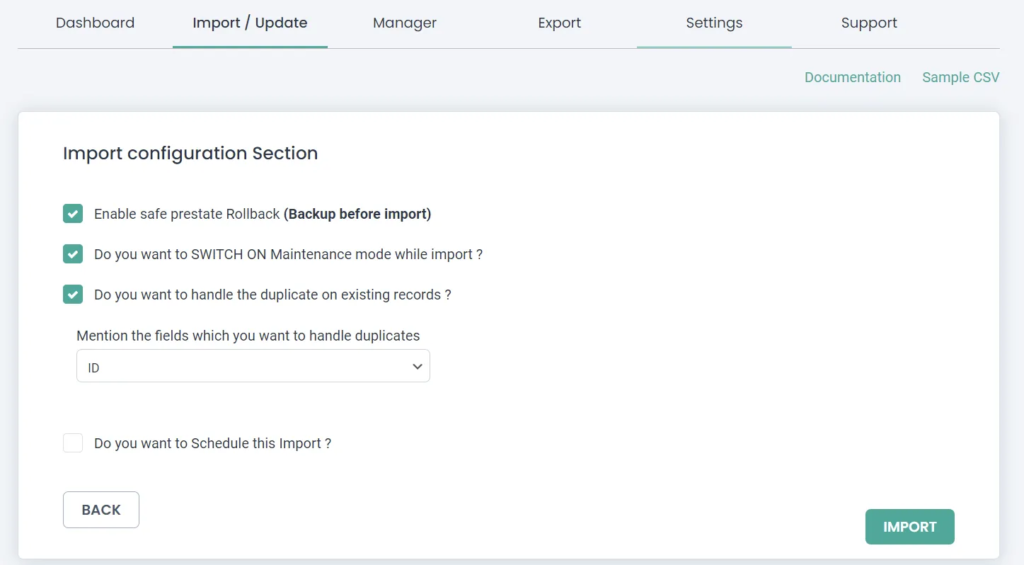
Step 3: Importing the CSV file
Now import the content to WordPress. To commit safely, check the ‘Enable Safe Rollback (Backup Before Import)’ option to create a backup before you import, and it will also roll back to the previous edition if an unexpected problem arises during the import.
Enable ‘Do you want to SWITCH ON Maintenance mode while importing?’ to notify your website visitors that the website is under maintenance. You also check for duplicates while you import using the option ‘Do you want to handle the duplicate on existing records?’ and choose the WordPress fields to check duplicates for.
Now choose the ‘Import’ button to instantly import the content on your WordPress website or schedule the post to get an update in the future, that is, to update content on the website at the specified date and time. The custom field ACF info will update successfully in WordPress from CSV.
Export ACF Fields in WordPress as CSV
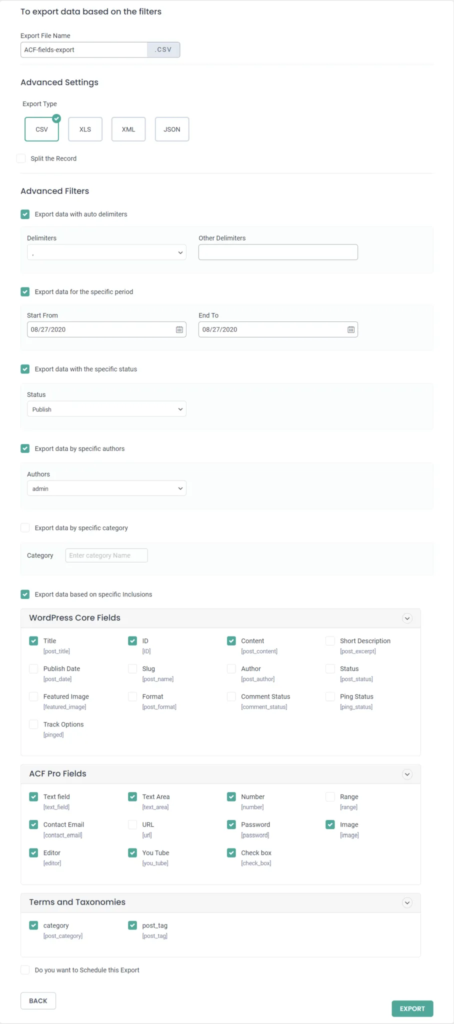
WordPress exports posts, pages, and custom post types along with ACF fields into CSV files for backup, migration, or bulk editing. In just two straightforward steps, you can export WordPress ACF fields alongside Post, Page, or Custom Post content into a CSV file, ensuring a secure backup or facilitating migration. In step one, select the post type, and in the second step, provide the export file name and choose ‘CSV’ as the export type.
The ‘Split the Record’ field mentions the number of records to export one by one; if you give 100, the first 100 records will be exported in the first CSV and the next 100 records exported in the second CSV file, and so on.
You can export records with advanced filters like ‘Export with auto delimiters,’ ‘Export data for the specific period,’ ‘Export with specific status,’ ‘Export data by specific author,’ and ‘Export data based on specific inclusions’; this lets you export data with specific fields.
Benefits of Using WP Ultimate CSV Importer for ACF
- Saves hours of manual data entry
- Supports bulk import/export
- Beginner-friendly interface
- Reduces migration errors
- Supports scheduled imports
- Works with WooCommerce & CPTs
How to Export ACF Field Groups in WordPress
If you’re using Advanced Custom Fields (ACF-WP) in WordPress and you want to export ACF field groups for backup or migration purposes, ACF provides a built-in export feature. Here are the steps to export ACF field groups:
- In your WordPress Dashboard:
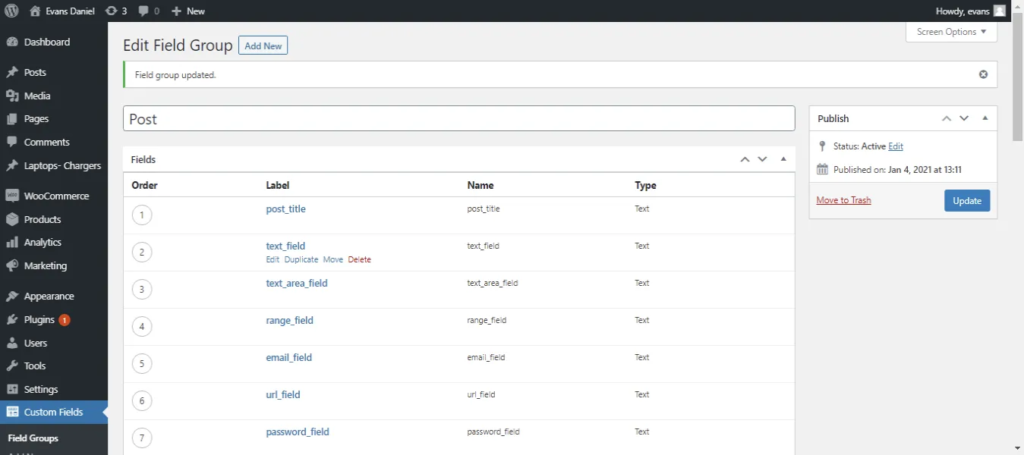
- Go to WP->” Custom Fields” > “Field Groups.”
- Select Field Groups:
- In the Field Groups screen, you’ll see a list of all your ACF field groups.
- Export Options:
- Navigate to Tools at the top of the menu and select the field groups you want to export.
- Now, click on the Export file.
Now, you have an XML file that contains the exported ACF field groups. You can use this file for backup purposes or for importing these field groups into another WordPress installation.
If you need to import these field groups into another WordPress site, you can follow these steps:
- In your WordPress Dashboard on the target site:
- Go to “Custom Fields” > “Field Groups.”
- Import Field Groups:
- Navigate to tools. And browse the ACF files you would like to import. Then Click on the “Import File” option.
ACF will then import the field groups, and you should see them listed in the Field Groups screen.
This process makes it easy to move your ACF configurations between WordPress installations or to create backups of your ACF settings. Always ensure that both sites have the same version of ACF or compatible versions to avoid compatibility issues during import.
Common ACF Import Errors and Fixes
| Issue | Possible Reason | Solution |
| Images not importing | Invalid image URL | Use complete image URLs |
| Fields not mapping | Incorrect field names | Match CSV headers correctly |
| Import failed | Wrong CSV encoding | Use UTF-8 format |
| Duplicate records | Existing content conflict | Enable duplicate handling |
Best Practices for Importing ACF Fields
- Always back up your WordPress database before importing
- Use UTF-8 encoded CSV files
- Validate image URLs before import
- Test imports on staging websites first
- Save field mappings for future imports
Frequently Asked Questions (FAQ)
Q1. What is Advanced Custom Fields?
Advanced Custom Fields (ACF) is a WordPress plugin that allows users to add custom fields to their content types, such as posts, pages, custom post types, and more. It provides a flexible interface for creating and managing custom fields, making it easier to customize WordPress websites to specific needs without writing any code.
Q2. How to export WooCommerce Products with ACF?
The WP CSV importer plugin has a few simple steps to export WooCommerce Products along with the ACF if you assign the desired custom fields with its appropriate Woocoommerce Product. Exporting Advanced Custom Fields (ACF) data alongside WooCommerce product information can provide valuable insights and streamline data management processes. Here’s a step-by-step instruction on how to achieve this:
Step 1: Navigate to the WP CSV importer plugin
Step 2: Click on the Export option and select the content type as WooCommerce Products
Step 3: Provide the File name and file type
Step 4: You can also export data with the advanced filter option
Step 5: Click on Export
By following these steps, you can seamlessly export WooCommerce product data along with associated Advanced Custom Fields, empowering you to analyze, manage, and utilize your data more effectively.
Q3. How to Update Advanced Custom Fields in Bulk?
The WP CSV importer allows you to import/update / Export your CSV files in WordPress.
Steps to update ACF in Bulk:
Step 1: Update all the Advanced custom fields in the CSV files
Step 2: Log in to WordPress and navigate to WP Ultimate CSV Importer Pro.
Step 3: Select the Import/Update option
Step 4: Browse the CSV files and select the content type for which you have updated the ACF (for example, posts, pages, Woocommerce Products, etc.,)
Step 5: Enable the Existing option to update your acf in the selected post types.
Step 6: Follow the onscreen instruction and Click on Import to import the updated changes.
Q4. Can I export ACF fields on their own?
Yes, you can easily export the advanced custom fields of posts, pages, WooCommerce products, etc. with WP CSV importer. The export process is the same as that explained above. Follow the three steps above. And finally, select the advanced filter option. In the Advanced Filter option, select all the advanced custom fields in the ACF fields PRO section. Once done click on export. Now all the ACF of the selected content type will be exported successfully.
Q5. How do I show Advanced Custom Fields in WordPress?
1. Display custom field using Theme files
To display Advanced Custom Fields in WordPress, you typically use PHP code within your theme files or in the content editor. ACF provides functions like get_field() or the_field() to retrieve and display the values of custom fields.
<?php
$custom_field_value = get_field(‘your_custom_field_name’);
if ($custom_field_value) {
echo $custom_field_value;
}
?>
Replace ‘your_custom_field_name’ with your custom field name.
2.Display custom fields using short codes
If you prefer not to edit theme files directly, you can also use shortcodes provided by the ACF plugin to display custom fields within your posts or pages. Shortcodes make it easy to insert custom field values directly into your content.
By following these steps, you can effectively show advanced custom fields in WordPress and enhance the functionality and customization of your website.
Q6. How do I export Advanced Custom Fields?
You can export Advanced Custom Fields settings and field groups using the built-in export feature in the ACF settings page within the WordPress admin dashboard. Also, you easily export the ACF with WP CSV Importer. This generates a JSON file containing all your custom field configurations which you can then import into another WordPress installation.
Q7. Is there a free version of Advanced Custom Fields?
Yes, there is a free version of Advanced Custom Fields available in the WordPress plugin repository. However, the free version has limited features compared to the Pro version.
Q8. How do I get a repeater in ACF?
To use the repeater field in ACF, you must create a field group and add a repeater field. You can then define the subfields that will be repeated within the repeater.
Q9. What is the repeater field limit in ACF?
The repeater field limit in ACF depends on the server resources and the maximum input variables allowed in your PHP configuration. By default, there isn’t a strict limit imposed by ACF itself, but performance may degrade if you have an excessive number of repeater rows due to database queries and memory usage.
Final Thoughts
Managing Advanced Custom Fields manually can become difficult as your WordPress website grows. WP Ultimate CSV importer Pro simplifies the entire process by allowing you to bulk import, export, and update ACF data quickly and accurately using CSV or XML files.
Whether you manage WooCommerce products, custom post types, or large-scale WordPress data, the plugin helps streamline workflows, reduce manual effort, and improve overall data management efficiency.For more detailed information, guide yourself through the WP Ultimate CSV Importer documentation to import/update/schedule or export the ACF fields data. Contact us for any help, and also please share your feedback with us without any hesitation.
