W2S – WooCommerce to Shopify Sync is a WordPress plugin that keeps your WooCommerce and Shopify stores connected and in sync. It lets you synchronize products, orders, customers, and categories between both platforms using flexible rules, automation, and background processing.
This guide walks you through the complete setup process, from installing the plugin and connecting both stores to verifying your configuration and preparing for your first sync.
If you prefer a visual walkthrough, you can also follow the Getting Started video linked below. The video covers authentication, basic configuration, and the initial syncing process.
Prerequisites #
Before installing WooCommerce to Shopify Sync, make sure the following requirements are met:
- WordPress version 6.0 or higher
- WooCommerce version 3.0 or higher (installed and activated)
- PHP version 7.2 or higher
- A WooCommerce store with REST API access enabled
- A Shopify store with Admin API access
- WooCommerce Consumer Key and Consumer Secret
- Shopify Admin API access token
Having these prerequisites in place helps prevent connection or authentication issues during setup.
Installation #
Step 1: Download the Plugin
Download the free WooCommerce to Shopify Sync plugin from the WordPress plugin repository. If you’re using the Pro version, download it from our website.
Log in to your WordPress dashboard and visit Plugins → Add New.
Note: The Pro plugin requires the free version to be installed and activated first.
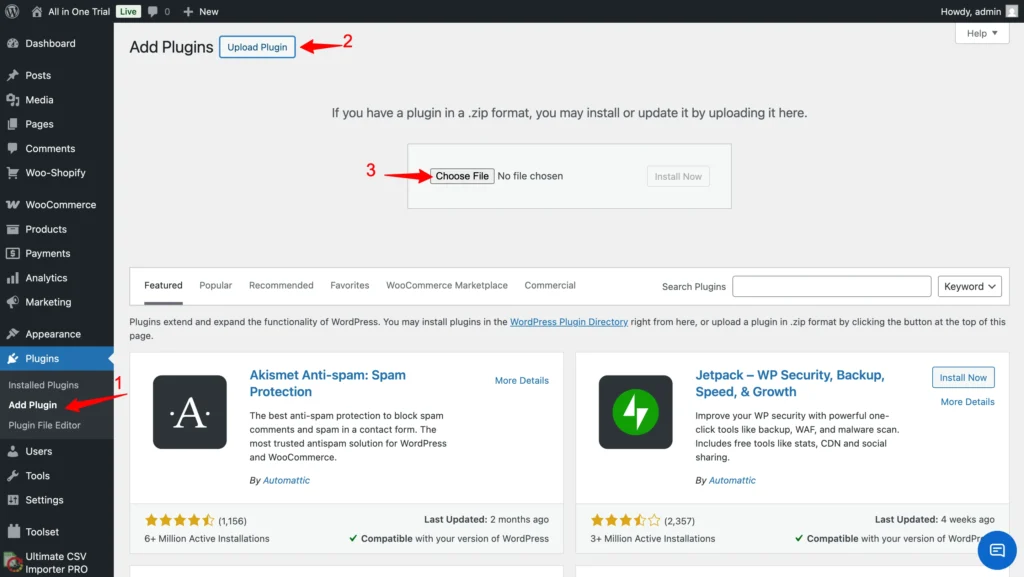
Step 2: Upload and Install
Click Upload Plugin, choose the plugin ZIP file, and click Install Now. Once installation is complete, click Activate Plugin.

Step 3: Verify Installation
After activation:
- A new menu item called Woo-Shopify will appear in the WordPress admin sidebar
- Click this menu to open the plugin dashboard
- You should see the main interface with authentication panels for both WooCommerce and Shopify

Initial Configuration #
Accessing the Plugin Dashboard
From the WordPress admin menu, click Woo-Shopify. The dashboard is organized into the following sections:
- Authentication
- Config
- Mapping
- Audit
Each section controls a specific part of how data is synced between WooCommerce and Shopify.

Authenticating WooCommerce #
In the Authentication tab:
- Locate the WooCommerce connection panel
- Enter your Consumer Key
- Enter your Consumer Secret
- Click Authorize
Once the credentials are validated, you’ll see a green Connected status. This confirms that WooCommerce is successfully connected.
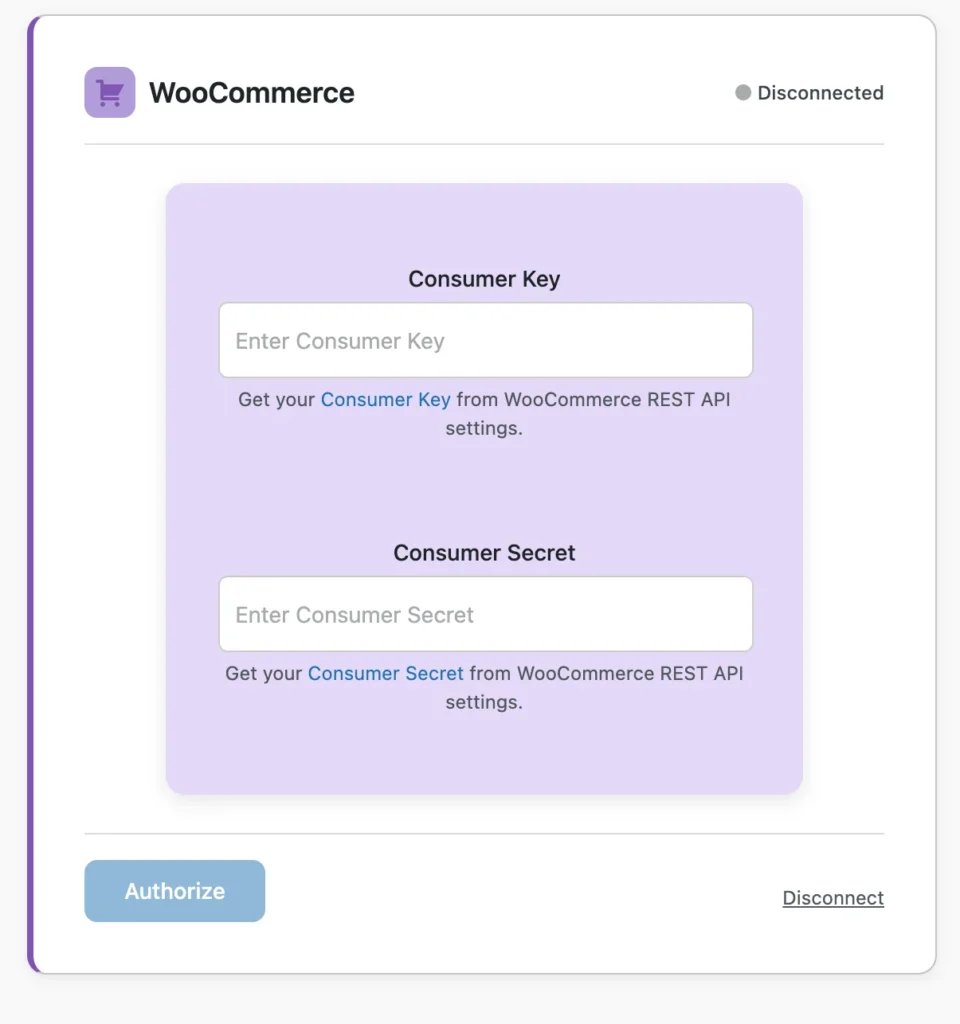
Refer to the sections below to learn how to generate WooCommerce API credentials.
Authenticating Shopify #
In the same Authentication tab,
- Enter your Shopify store name
- Example: If your store URL is mystore.myshopify.com, enter mystore
- Paste your Shopify Admin API access token
- Click Authorize
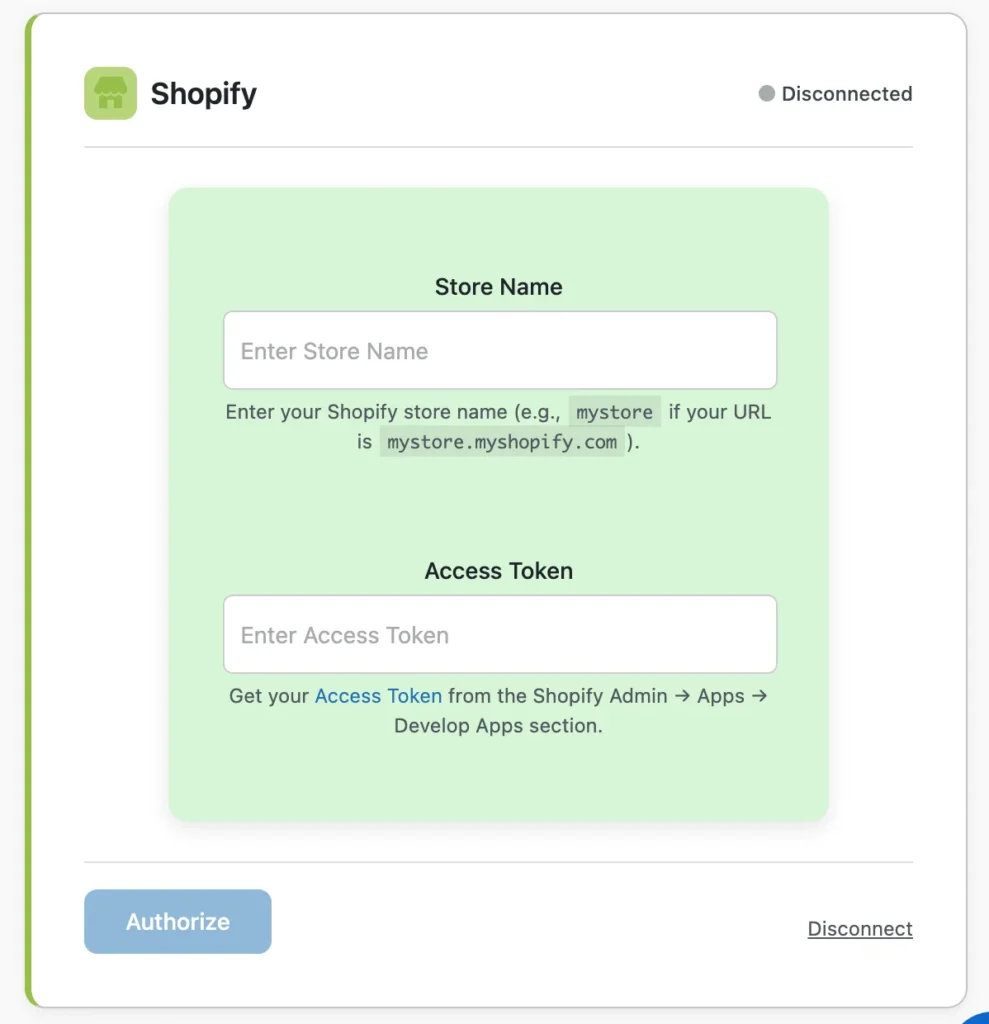
After successful verification, Shopify will also display a green Connected status.
Getting API Credentials #
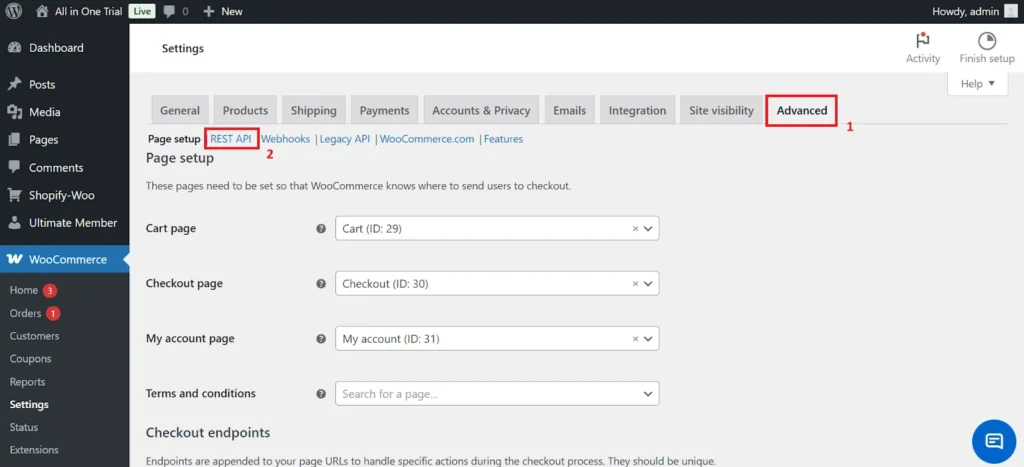
WooCommerce API Credentials
To generate WooCommerce API credentials:
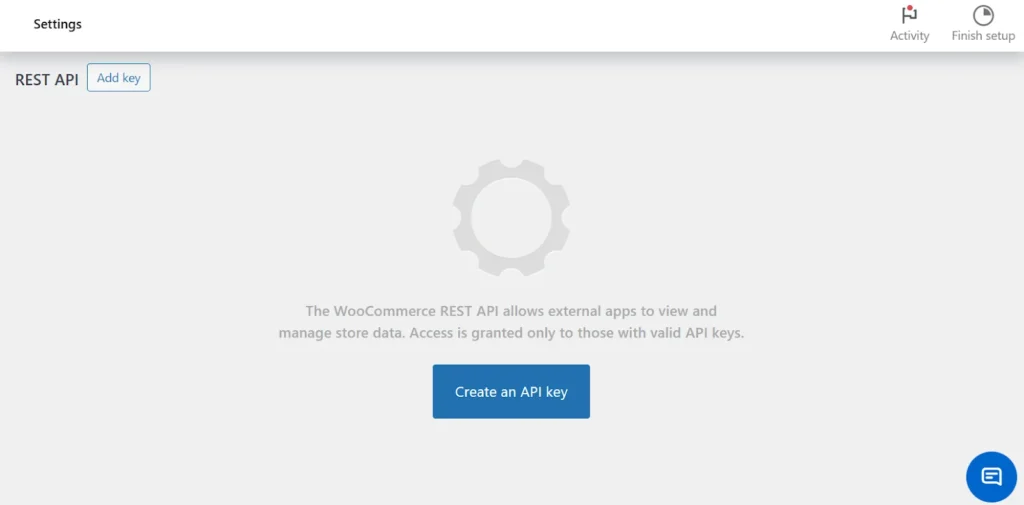
- Visit WooCommerce → Settings → Advanced → REST API
2. Click Add Key
3. Enter a description (for example, W2S Sync Integration). This is only for reference
4. Set Permissions to Read/Write. This is required for creating and updating data
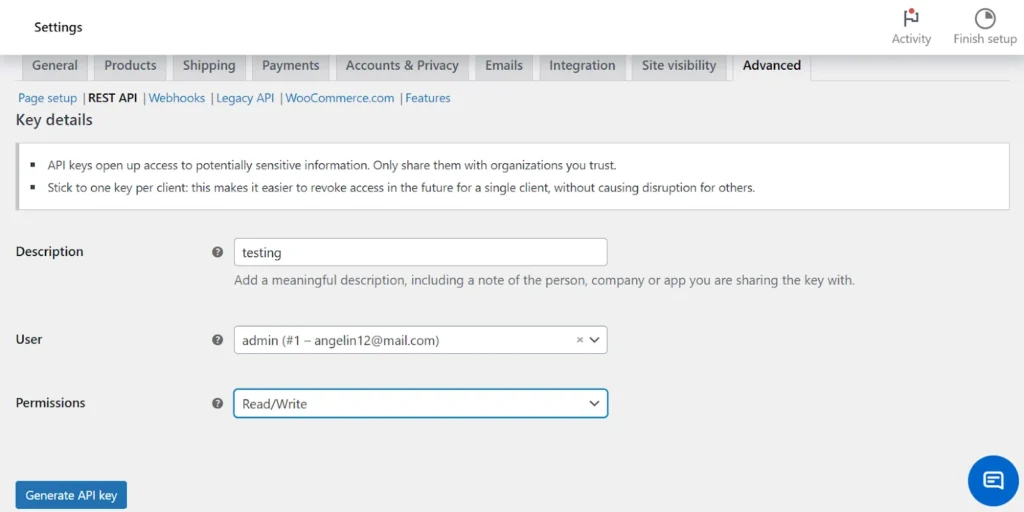
5. Click Generate API Key
6. Copy the Consumer Key and Consumer Secret and store them in a safe place to use next
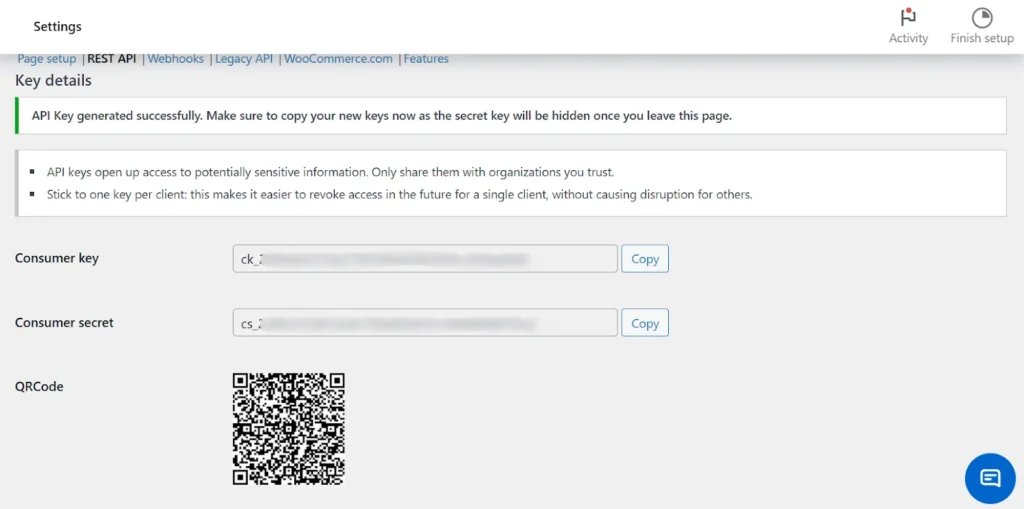
Note: The Consumer Secret is displayed only once.
Generating Client ID & Secret for Shopify Custom App #
Note: If your Shopify account was created on or after January 1, 2026, you must configure your Shopify store using a Client ID and Client Secret when connecting it with W2S – WooCommerce to Shopify Sync.
Step 1: Register a New App on the Developer Dashboard
Begin by logging in to your Shopify Admin.
- Click your profile icon located at the top-right corner of the dashboard.
- From the dropdown menu, select Dev Dashboard.
Once you are inside the Developer Dashboard:
- Click Create App.
- You will be prompted to enter the following details:
- App Name
Enter a recognizable name for the application. It is recommended to use the name of the integration or service you are connecting (for example, WooCommerce Sync). - App URL
This is the URL where users are redirected after installing the application. If your integration does not include a dedicated installation flow, you can keep the default value or enter a placeholder URL.
After entering the required information, click Create to register your application.
Step 2: Configure API Scopes (Permissions)
Once the app is created, the next step is to define the API scopes. These scopes determine what type of store data the application can access or modify.
Inside the app settings, locate the Scopes section and choose the permissions necessary for your integration.
Typical permissions may include:
- Read and/or Write Products
- Read and/or Write Orders
- Read and/or Write Customers
- Read and/or Write Inventory
Only enable the scopes required for your integration. Limiting permissions improves security and ensures the generated access token only has the minimum privileges needed.
In this section, you can also configure Redirect URLs. Redirect URLs specify which destinations Shopify can trust during the authentication process.
After selecting the required scopes, click Save or Release this version to apply the changes.
Step 3: Retrieve Your Client ID and Client Secret
After completing the app configuration, navigate to the Settings tab of your application in the Developer Dashboard.
Here you will find the following credentials:
- Client ID
A unique identifier assigned to your application. It allows Shopify to recognize which app is sending API requests. - Client Secret
A private key used to verify the identity of your application. This value must remain confidential and should never be shared publicly.
Next Steps #
Once both WooCommerce and Shopify are authenticated, you can continue with the following steps:
- Set up field mapping between WooCommerce and Shopify
- Configure sync direction and timing
- Choose which modules to sync (products, orders, customers, categories)
- Run a test sync to confirm everything works as expected
- Enable automation or scheduled syncing
- Monitor sync activity using audit logs
Each of these steps is explained in detail in the following documentation sections.
Troubleshooting #
Connection Issues
If you’re unable to connect to WooCommerce or Shopify, check the following:
- API credentials are correct and complete
- No extra spaces are included in keys or tokens
- Store URLs are accessible
- SSL certificates are valid
- Hosting firewalls or security rules are not blocking API requests
Authentication Errors
If authentication fails:
- Regenerate API credentials if needed
- Confirm API permissions are set to the required levels
- Make sure the Shopify app is installed and active
- Verify that API keys or tokens have not been revoked
Related Documentation #
To continue setting up and using the plugin, refer to the following guides:
Support #
If you need help at any stage:
- Refer to the Troubleshooting Guide
- Check the FAQ section
- Contact the Smackcoders support team through the support page.