Table of Contents
WP-Cron is one of those things most WordPress site owners never think about until something breaks. A scheduled post did not publish on time. A plugin update that was supposed to run automatically never did. Emails stopped going out. Nine times out of ten, WP-Cron is sitting right at the center of the problem.
WP-Cron is WordPress’s built-in task scheduling system. It handles everything that needs to happen automatically in the background, from publishing scheduled posts and sending notifications to running plugin tasks and triggering bulk imports. The difference between WP-Cron and a traditional server cron job is that WP-Cron depends on site traffic to fire. When someone visits your site, WordPress checks whether any scheduled tasks are due and runs them. On low-traffic sites, this can cause delays. On high-traffic sites, it can create unnecessary server load if it is not configured correctly.
This guide covers everything you need to know about WP-Cron in 2026. How to check if it is enabled, how to configure it properly, how to hook it into your system task scheduler, and how to fix it when scheduled tasks stop running. Whether you are setting it up fresh or troubleshooting an existing issue, every answer you need is in here.
What is WP-Cron in WordPress?
WP-Cron is WordPress’s built-in scheduling system. It handles everything that runs automatically in the background, publishing scheduled posts, sending email notifications, checking for updates, and triggering plugin tasks at set intervals.
Unlike a traditional server cron that runs on a fixed clock, WP-Cron fires when someone visits your site. WordPress checks for pending tasks on every page load and runs anything due. It works well for most sites, but low-traffic sites can experience delays, and high-traffic sites can put unnecessary load on the server if WP-Cron is not configured properly. Both are common issues, and both are completely fixable.
Is WordPress Cron Enabled? Here Is How to Check and Turn It On:
WP-Cron comes enabled on every fresh WordPress installation by default. If scheduled tasks are not running on your site, the first thing worth checking is whether it got disabled somewhere in your wp-config.php file, either manually or through a plugin setting.
How to Check If WP-Cron Is Enabled:
Open your wp-config.php file from the root directory of your WordPress installation and look for this line:
define(‘DISABLE_WP_CRON’, true);
If this line exists and is set to true, WP-Cron is off. If the line is not there at all, WP-Cron is running as it should.
How to Enable WP-Cron:
To switch it back on, either delete that line completely or update the value to false:
define(‘DISABLE_WP_CRON’, false);
Save the file, and WP-Cron will start handling your scheduled tasks right away.
Verify Through the WordPress Dashboard:
Head to Settings, then General, inside your WordPress dashboard, and confirm your timezone is configured correctly. WP-Cron schedules everything based on your site’s timezone, so an incorrect setting here will cause tasks to fire at the wrong time even when WP-Cron itself is running perfectly.
Hooking WP Cron in the task scheduler
WP Cron does not run continuously, and to run the tasks at the time of import, you can set up the system task scheduler to run on intervals. If you have a high-traffic website, you can trigger WP-Cron only during CSV imports.
First, disable the built-in trigger by adding this line to your wp-config.php:
define(‘DISABLE_WP_CRON’, true);
Then set up your system scheduler to call wp-cron.php at regular intervals using the steps below.
Windows
Open Task Scheduler via Start → All Programs → Accessories → System Tools → Task Scheduler.

Create a new basic task and set your preferred trigger interval. For the action, select “Start a Program” and use PowerShell with the following command:
powershell.exe -Command “Invoke-WebRequest -Uri ‘http://yoursite.com/wp-cron.php?doing_wp_cron’ -UseBasicParsing”
Replace `yoursite.com` with your actual domain. Set the task to run every 5 or 15 minutes, depending on how frequently your scheduled tasks need to fire.
Mac / Linux
Both macOS and Linux use crontab for time-based scheduling. Open your terminal and run:
crontab -e
Add one of the following lines depending on your schedule needs.
To run every 5 minutes, the most common setup for WordPress:
*/5 * * * * wget -q -O – http://yoursite.com/wp-cron.php?doing_wp_cron > /dev/null 2>&1
To run every 2 hours:
0 */2 * * * wget -q -O – http://yoursite.com/wp-cron.php?doing_wp_cron > /dev/null 2>&1
To run once daily at midnight:
0 0 * * * wget -q -O – http://yoursite.com/wp-cron.php?doing_wp_cron > /dev/null 2>&1
Note: Replace yoursite.com With your actual domain in every command above. Save and exit, your system scheduler will now trigger WP-Cron at the interval you set, completely independent of site traffic.
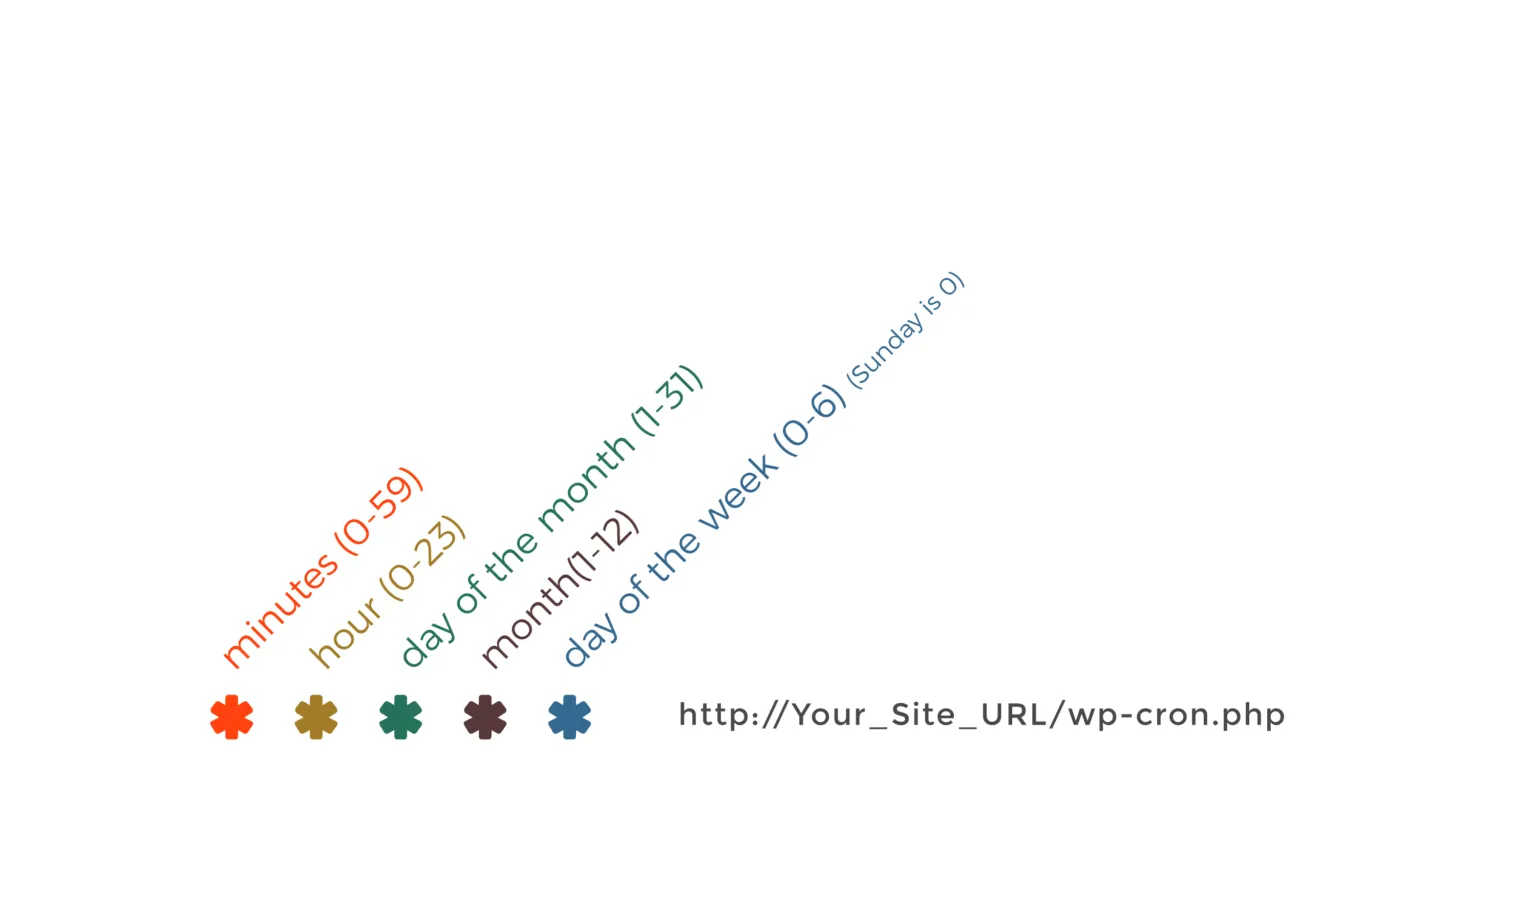
How to read the cron time format, five fields in order:
minute hour day-of-month month day-of-week
WP-Cron Job: How to Set Up and Manage Cron Jobs
If you want WordPress to do something on a schedule, you need a cron job. That could be running an import every hour, sending out a notification every morning, or clearing out temporary data every few days. WP-Cron handles all of this, but you have to tell it what to do and when.
Setting Up a Custom Cron Job:
You need two things to get a cron job running. A scheduled hook that tells WordPress when to fire, and a function that tells it what to actually do. Add this to your functions.php file or a custom plugin:
php:
function smack_schedule_cron() {
if ( ! wp_next_scheduled( ‘smack_custom_cron_job’ ) ) {
wp_schedule_event( time(), ‘hourly’, ‘smack_custom_cron_job’ );
}
}
add_action( ‘wp’, ‘smack_schedule_cron’ );
add_action( ‘smack_custom_cron_job’, ‘smack_run_cron_task’ );
function smack_run_cron_task() {
// Your task logic goes here
}
Swap smack_custom_cron_job with your own hook name and put your task logic inside smack_run_cron_task.
Built-in WordPress Cron Intervals:
WordPress gives you four ready-to-use intervals straight out of the box.
| Schedule | How Often It Runs |
| hourly | Every 60 minutes |
| twicedaily | Every 12 hours |
| daily | Every 24 hours |
| weekly | Every 7 days |
If none of these work for what you need, you can create your own.
Adding a Custom Interval:
Say you need something to run every 20 minutes. WordPress does not have that built in, but adding it takes about ten lines of code:
php:
add_filter( ‘cron_schedules’, ‘smack_add_custom_schedule’ );
function smack_add_custom_schedule( $schedules ) {
$schedules[‘every_20_minutes’] = array(
‘interval’ => 1200,
‘display’ => ‘Every 20 Minutes’,
);
return $schedules;
}
The interval is always in seconds. 1200 equals 20 minutes. Change that number to whatever your situation calls for.
Running a Cron Job Manually:
Sometimes you just need to trigger a job right now without waiting for the next scheduled run. Here are three ways to do it, depending on what you have access to.
WP-CLI
Open your terminal, go to your WordPress root directory, and run:
bash
wp cron event run –all
cURL
No WP-CLI? Use cURL instead:
bash
curl http://yourdomain.com/wp-cron.php?doing_wp_cron
“`
**Browser**
Paste this directly into your browser address bar:
“`
http://yourdomain.com/wp-cron.php?doing_wp_cron
Removing a Cron Job You No Longer Need:
Leaving unused cron jobs sitting in your queue is not a great idea. They keep running in the background even if they are not doing anything useful. Clean them out like this:
php:
$timestamp = wp_next_scheduled( ‘smack_custom_cron_job’ );
wp_unschedule_event( $timestamp, ‘smack_custom_cron_job’ );
WP Ultimate CSV Importer Pro
Get Ultimate CSV/XML Importer to import data on WordPress faster, quicker and safer.
WordPress cron job or WP cron not working
If scheduled tasks have stopped running on your site, work through these checks in order. Most issues are resolved by step 1 or 2.
Step 1 — Check if WP-Cron is disabled
Open your wp-config.php file and look for this line:
php
define(‘DISABLE_WP_CRON’, true);
If it exists and is set to true WP-Cron is off, and no scheduled tasks will run. Either remove the line entirely or change it to false and save the file.
Step 2 — Check your timezone setting
Go to Settings → General in your WordPress dashboard and confirm your timezone is set correctly. WP-Cron schedules everything relative to your site’s timezone. A wrong timezone is one of the most common reasons tasks appear broken when WP-Cron itself is actually running fine, tasks fire at the wrong time and look like they never ran at all.
Step 3 — Run pending tasks manually to confirm they execute
If you have WP-CLI access, run all pending cron events immediately:
bash
wp cron event run --allIf tasks complete successfully when run manually but fail on schedule, the issue is with how WP-Cron is being triggered, not with the tasks themselves. Move to Step 4.
Step 4 — Switch to a server-level cron job
If WP-Cron keeps failing intermittently or your site has low traffic, the most reliable permanent fix is replacing the default trigger with a real server cron. See the Scheduled Task with Server Cron section below for the complete setup steps.
Step 5 — Check for plugin conflicts
Caching plugins and security plugins occasionally block wp-cron.php requests. If you have a caching plugin active, add wp-cron.php to its exclusion list. If a security plugin is blocking external requests, whitelist the wp-cron.php endpoint.
Step 6 — Use WP Crontrol to inspect the task queue
Install the free WP Crontrol plugin and go to Tools → Cron Events. Look for overdue tasks, shown with a past “Next Run” time. If overdue tasks are accumulating, it confirms WP-Cron is running, but tasks are either failing or taking too long to complete. Check your PHP error logs for the specific task that is failing.
Scheduled Task with Server Cron
You can set up a cron job in WordPress without a plugin by adding custom code to your theme’s functions.php file or by using a custom plugin. Alternatively, you can schedule cron jobs directly on your server’s control panel or through a command-line interface like SSH.
Set up a server cron job to run the WordPress cron regularly. Edit your server’s crontab file:
crontab -e
Add a line like the following to run the WordPress cron every 5 minutes:
*/5 * * * * wget -q -O – http://yoursite.com/wp-cron.php?doing_wp_cron > /dev/null 2>&1
Replace “yoursite.com” with your actual domain.
After enabling the cron system, WordPress should be able to perform scheduled tasks, including garbage collection. Keep in mind that running the cron system too frequently may impact server performance, so adjust the frequency based on your site’s needs.
To re-enable default Cron behavior, remove any custom cron-related configurations and ensure that the Disable_WP_CRON constant in your wp-config. php file is not set to true. This constant, when set to true, disables the default cron behavior in WordPress.
If the external WP-Cron seems to be enabled, you can still manually run it using the following methods:
To manually run the cron system in WordPress, you have a few options:
- Use WP-CLI
If you have command-line access to your server and WP-CLI installed, you can manually trigger the cron events. Open a terminal, navigate to your WordPress root directory, and run the following command:
wp cron event run –all
This command instructs WordPress to execute all pending cron events, ensuring timely updates and scheduled tasks.
- cURL or Wget
Alternatively, you can use cURL or Wget to make an HTTP request to the wp-cron.php file. This simulates a visitor accessing your site and triggers the cron events. Here’s an example using cURL:
curl http://yourdomain.com/wp-cron.php
Replace “yourdomain.com” with your actual domain. This method is useful if you don’t have access to WP-CLI.
How to Set Up and Manage WP-Cron Using Plugins – Best WordPress Cron Job Plugins
However, managing WP Cron effectively requires attention to detail and sometimes additional plugins to enhance functionality. Let’s explore some of the top WP-Cron plugins and their role in CSV importing.
Below are some of the top WP Cron plugins available to enhance WP-Cron functionality.
WP Crontrol
WP-Crontrol is one of the top plugins for setting up and managing Cron jobs effectively in WordPress. It is a free plugin that offers a user-friendly interface to manage WP-Cron jobs. WP-Crontrol allows granular control over cron events, enabling you to add, edit, and delete events directly from the WordPress dashboard.
How does the WP- Crontrol works?
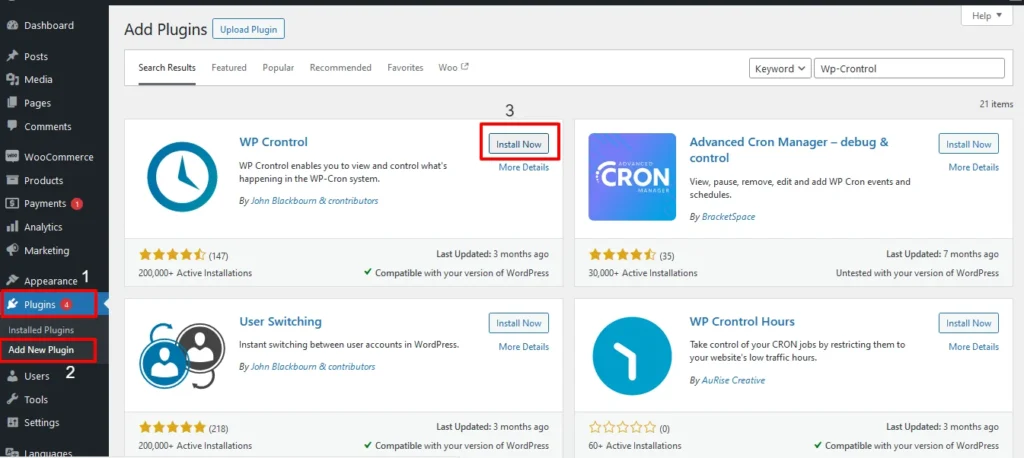
Step 1: Install and Activate
- Login to your WordPress dashboard and Install the WP-crontrol plugins.
- Once installed, click on Activate.
Step 2: Access the plugin
- To access the WP-Crontrol plugin, navigate to Tools -> Cron Events
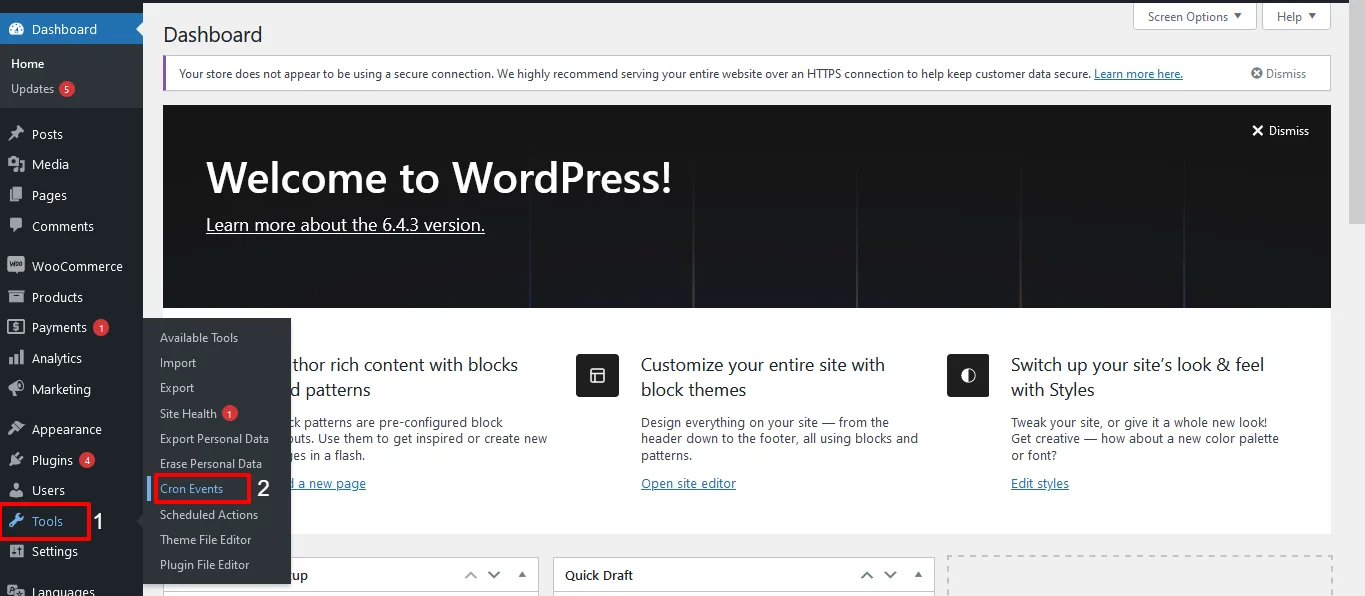
Step 3: WP- Control dashboard
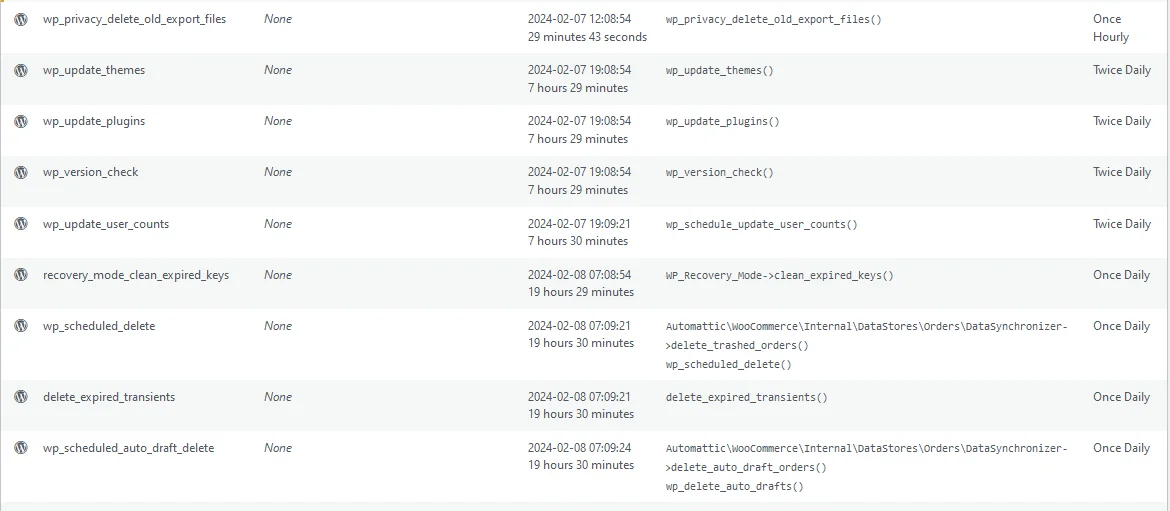
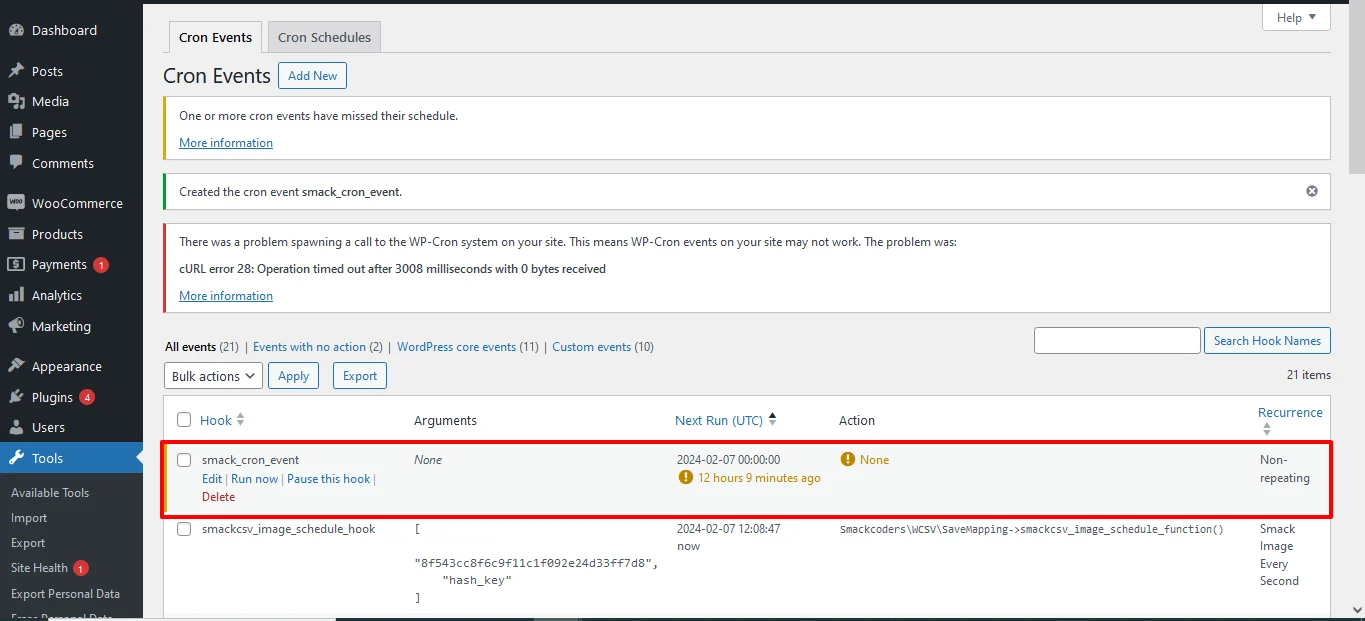
- Once you access the extension, you will land on the WP-Crontrol dashboard. Here, you have a complete overview of all the WP cron jobs running on your WordPress site.
- It also includes the default wordpress cron jobs that prefix with wp. Make sure not to delete these core files as it will impact the core functionality of your WordPress site.
Step 4: Add New Cron event
To add a new cron event,
- Navigate to the Add New button corresponding to the Cron events tab.
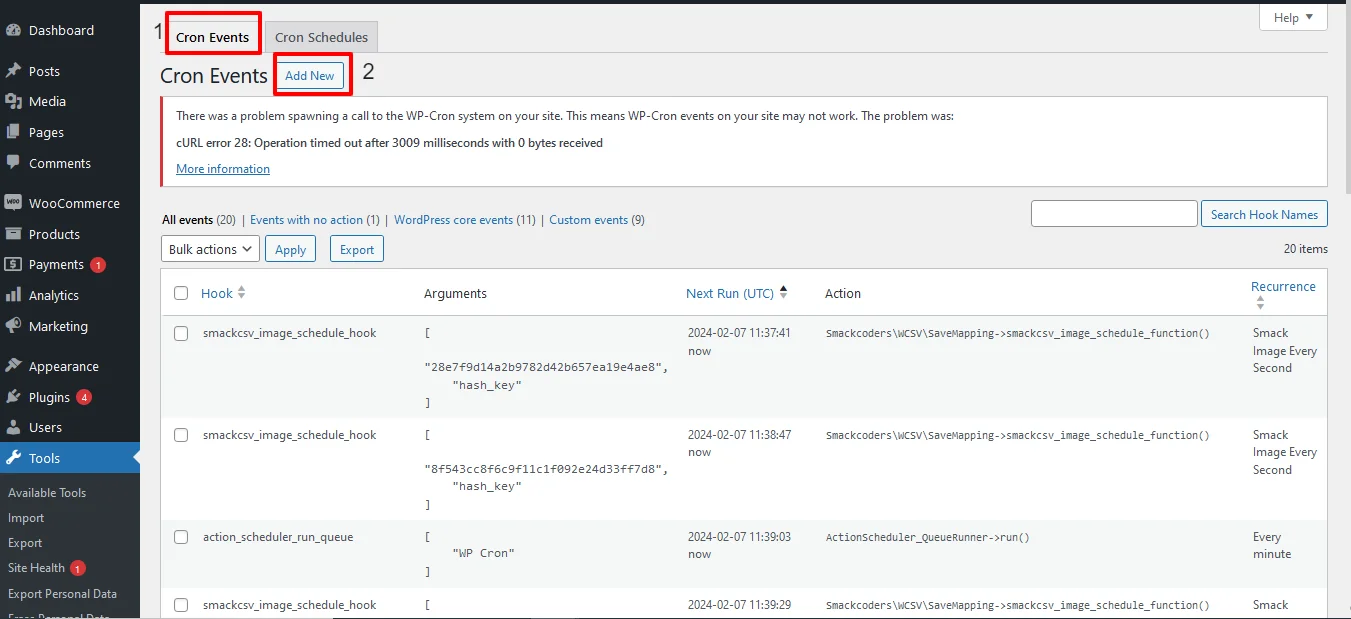
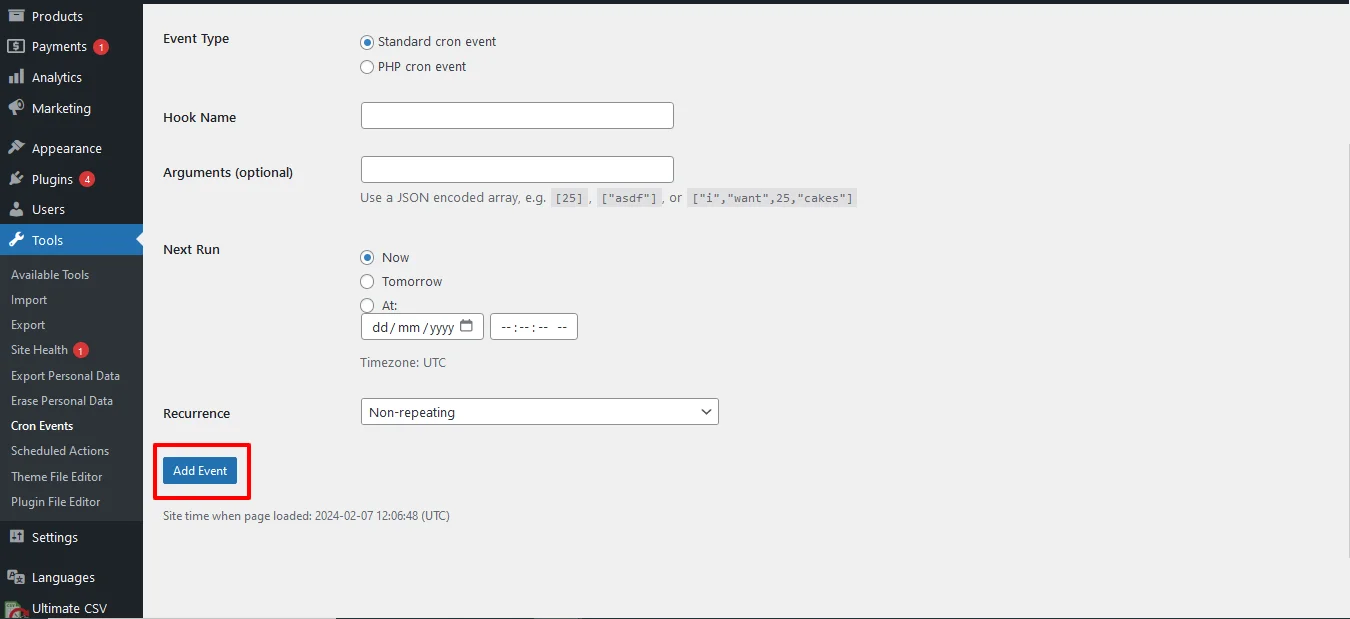
- The Add new cron event page will be displayed.
- Select the cron event type as the standard cron event
- Provide the name of your webhook using PHP naming conventions. For example, smack_cron_event.
- The Arguments field is optional. You can simply leave it empty or you can use your desired JSON-encoded array
- Select the time for the next run as Now, tomorrow, or At(provide any specified date and time) to run the cron event next time.
- Select the recurrence of the cron event from the drop-down. That is how often the cron events need to run. For example, every two hours or every ten minutes.
- Finally, click on Add Event. Now, new WP cron events have been added to your CRON event list.
- Here, you have the None option which shows an error. So you have to write the below code in functions.php.
- Navigate to xampp/wamp on your local computer where you installed WordPress.
- Navigate to htdocs > wordpress > wp-content > themes > [Your Theme] > functions.php
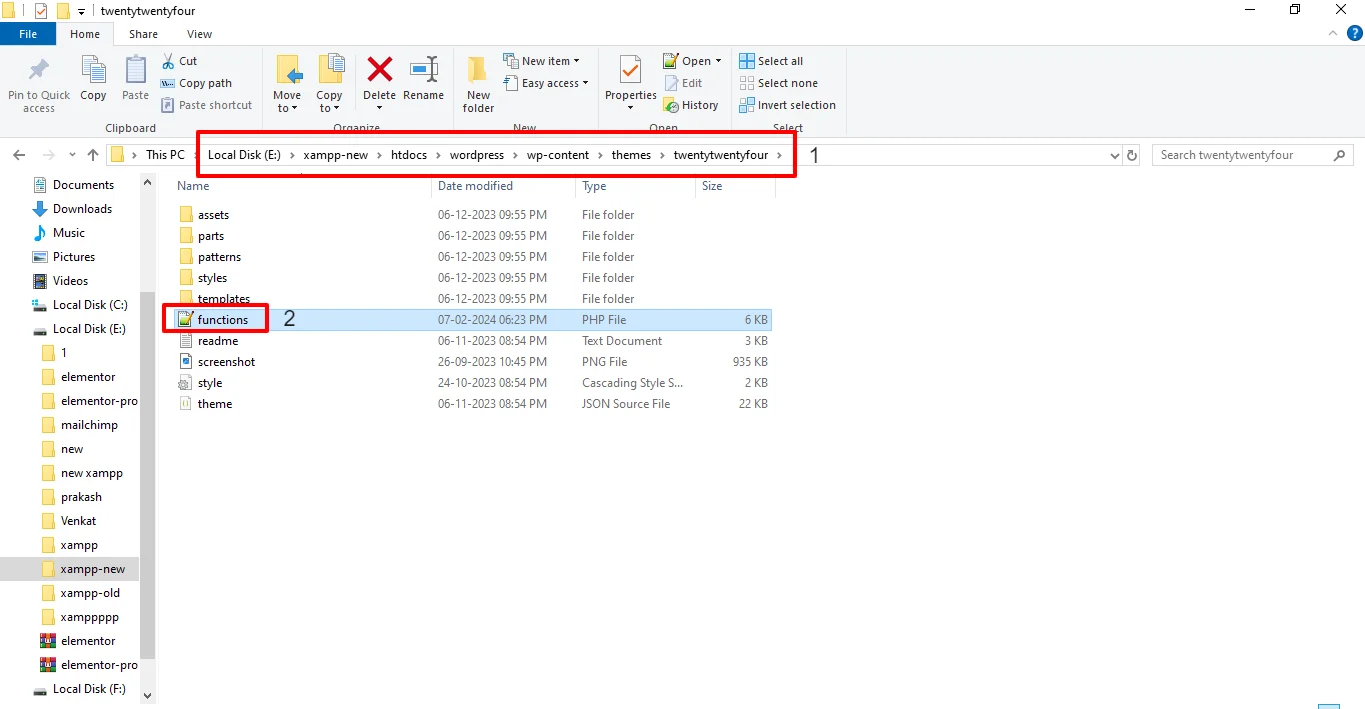
- Open the file and write the below code:
add_action( ‘smack_cron_event’, ‘smack_cron_event_func’ );
function smack_cron_event_func() {
wp_mail( ‘[email protected]’, ‘Automatic email’, ‘Automatic scheduled email from WordPress to test cron’);
}
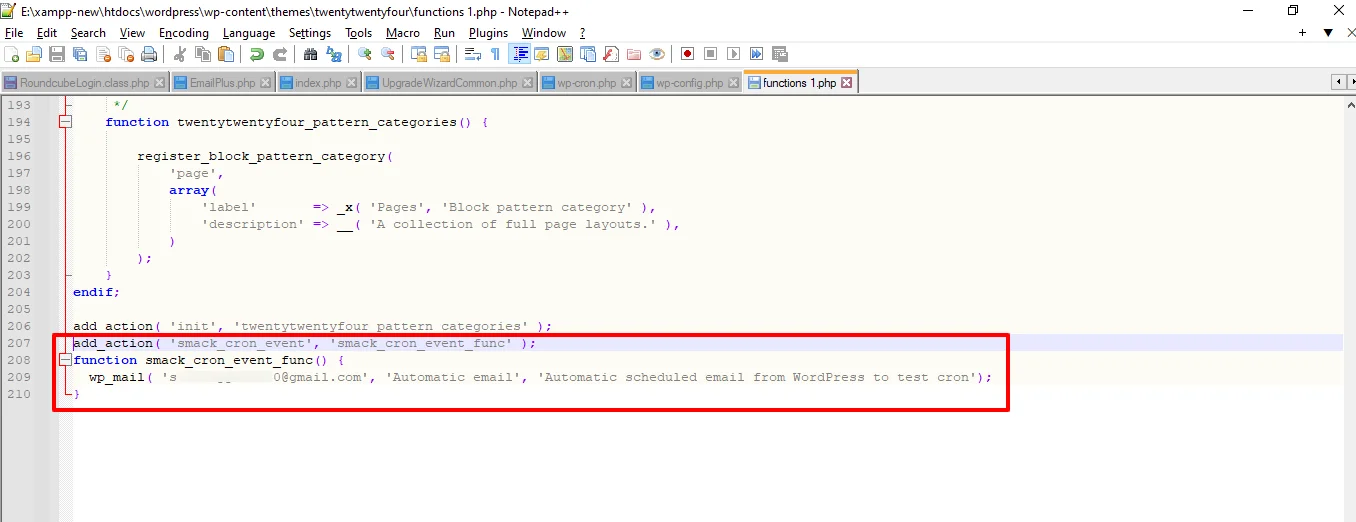
Note: Make sure you have edited the above code by replacing smack_cron_event with your desired cron event name that you have created, and [email protected] with your email address.
Once done, you will receive an email at the email address mentioned in the code. The email you receive indicates that the Cron job ran successfully.
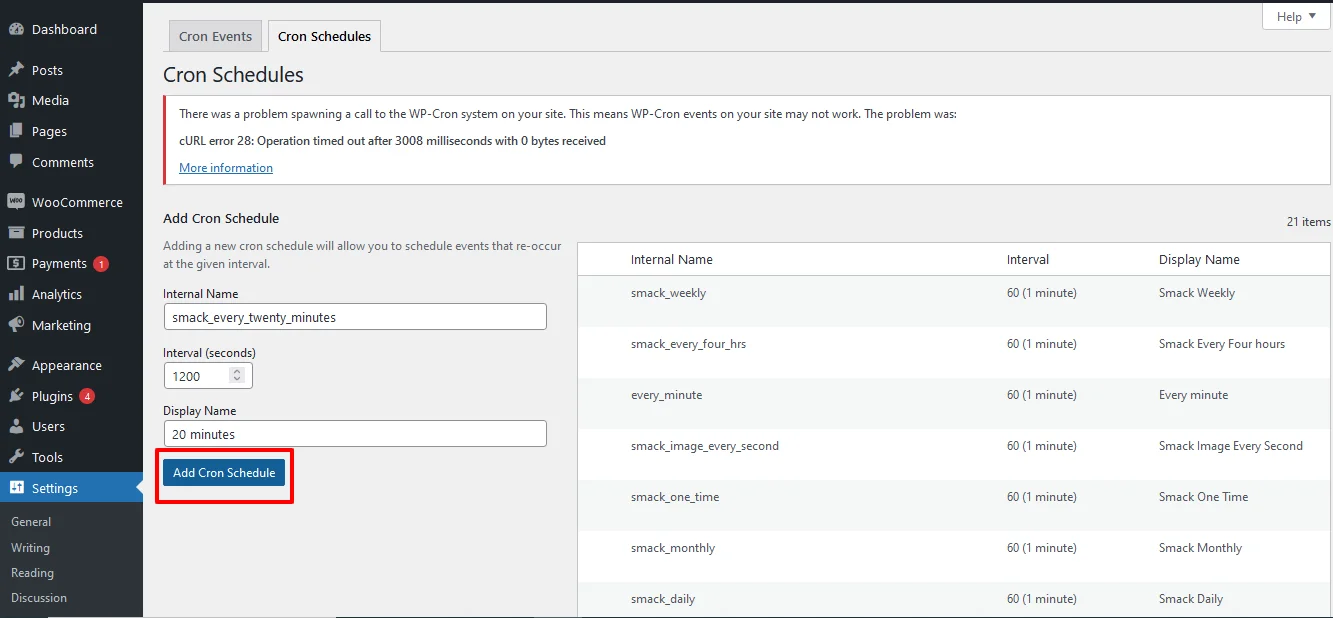
Step 5: Add new CRON Schedule
WordPress allows four standard cron intervals to choose when creating a new cron event. However, with WP-Crontrol, you can also add new custom cron intervals by,
- Navigating to WordPress Settings -> Cron Schedules or navigate to Tools-> Cron Events-> Cron Schedule
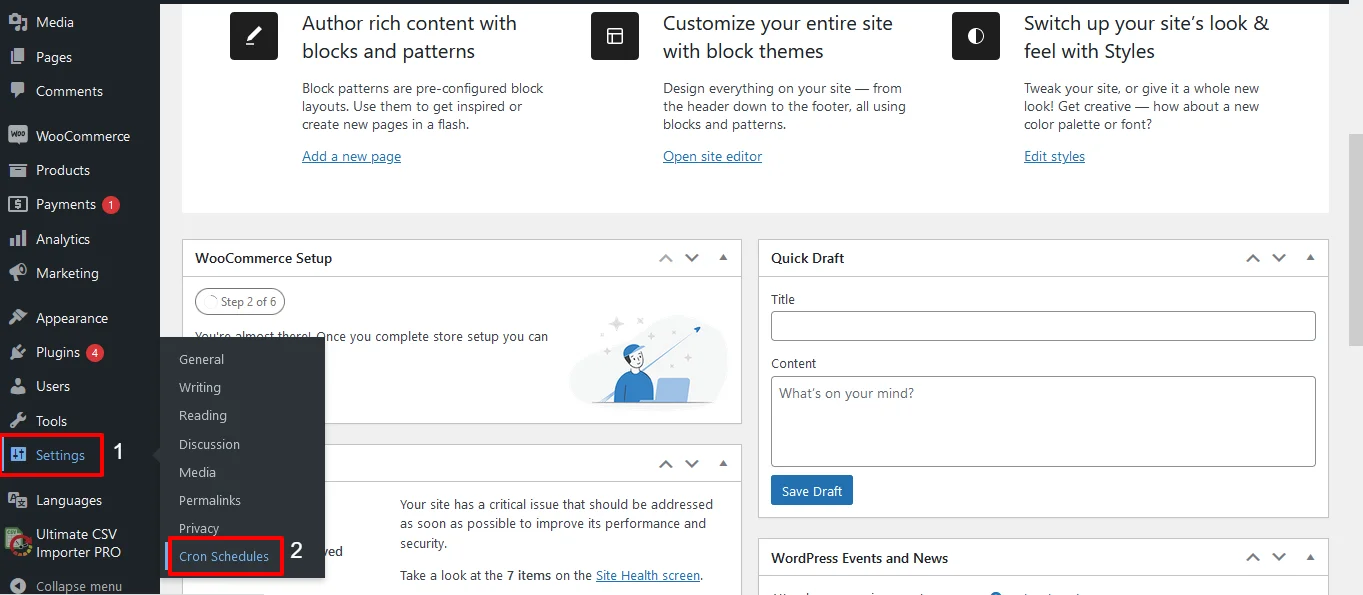
- Provide the internal name for your cron schedule with php naming convention For example, smack_twenty_minutes.
- Then provide the interval in seconds. Here, I have set 1200 seconds(20 minutes)
- Provide the display name. Here, I have given 20 minutes.
- Click on Add Cron schedule. The newly created cron schedule has been listed in the table.
Step 6: Edit or delete any existing cron event
In addition to adding new cron events, WP Crontrol enables you to edit or delete existing cron events effortlessly. This functionality is useful for fine-tuning scheduled tasks or removing redundant cron jobs.
With WP-Crontrol, it is easy to edit any existing WP- CRON event that was listed in the WP-crontrol dashboard.
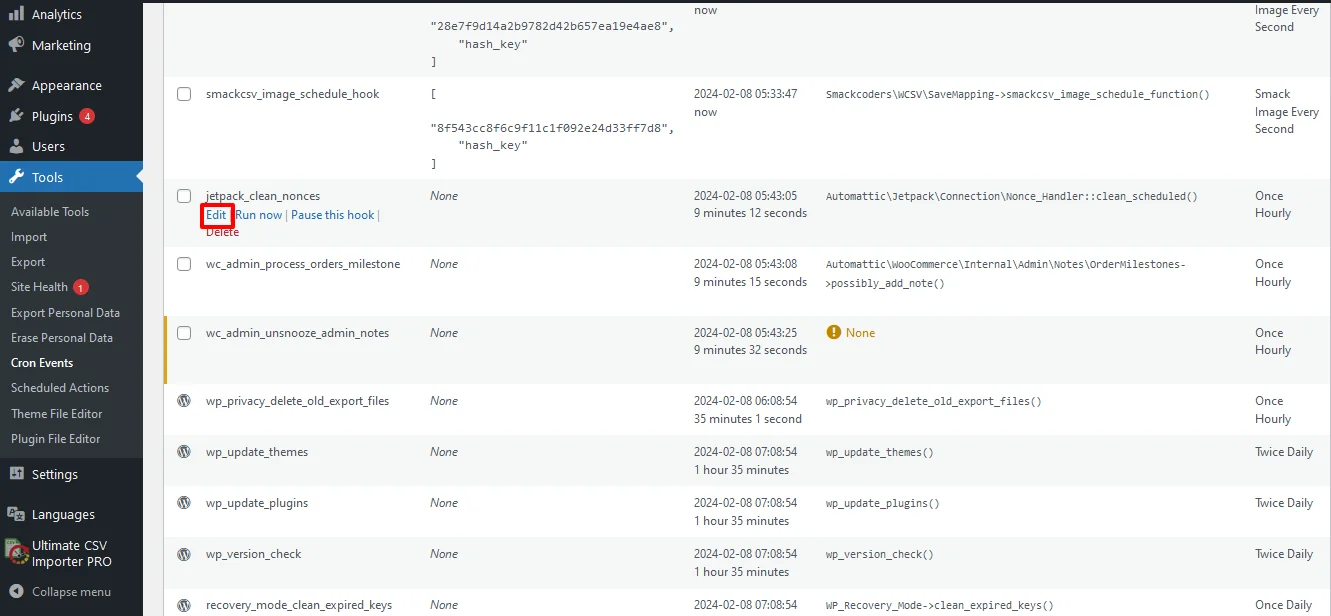
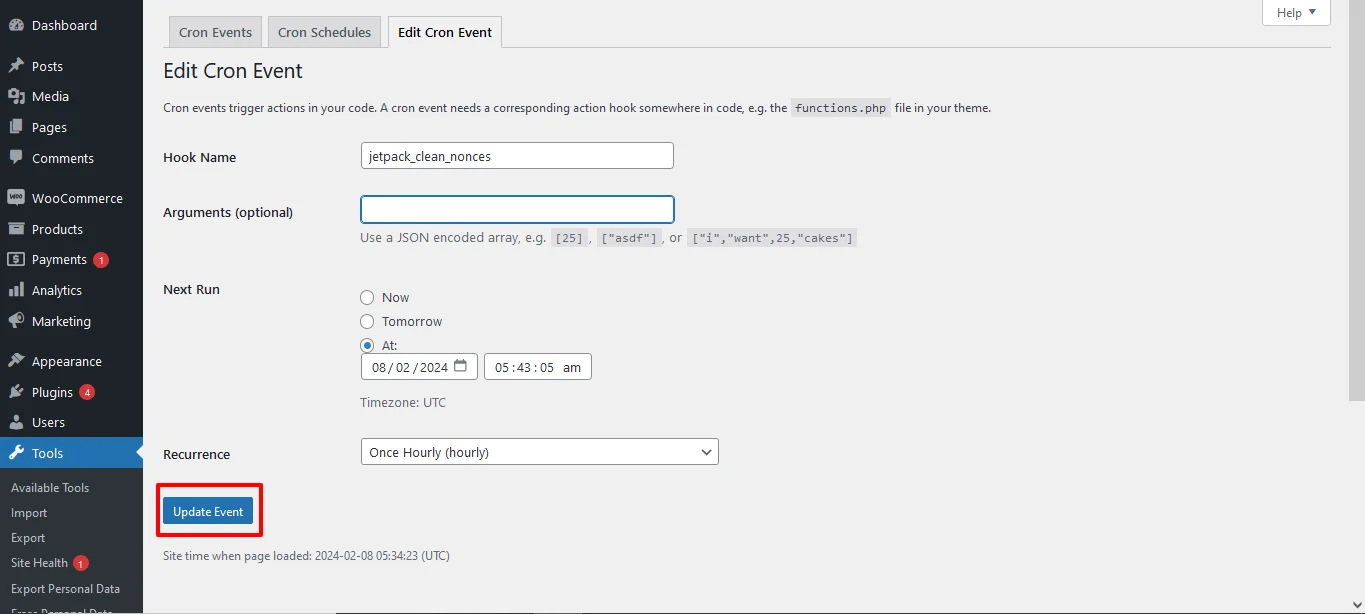
- Hover over the desired Cron event and click on Edit.
- Edit the desired fields based on your business needs. You can update the recurrence time interval, Hooke name, or Next run time.
- Once edited, click on Update Event.
To delete an existing cron event, hover over the desired cron event and click on Delete.
WP Crontrol is a powerful tool for WordPress administrators and developers to manage cron jobs efficiently. By providing an intuitive interface and robust features, WP Crontrol simplifies the process of scheduling, monitoring, and debugging cron events, ultimately enhancing the automation capabilities of your WordPress site. Whether you’re a novice user or a seasoned developer, WP Crontrol empowers you to take control of your site’s automation with ease.
Advanced Cron Manager:
This plugin provides a user-friendly interface to manage all WP-Cron tasks. It allows you to view, edit, delete, and schedule tasks effortlessly. Additionally, it provides insights into when each task last ran and when it’s scheduled to run next.
Steps to Set up and Manage WP-Cron Schedule Using Advanced CRON Manager:
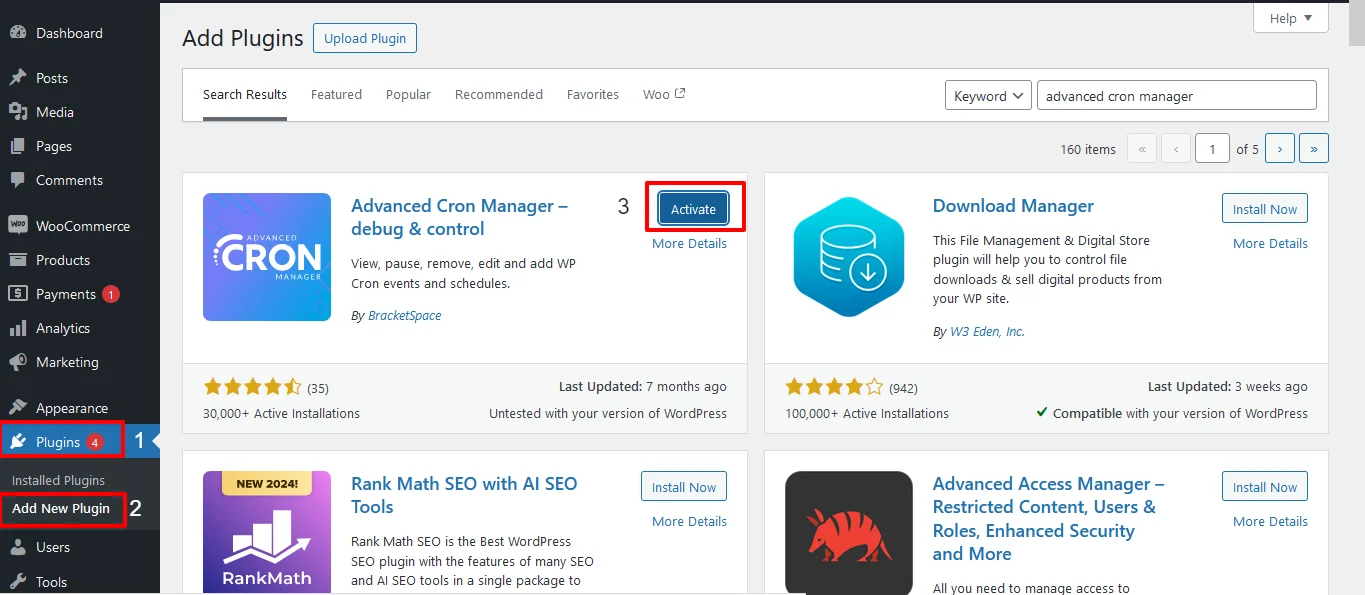
Step 1: Install and activate the plugin
Navigate to plugins and search for Advanced CRON Manager.
Install the plugin and then activa
Step 2: Access the Plugin
To access the plugin, navigate to Tools -> CRON Manager
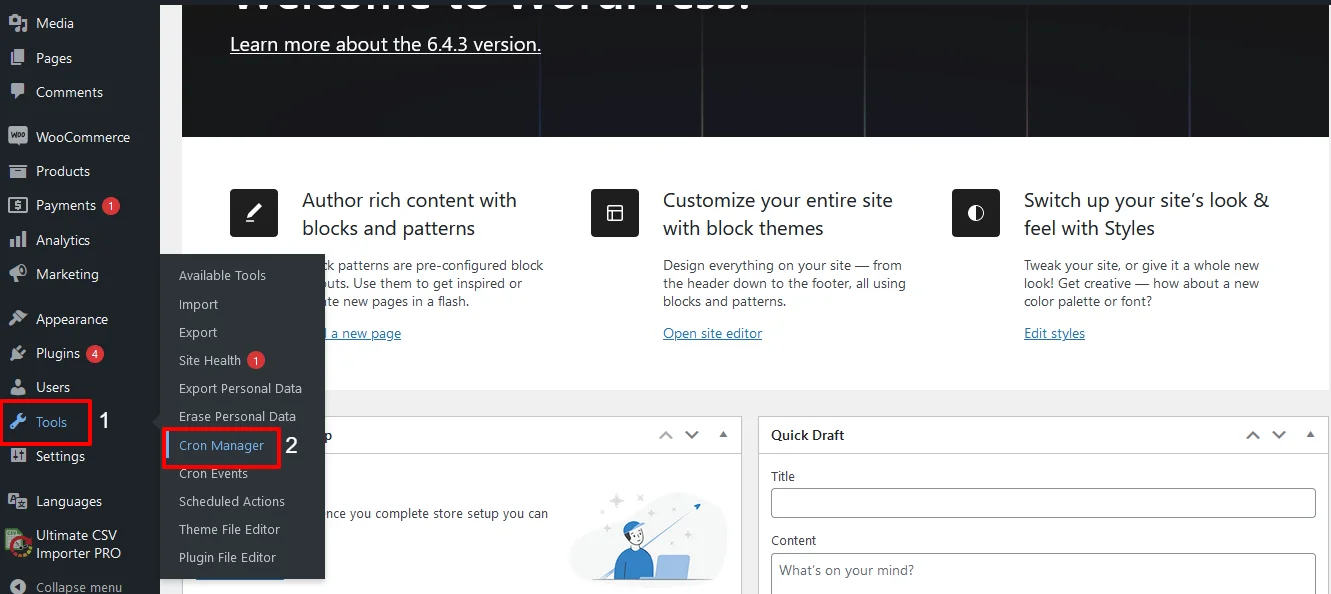
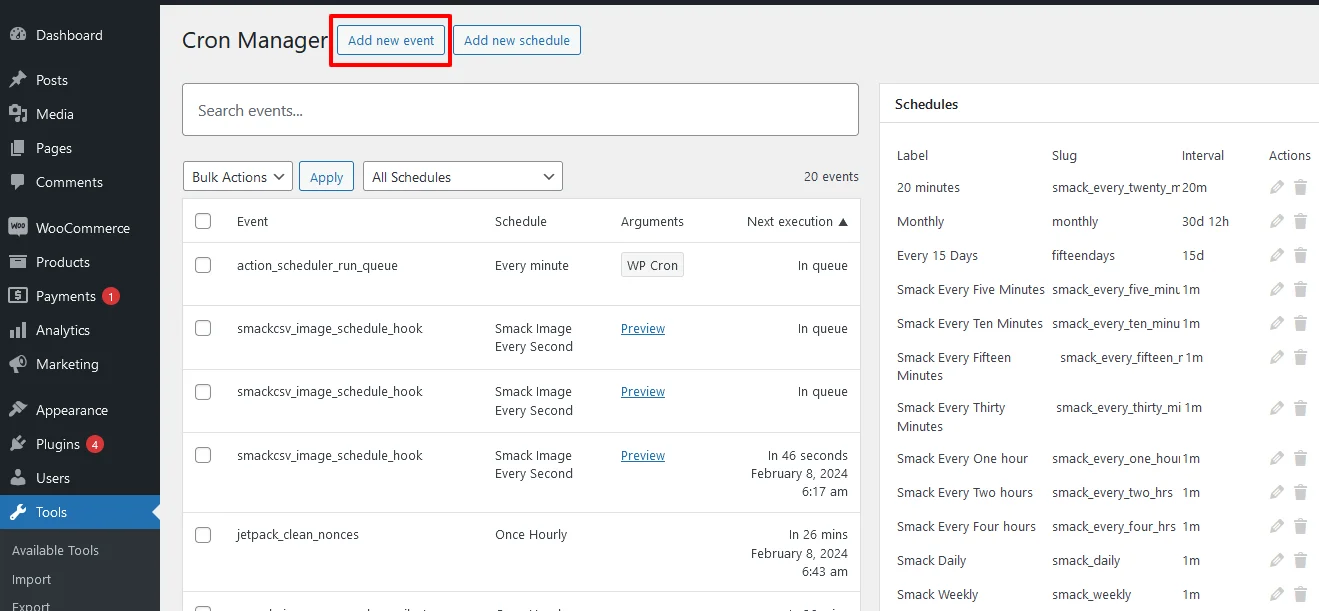
Step 3: View the CRON Manager’s Dashboard
On accessing the CRON manager, you can view the list of all cron events and list of all cron schedules.
Step 4: Add a new CRON Event
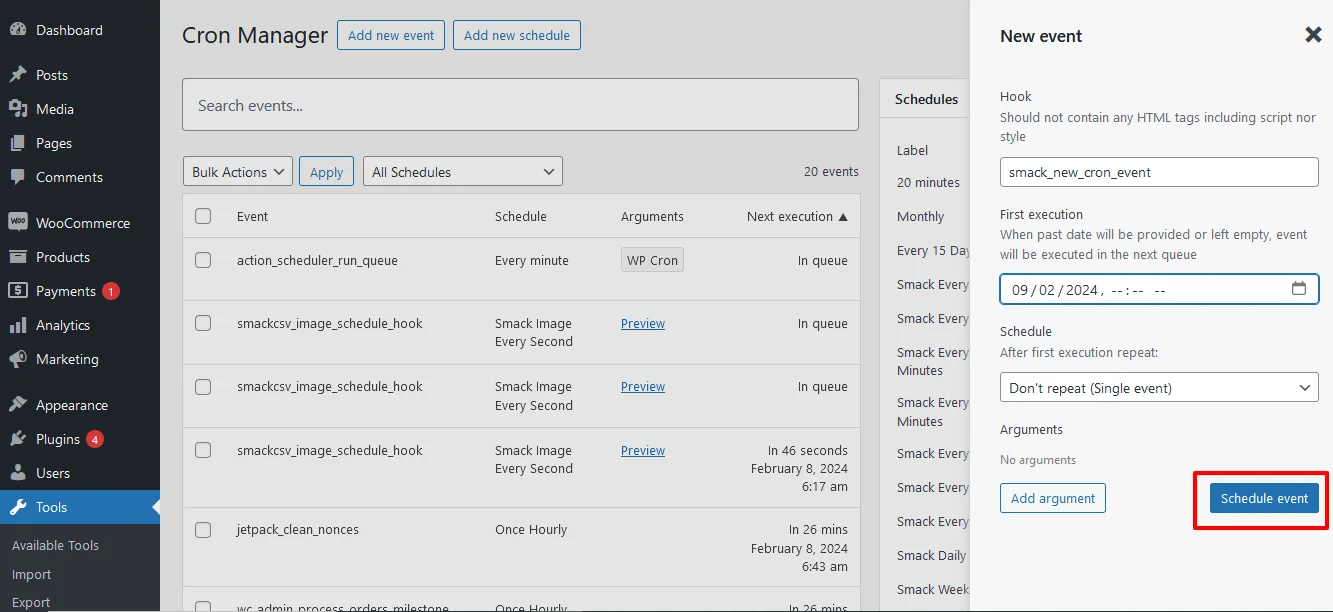
With Advanced CRON Manager, you can easily add new CRON events by simply clicking on the Add new event button on Cron Manager’s dashboard.
Provide the hook name with the php naming convention. E.g. smack_new_cron_event.
Then select the first execution date and recurring (Scheduled) time interval of the New Cron event.
Once done, Click on schedule event
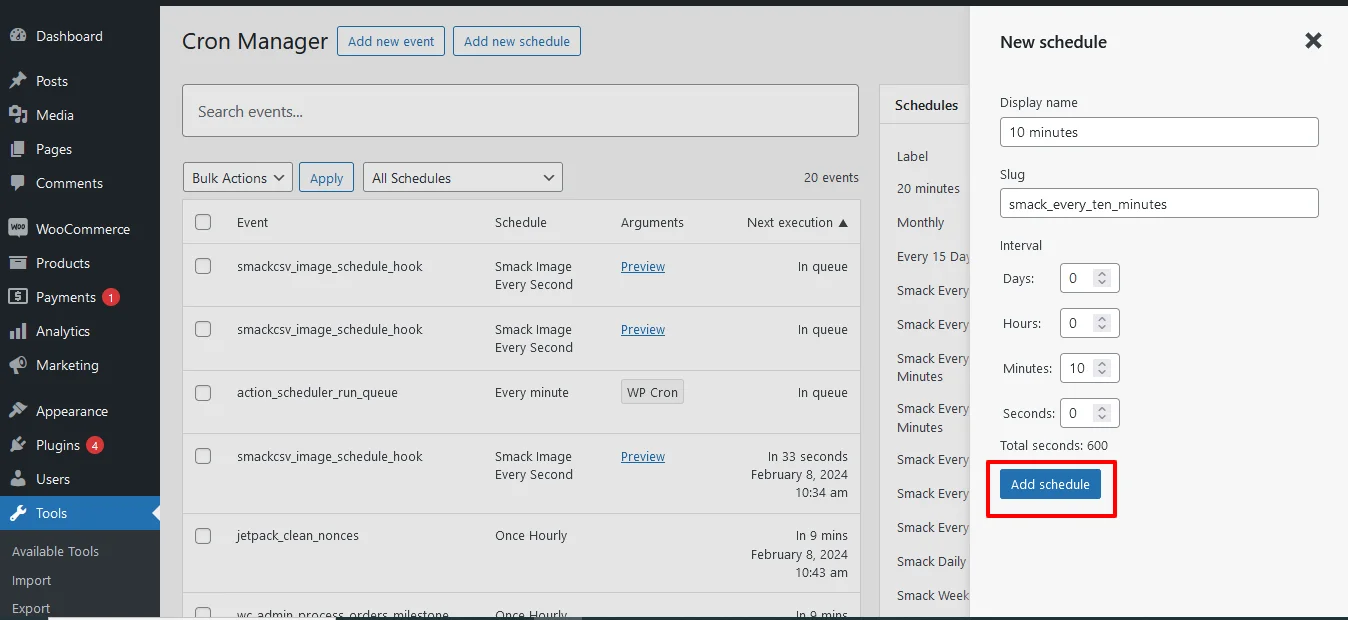
Step 5: Add new schedule
To add custom time schedule for wp- cron,
- Navigate to the Add new schedule at the top of the Cron’s Manager dashboard page.
- Provide the display name, slug and the select the schedule intervals as day, hour, minutes or seconds.
- Once done click on Add schedule button. Now your new schedule will get added to the schedule list.
How WP Ultimate CSV Importer Works with WP-Cron:
If you are importing large volumes of data into WordPress, WP-Cron becomes genuinely useful rather than just a background system you never think about. WP Ultimate CSV Importer uses WP-Cron in two specific ways that make a real difference when you are working with big datasets.
Scheduled Imports:
Instead of triggering every import manually, you can set WP Ultimate CSV Importer to run at a defined interval using WP-Cron. If you receive updated CSV files regularly, whether daily, weekly, or on any custom schedule, you can configure the importer to pick up those files and process them automatically without you having to log in and kick things off every time.
Batch Processing:
Large imports do not run as a single operation. WP Ultimate CSV Importer Plugin breaks them down into smaller batches and processes each one in the background using WP-Cron. This keeps your server from being overwhelmed by a single heavy operation and means your site stays responsive for visitors while the import is running. Featured images from external URLs are also handled this way, pulled and
WP Ultimate CSV Importer Pro
Get Ultimate CSV/XML Importer to import data on WordPress faster, quicker and safer.
Frequently Asked Questions:
1. What is WP-Cron in WordPress?
WP-Cron is how WordPress handles anything that needs to happen on a schedule. When you set a post to go live tomorrow morning, schedule a plugin to check for updates overnight, or configure an automated email to go out every week, WP-Cron is what actually makes those things happen. It runs quietly in the background and most site owners never interact with it directly until a scheduled task stops working.
2. How do I check if WP-Cron is enabled?
Head into your wp-config.php file and search for this line:
phpdefine(‘DISABLE_WP_CRON’, true);
If it is there and set to true, WP-Cron is switched off. If you cannot find the line at all, it is enabled and running fine. Another quick way to confirm is by installing the WP Crontrol plugin, which shows you every scheduled event and whether they are running correctly.
3. How does WordPress cron work?
It piggybacks on site visits. Every time a visitor loads a page, WordPress checks its task queue and runs anything that is due. No visitors means no trigger, which is why low traffic sites sometimes see delays with scheduled tasks. It works well enough for most sites but if you need tasks firing on a strict schedule, setting up a real server cron job to call wp-cron.php is the more dependable setup.
4. How do I fix WP-Cron when it stops working?
First check wp-config.php and make sure DISABLE_WP_CRON is not set to true. Then head to Settings and General inside your dashboard and double-check your timezone. A wrong timezone setting is one of the most common reasons tasks appear to be broken when WP-Cron itself is actually fine. If tasks are still stuck after that, try running them manually through WP-CLI:
bashwp cron event run –all
If nothing works and the issue keeps coming back, switching to a server-level cron job is the cleanest permanent fix.
5. How do I disable WP-Cron in WordPress?
Turning off WP-Cron makes sense in two specific situations. Your site gets a lot of traffic and WP-Cron is firing too frequently on every page load, or your scheduled tasks are heavy enough that running them through site visits is putting real strain on your server. In both cases the better move is to disable WP-Cron and hand the job over to a real server cron instead.
To disable it, add this line to your wp-config.php file:
php
define(‘DISABLE_WP_CRON’, true);
Once that is in place, set up a server cron job to call wp-cron.php at regular intervals so your scheduled tasks still run on time. Disabling WP-Cron without replacing it with a server cron means your scheduled tasks stop running entirely, so do not skip that second step.
Wrapping Up:
WP-Cron is one of those parts of WordPress that works fine until it does not, and when it breaks, the symptoms show up in places that seem completely unrelated. Posts not publishing, emails are not sending, and imports are sitting untouched. Now you know exactly where to look and what to do about it.
If your site is small and traffic is steady, the default WP-Cron setup will serve you well with the right configuration in place. If you are running a high-traffic site or need tasks firing on a precise schedule, switching to a server-level cron job is worth the extra fifteen minutes it takes to set up.
The plugins covered in this guide make day-to-day cron management straightforward, even if you never want to touch a line of code. Pick the one that fits how you work and use it to keep an eye on what is running and what is not.
If something is still not behaving the way it should after working through this guide, reach out to us at [email protected], and we will help you sort it out.
