
Table of Contents
By default, WordPress only lets you set a featured image from your media library. But what if you want to provide external URLs to your post or page featured image? You’ll definitely need other options to implement this. Here comes the plugins and one popular option is “Featured Image from URL”. Otherwise known as FIFU.
Once you install and activate this plugin, it adds a new meta box to your post or page editor where you can directly input the URL of an external image. That image will then act as the featured image for your post or page without need to download and upload it into your WordPress media library.
In this article, we’ll cover:
- How to use the FIFU plugin to add external URLs to featured images
- How to add or hide the metabox for your post, page, or custom post types
- Also we’ll see how to import image urls to these featured image fields
- How to extract those URLs from WordPress
- And if you don’t want to use a plugin, how to set a featured image field from a url programmatically.
Let’s see each in detail.
How to Add External Image Links to Featured Image field in WordPress Posts & Pages
FIFU, or Featured Image from URL, a WordPress plugin that makes adding URLs to featured images possible.
The title itself clearly explains that the images are loaded from external URLs( which are from other websites). You don’t need to store them in your media library. This could save you time, storage space, and money.
Install WordPress Featured Image from URL(FIFU) plugin
The Featured Image from the URL plugin is available for free in WordPress. This plugin is easy to use and set up from your admin dashboard.
Visit dashboard >> Plugins >> Add new. Search for ‘fifu’ or ‘featured image from URL’ in the search box. The plugin will be listed. You can see that in the below screenshot.
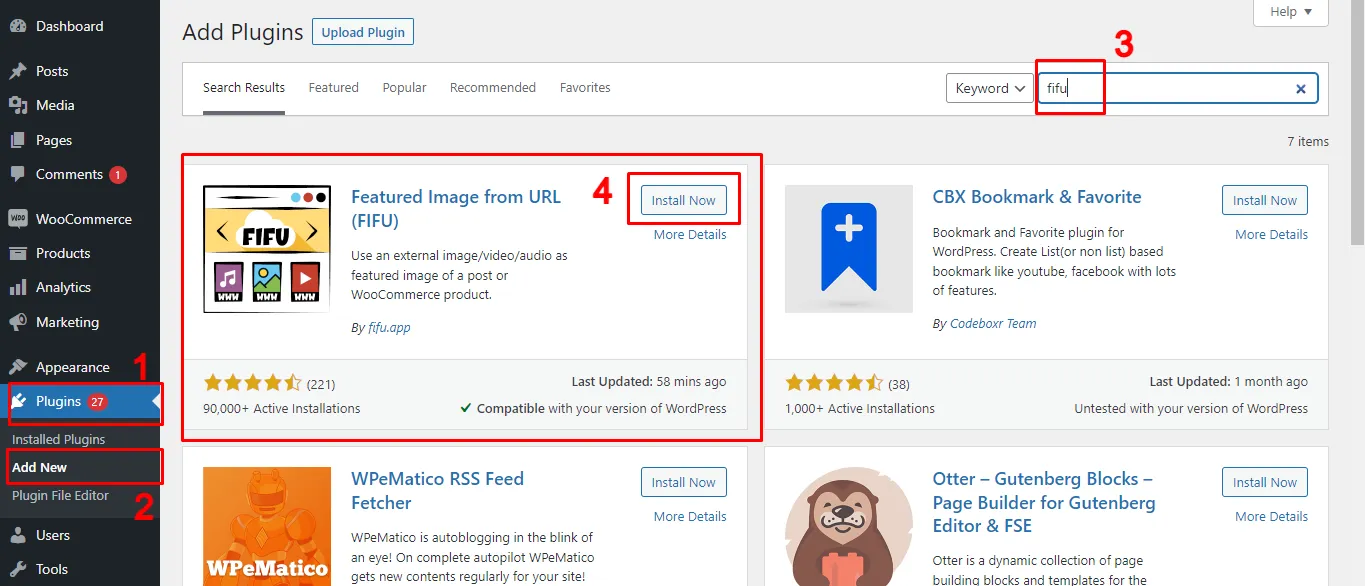
Install and activate the FIFU plugin.
You can now add external images as featured images for posts, pages, and custom post types.
How to Set an URL as Featured Image for WordPress Posts & Pages
Before using images from other websites, just make sure you have the right permission or licensing to use them on your site.
To copy an external image URL:
- Visit the website where the image is located.
- Right-click the desired image and select ‘copy image address’.
- The image URL is now saved to your clipboard and you can paste it whereever you need.
Keep in mind, you can only copy one image at a time.
If the image is from another WordPress site you own or manage, you can easily copy its URL directly from the media library.
Now, if you want to add external images as featured images for all your posts, you’ll need to copy and paste each URL into the featured image field of every post.
To add a featured image for WordPress Posts, Pages, or Custom Posts like Products:
- Open the edit screen of any post type(either create a new one or edit existing one).
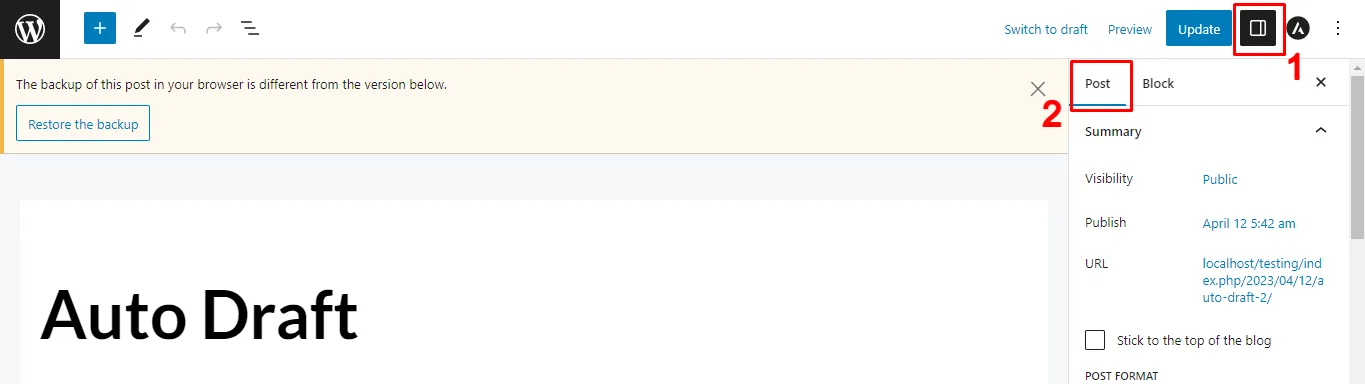
- From the top bar, click the setting icon to open the sidebar. By default, this will display the Post settings.
- Scroll down to locate the ‘Featured Image’ field provided by the FIFU plugin (like in the screenshot below).
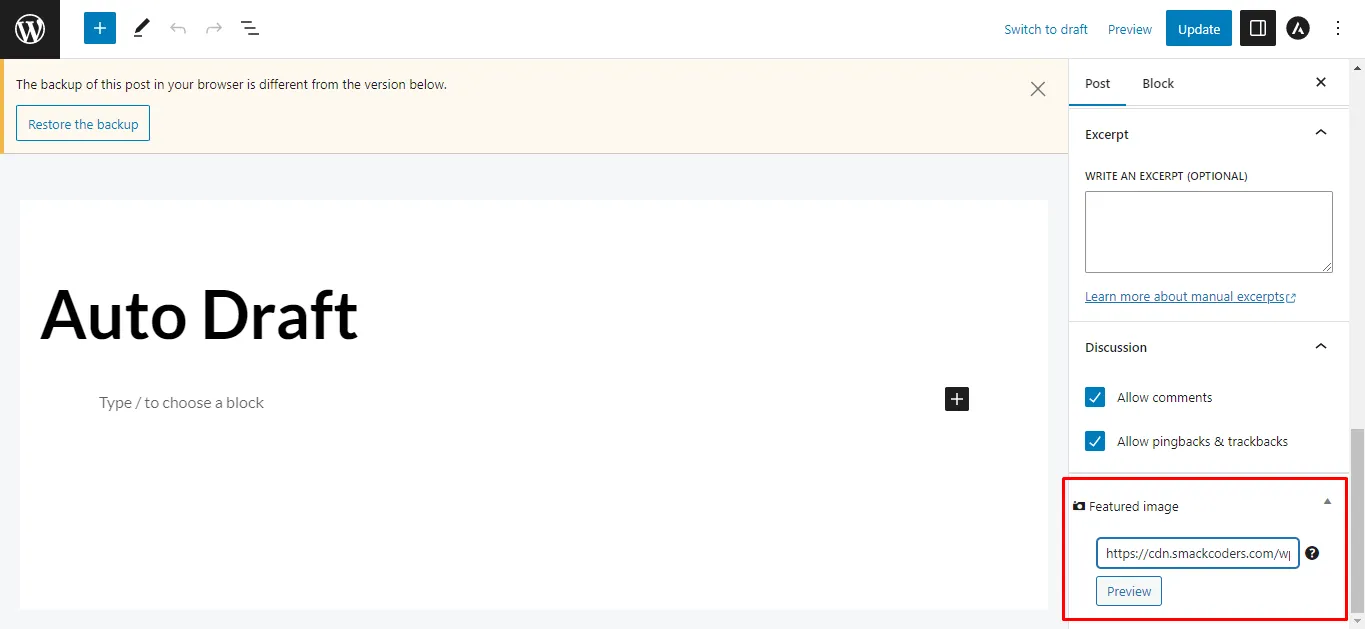
Now you can add your external image in two ways:
- Paste an image URL: Copy the external image link and paste it into the featured image text box.
- Search by keyword: Enter a keyword to get image suggestions, then choose one to use as your featured image.
Once you’ve added the image:
- Click Preview to see how it looks on your post.
- A new text box will appear where you can add Alt Text (recommended for SEO and accessibility).
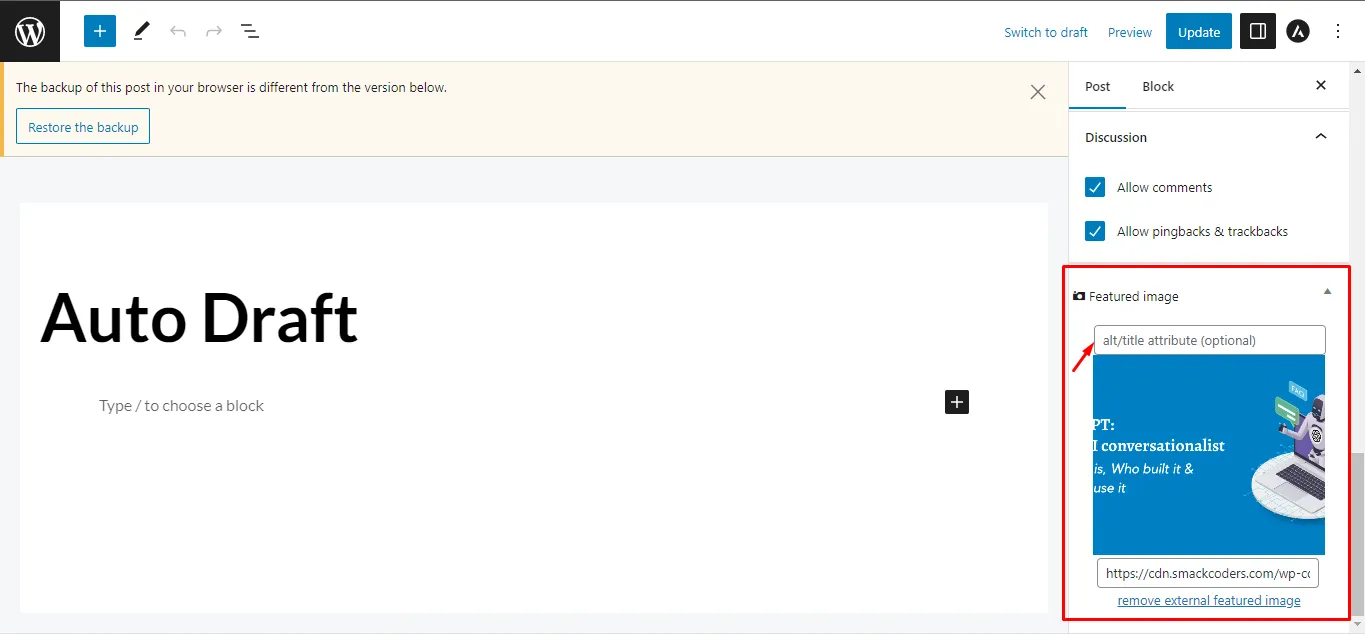
- Finally, click Save/Update to apply the changes.
If you’d like to replace the featured image, simply remove the existing URL and paste a new one, then click Update.
To remove it entirely, select “Remove External Featured Image” and you’ll return to the default state, where you can add another image if needed.

WP Ultimate CSV Importer Pro
Get Ultimate CSV/XML Importer to import data on WordPress faster, quicker and safer.
How to Hide the FIFU Featured Image Meta Box in WordPress
Sometimes, you may want to hide the featured image meta box by the FIFU plugin for specific post types like Posts, Pages, or Custom Post like Products. This can be easily managed from the plugin’s settings.
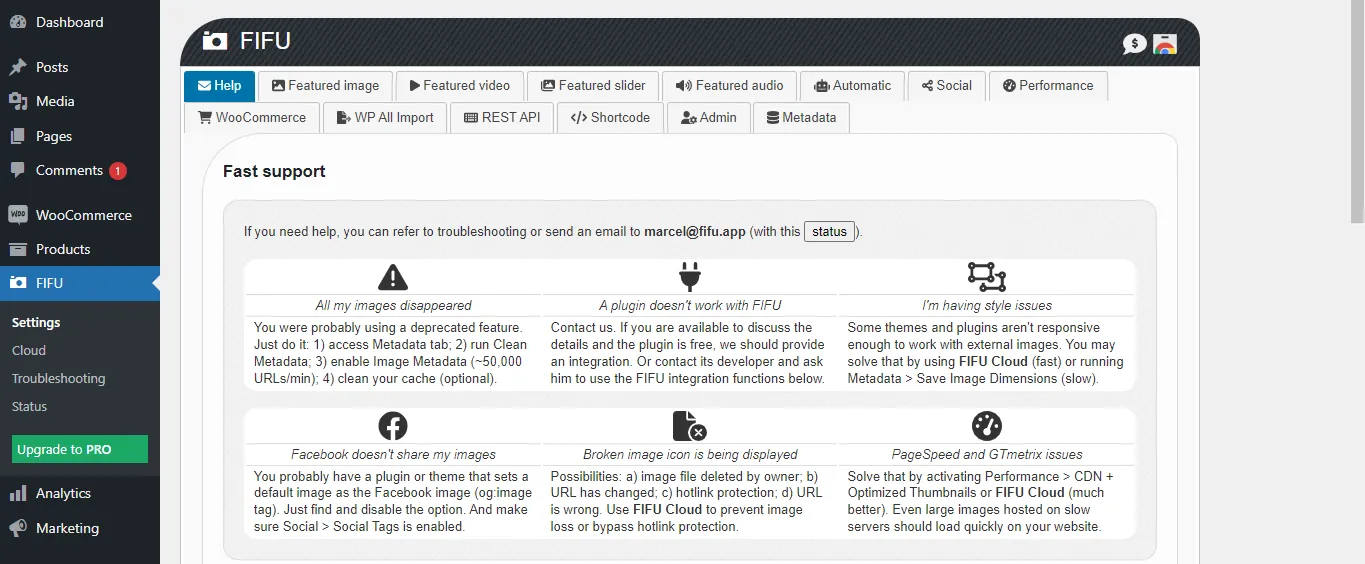
- Go to the FIFU → Settings menu in your WordPress dashboard.
- The Settings page has multiple tabs (like image, video, slider, audio, etc.,) since the plugin supports more than just images.
- Open the Image tab and scroll down to the “Hide Featured Media” section (just above the default featured image setting).
- Enable the Hide toggle and in the next post type filter tab, specify the post types like “page,post” you want to exclude.
- This will remove the meta box from those post types.

Note once you installed the FIFU plugin, the featured image meta box will automatically display inside the post types(posts, page, and products).
How to Add a Default Featured Image for a Post
The Default Featured Image option is useful if you create or update a post, page, or custom post type without assigning a featured image. Instead of leaving it blank, the plugin will automatically use the default image you set.
To configure this:
- Go to the FIFU → Settings page.
- Scroll down to the Default Featured Image section.
- Enable the Default featured image toggle.
- Paste the URL of the image you want to use as the default into the Image URL field.
- (Optional) If you want this to apply only for specific post types, add their values in the Post Type filter field. Example: post,page. This ensures the default image is applied only to those post types.
- Once configured, the image will automatically be assigned as a featured image to any post type (post, page, product, etc.) that doesn’t have one.
How to Import External Image URLs as featured Images in WordPress Posts, Pages, and Custom Posts
When you are dealing with a large number of records, manually adding external image urls as featured images can be extremely time-consuming. The WP Ultimate CSV Importer plugin makes this process much easier by allowing you to bulk import external images URLs into WordPress Posts, Pages, and WooCommerce Products, complete with their alt texts.
Here’s how to import external image URLs step by step:
Note the same import steps are followed for posts, pages and products. The only difference is configuring the post type.
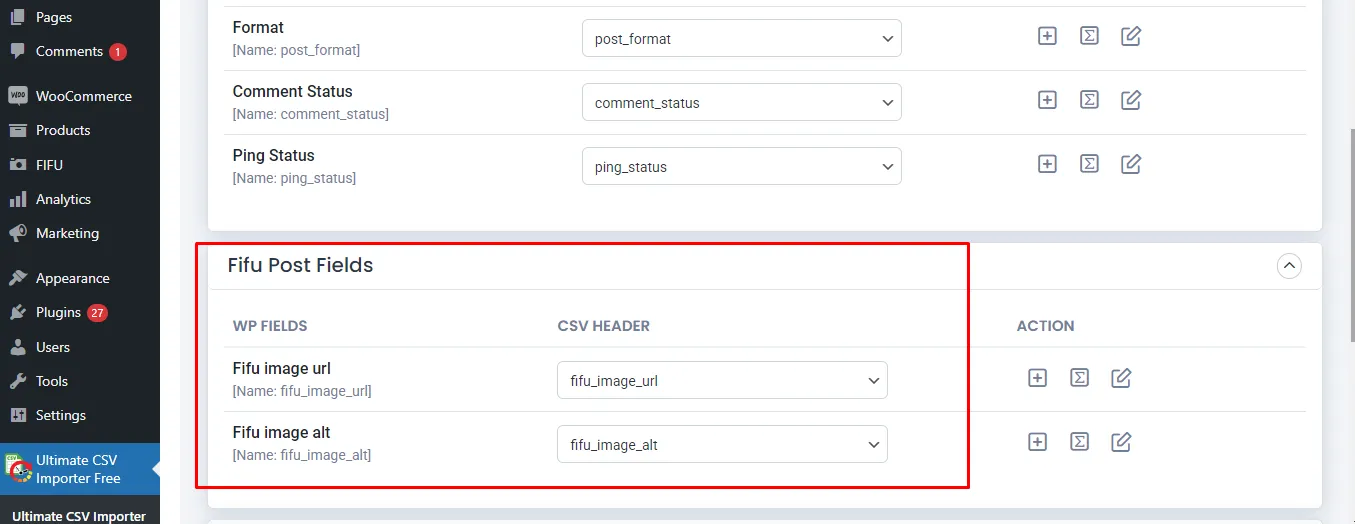
1. Prepare your import file: Create a file like CSV that includes the FIFU featured image URL and image alt text columns(as shown in the example screenshot below). The easier way is to export the records with WP Ultimate CSV Importer and adding the image column and their values.

2. Upload your file: In your WordPress dashboard, go to the Ultimate CSV Importer plugin page. Browse and select your CSV file(or other type file), or upload it using another available method.
3. Select the post type: Choose whether you want to import into Posts, Pages, or Products.
4. Map your fields: Match the columns in your import file with WordPress fields. Make sure to match the FIFU Post Fields for image url and alt text.
5. Run the Import: Click Import to begin. Once the process is complete, review the import log and verify the results both in the WordPress admin and on the front end.
How to Export FIFU featured image URLs and alt texts from WordPress
WP Ultimate CSV Importer also lets you export FIFU fields data from WordPress alongside posts, pages, custom post and products.
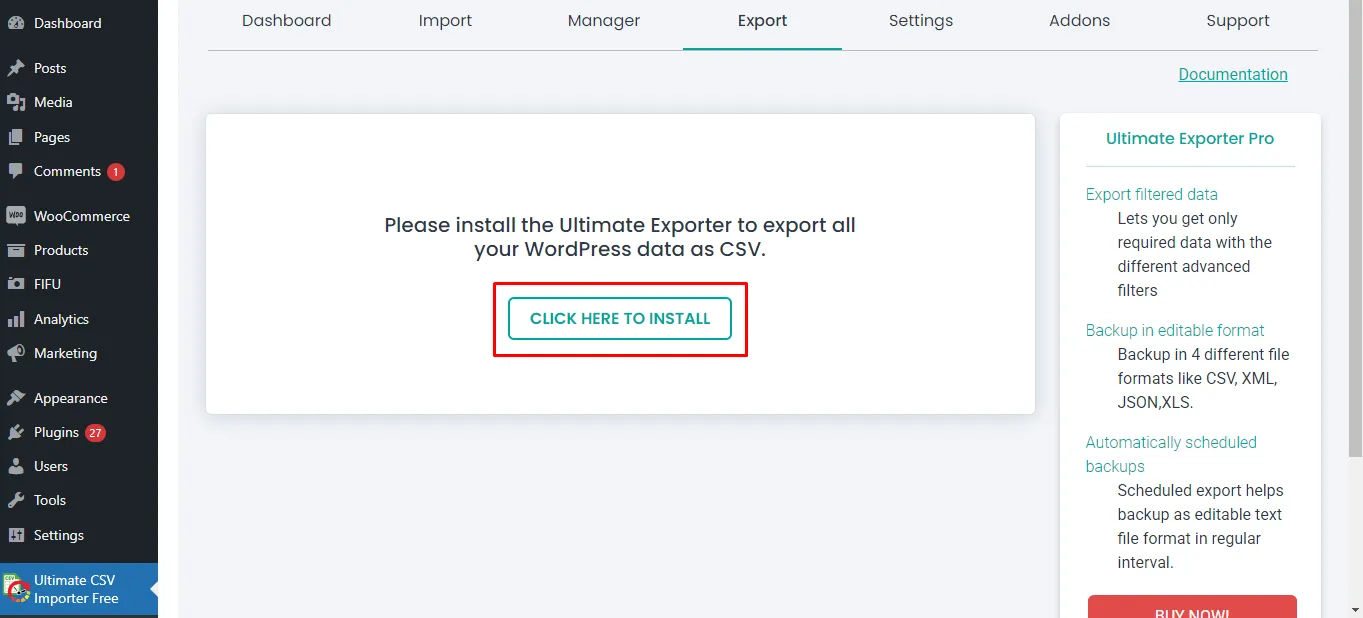
If you are using the free plugin, then we offer an export add-on to extract your FIFU fields.
Move to the Export tab. The export page tells you to install the Ultimate Exporter plugin by providing a button link to install. The export plugin is also free to use.
This takes you to the manage add-ons page where you can see all the supported add-ons listed.
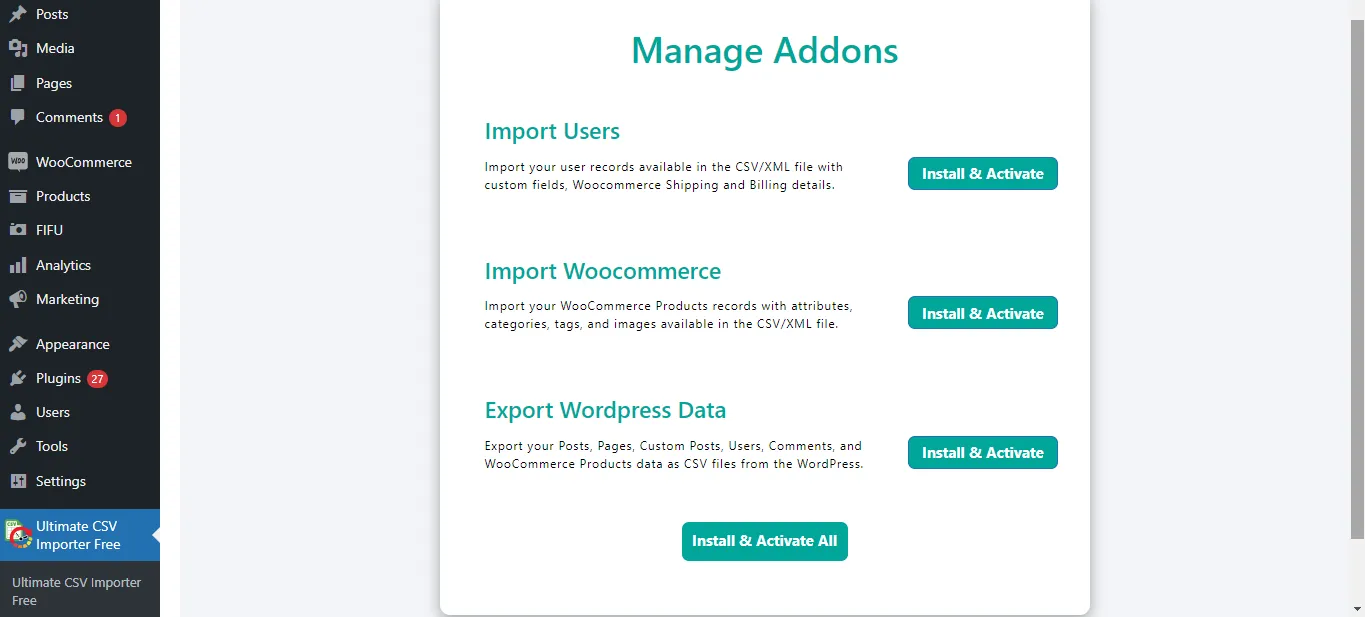
You can install and activate all the add-ons or specific add-ons you need.
When you activate the exporter addon, the export page will be seen like this.
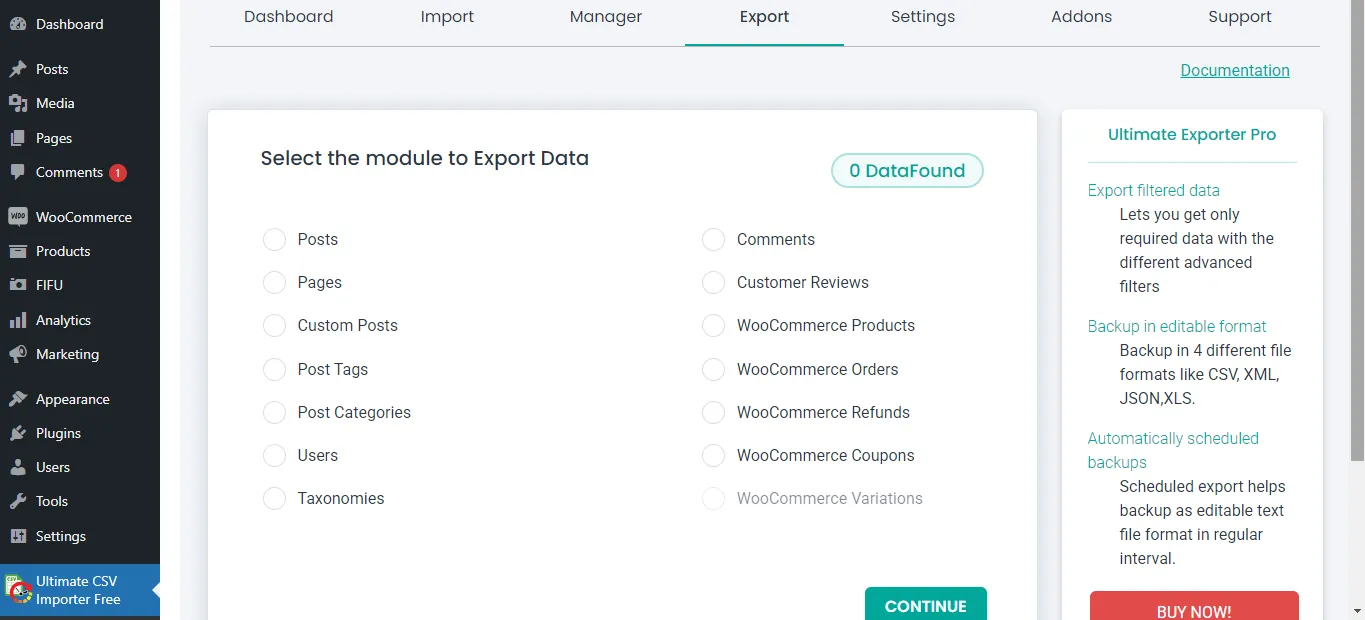
Select the post type here. Note that you can only export FIFU-featured image fields assigned to post types like Posts, Pages, Custom Posts, and WooCommerce Products.
In the next page, provide an export file name then choose a file type.

Configure filters like export for specific periods and export records of specific authors. If you don’t need filters and want to export all records of the chosen post type, just click Export without configuring the filters.
Finally, download the export file and verify the exported field data including the FIFU Featured image and alt text columns to confirm the successful export.
WordPress set featured images from URL programmatically
To set a featured image in WordPress programmatically from a URL, you can use the media_sideload_image() function along with the wp_insert_post() function. Here’s an example of how you can achieve this:
function set_featured_image_from_url($post_id, $image_url) {
// Add Featured Image to Post
$image_id = media_sideload_image($image_url, $post_id, ‘Image Description’);
// Set Featured Image
if (!is_wp_error($image_id)) {
     set_post_thumbnail($post_id, $image_id);
}
}
// Usage
$post_id = 123; // Replace with your post ID
$image_url = ‘https://example.com/image.jpg’; // Replace with the URL of the image
set_featured_image_from_url($post_id, $image_url);
In this example:
- Replace $post_id with the ID of the post to which you want to set the featured image.
- Replace $image_url with the URL of the image you want to set as the featured image.
This function downloads the image from the provided URL, attaches it to the specified post, and sets it as the featured image. The media_sideload_image() function downloads the image and returns the attachment ID, and then set_post_thumbnail() sets this attachment ID as the featured image for the specified post.
Ensure you add this code to your theme’s functions.php file or a custom plugin. Also, be aware that this method relies on the allow_url_fopen setting in your PHP configuration. If it’s disabled on your server, you might need to use alternative methods or enable this setting.
WP Ultimate CSV Importer Pro
Get Ultimate CSV/XML Importer to import data on WordPress faster, quicker and safer.
Frequently Asked Questions
How to Set a Featured Image with an External Image URL in WordPress?
WordPress doesn’t inherently support setting a featured image directly from an external image URL. However, you can achieve this by first downloading the Feature Image from the URL plugin, and then uploading the image URL using the “Set featured image” option in WordPress.
How do you embed a URL in an image?
Embedding a URL in an image typically involves creating an image with a clickable link. This can be achieved by using HTML code if you’re working on a web page or by using image editing software such as Adobe Photoshop or GIMP if you’re creating a standalone image file.
Here’s how you can do it using HTML:
html
<a href=”https://www.example.com”>

  <img src=”image.jpg” alt=”Description of the image”>

</a>
In this code snippet:
- <a> is an anchor tag used to create a hyperlink.
- href=”https://www.example.com” specifies the URL that the image will link to when clicked.
- <img> is an image tag used to display the image.
- src=”image.jpg” specifies the image file to be displayed.
- alt=”Description of the image” provides alternative text for the image, which is useful for accessibility and SEO purposes.
When a user clicks on the image, they will be directed to the specified URL.
If you’re creating a standalone image file (e.g., JPEG, PNG) and want to embed a clickable link directly into the image, you’ll typically need to use image editing software. These programs allow you to create image maps or add clickable areas to an image, which can then be exported with the link embedded. However, note that clickable images created this way will only work when displayed on a web page or in an environment that supports HTML and image maps. They won’t retain the clickable link if shared as standalone image files.
How to Set a Featured Image with an External Image URL in WordPress?
WordPress doesn’t inherently support setting a featured image directly from an external image URL. However, you can achieve this by first downloading the Feature Image from the URL plugin, and then uploading the image URL using the “Set featured image” option in WordPress.
How do you embed a URL in an image?
Embedding a URL in an image typically involves creating an image with a clickable link. This can be achieved by using HTML code if you’re working on a web page or by using image editing software such as Adobe Photoshop or GIMP if you’re creating a standalone image file.
Here’s how you can do it using HTML:
html
<a href=”https://www.example.com”>
<img src=”image.jpg” alt=”Description of the image”>
</a>
In this code snippet:
- <a> is an anchor tag used to create a hyperlink.
- href=”https://www.example.com” specifies the URL that the image will link to when clicked.
- <img> is an image tag used to display the image.
- src=”image.jpg” specifies the image file to be displayed.
- alt=”Description of the image” provides alternative text for the image, which is useful for accessibility and SEO purposes.
When a user clicks on the image, they will be directed to the specified URL.
If you’re creating a standalone image file (e.g., JPEG, PNG) and want to embed a clickable link directly into the image, you’ll typically need to use image editing software. These programs allow you to create image maps or add clickable areas to an image, which can then be exported with the link embedded. However, note that clickable images created this way will only work when displayed on a web page or in an environment that supports HTML and image maps. They won’t retain the clickable link if shared as standalone image files.
How to Add a Link to a Picture on Your Blog?
Elementor is a popular WordPress page builder plugin that allows users to create and customize websites using a drag-and-drop interface. When you link an image URL to an image in a blog post using Elementor, you’re essentially adding a hyperlink to the image, so that when visitors click on the image, they’re directed to another webpage or resource.
Here are some common purposes for linking an image URL to an image in a blog post using Elementor:
- Enhanced User Experience: Linking images can improve user experience by making it easier for visitors to navigate your website. For example, you might link an image to related content, a product page, or a larger version of the image for better viewing.
- Call to Action (CTA): Images with linked URLs can serve as effective calls to action, prompting visitors to take a specific action such as making a purchase, signing up for a newsletter, or downloading a resource.
- Cross-Promotion: You can use linked images to cross-promote other content or products within your website. For instance, you might link an image in a blog post to a relevant product page or to another blog post with related content.
- External Links: Linked images can also be used to direct visitors to external websites or resources that are relevant to your blog post topic. This can be useful for citing sources, providing additional information, or driving traffic to partner websites.
- Social Sharing: If you’re sharing your blog posts on social media platforms, linked images can encourage more engagement by providing clickable visuals that lead back to your website.
In Elementor, linking an image URL to an image is typically done by adding an image widget to your blog post layout and specifying the URL in the widget settings. Elementor offers various customization options, so you can adjust the size, alignment, and other settings of the linked image to suit your design preferences and content goals.
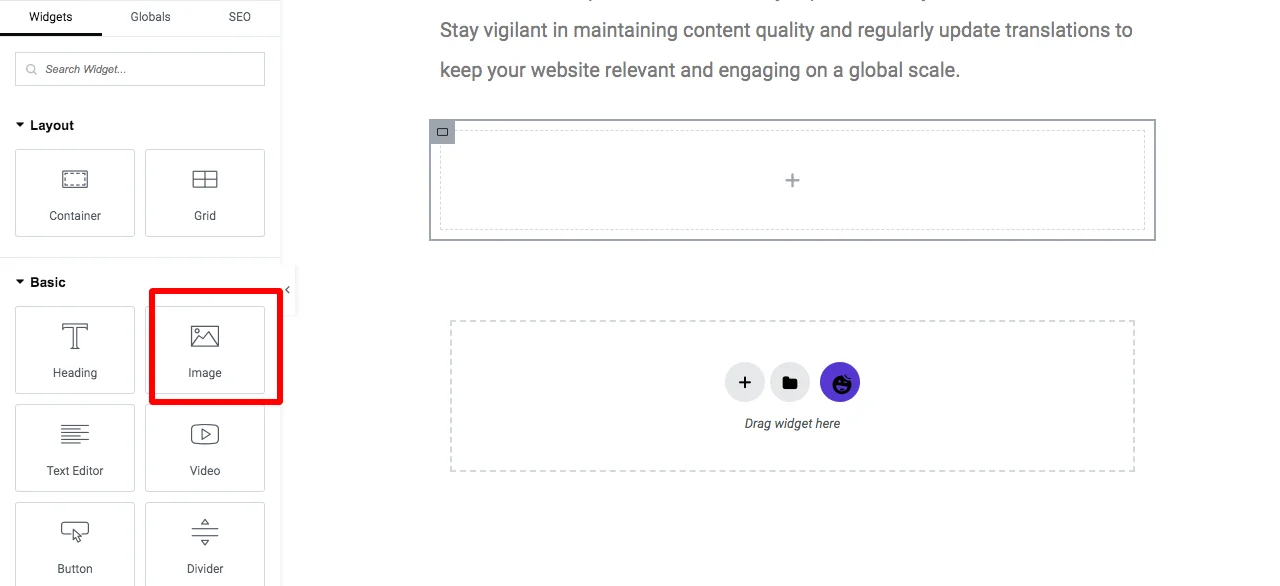
Here are some general steps on how to add a link to a picture on a blog using Elementor in WordPress as an example:
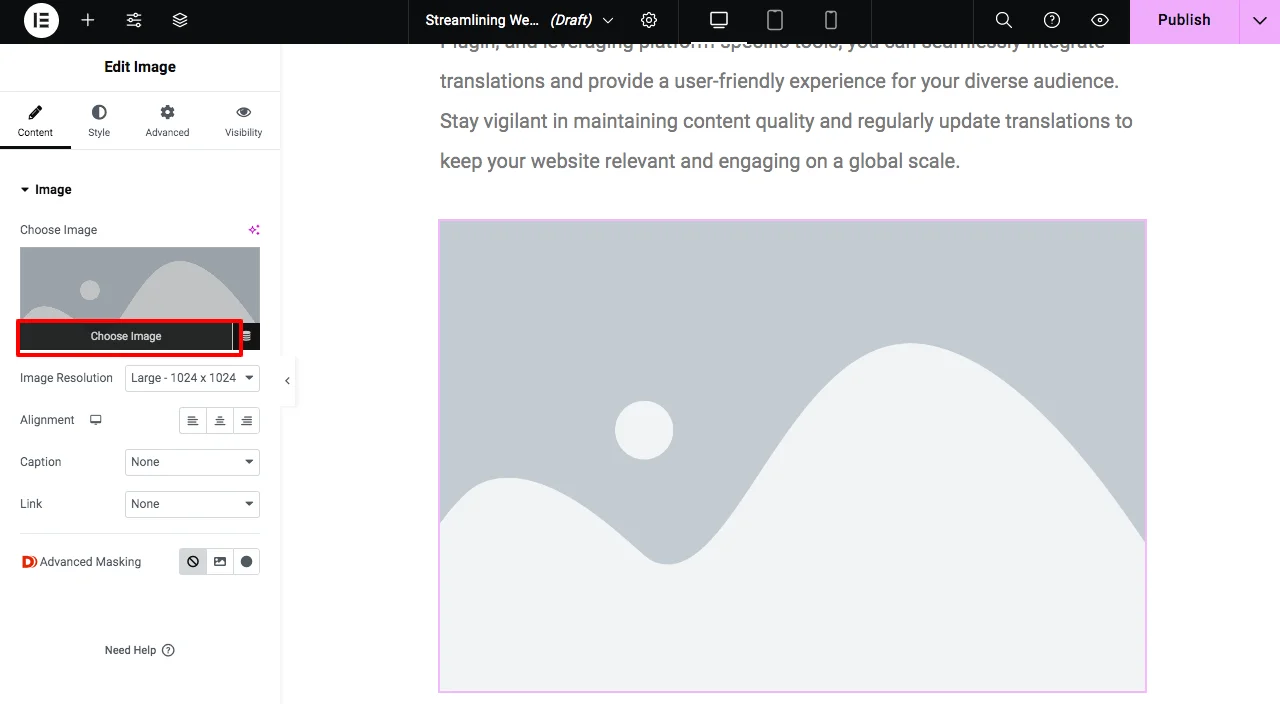
- Insert the Image by dragging the image widget from the Left side tab
- Insert the image from the Media library.
- After inserting the image, click on the edit icon on the image
- Now on the Linked To option, select the custom URL from the drop-down
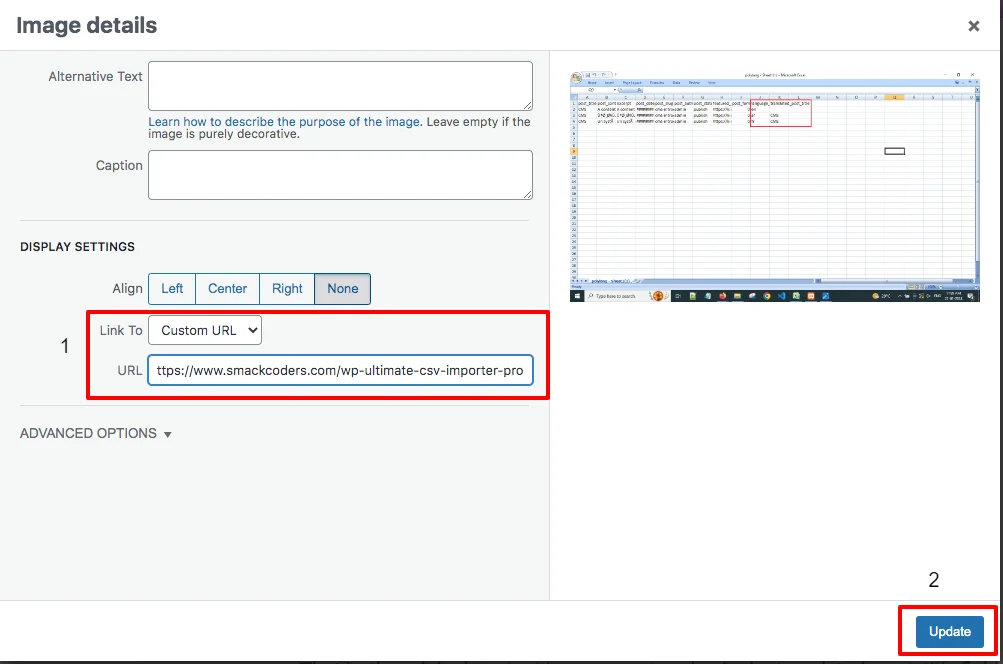
- Enter your custom URL for the posts or pages you want to link to the image.
- You can also select Image URL from the drop-down to link any of your desired images.Your blog image is now linked to the specified URL.
Thus on clicking your blog image, your linked image will pop out. That is you can insert two images in a single image field effectively.
How do I add an Alt Tag to a Featured Image in WordPress?
- When setting or editing the featured image in WordPress, you’ll see an “Alt Text” field.
- Enter a brief, descriptive alt tag that accurately describes the content or purpose of the image.
- Save or update your post/page to apply the alt tag to the featured image.
By incorporating these techniques into your WordPress content creation workflow, you can enhance the interactivity and engagement of your posts, ultimately providing a more enriching experience for your readers. Whether it’s directing them to additional resources or improving accessibility through alt tags, these strategies can elevate the effectiveness of your WordPress website or blog.
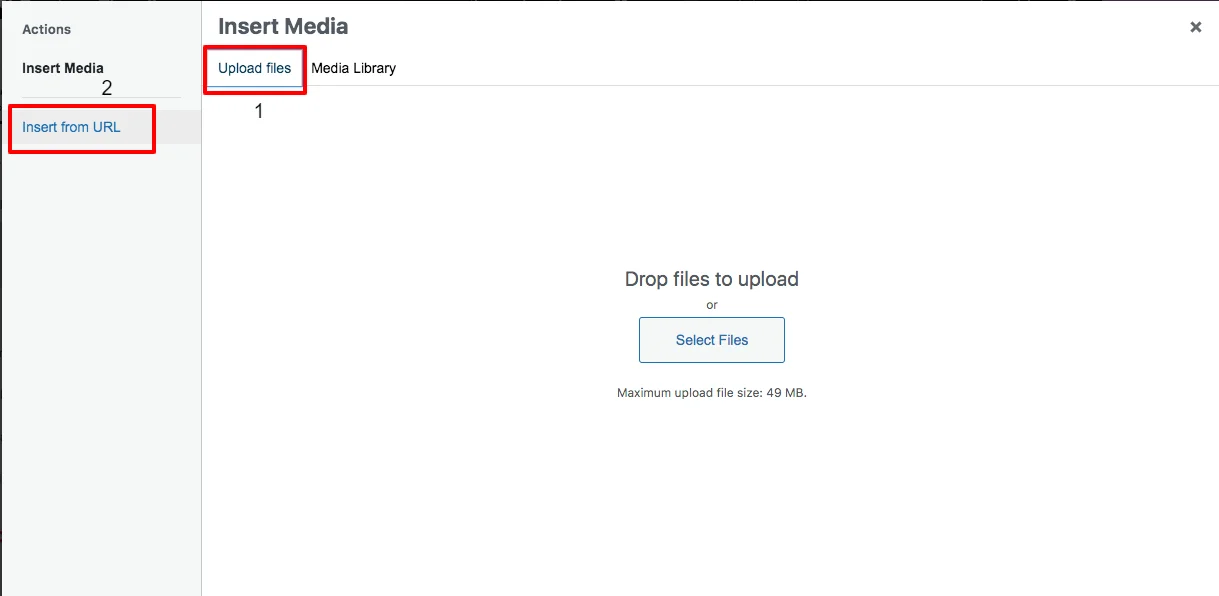
How to set an image other than the featured image from a URL using Elementor?
With Elementor PRO, it is easy to import images from other sources using the URL.
- On your Elementor, Drag the image widget where you want to insert the image on your post
- Click on Choose Image
- On the Upload files section, select the Insert from URL option.
- Provide the link of your desired image and its Link Text(alt text)
- Click on the Insert to post
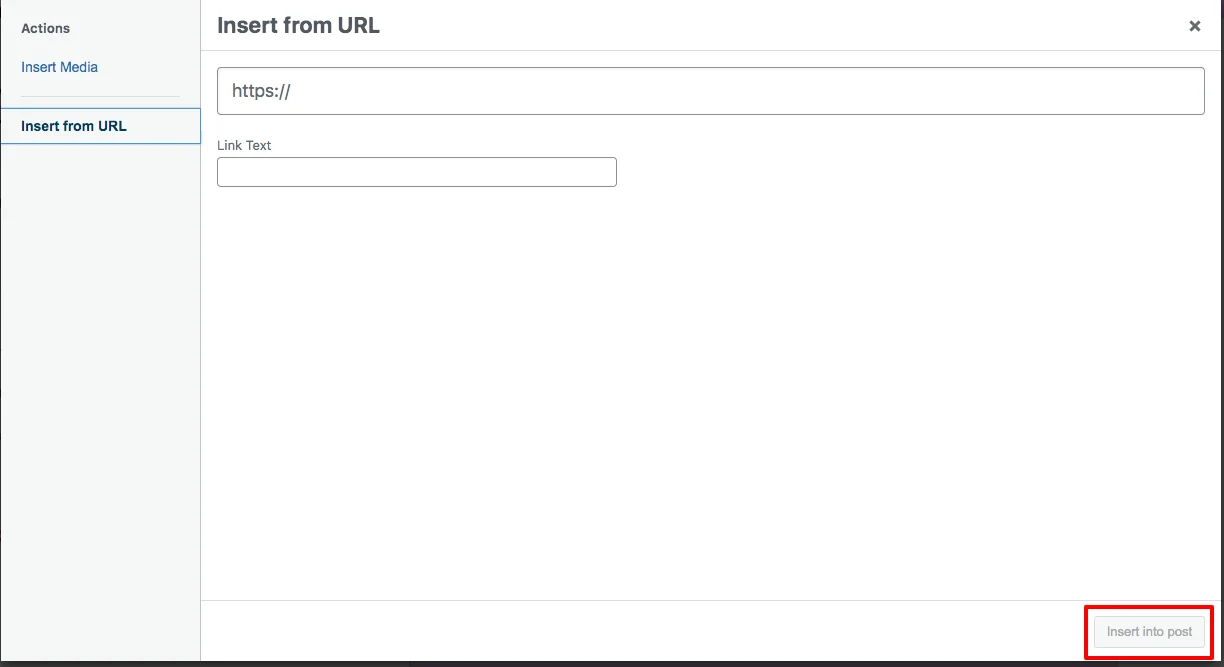
Now your images from the URL have been uploaded to your post successfully.
How can I find and use a WordPress featured image URL?
A WordPress featured image URL is simply the direct link to an image assigned as the featured image for a post, page, or product. If you’re using the Featured Image from URL (FIFU) plugin, you don’t need to upload the image to your media library. Instead, you can copy the external image URL (by right-clicking an image → “Copy Image Address”) and paste it into the featured image field of your post. This allows WordPress to display that external image as the featured image without consuming your server storage.
Can I add an image from a URL directly in WordPress without uploading it?
Yes, you can add an image from a URL in WordPress by using a plugin like FIFU (Featured Image from URL). Once installed, it gives you a meta box where you simply paste the external image link. The image will load from the external source and appear as your post’s featured image or inline content.
Wrapping Up
Featured images play a big role in catching your readers’ attention and improving engagement. By using external image URLs as featured images, you not only save valuable server space but also streamline content management. With the WP Ultimate CSV Importer plugin, importing and exporting external image URLs into featured images for WordPress posts, pages, and custom post types becomes fast and effortless.Still have questions about importing external images in WordPress? Reach out to us anytime at [email protected]. And don’t forget to subscribe to our YouTube channel for more step-by-step tutorials on getting the most out of the WP Ultimate CSV Importer plugin.