Vtiger Backup Automation is an effective Vtiger extension that allows you to back up your Vtiger files and databases on your local computer or any other server based on your preferences. It supports manual backup locally and automatic backup on any of the cloud-based servers such as S3, FTP, FTPS, SFTP, Google Drive, and Dropbox.
Steps to install Vtiger Automated Backup
- Login to Vtiger CRM
- Navigate to Settings -> CRM Settings -> Modules -> Import Module from Zip
- Follow the onscreen instructions click on Import and select Import Now to finish the installation process.
- Now access the extension by navigating to Tools -> Automated Backup
Configuration
First, configure your cloud server with the extension. So that all your Vtiger files and databases are seamlessly backed up on the desired server at the scheduled time.
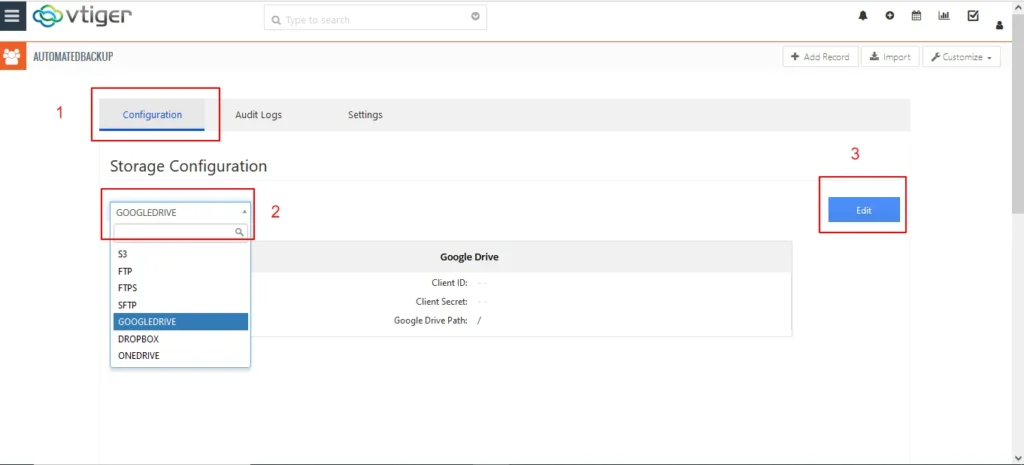
For configuration, navigate to the configuration tab at the top side menu
Select the cloud server from the drop-down in which you need to backup your file or database
Now Click on the edit option
S3 Configuration
- Get the access key and secret key from your S3 account.
- For that Login to your Amazon S3 account.
- Select User and click on IAM.
- On the right side click on the My security credentials. Here click on Create key to get your acces key and secret key.
- Copy the credentials and paste them into the appropriate field on the configuration page of the Vtiger Automated Backup.
To get the Region name
- Moving back to the S3 account, click on the global at the top bar and select your nearby region.
- Provide the region name on the configuration page
- Click on Next
Now all the bucket names of the S3 account will be displayed. Select the desired bucket name from the drop-down
FTP Configuration
To configure your FTP server with the extension, provide your FTP Host, and FTP Port.
SFTP Configuration
For SFTP configuration provide the SFTP host, SFTP port, SFTP user name, SFTP password, and SFTP path directory.
Google Drive Configuration
To configure Google Drive with the extension, you need to provide the client ID, client secret, and Google Drive path
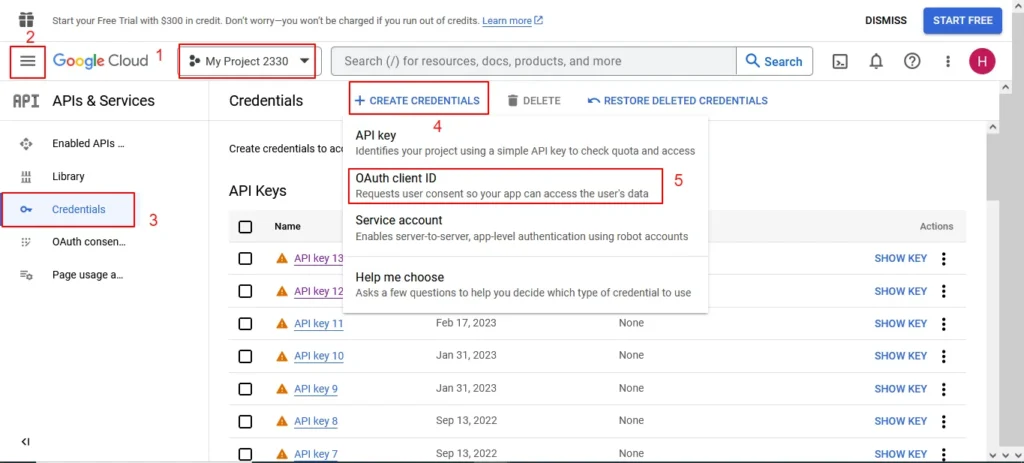
The redirect URL path must be in the format,
Your Vtiger path directory/ GoogleDriveAuthentication.php
For example, http://localhost/vtigercrm7.5/GoogleDriveAuthentication.php
DropBox Configuration
Provide the App key, App secret, and Dropbox path
Authorize the appropriate Dropbox account to configure your Dropbox for the Automated backup.
Once you are done with the configuration move on to the Backup settings to set the time-frequency for Automatic Backup.
Settings
Navigate to the settings at the top side menu
Manual Data Backup
If you want to manually back up your databases and files click on the Manual option. Now your Vtiger files and databases will be downloaded on your local computer.
Automatic Data Backup
Enter the time-frequency and number of backups to retain.

Database Backup Schedule
Select the time frequency from the drop-down for the database backup schedule. That is select the time interval (in how many hours/months/weeks) you need to run the backup. The time frequency includes every hour, every 2 hours, every 4 hours, every 8 hours, every 12 hours, Daily, Weekly, Fortnightly, and Monthly.
select the number of backups you want to keep
Retain how many scheduled backups
Select the number of database backups you want to keep on your server.
If you select 2, only the data backup of the last 2 days will be saved on your primary server and all other backups will be deleted automatically.
Note: Retaining at least last 7 days of data backup is recommended
CRON Schedule
Set up the Cron scheduler in order to run the automatic data backup at the scheduled time interval.
Enable CRON on your server by adding the following entry:
*****wget -o /dev/null -q -O /dev/null {site_URL}/BackupCron.php.2>&1
Audit Logs
To track the number of data backups and their status, navigate to the Audit Logs at the top side menu. It shows all the success/failure statuses of both the manual and automatic data backups.