Artificial intelligence is reshaping how WordPress site owners create content, handle customer support, and automate workflows in 2026. From solo bloggers to growing eCommerce brands, AI tools have moved from being optional add-ons to becoming core infrastructure for high-performing websites. The competition is no longer just about who publishes more, it is about who publishes smarter using the right AI tools.
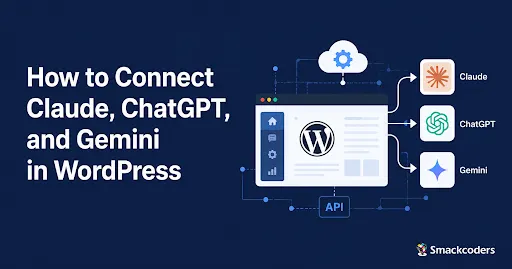
Most WordPress users pick one AI tool and stop there. But the sites seeing real results are combining Claude, ChatGPT, and Gemini together, each handling a specific role in one content workflow. This guide walks you through exactly how to connect all three AI models to your WordPress site using plugins and APIs, with no advanced coding required.
Key Takeaways
- You can connect Claude, ChatGPT, and Gemini to a single WordPress site using one plugin
- Each AI model has different strengths; combining them produces better results than relying on one
- Plugin-based integration requires zero coding and takes under 30 minutes to complete
- Assigning each AI a specific role creates a smarter, faster content workflow
- Always set API spending limits to avoid unexpected billing charges during automation
Why Integrate Multiple AI Models in WordPress
Using multiple AI models in WordPress is not about redundancy; it is about strategy. Each model has distinct strengths, and routing tasks to the right AI significantly improves content quality while reducing the time spent editing or rewriting output. WordPress is uniquely positioned to support multi-AI integration through its flexible plugin ecosystem.
What Happens When You Rely on Just One AI Tool
Every AI model has limitations. ChatGPT can be fast but sometimes produces generic content. Claude is strong at long-form writing but can be conservative in creative tasks. Gemini has excellent real-time research capability but lacks the editorial depth needed for polished blog content.
Relying on a single model means inheriting all its weaknesses. When you use one AI for drafting, editing, research, SEO, and chatbot responses simultaneously, you hit a quality ceiling fast. Multi-model integration removes that ceiling by assigning each task to the AI best suited for it.
Key Benefits of Using Multiple AI Tools on One WordPress Site
Multi-AI integration makes content production faster by running parallel workflows one AI researches while another drafts and a third optimizes for SEO. Customer support chatbots become more accurate when powered by a model built for conversational depth rather than forcing a writing-focused model into that role.
Beyond content, combining AI tools with automation plugins like Uncanny Automator allows WordPress to trigger AI actions based on site events new post published, form submitted, or WooCommerce order placed. This level of automation was previously reserved for enterprise teams with developer resources.
Claude vs ChatGPT vs Gemini – A Practical Comparison for WordPress Users
Understanding what each model does best helps you configure a smarter workflow from day one. The three models differ in tone, speed, accuracy, and ideal use cases and mapping them correctly to WordPress tasks is what separates a basic integration from a genuinely powerful one.
What Each AI Does Best
ChatGPT by OpenAI is the most widely supported AI in the WordPress plugin ecosystem. It is fast, versatile, and ideal for conversational chatbot responses, short-form copywriting, and high-volume content tasks. Claude by Anthropic is the strongest performer for long-form blog writing, complex instruction-following, and nuanced editorial content. Gemini by Google is built for research-heavy tasks, real-time information retrieval, and fact-based content that needs current data accuracy.
Which AI Should Handle Which WordPress Task
For a practical WordPress workflow, assign roles clearly. Use Gemini for topic research and trend analysis, Claude for writing full blog drafts and long-form pages, and ChatGPT for generating meta descriptions, social media captions, FAQ answers, and chatbot interactions.
This role-assignment approach means each AI operates in its strongest zone. Your overall content quality improves without increasing the time you spend correcting or rewriting AI-generated output.
Prerequisites Before You Start
Before starting, make sure your WordPress environment is ready. You need a self-hosted WordPress.org site with admin-level access and a basic familiarity with the WordPress dashboard. No developer experience is needed for plugin-based setup.
What You Need Before Integration
You will need three separate API accounts an OpenAI account for ChatGPT, an Anthropic Console account for Claude, and a Google AI Studio account for Gemini. All three offer free credits or free tiers for new users, which is enough to test your integration before committing to paid usage.
Have your API keys ready before starting the WordPress setup. Note that a Claude.ai subscription and Anthropic API access are completely separate you must register at console.anthropic.com specifically for API access.
Plugin vs Custom API Integration – Which Should You Choose
For most WordPress users, plugin-based integration is the right path. Tools like AI Engine by Meow Apps support all three AI providers from a single settings panel and require no code to configure. Custom API integration using WordPress REST API is only needed for developers building proprietary AI-powered tools or managing multisite networks.
If you are just starting out, go with the plugin route. You can always switch to a custom API approach later as your workflow needs grow more complex.
How to Connect ChatGPT to WordPress
Connecting ChatGPT to WordPress is straightforward when using a dedicated AI integration plugin. In this setup, you will first install the plugin inside WordPress, then generate an API key from the OpenAI platform, and finally connect that API key within the plugin settings to establish a live connection.
Step 1 – Install the AI Plugin in WordPress
Log in to your WordPress dashboard and navigate to Plugins and then Add New Plugin. Search for the AI plugin you intend to use for OpenAI integration, click Install Now, and activate the plugin once installation is complete.
Once the plugin is activated, a dedicated AI settings section will appear in your WordPress dashboard menu, ready for configuration.
Step 2 – Generate an API Key from OpenAI
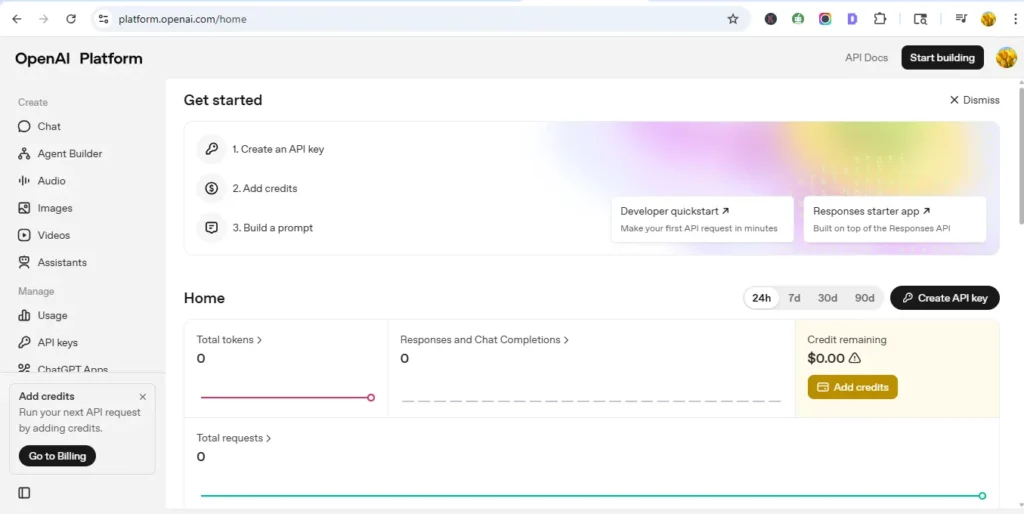
Open your browser and visit platform.openai.com. Log in with your existing OpenAI account or create a new account if you do not have one already.
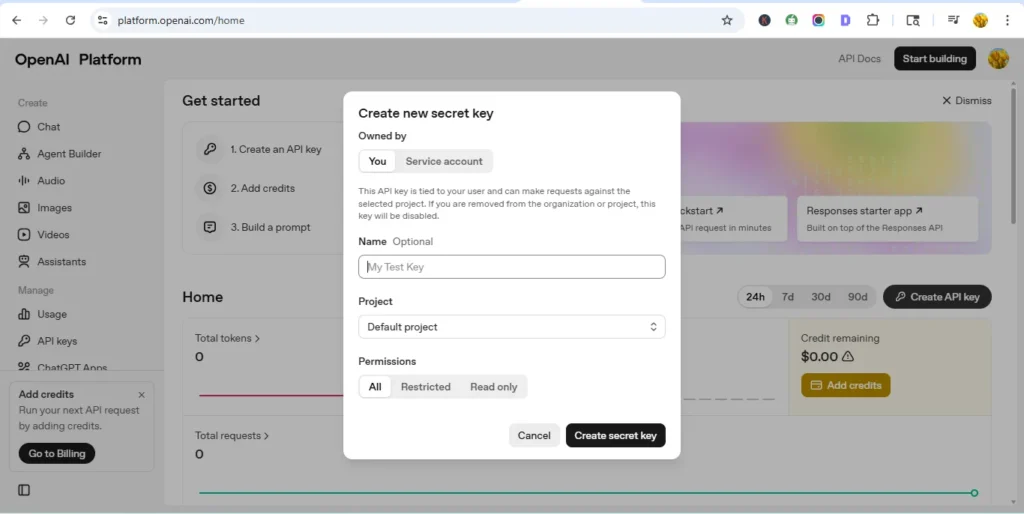
After logging in, go to the API Keys section, click Create New Secret Key, copy the generated API key immediately, and store it in a secure location because OpenAI will not display the key again after you leave the page.
Step 3 – Connect the API Key in WordPress
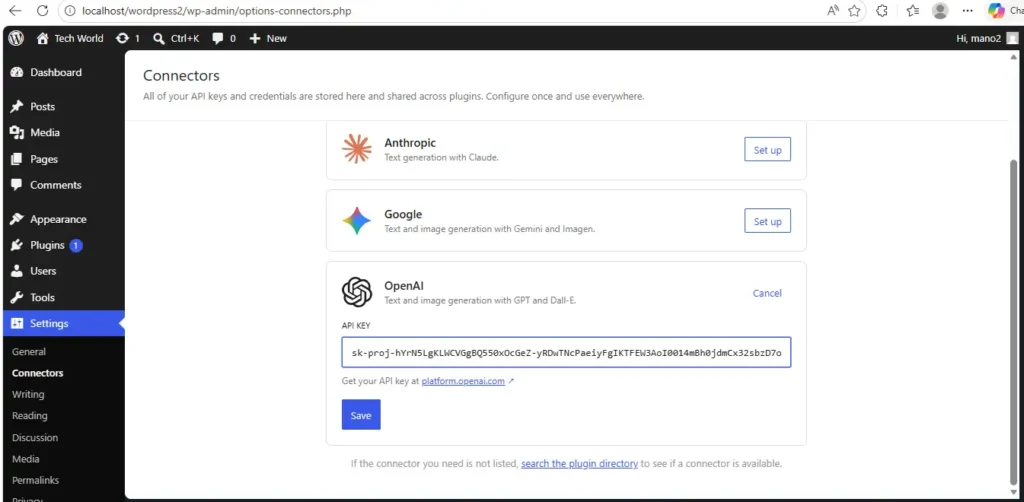
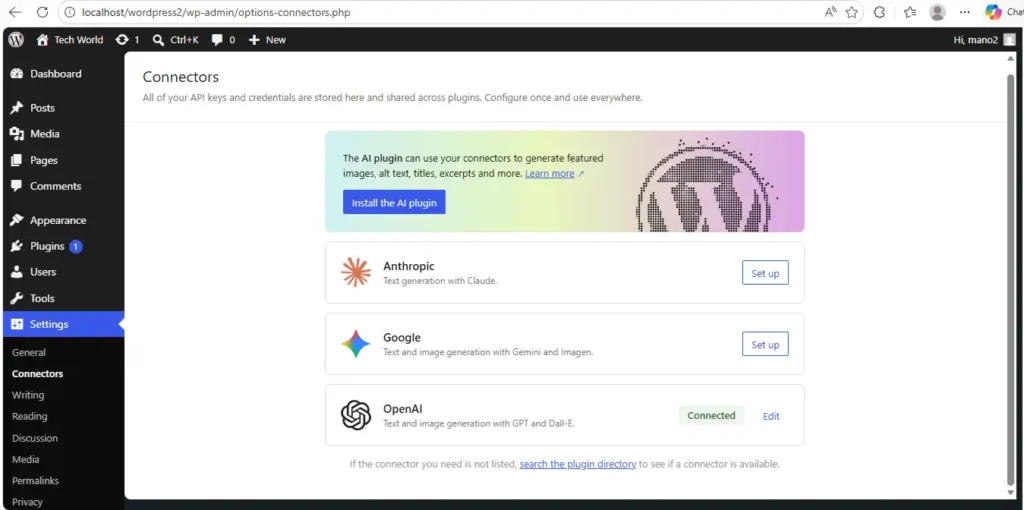
Return to your WordPress dashboard and open the AI plugin settings. Navigate to the Connectors or AI Providers section within the plugin settings panel.
From there, select OpenAI, paste the copied API key into the designated API field, and click Save or Connect. Once saved, WordPress will automatically establish a connection with ChatGPT through the OpenAI API.
Step 4 – Verify the Connection
After connecting, the plugin will typically display a Connected status confirmation. You can verify the integration by opening a new post or accessing any AI feature inside WordPress and entering a sample prompt.
If the AI generates a response successfully, ChatGPT has been connected to your WordPress site correctly and is ready to use.
How to Connect Claude to WordPress
Setting up Claude on your WordPress site is much easier than it sounds, especially when you use an AI plugin that already has Anthropic built in as a supported provider. The entire process comes down to three simple stages getting the plugin ready inside WordPress, grabbing your API key from the Anthropic Console, and dropping that key into the plugin to activate the connection.
Step 1 – Install the AI Plugin in WordPress
Log in to your WordPress dashboard and navigate to Plugins and then Add New Plugin. Search for the AI plugin that supports Anthropic integration, click Install Now, and activate the plugin once the installation is complete.
After activation, the plugin settings section will appear in your WordPress dashboard menu, ready for the next configuration step.
Step 2 – Generate an API Key from Anthropic
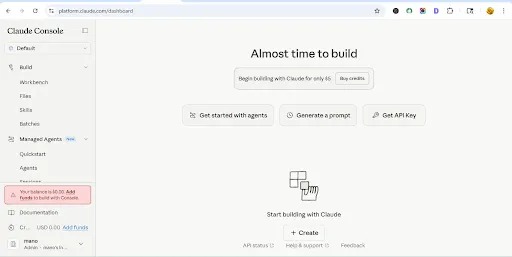
Open your browser and visit console.anthropic.com. Log in with your existing Anthropic account or create a new account if you do not have one already.
After logging in, go to the API Keys section, click Create Key, generate a new API key, copy it immediately, and store it in a secure location. Anthropic provides free credits for new users, which allows you to test the API integration before moving to a paid plan.
Step 3 – Connect the Claude API Key in WordPress
Return to your WordPress dashboard and open the AI plugin settings. Navigate to the Connectors or AI Providers section within the plugin settings panel.
From there, select Anthropic or Claude, paste the copied API key into the designated API field, and click Save or Connect. Once saved, WordPress will automatically establish a connection with Claude through the Anthropic API.
Step 4 – Verify the Claude Integration
After completing the setup, the plugin will display a Connected status confirmation if everything is configured correctly. Test the integration by opening a new post or accessing any AI feature inside WordPress and entering a sample prompt.
If Claude generates a response successfully, the Claude integration with your WordPress site is working correctly and is ready for use.
How to Connect Gemini to WordPress
Connecting Gemini to WordPress is simple using an AI integration plugin that supports Google AI as a provider. In this process, you will first install the plugin inside WordPress, then generate an API key from Google AI Studio, and finally connect that API key within the plugin settings to activate the integration.
Step 1 – Install the AI Plugin in WordPress
Log in to your WordPress dashboard and navigate to Plugins and then Add New Plugin. Search for the AI plugin that supports Google AI integration, click Install Now, and activate the plugin once installation is complete.
Once activated, the plugin settings section will appear in your WordPress dashboard menu, ready for configuration.
Step 2 – Generate an API Key from Google AI Studio
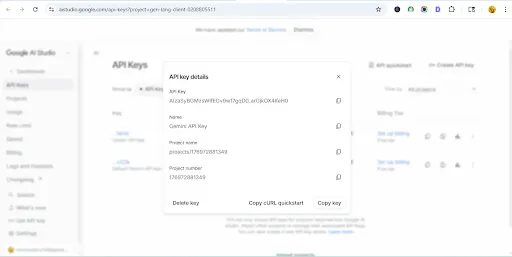
Open your browser and visit aistudio.google.com. Sign in using your existing Google account.
After logging in, click Get API Key, create a new API key, copy the generated key immediately, and save it securely for later use. Google AI Studio provides a free usage tier, allowing you to test the Gemini integration without adding billing details right away.
Step 3 – Connect the Gemini API Key in WordPress
Return to your WordPress dashboard and open the AI plugin settings. Navigate to the Connectors or AI Providers section within the plugin settings panel.
From there, select Google AI or Gemini, paste the copied API key into the designated API field, and click Save or Connect. Once saved, WordPress will automatically establish a connection with Gemini through the Google AI API.
Step 4 – Verify the Gemini Integration
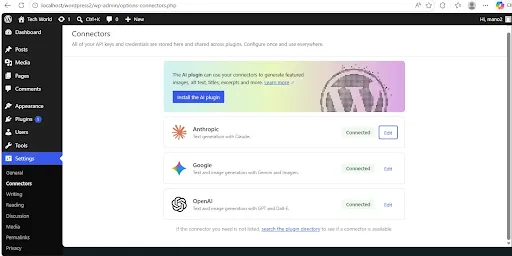
After completing the setup, the plugin will display a Connected status message confirming the integration is active. Test the connection by opening a new post or accessing any AI feature inside WordPress and entering a sample prompt.
If Gemini generates a response successfully, the Gemini integration with your WordPress site is working correctly and is ready to use.
How to Use All Three AI Tools Together in WordPress
With all three AI models connected, the real advantage comes from using them in a coordinated workflow rather than switching between them manually for every task.
Setting Up a Multi-AI Workflow
Assign each AI a specific role. Gemini handles Stage 1 research and current data gathering. Claude handles Stage 2 writing the full draft with structure and depth. ChatGPT handles Stage 3 generating meta descriptions, social captions, and FAQ content from the finished draft.
This three-stage pipeline can be run manually using AI Engine’s provider switching or fully automated using Uncanny Automator connected to WordPress triggers like post publishing or WooCommerce order creation.
Real-World Example Use Cases
For blog content, use Gemini to research trending angles, feed that into Claude for a full SEO-optimized draft, then use ChatGPT to create all short-form assets around it. For customer support, deploy Claude for detailed product queries and ChatGPT for quick conversational responses on simpler questions.
For SEO, use Gemini to identify high-intent keywords currently ranking, Claude to embed them naturally into existing posts, and ChatGPT to rewrite title tags and meta descriptions at scale across your WordPress site.
Best Plugins to Connect AI with WordPress
Top Recommended Plugins
AI Engine by Meow Apps is the most versatile option it supports all three AI providers, includes a chatbot builder, Gutenberg content generator, and WooCommerce compatibility. Uncanny Automator works as the automation layer connecting AI outputs to WordPress actions and third-party tools like Slack and Mailchimp.
WPBot is a dedicated chatbot plugin best suited for sites that need a front-end support chatbot specifically powered by ChatGPT, without broader content generation requirements.
Plugin vs Custom API Integration – Final Verdict
For 90 percent of WordPress site owners, AI Engine handles every use case across all three providers without writing a single line of code. Custom API integration is only worth pursuing when you need fine-tuned control over request headers, rate limits, or are managing a multisite network requiring centralized API management.
Common Issues and Troubleshooting
API Key Errors
The most common error is 401 Unauthorized, which almost always means the API key was copied incorrectly extra spaces, missing characters, or an outdated key. Fix this by generating a fresh key from the respective console and re-pasting it carefully. For Claude specifically, confirm your Anthropic Console account has API access enabled separately from any Claude.ai subscription.
Plugin Conflicts
If the AI Engine toolbar disappears from the Gutenberg editor after activation, a plugin conflict is the most likely cause. Temporarily deactivate other plugins one by one to isolate the issue. Known conflicts have been reported with certain versions of WP Rocket and Elementor’s asset optimization settings.
Slow Response or Timeout Issues
Slow AI responses are typically caused by high max_tokens settings or shared hosting plans with low PHP execution time limits. Reduce max_tokens in AI Engine’s advanced settings first. If timeouts persist, increase the max_execution_time value in your php.ini or upgrade to a managed WordPress hosting plan with higher PHP limits.
Best Practices for Using AI in WordPress
Maintain Content Quality with Human Review
Every AI-generated post should go through a human review pass before publishing especially for factual accuracy and brand voice. Use AI for first drafts and structural outlines, not for final output ready to publish. The Gutenberg editor with AI Engine’s inline editing makes this review process fast.
Avoid Over-Automation
Over-automating AI content leads to generic, repetitive output that readers notice quickly. Limit automation to high-volume low-stakes content like meta descriptions and social captions. Keep long-form blog articles human-led with AI assistance. Monitor your API usage monthly and set spending caps in each provider’s billing console.
Ensure Data Privacy and Compliance
Content sent to AI APIs is processed on external servers. Never send personally identifiable user data email addresses, purchase history, or form submissions through AI APIs without a Data Processing Agreement in place. OpenAI, Anthropic, and Google all offer enterprise DPAs for API users that include no-data-retention clauses.
Conclusion
Connecting Claude, ChatGPT, and Gemini to your WordPress site is no longer a complex technical project it is a straightforward plugin-based setup that any site owner can complete in under an hour. The real value is not in the individual tools but in how you combine them: Gemini for research, Claude for writing, ChatGPT for optimization and repurposing. That coordinated three-stage workflow is what separates AI-assisted sites from truly AI-powered ones.
The future of WordPress is multi-AI, and the sites building that foundation today will have a significant head start as these models grow more capable. Start with one integration, test it against your current process, and expand from there. The tools are connected now it is time to put them to work.
Frequently Asked Questions
1. Is it possible to run Claude, ChatGPT, and Gemini together on a single WordPress site?
Absolutely. A plugin like AI Engine lets you add API keys for all three AI providers within one unified settings panel. You can easily switch between them or dedicate each one to a specific task without needing to install multiple separate plugins.
2. Will I need any coding knowledge to add AI tools to my WordPress site?
Not at all. When using a plugin like AI Engine, the entire setup happens through a visual settings panel inside your WordPress dashboard. All you need to do is paste your API key and pick your preferred model from a simple dropdown menu.
3. Does using the ChatGPT API in WordPress come with a cost?
Yes, the ChatGPT API is a paid service for regular production use. While OpenAI does offer a small amount of free credits when you first sign up, any usage beyond that is charged based on the number of tokens processed. Adding a payment method and setting a usage limit in your OpenAI account is recommended before going live.
4. Among the three AI models, which one works best for writing WordPress blog content?
Claude by Anthropic tends to deliver the best results for long-form blog writing because it handles detailed instructions well and maintains a consistent, natural tone throughout. ChatGPT works better for quick content formats such as meta descriptions, social media captions, and chatbot reply scripts.
5. Could adding AI integrations affect the loading speed of my WordPress site?
It can if AI features are placed on the front end of your site. Since every AI response involves a live call to an external API server, running these features for every visitor can create delays. The best approach is to keep AI tools limited to the WordPress admin area and avoid triggering them dynamically on public-facing pages.
