Table of Contents
Running a WooCommerce store becomes more challenging as your product catalog grows in size and complexity. Adding products manually one by one can take a significant amount of time and effort. Small mistakes in pricing, stock quantity, or SKU can create serious inventory and sales issues. Managing bulk updates without a proper system can also lead to inconsistencies. That is why learning how to import products using a CSV file is extremely important for store owners and developers.
WooCommerce provides a built-in CSV product import feature that allows you to upload multiple products at once. Instead of entering every product detail manually, you can prepare all information inside a structured spreadsheet. This file can include product names, prices, stock details, categories, images, and attributes. Once uploaded, WooCommerce reads the file and maps the data to the correct fields. This method significantly reduces manual workload and improves overall efficiency.
This guide will help you understand how the WooCommerce CSV template works in detail. You will learn about required columns, optional fields, and correct formatting rules. It also explains how to handle simple and variable products during import. Additionally, you will see common errors and how to avoid them effectively. By the end, you will be able to manage bulk product uploads confidently and accurately.
Understanding the WooCommerce CSV Template Structure
The WooCommerce CSV template is organized in a structured format where each column represents a specific product field. WooCommerce reads the column headers to determine where each value should be mapped during import. If the headers are accurate and properly formatted, the import process runs smoothly. However, incorrect naming or missing fields can cause mapping errors or skipped products. Understanding this structure is essential before preparing your CSV file.
Each row in the CSV represents either a single product or a variation of a product. The template supports simple, variable, grouped, and external product types. Required columns handle essential product data, while optional columns allow advanced customization. Proper alignment between column names and WooCommerce fields ensures correct product creation. A clear understanding of this structure reduces the risk of import failures.
Core Required Columns
Core required columns include Product Name, Type, SKU, Regular Price, Stock Quantity, and Stock Status. These fields define the basic identity and selling details of the product. Without a product name and type, WooCommerce cannot properly create the product. SKU acts as a unique identifier and is especially important when updating existing products. Ensuring these core fields are correctly filled is the first step in successful CSV import.
Pricing and Tax Columns
Pricing columns include Regular Price and Sale Price, which define how the product is sold. You can also include Tax Status and Tax Class to manage taxation rules. If tax details are not specified, WooCommerce applies default store tax settings. Including tax information in the CSV helps maintain pricing accuracy. Proper formatting of numeric values ensures prices are imported correctly.
Inventory Management Columns
Inventory columns control stock tracking and availability. These include Manage Stock, Stock Quantity, Stock Status, and Backorders. If stock management is enabled, WooCommerce automatically updates inventory levels after each sale. Backorder settings determine whether customers can purchase out-of-stock products. Accurate inventory fields prevent overselling or incorrect stock display.
Product Description Fields
The CSV template allows you to include both full product descriptions and short descriptions. The full description appears in the main product content area. The short description is typically displayed near the product price. Adding structured descriptions ensures consistency across all products. Proper text formatting also improves the overall presentation of your store.
Category & Tag Formatting
Categories must follow the correct structure for proper assignment. If using subcategories, they should be written in a Parent > Child format. Multiple categories or tags should be separated correctly within the cell. Incorrect formatting may create duplicate or unwanted categories. Proper organization helps customers navigate your store easily.
Product Image Formatting
Images must be added using direct and publicly accessible URLs. Multiple images can be included by separating URLs correctly in the same column. WooCommerce downloads these images during the import process. If the URL is broken or restricted, the image will not import. Verifying image links before upload prevents display issues.
Attribute & Variation Columns
Attributes are essential for creating variable products. You must define attribute names, values, and indicate whether they are used for variations. Parent products define the attributes, while variation rows contain pricing, SKU, and stock details. The attribute values must match exactly between parent and variation rows. Proper structuring ensures variations link correctly and function as expected.

WP Ultimate CSV Importer Pro
Get Ultimate CSV/XML Importer to import data on WordPress faster, quicker and safer.
WooCommerce Default CSV Format Explained with Example
WooCommerce provides a default CSV format that serves as a standard template for importing products. When you export products from your store, the downloaded file includes predefined column headers that match WooCommerce fields exactly. These columns may include ID, Type, Name, SKU, Regular Price, Sale Price, Stock, Categories, and Images. Each column represents a specific product attribute, and every row represents a single product or variation. Understanding this structure helps you prepare your CSV file correctly and avoid mapping errors during import.
For example, the “Type” column defines whether a product is simple or variable, while the “Name” column stores the product title. Pricing columns control how the product is displayed and sold, and the “Categories” column assigns the product to the correct group using proper formatting. The “Images” column contains direct image URLs that WooCommerce downloads during import. If you are working with variable products, parent and variation rows must be structured properly. Reviewing the default export file before creating your own template ensures better accuracy and fewer import issues.
How to Download the WooCommerce CSV Template
WooCommerce allows you to obtain a properly structured CSV template in multiple ways. Using the correct template ensures that your column headers match WooCommerce’s required format. Instead of guessing field names, it is always safer to download a sample file directly from your store. This reduces the chances of formatting errors during import. Understanding these methods helps you prepare your CSV file accurately.
Export Existing Products as a Template
One of the easiest ways to get a correct CSV template is by exporting existing products from your store. Go to WooCommerce → Products → Export and download the product CSV file. If you need advanced field mapping, custom meta support, or bulk update flexibility, you can also use WP Ultimate CSV Importer Pro for more powerful WooCommerce product import options. This exported file contains all standard column headers used by WooCommerce. You can edit this file by removing old product data and adding new products. Using this method ensures perfect compatibility with the import system.
Create Custom CSV Template in Excel or Google Sheets
You can also create your own CSV template manually using Excel or Google Sheets. In this case, you must ensure that the column names exactly match WooCommerce’s field names. After entering all product data, save the file in CSV UTF-8 format to avoid encoding issues. Double-check formatting for categories, images, and attributes before uploading. A properly structured custom template works just as effectively as a downloaded one.
Preparing Your CSV File Before Import
Before importing your CSV file into WooCommerce, it is important to review and validate all product data carefully. Make sure required fields like product name, SKU, type, and price are filled correctly. Check for spelling mistakes, duplicate SKUs, or missing values that could cause import errors. Even small formatting issues can lead to skipped products during the process. Proper preparation ensures a smooth and error-free import experience.
You should also confirm that the file is saved in CSV UTF-8 format to avoid encoding problems. Remove unnecessary spaces, hidden characters, or special symbols that may affect data reading. Verify that image URLs are publicly accessible and categories follow the correct structure. If you are importing variable products, ensure parent and variation rows are clearly defined. Testing the file with a small batch of products before full import is always a recommended best practice.
WP Ultimate CSV Importer Pro
Get Ultimate CSV/XML Importer to import data on WordPress faster, quicker and safer.
Step-by-Step Guide to Import Products in WooCommerce
Importing products into WooCommerce using a CSV file is a straightforward process when your file is properly prepared. WooCommerce provides a default import tool, but for advanced import, custom fields, bulk updates, and better duplicate handling, plugins like WP Ultimate CSV Importer Pro offer more flexibility and control. The system guides you through upload, mapping, and confirmation stages. Each step ensures that your product data is assigned to the correct fields. Carefully reviewing each stage helps prevent duplication or missing data. Below is the complete step-by-step workflow.
Step 1 – Prepare Your CSV File
Before starting the import process, ensure your CSV file is properly structured. Each column should represent a specific WooCommerce product field such as Product Name, SKU, Price, Categories, Images, and Stock. Make sure the data is clean and formatted correctly. Save the file in CSV UTF-8 format to avoid encoding issues. Proper preparation reduces errors during import.
Step 2 – Upload Your CSV File
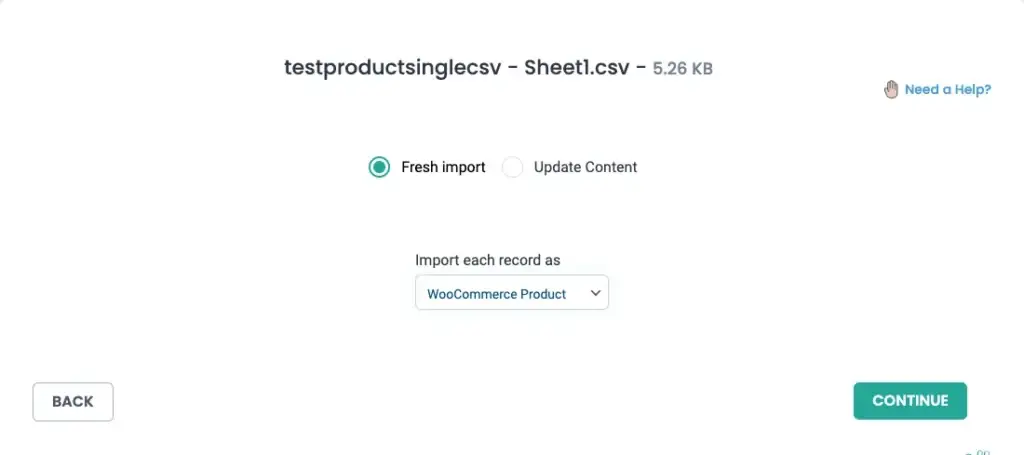
Login to your WordPress dashboard and navigate to WP Ultimate CSV Importer Pro → Import/Update. Click on Browse and select your prepared CSV file. Choose the import type such as Fresh Import for new products or Update Content for existing ones. Select the post type as WooCommerce Products. Then proceed to the next step.
Step 3 – Map Your Fields
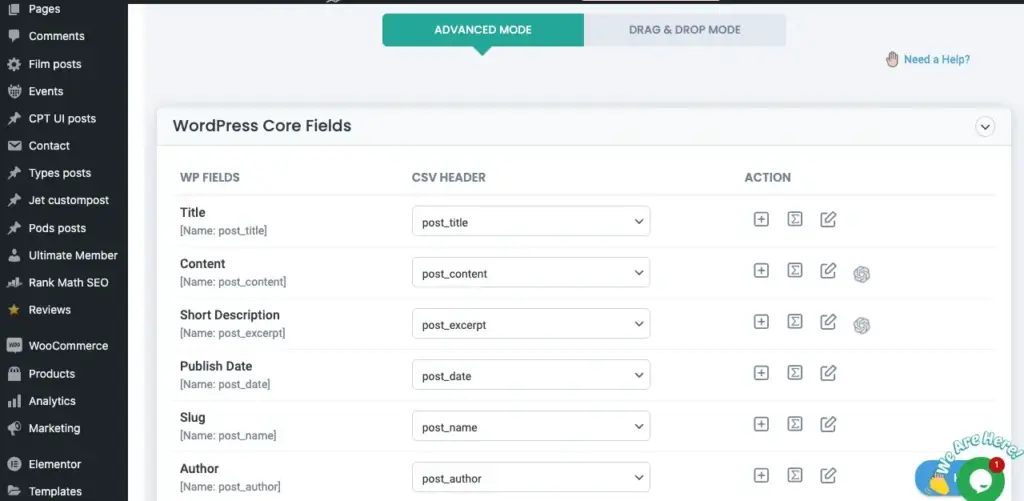
After uploading the file, the mapping screen will appear. Here, match the CSV columns with the corresponding WooCommerce product fields. You can use Advanced mode or Drag-and-Drop method for mapping. Ensure fields like Product Name, SKU, and Price are mapped correctly. Save the mapping template for future imports and click Continue.
Step 4 – Configure Import Settings
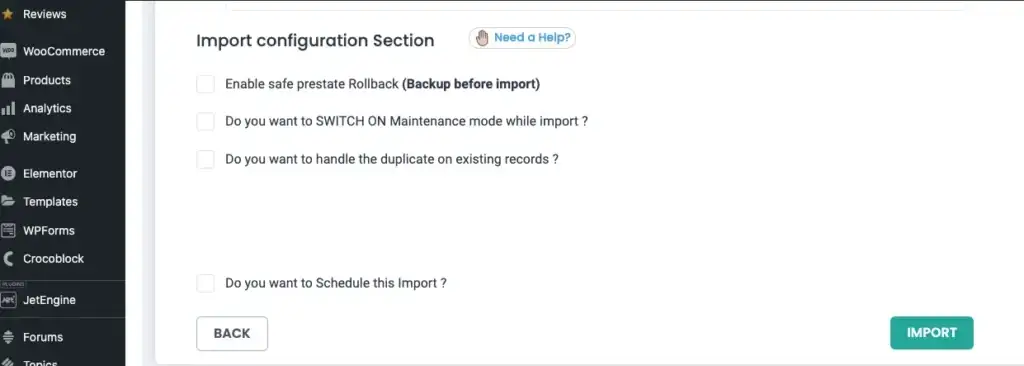
In this step, configure media handling and import options. You can manage duplicate handling, enable rollback backup, or activate maintenance mode during import. These settings help ensure a safe and controlled import process. Review all configurations carefully before proceeding. Proper settings prevent unwanted data overwrites.
Step 5 – Run the Import and Verify
Click on Import Now to start the process. Monitor the progress bar until the import completes successfully. After completion, review the import summary to check processed, imported, and failed records. Finally, navigate to WooCommerce Products to verify that products are imported correctly. This confirms successful execution of the CSV import.
WP Ultimate CSV Importer Pro
Get Ultimate CSV/XML Importer to import data on WordPress faster, quicker and safer.
Importing Variable Products via CSV (Detailed Structure)
Importing variable products through CSV requires a properly organized structure because both parent and variation data must be clearly defined. Unlike simple products, variable products contain multiple variations such as size, color, or style. Each variation has its own price, SKU, and stock quantity. WooCommerce depends heavily on correct attribute linking between parent and variation rows. If the structure is not accurate, variations may not connect properly after import.
Parent Product Row Setup
The parent product row represents the main variable product and must be clearly defined in the import file. In the “Product Type” column, the value should be set as 4 to indicate that it is a parent variable product. This row should include the product name, description, categories, and all attribute definitions, but it should not contain individual variation prices or stock quantities.
Attributes must be defined in separate columns such as Product Attribute 1, Product Value 1, and Visibility fields. For example, Attribute Name 1 can be “Color” and its values can be “Red, Blue, Green,” with visibility set as “1” to enable it. The parent SKU must also be defined because it will be used to link all variation rows. A properly configured parent row acts as the container that groups all variations under one variable product listing.
Variation Rows Configuration
Each variation must be added as a separate row in the same CSV file. In the “Product Type” column, the value should be set as 8 to indicate that the row represents a variation. Every variation row must include a unique SKU, price, and stock quantity along with the appropriate attribute values defined in separate attribute columns For variations, specify the attribute values in the Product Value column corresponding to the defined Product Attribute
Each variation row must reference the parent product using the Parent SKU field to establish the correct relationship. The attribute values in variation rows must exactly match the attribute names and values defined in the parent row. Even small mismatches in spelling or formatting can prevent variations from linking correctly. Proper variation configuration ensures that each option displays accurately with its own pricing and stock information on the product page. To better understand the structure, you can download the reference sample CSV file
Attribute Linking and Pricing Setup
Attributes must be clearly defined in the parent product row before adding variation rows. The attribute column should indicate whether the attribute is global or custom and whether it is used for variations. WooCommerce uses these attribute definitions to generate variation options on the product page. Without proper attribute setup, variations will not display correctly.
Pricing and stock information should be added only in the variation rows, not in the parent row. Each variation can have different prices, sale prices, and stock quantities. This allows customers to select different options with accurate pricing displayed dynamically. Careful alignment between attribute names and pricing fields ensures a smooth variation import process.
Updating Existing Products Using CSV
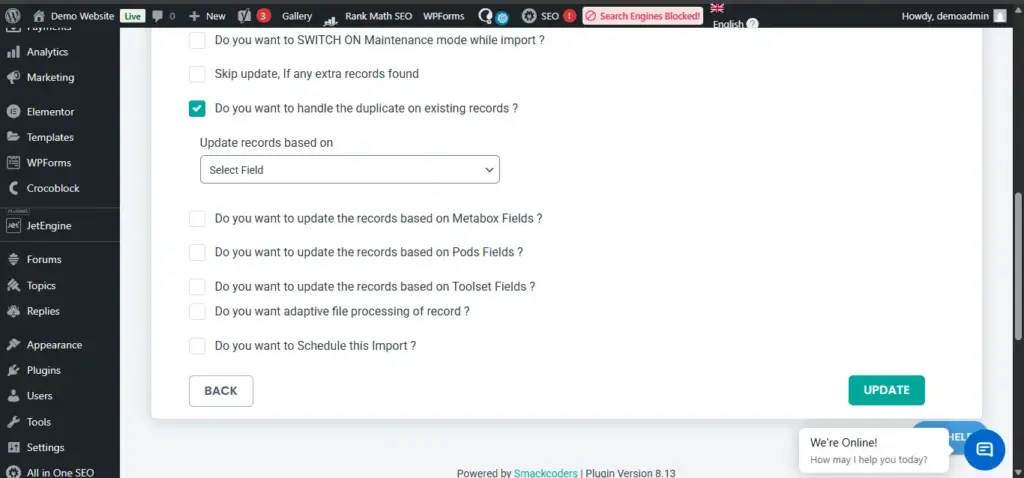
To update existing products using CSV in WP Ultimate CSV Importer Pro, first upload your file in the Import/Update section and select the “Update Content” option instead of Fresh Import. Then choose the post type as “WooCommerce Products” to ensure the importer targets product records. After proceeding to the Import Configuration section, enable the duplicate handling option and select a unique identifier such as ID or SKU from the dropdown. This allows the plugin to match existing products correctly and update them instead of creating duplicates.
Common WooCommerce CSV Import Errors & Solutions
While importing products using a CSV file is efficient, errors can occur if the file is not properly formatted. Most problems are related to incorrect data structure, missing values, or formatting mismatches. Even a small mistake in one column can affect multiple products during import. Understanding common errors helps you troubleshoot quickly and avoid repeated failures. Below are the most frequent issues and their practical solutions.
Invalid or Missing SKU
SKU is a unique identifier used by WooCommerce to recognize each product. If the SKU is missing, duplicated, or incorrectly formatted, the system may skip the product during import. This issue becomes more serious when you are trying to update existing products. Without a matching SKU, WooCommerce cannot identify which product to modify.
To fix this, ensure every product has a unique SKU with no duplicates. Avoid unnecessary spaces or special characters that may cause conflicts. When updating products, double-check that the SKU in the CSV matches exactly with the one in your store. Proper SKU management ensures smooth imports and updates.
Incorrect Attribute Format
Attribute errors usually occur when importing variable products. If attribute names or values do not match exactly between parent and variation rows, WooCommerce will fail to link the variations correctly. Even small spelling differences or extra spaces can break the connection. This results in missing or improperly displayed variations.
To avoid this problem, maintain consistent attribute naming throughout the CSV file. Ensure attributes are marked correctly as “used for variations” in the parent row. Always review a sample exported CSV to confirm the correct format. Consistency is the key to proper variation linking.
Image Not Importing
Images may not import if the URL provided in the CSV file is incorrect or restricted. WooCommerce requires direct and publicly accessible image URLs to download them successfully. If the link requires login access or leads to a broken page, the image will fail to load. This can leave your product listings without visuals.
To resolve this issue, test each image URL in a browser before importing. Ensure that the link opens directly without redirection or authentication. Separate multiple image URLs correctly within the same cell if needed. Verifying images beforehand prevents display issues after import.
Category Structure Errors
Incorrect category formatting can lead to duplicate or wrongly structured categories. If the hierarchy is not written properly, WooCommerce may create unexpected category levels. This can affect store navigation and product organization. Cleaning up category errors later can be time-consuming.
To prevent this, use the correct format such as Parent > Child when defining subcategories. Make sure category names are consistent with existing store categories. Avoid spelling variations that create duplicates. Proper structure ensures organized and accurate product grouping.
Encoding Issues
Encoding errors happen when the CSV file is not saved in the correct format. This may cause special characters to appear broken or unreadable after import. It can also interfere with how WooCommerce reads certain fields. Encoding problems are common when copying data from external sources.
Always save your CSV file in UTF-8 format before uploading it. Remove hidden characters or unusual symbols that may affect readability. Reopen and resave the file using a reliable spreadsheet tool if needed. Proper encoding ensures clean and accurate product data import.
WP Ultimate CSV Importer Pro
Get Ultimate CSV/XML Importer to import data on WordPress faster, quicker and safer.
Performance Considerations for Large CSV Imports
When importing a large number of products using a CSV file, performance issues may arise depending on your server capacity. If the file contains hundreds or thousands of products, the import process can take significant time to complete. In some cases, you may experience timeout errors, memory limit issues, or incomplete imports. These problems are usually related to hosting configuration rather than WooCommerce itself. Understanding these limitations helps you prepare properly before running large imports.
To reduce performance risks, it is recommended to split large CSV files into smaller batches instead of importing everything at once. Smaller files place less load on the server and are easier to manage if errors occur. You can also increase PHP memory limit and execution time through hosting settings if needed. Performing imports on a staging site before applying them to a live store is a safe practice. Proper planning ensures stable and successful bulk product imports.
Best Practices for Safe Product Import
Before performing any bulk product import, always take a complete backup of your website and database. This ensures that you can restore your store if something goes wrong during the process. Even small formatting mistakes in a CSV file can affect multiple products at once. Testing the import with a small sample file first is a smart approach. Careful preparation minimizes risks and prevents large-scale errors.
It is also important to review column mapping and formatting before running the final import. Make sure SKUs are unique, categories are structured properly, and image URLs are accessible. Avoid importing unnecessary columns that may overwrite existing data unintentionally. Keep your CSV file clean, organized, and saved in UTF-8 format. Following these best practices ensures a smooth and controlled import process.
Frequently Asked Questions (FAQ):
1. How to import products CSV file in WooCommerce?
To import a products CSV file in WooCommerce, go to your WordPress dashboard and navigate to WooCommerce → Products → Import (or WP Ultimate CSV Importer Pro → Import/Update if using the plugin). Upload your CSV file, map the fields correctly, configure import settings, and click Run Import. After completion, review the import summary and verify the products in your store.
2. How to import products from a CSV file?
First, prepare a properly formatted CSV file with required product fields such as name, SKU, price, stock, categories, and images. Then upload the file through the WooCommerce import tool or CSV importer plugin. Map the CSV columns to the correct product fields and start the import process. Finally, check the results to ensure all products are imported correctly.
3. Trade-offs between speed and correctness for WooCommerce?
There is always a balance between making quick changes and maintaining accuracy. Bulk updates done too fast may cause pricing errors or broken variations. It is safer to deploy one change at a time and test before going live. Using staging or phased rollouts helps reduce risks.
4. Compatibility with headless or multisite?
Compatibility depends on your WooCommerce setup and hosting architecture. In headless or multisite environments, imports must be tested carefully to avoid syncing issues. Always perform imports on a staging clone first. This ensures your configuration works correctly before production deployment.
5. Performance impact?
Large imports can temporarily increase server load and slow down the site. Monitor performance metrics like TTFB and server usage before and after import. Splitting large CSV files into smaller batches improves stability. Regular monitoring helps maintain long-term performance.
6. How to handle duplicate SKUs during bulk CSV import?
If duplicate SKUs exist in your CSV file, WooCommerce may skip products or update the wrong items. Always validate SKU uniqueness before import using spreadsheet filters. When updating products, enable the “update existing products” option carefully. Running a test import with a small batch helps detect SKU conflicts early.
7. Can I schedule automatic WooCommerce CSV product imports?
The default WooCommerce importer does not support scheduled imports. For automation, you need an advanced CSV import plugin with cron-based scheduling support. This is useful when importing supplier feeds daily or weekly. Always test scheduled imports in staging before applying them live.
8. How to safely import 10,000+ products without server timeout?
Large imports can cause PHP memory limit or execution timeout errors. Split the CSV file into smaller batches such as 500–1000 products per upload. You can also increase server memory limits through hosting settings. Performing imports during low-traffic hours reduces server load risks.
9. How to import custom meta fields or plugin-specific product data?
WooCommerce default importer supports standard product fields only. For custom fields added by themes or plugins, you must map meta keys properly. Advanced CSV import plugins allow meta field mapping for extended compatibility. Always verify that custom data appears correctly after import.
10. What happens if the CSV import process is interrupted midway?
If the import stops due to timeout or browser interruption, some products may still be partially created. WooCommerce does not automatically roll back incomplete imports. You must review the import summary and manually remove duplicates if needed. Keeping a backup before bulk import ensures recovery safety.u003cbru003e
Conclusion
WooCommerce CSV product import is a powerful feature that simplifies bulk product management for growing online stores. By understanding the correct template structure and formatting rules, you can avoid common errors and save valuable time. Proper preparation, testing, and validation play a crucial role in successful imports. Whether you are adding new products or updating existing ones, CSV import provides flexibility and efficiency.
With the right approach, managing large product catalogs becomes much easier and more organized. Always follow structured formatting, verify mapping, and monitor the import summary after completion. Taking these steps ensures that your products are uploaded accurately without affecting store performance. Mastering CSV import gives you better control over your WooCommerce store operations.