Table of Contents
Exporting WordPress data to CSV is an essential task for website owners, bloggers, and WooCommerce store managers. Whether you are migrating your website, preparing reports, integrating with third-party tools, or backing up specific content, knowing how to export WordPress data to CSV can save time and reduce errors.
In this complete tutorial, you will learn multiple methods to export WordPress data safely and efficiently. We will cover built-in tools, plugin-based exports, WooCommerce exports, database methods, and advanced WP-CLI options. By the end of this guide, you will know exactly which method suits your needs.
Key Takeaways
- You can export WordPress data using built-in tools, plugins, database access, or WP-CLI.
- CSV format is ideal for reporting, spreadsheets, and external integrations.
- WooCommerce allows direct CSV exports for products and orders.
- Large websites require batch exports to avoid timeout errors.
- Always take a backup before exporting data from a live site.
Method 1 – Export WordPress Data Using the Built-in Export Tool
If you’re looking for a simple way to export WordPress data, the built-in export feature is a good place to start. WordPress comes with a default export tool that allows you to download your content without needing to install any additional plugins.
While this method does not generate a CSV file directly, it helps you export your site data in XML format, which can later be converted to CSV if needed.
Let’s walk through the process step by step.
Step 1: Log in to Your WordPress Dashboard
First, sign in to your WordPress admin panel. You’ll need administrator access to export website data. Once you’re inside the dashboard, you’re ready to proceed.
Step 2: Navigate to Tools → Export
On the left-hand side menu, look for Tools. Hover over it, and then click on Export. This will take you to the WordPress Export screen.
Step 3: Choose What You Want to Export
Here, WordPress gives you a few options:
- All Content
- Posts
- Pages
- Media
- Custom Post Types
If you want to export everything, choose All Content.
If you only need specific data, like blog posts or a page, you can select that particular option. This flexibility makes it easy to export only the data you actually need.
Step 4: Click “Download Export File”
Once you’ve selected the content type, click the Download Export File button.
WordPress will generate an export file and download it to your computer. This file will be in XML format, not CSV.
When Should You Use This Method?
This built-in export method is best for:
- Migrating your website to another WordPress installation
- Creating a backup copy of your content
- Transferring posts and pages between WordPress sites
If you specifically need a structured CSV file, using a plugin-based method is usually more efficient.
Method 2 – Export WordPress Data to CSV Using a WP Ultimate CSV Importer Pro Plugin (Recommended)
If you want a direct and hassle-free way to export WordPress data to CSV, using a plugin is the smartest option. Instead of converting XML files or accessing your database manually, a professional export plugin allows you to generate clean CSV files in just a few clicks.
For this tutorial, we will use WP Ultimate CSV Importer Pro, a powerful plugin that supports exporting WordPress and WooCommerce data in structured CSV format. This method is beginner-friendly, yet advanced enough for developers managing large websites or WooCommerce stores.
Why Use WP Ultimate CSV Importer Pro for CSV Export?
When you need to export WordPress data to CSV, you want more than just a basic file download. You need flexibility, accuracy, and full control over what gets exported. WP Ultimate CSV Importer Pro makes this process simple by allowing you to generate structured CSV files directly from your WordPress dashboard without touching the database or converting XML files.
Direct CSV Download
The plugin lets you export WordPress data directly in CSV format. There’s no need to generate an XML file and convert it separately. You get a clean, ready-to-use CSV file that works perfectly with Excel, Google Sheets, and other tools.
Custom Field Selection
You can choose exactly which fields to export such as post titles, product SKUs, prices, or user emails. This helps you create a focused and well-structured CSV file without unnecessary columns.
Advanced Filtering
WP Ultimate CSV Importer Pro allows you to filter data before exporting. You can export based on:
- Date range
- Post status
- Categories
- Product type
- User role
This is especially useful for large websites.
WooCommerce Support
The plugin fully supports WooCommerce data, including:
- Products
- Orders
- Customers
- Coupons
This makes it easy to manage eCommerce data from one interface.
Batch Processing for Large Sites
For websites with thousands of records, the plugin supports batch exports. This prevents server overload and ensures smooth data extraction.
Safe and Database-Free Export
There’s no need to access phpMyAdmin or handle raw database tables. Everything can be managed securely inside your WordPress dashboard.
A Smarter CSV Export Solution
If your goal is to export WordPress data to CSV efficiently and safely, WP Ultimate CSV Importer Pro provides a reliable and scalable solution for both beginners and advanced users.
Step-by-Step: How to Export WordPress Data to CSV Using WP Ultimate CSV Importer Pro
Now let’s actually export your WordPress data to CSV using WP Ultimate CSV Importer Pro. Don’t worry the process is simple, and once you do it once, it becomes very easy to repeat.
Let’s go step by step.
Step 1: Install and Activate WP Ultimate CSV Importer Pro
- First, log in to your WordPress dashboard.
- From the left sidebar, click on Plugins → Add New.
- Upload the WP Ultimate CSV Importer Pro plugin file, then click Install Now.
- Once the installation is complete, click Activate.
After activation, you’ll see the plugin menu appear in your dashboard. That’s where you’ll manage all your export options.
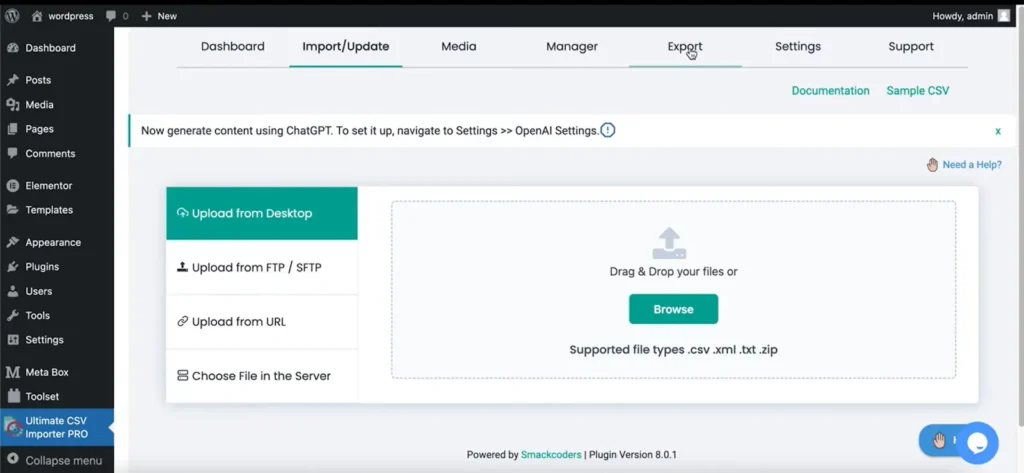
Step 2: Open the Export Section
- Now that the plugin is active, click on the WP Ultimate CSV Importer Pro menu in your dashboard.
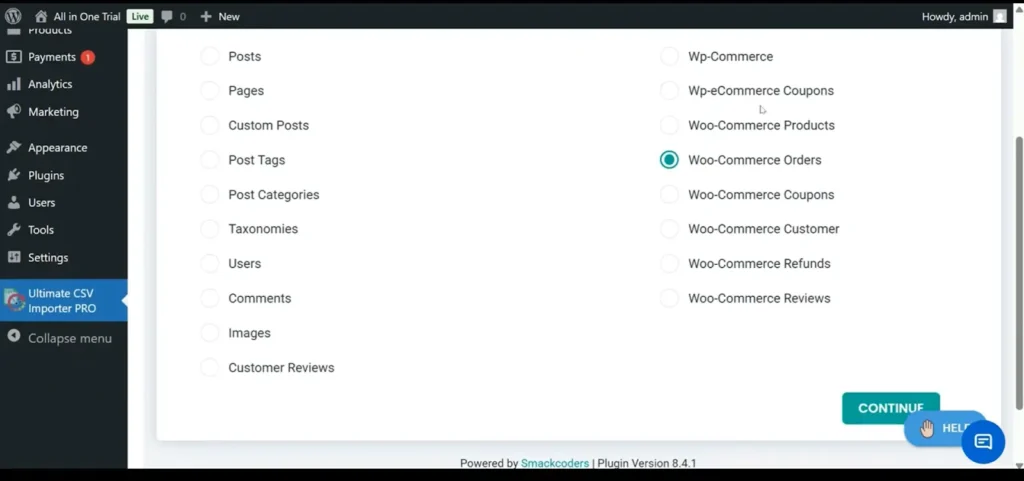
- Inside the plugin, choose the Export option. This is where you decide what type of WordPress data you want to download.
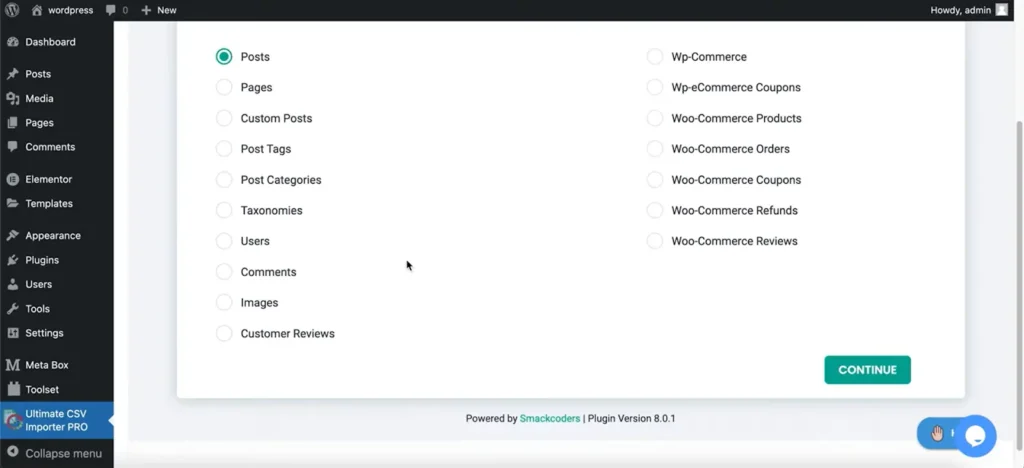
- You’ll see several modules available, such as:
- Posts
- Pages
- Custom Post Types
- Users
- WooCommerce Products
- WooCommerce Orders
- Customers
- Coupons
This flexibility allows you to export only the specific data you need instead of downloading everything at once.
Step 3: Select the Data Type
- Are you migrating blog content? Select Posts.
- Need user details for an email campaign? Choose Users.
- Managing inventory or pricing? Go with WooCommerce Products.
Selecting the right module ensures your CSV file contains structured and relevant data.
Step 4: Choose the Fields You Want to Export
This is where WP Ultimate CSV Importer Pro really stands out.
You don’t have to export every available column. Instead, you can customize your CSV file by selecting only the fields you actually need.
You can:
- Include required fields
- Add custom fields
- Rearrange column order
- Remove unnecessary data
For example, if you’re exporting WooCommerce products, you might include:
- Product Name
- SKU
- Price
- Stock Status
- Category
This helps create a clean, well-organized CSV file that’s easy to work with in Excel or other tools.
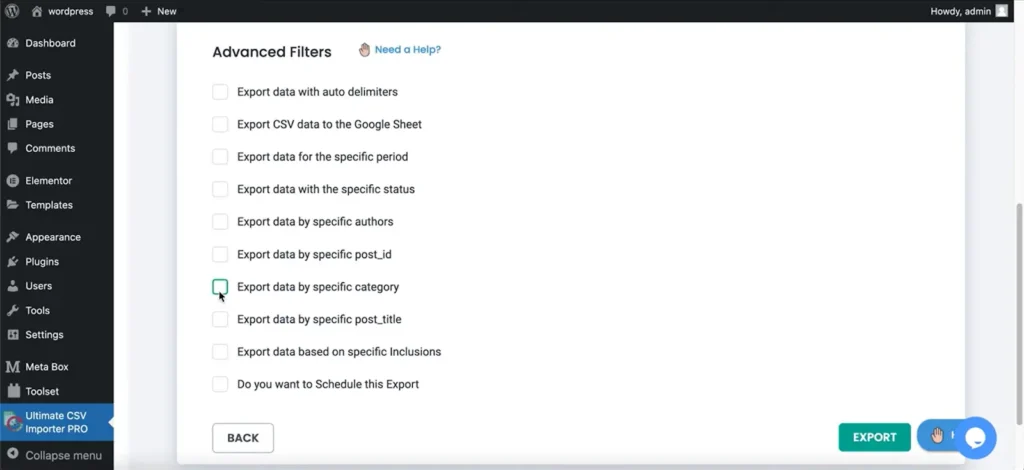
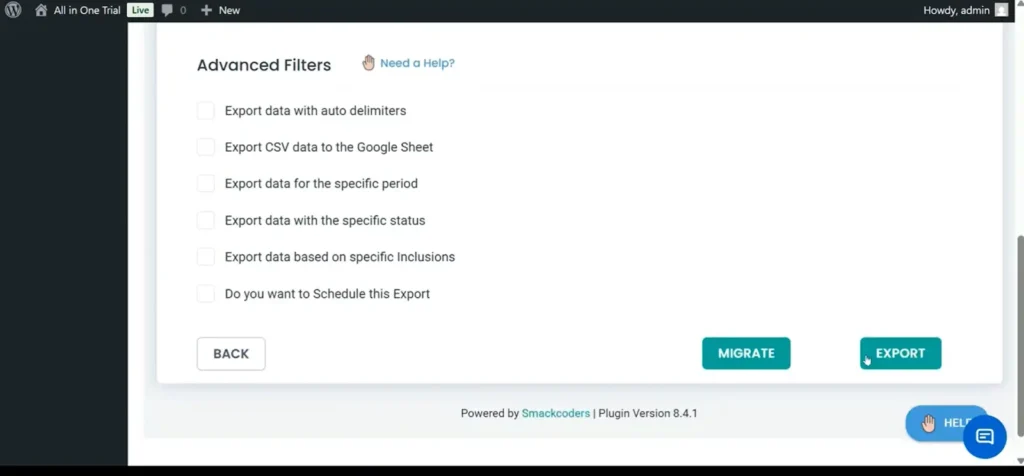
Step 5: Apply Filters (Optional but Very Helpful)
If your website has a lot of data, exporting everything may not be necessary.
WP Ultimate CSV Importer Pro allows you to filter your data before exporting. You can filter based on:
- Date range
- Post status
- Product category
- User role
Filtering ensures you export only relevant records and improves performance during the process.
Step 6: Generate and Download the CSV File
- Once you’ve selected your data type, chosen fields, and applied filters, it’s time to export.
- Click the Export button. The plugin will process your request and generate the CSV file.
- Download the file and open it in Excel or Google Sheets to confirm everything looks correct.
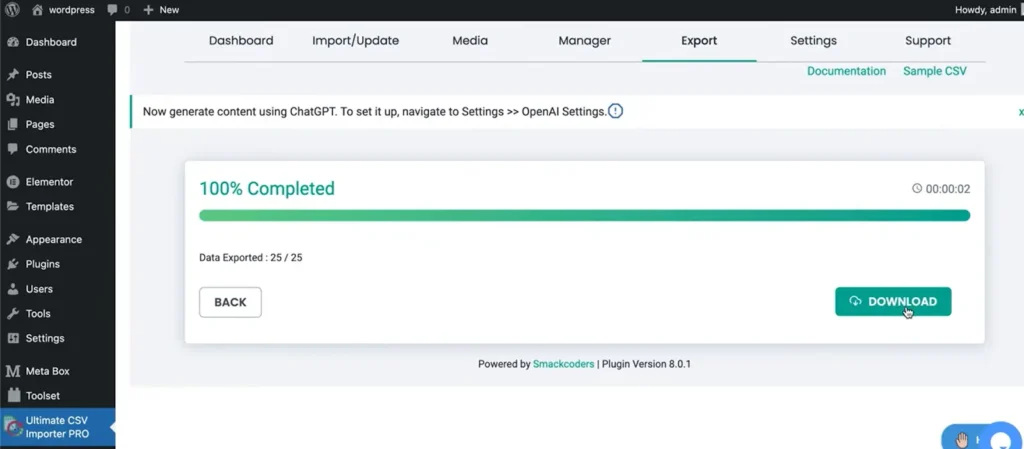
And that’s it, your WordPress data is now successfully exported to CSV.
How to Export WooCommerce Data to CSV Using WP Ultimate CSV Importer Pro
If you run a WooCommerce store, exporting data is often necessary for accounting, reporting, supplier updates, or ERP integrations.
Export WooCommerce Products
To export product data:
- Go to the plugin’s Export section
- Select WooCommerce Products
- Choose the product fields you want (SKU, Price, Stock, Category, etc.)
- Apply filters if needed
- Click Export and download the CSV file
This is perfect for inventory management and bulk product updates.
Export WooCommerce Orders
If you need order reports:
- Choose WooCommerce Orders from the module list
- Select required fields such as Order ID, Customer Name, Total Amount, Status, and Date
- Apply date filters if necessary
- Generate and download the CSV file
This method is especially useful for financial reporting and reconciliation.
Export WooCommerce Customers
To export customer details:
- Select the Customers or Users module
- Choose the relevant customer fields
- Click Export
This is helpful for CRM integration or email marketing campaigns.
Scheduled WooCommerce Exports
One of the most powerful features of WP Ultimate CSV Importer Pro is automation.
Instead of exporting manually every time, you can:
- Schedule recurring exports
- Set automatic CSV generation
- Configure cron-based automation
For large WooCommerce stores with frequent transactions, scheduled exports save time and ensure your data stays updated without manual effort.
Want to Automate It? You Can.
One powerful feature of WP Ultimate CSV Importer Pro is automation. Instead of exporting manually every time, you can:
- Schedule regular exports
- Set automatic CSV generation
- Use cron-based automation
This is a lifesaver if you manage a large WooCommerce store with constant updates.
Method 3 – Export WordPress Data Using phpMyAdmin (Database Method)
For users who are comfortable working at the database level, exporting WordPress data through phpMyAdmin offers complete control. This method allows you to download specific database tables directly in CSV format. However, it requires a technical understanding of how WordPress stores its data.
Below is the step-by-step process.
Step 1: Log in to Your Hosting Control Panel
Start by accessing your web hosting account. This could be cPanel, Plesk, or any custom hosting dashboard provided by your hosting company. You will need administrative access to continue.
Step 2: Open phpMyAdmin
Once inside your hosting control panel, locate and click on phpMyAdmin. This tool allows you to manage and export your website’s database tables.
Step 3: Select Your WordPress Database
After phpMyAdmin opens, you’ll see a list of databases on the left side. Select the database associated with your WordPress installation.
If you’re unsure which one it is, you can confirm the database name inside your wp-config.php file.
Step 4: Choose the Relevant Tables
WordPress stores different types of data in separate database tables. Depending on what you want to export, select the appropriate table.
Common tables include:
- wp_posts – Contains posts, pages, and custom post types
- wp_users – Stores registered user information
- wp_comments – Holds comment data
You can select a single table or multiple tables based on your export requirement.
Step 5: Export the Table in CSV Format
After selecting the required table:
- Click on the Export tab at the top
- Choose the export method (Quick or Custom)
- Select CSV as the output format
- Click Go to download the file
Your selected WordPress data will now be saved as a CSV file on your computer.
Method 4 – Export WordPress Data Using WP-CLI (Advanced Users)
For developers and advanced users who prefer working from the command line, WP-CLI provides a fast and flexible way to export WordPress data. WP-CLI is a command-line interface that lets you manage WordPress directly from your server without using the admin dashboard.
This approach is especially useful for automation, staging environments, and large-scale export operations.
Below is the step-by-step process.
Step 1: Connect to Your Server via SSH
Before using WP-CLI, you need SSH access to your server. Log in to your hosting account using an SSH client and navigate to the root directory where WordPress is installed.
Make sure WP-CLI is installed and properly configured on your server.
Step 2: Run the Export Command
Once you are inside your WordPress installation directory, you can run a command to export specific data.
For example, to export posts, use:
wp export –post_type=post
This command generates an export file containing all posts from your website. You can modify the –post_type parameter to export other content types such as pages or custom post types.
Step 3: Customize the Export (Optional)
WP-CLI allows you to refine your export by adjusting parameters. You can:
- Specify a date range
- Export a particular post type
- Define a filename for the export
- Control the export directory
These options make WP-CLI a powerful tool for developers who need precision and flexibility.
Step 4: Automate the Export Process
One of the biggest advantages of WP-CLI is automation. Developers can combine export commands with server cron jobs to schedule recurring exports.
This is especially helpful for:
- Automated reporting
- Backup workflows
- Staging-to-production synchronization
- Continuous integration pipelines
With automation in place, exports can run in the background without manual intervention.
When Should You Use WP-CLI for WordPress Data Export?
WP-CLI is not the first choice for beginners, but it becomes extremely powerful in the right situations. If you are working in a development-focused environment or managing large-scale WordPress projects, this method can save significant time and effort.
Let’s look at when using WP-CLI for exporting WordPress data makes the most sense.
Ideal for Developers Managing Multiple WordPress Sites
If you handle several WordPress installations, logging into each dashboard to export data manually can be time-consuming. WP-CLI allows you to run export commands directly from the server, making it easier to manage multiple sites efficiently from a single interface.
For developers working with client projects, this approach offers consistency and speed.
Suitable for Large Websites with Frequent Exports
Websites that handle large volumes of content or transactions often require regular data exports. Running export commands via WP-CLI reduces the chances of browser-based timeouts and improves performance when dealing with large datasets.
This makes it a practical solution for high-traffic blogs and WooCommerce stores.
Best for Automated Workflows and Staging Environments
WP-CLI works especially well in automated environments. Developers can integrate export commands into scheduled cron jobs or deployment scripts. This allows data exports to run automatically without manual intervention.
It is also useful in staging environments where developers test data synchronization before pushing changes to a live site.
Recommended for Users Comfortable with Server Access
WP-CLI requires SSH access and a basic understanding of command-line operations. If you are familiar with server management and terminal commands, you will appreciate the control and flexibility it provides.
However, beginners without technical experience may find plugin-based export methods more suitable.
Common Errors When Exporting WordPress Data
While exporting WordPress data to CSV is usually straightforward, certain technical issues can interrupt the process. Understanding these common errors will help you troubleshoot problems quickly and complete your export without frustration.
1. Timeout Errors
One of the most frequent problems during data export is a timeout error. This typically happens when the export process takes longer than the server’s maximum execution time. Large databases or websites with thousands of records are more likely to face this issue.
To resolve this, consider exporting data in smaller batches or increasing the server’s execution time limit through your hosting settings.
2. PHP Memory Limit Issues
If your WordPress site contains a large volume of content or WooCommerce data, you may encounter memory exhaustion errors. This occurs when the export process requires more memory than your server allows.
In such cases, increasing the PHP memory limit in your hosting configuration or the wp-config file can help complete the export successfully.
3. Character Encoding Problems
Sometimes, after downloading the CSV file, you may notice unusual characters or broken text formatting. This is usually caused by incorrect character encoding during export.
To prevent this issue, make sure your CSV file is generated using UTF-8 encoding. This ensures compatibility with spreadsheet tools like Excel and Google Sheets.
4. Permission and Access Issues
If you are unable to export certain data, the problem may be related to user permissions or file access restrictions. Only administrators typically have full export privileges.
Ensure that:
- Your WordPress role has export permissions
- Server file permissions are correctly configured
- No security plugin is blocking export actions
By being aware of these common export issues, you can handle them quickly and ensure a smooth WordPress data export process.
Best Practices for Exporting WordPress Data Safely
Exporting WordPress data to CSV is generally safe, but following a few important precautions can help you avoid unexpected issues. Whether you’re handling blog posts, user information, or WooCommerce data, these best practices ensure your export process remains secure and reliable.
Create a Full Backup Before Exporting
Before starting any export process, always generate a complete backup of your website. This includes both your database and website files. While exporting data does not usually modify content, having a backup gives you peace of mind and a restore point in case anything unexpected happens.
Avoid Exporting During High Traffic Periods
Large export operations can temporarily consume server resources. If your website receives heavy traffic, running exports during peak hours may affect performance.
To minimize disruption, schedule exports during low-traffic periods, such as late at night or early in the morning.
Export Large Datasets in Smaller Segments
If your site contains thousands of posts, users, or WooCommerce records, exporting everything at once may result in timeouts or memory errors.
Breaking the export into smaller batches reduces server load and improves stability. This approach is especially helpful for large eCommerce stores.
Secure Your Exported CSV Files
Exported CSV files often contain sensitive information, including user data or order details. Once downloaded, store these files securely.
Consider:
- Saving them in password-protected folders
- Limiting access to authorized users only
- Deleting files once they are no longer needed
Protecting exported data is just as important as protecting your live website.
Test Exports in a Staging Environment
Whenever possible, test your export process in a staging environment before performing it on your live site. This allows you to verify file structure, formatting, and completeness without impacting real users.
Testing ensures that your CSV file is accurate and ready for its intended purpose.
By following these best practices, you can export WordPress data safely and maintain the integrity of your website and its information.
FAQ – How to Export WordPress Data to CSV: Complete Tutorial
1. What Does Exporting WordPress Data to CSV Mean?
Exporting WordPress data to CSV means downloading your website information in a structured, spreadsheet-friendly format. A CSV (Comma-Separated Values) file organizes data into rows and columns, making it easy to open in Excel, Google Sheets, or import into external tools like CRM, ERP, or analytics platforms. Unlike the default WordPress XML export, CSV files are better suited for reporting and data analysis.
2. What Types of WordPress Data Can Be Exported?
You can export various types of data depending on your needs and the tools used.
Core WordPress Data
This includes:
– Posts
– Pages
– Custom post types
– Categories and tags
– Users
– Comments
These are typically exported for migration, reporting, or backup purposes.
WooCommerce Data
If WooCommerce is installed, you can also export:
– Products
– Orders
– Customers
– Coupons
WooCommerce CSV exports are commonly used for accounting, inventory management, and third-party integrations.
3. How Do I Export WordPress Data to CSV?
You can export WordPress data to CSV using a dedicated export plugin, a database tool like phpMyAdmin, or WP-CLI for advanced users. Plugins are the easiest method because they allow direct CSV downloads without requiring technical knowledge.
4. Can I Export WordPress Posts to CSV?
Yes, WordPress posts can be exported to CSV using a CSV export plugin. Most plugins allow you to choose specific post types and select only the fields you need before generating the file.
5. How Do I Export WooCommerce Products to CSV?
WooCommerce products can be exported directly from the WooCommerce export feature or by using a specialized WordPress export plugin. You can customize which product fields—such as SKU, price, and stock status—are included in the CSV file.
6. Can I Export WordPress Users to CSV?
Yes, user data can be exported using a plugin designed for user exports or by exporting the relevant database table. This is often done for email marketing, CRM integration, or internal reporting.
7. How Do I Export Large WordPress Data Without Timeout Errors?
For large websites, it’s best to export data in smaller batches. You can also increase your PHP memory limit or use WP-CLI for better performance. Using optimized export plugins designed for large datasets can also reduce server strain.
8. Is It Safe to Export WordPress Data from a Live Website?
Yes, exporting data does not typically modify your website. However, it is recommended to create a backup before starting and avoid running heavy exports during peak traffic hours to prevent performance slowdowns.
9. Can I Automate WordPress CSV Exports?
Yes, automation is possible using scheduled export features available in advanced plugins or by setting up cron jobs with WP-CLI. Automated exports are especially useful for WooCommerce stores that require regular reporting.
10. How Do I Export Specific Fields Only?
Most WordPress export plugins allow you to customize the fields included in your CSV file. You can select only the required columns, remove unnecessary data, and rearrange fields to match your reporting or integration need
Conclusion
Exporting WordPress data to CSV is straightforward when you use the right approach for your website’s needs. Whether you prefer a plugin-based method, database export, or WP-CLI for automation, choosing the proper workflow ensures accurate, structured, and secure data handling.
As your site grows, having a reliable export process becomes essential for reporting, migration, integrations, and WooCommerce management. Always follow best practices such as creating backups, exporting in manageable batches, and verifying your CSV files to maintain data integrity.
For businesses seeking a dependable WordPress data export solution, Smackcoders offers tools designed to simplify bulk data management and large-scale operations. If you need assistance or have questions, feel free to contact the team at [email protected] for expert guidance.
