Table of Contents
WordPress Custom Post Type Import with ACF Integration refers to importing structured data into an existing Custom Post Type (CPT) while accurately mapping Advanced Custom Fields (ACF) so that all custom metadata is stored correctly in the WordPress database. This is especially important for websites that manage structured content such as properties, projects, events, directories, or listings where data goes far beyond the default title and content fields.
Instead of manually creating each entry, professional import tools like WP Ultimate CSV Importer allow you to upload CSV, XML, or Excel files and map both WordPress core fields and ACF fields in a single workflow. When implemented properly, this approach ensures clean meta storage, prevents duplication, and enables scalable content management for agencies, developers, and growing businesses.
Key Takeaways
- Your Custom Post Type must be created before starting the import.
- ACF field names must match the CSV column headers.
- Structured imports significantly reduce manual errors.
- Repeater, image, and relationship fields require special formatting.
- Using a reliable importer simplifies large-scale CPT and ACF data management.
Understanding Custom Post Types, ACF, and Data Import
What Is a Custom Post Type in WordPress?
A Custom Post Type (CPT) is a custom content structure in WordPress that goes beyond the default Posts and Pages. It allows you to manage different types of content separately inside the dashboard.
For example, instead of publishing everything as blog posts, you can create CPTs like Projects, Properties, Events, or Listings. Each of these can have its own layout, archive page, and admin menu.
Businesses rely on CPTs to keep content organized, scalable, and structured. When importing data, selecting the correct CPT slug (such as property or project) is essential; the data will not attach to the intended post type.
What Is Advanced Custom Fields (ACF) and How Does It Work?
Advanced Custom Fields (ACF) is a WordPress plugin that allows you to add structured custom fields to posts, pages, and Custom Post Types.
Instead of storing everything inside the main content editor, ACF lets you create fields like text, number, image, date, repeater, and relationship fields. These fields are grouped into Field Groups and assigned to specific post types.
Each ACF field has two important parts:
- Field Label – what you see in the admin
- Field Name – the meta key stored in the database
During import, you must use the Field Name, not the label. WordPress stores ACF values inside the wp_postmeta table using the field name as the meta key. If the key doesn’t match exactly, the data won’t populate.
You can also use ACF’s export feature to review field names before preparing your CSV file.
What Is WP Ultimate CSV Importer and How Does It Simplify Data Import?
WP Ultimate CSV Importer is a structured data import plugin designed to handle bulk uploads into WordPress, including Custom Post Types and ACF fields.
It supports multiple file formats, such as:
- CSV
- XML
- Excel (XLS, XLSX)
The plugin allows you to select your target Custom Post Type, then map both core WordPress fields (title, content, slug, featured image) and ACF custom fields using their exact meta keys. This makes it suitable for structured imports where accuracy matters.
For developers comparing tools, options like WP All Import are often considered. However, advanced ACF mapping typically requires the WP All Import ACF add-on. The free version has limitations for complex field types such as repeaters and flexible content.
In most real-world CPT and ACF scenarios, using a dedicated importer that directly supports ACF mapping reduces setup complexity and prevents serialization issues.
Requirements Before You Start
Before performing a WordPress Custom Post Type Import with ACF Integration, make sure the following conditions are met:
- The Custom Post Type already exists in WordPress. The importer will not automatically create a new CPT, so confirm that the correct slug is registered and visible in the dashboard.
- All ACF field groups are created and assigned to the correct Custom Post Type. The fields should be active and visible when editing that post type.
- The ACF field names (meta keys) are finalized. Your CSV column headers must match the exact field name – not the label. Even small spelling differences will cause mapping issues.
- A unique identifier strategy is decided (post slug, ID, or a custom unique field like listing_code) to prevent duplicate entries and enable future updates.
- A full database backup is taken before running the import, since bulk operations modify wp_posts and wp_postmeta.
- Server limits such as PHP memory and execution time are sufficient to handle large imports without timeout errors.
Preparing File for ACF CPT Import
Your CSV file must be clean and properly structured before running a WordPress Custom Post Type Import with ACF Integration. The first row should contain column headers, and each row should represent one post.
ACF column headers must match the exact field name (meta key) – not the field label. Even small spelling differences will break mapping. Include core fields such as post_title, post_content, and post_slug as needed.
Use full image URLs for image fields, valid post IDs or slugs for relationship fields, and consistent indexing for repeater fields. Save the file as UTF-8 CSV and remove blank rows or extra spaces to avoid import errors.
Step-by-Step Guide: Importing ACF CPT Using WP Ultimate CSV Importer
Installing and Activating the Plugin
To start the WordPress Custom Post Type Import with ACF Integration process, you need to install WP Ultimate CSV Importer from the official Smackcoders website. Visit the Smackcoders page and click on My Account. Log in using your registered credentials, then download the WP Ultimate CSV Importer plugin file in ZIP format.
After downloading the file, log in to your WordPress dashboard and open the Plugins section. Select Add New, then click Upload Plugin, and choose the ZIP file you downloaded to begin the upload.
Once the installation completes, click Activate. After activation, the importer module will appear in your WordPress admin area, and you’ll be ready to upload your import file.
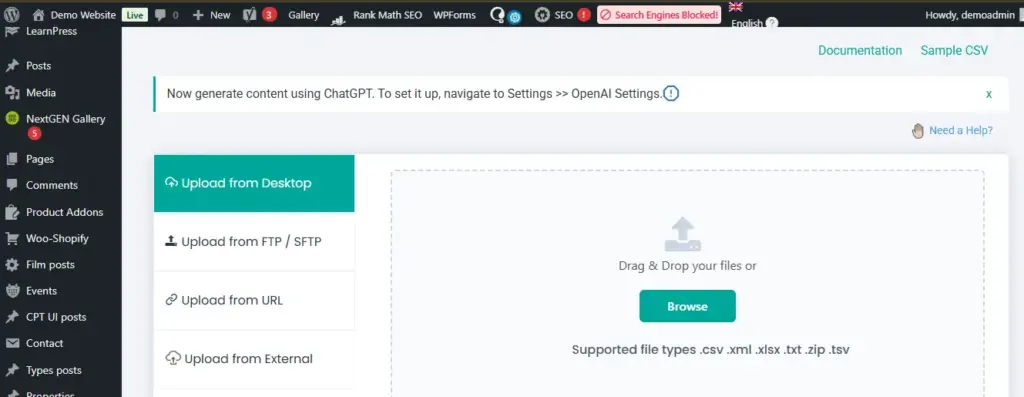
Uploading the CSV / XML / Excel File
Once the plugin is activated, open the importer inside your WordPress dashboard and start a new import. You’ll be prompted to upload your prepared file.
The plugin supports CSV, XML, and Excel formats such as XLS and XLSX. Select your file and upload it. After uploading, the system will automatically parse the file and display all detected columns.
Take a moment to verify that every column header appears correctly. If something is missing or misaligned, it usually indicates a formatting issue in the file that should be corrected before moving forward.
Selecting the Target Custom Post Type
After uploading your file, the next step is to select the correct Custom Post Type for the import. Make sure you choose the exact CPT slug that matches the one you created earlier, like property, project, or event.
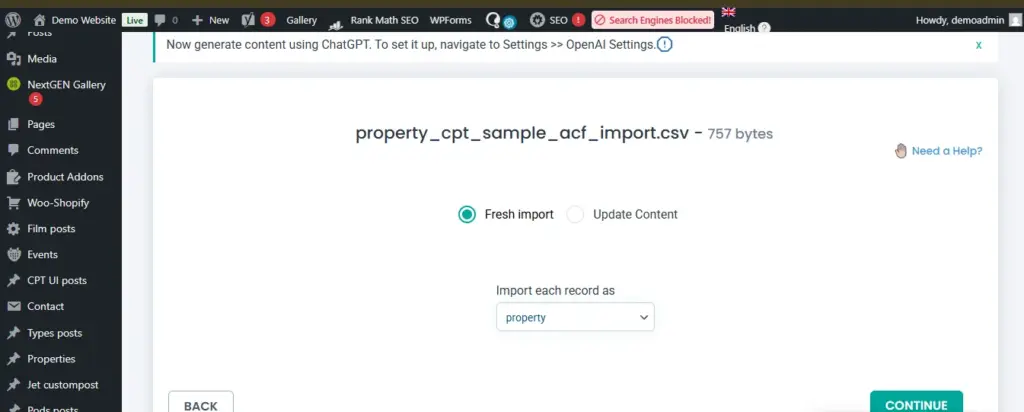
Selecting the wrong post type will cause the imported data to attach incorrectly or fail. Take a moment to double-check the slug before proceeding, as this is critical for mapping both WordPress core fields and ACF fields properly.
Mapping WordPress Core Fields
Once the target Custom Post Type is selected, you need to map the WordPress core fields. These are the standard fields every post uses, such as the title, content, excerpt, slug, and featured image.
For each field, select the corresponding column from your CSV, XML, or Excel file. For example, map the column containing post titles to post_title, the main content to post_content, and so on. Correct mapping ensures that the basic structure of each post is created accurately before importing ACF fields.
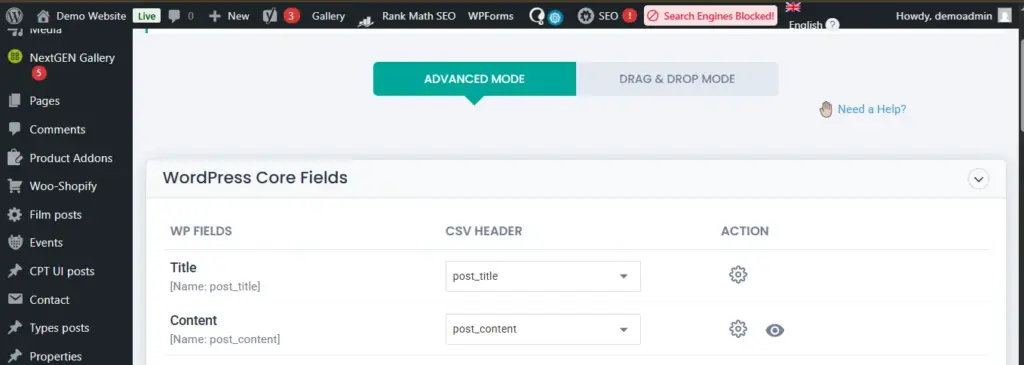
After mapping the core fields, your posts will have all the necessary WordPress data in place.
Mapping ACF Fields (Text, Image, Repeater, Relationship)
After mapping the core fields, move to the custom fields section to map your ACF fields. This is where precision matters most. Each CSV column must be mapped to the exact ACF field name (meta key) that you configured earlier.
For text and number fields, simply match the correct column to the corresponding field name. For image fields, ensure the column contains full image URLs so the importer can fetch and attach them properly.
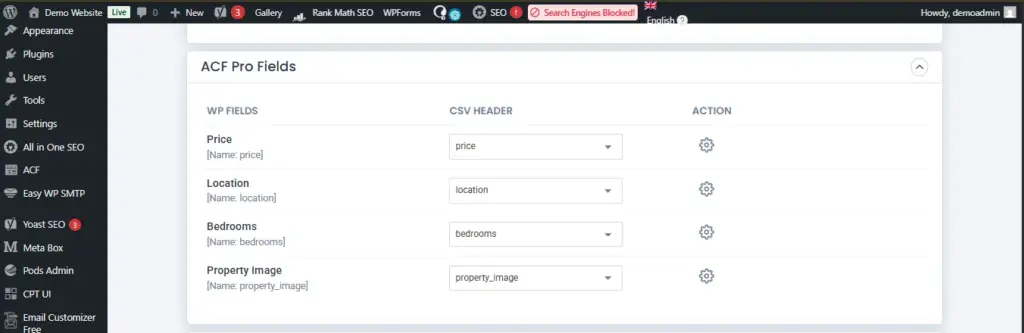
For relationship fields, use the related post ID or slug. Those related posts must already exist in WordPress before running the import. For repeater fields, maintain consistent indexed formatting in your file so the importer can store the structured data correctly.
Always double-check spelling when mapping ACF fields. Even a small mismatch in the field name will result in empty values after import.
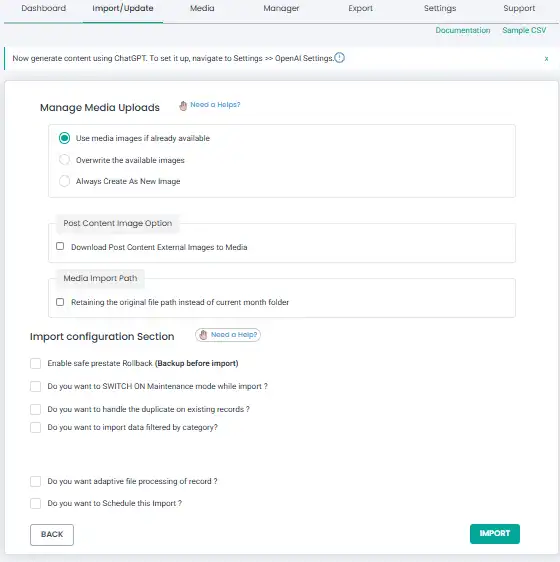
Configuring Advanced Import Settings
Before running the import, review the advanced settings carefully. This step controls how WordPress handles duplicates, updates, and empty values.
First, choose how duplicates should be managed. You can either skip existing posts or update them. To make this work properly, select a unique identifier such as post slug, post ID, or a custom unique field like listing_code.
If you are updating existing posts, ensure the identifier matches exactly with the records already in the database. This prevents duplicate entries and cleans your data.
You can also enable options like skipping empty values, so existing data is not overwritten with blank fields. Taking a few extra minutes in this step can save significant cleanup work later.
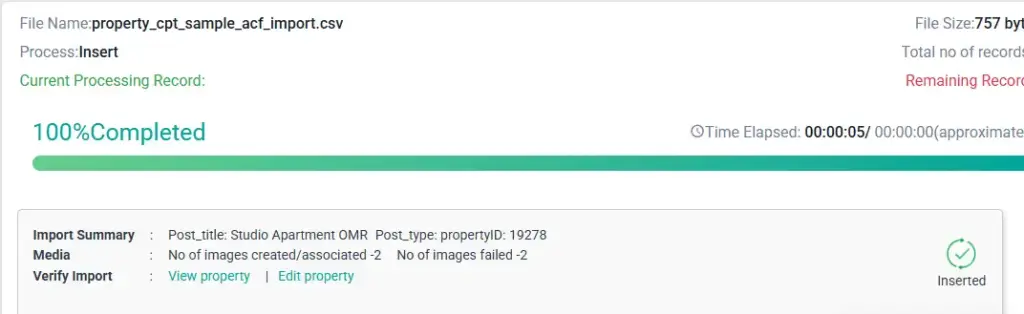
Running the Import and Validating Results
Once everything is mapped and configured, you can proceed with running the import. Before starting a full import, it’s recommended to run a small test batch if the option is available. This helps confirm that fields are mapping correctly.
After the import completes, review the summary screen. It will show how many records were created, updated, skipped, or failed. If there are errors, check the logs to identify issues such as missing images, incorrect field names, or duplicate identifiers.
Finally, manually open a few imported posts in the dashboard and verify that both core fields and ACF fields are populated correctly. For large files, consider importing in smaller batches to avoid server timeout issues.
Handling Advanced ACF Field Types
When performing a WordPress Custom Post Type Import with ACF Integration, basic text and number fields are straightforward. However, advanced field types require careful formatting to ensure proper storage in wp_postmeta.
Repeater Fields must follow a consistent indexed structure in your file. Each row should clearly define subfields using a predictable pattern so the importer can serialize the data correctly. If indexing is inconsistent, the repeater layout may break.
Flexible Content Fields are more complex because they store layout structures along with subfields. Each layout must be clearly defined in the import file. This type of field requires strict structure alignment; WordPress may save incomplete layout data.
Gallery Fields typically require multiple image URLs separated by a delimiter such as a comma. All URLs must be publicly accessible so the importer can download and attach them.
Relationship Fields require existing post IDs or slugs. The related posts must already be available in the database before running the import. Importing relationships before the parent content exists will result in empty references.
In edge cases where serialized data becomes corrupted, re-check field names, indexing format, and delimiter consistency. Most advanced field errors come from minor structural mismatches in the file.
How to Schedule the Imports
Scheduling imports is useful when your data changes regularly, and you want WordPress to update automatically without manual uploads. This is common for property listings, directories, inventory feeds, or partner data integrations. Instead of repeating the import process each time, automation ensures new records are added, and existing ones are updated consistently.
To schedule the import, first upload and configure your file as usual, including field mapping and duplicate handling. Then enable the scheduling option inside the importer and define how often the import should run, such as daily or weekly. If required, set up a server cron job that triggers the import URL at specific intervals.
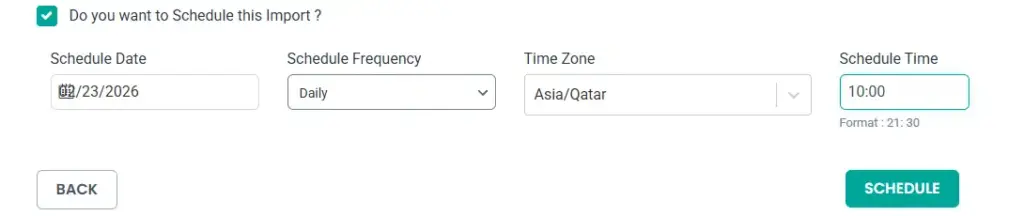
Always configure a unique identifier like a post slug or a custom field, so the system updates existing posts instead of creating duplicates. Before activating automation on a live website, test the schedule with a small dataset to confirm everything updates correctly.
Applying Conditional Filters During Import
Conditional filters allow you to control which records should be imported and which should be skipped. This is especially useful when your CSV contains mixed data, but you only want specific entries to be published in your Custom Post Type.
You can configure conditions during the import setup by defining rules based on column values. For example, you may choose to import only rows where the status column equals “publish” or where a price field is greater than a specific value. This ensures only relevant records are processed.

Conditional filters are also helpful for controlling post status. You can automatically set posts as drafts or published depending on a field value. This gives you better control over what goes live on your site.
In real-world scenarios, filters are commonly used to import only active listings, approved submissions, or products that are in stock. Proper filtering reduces cleanup work and keeps your CPT data clean and structured.
Performance Tips for Large Imports
When handling large datasets in a WordPress Custom Post Type Import with ACF Integration, performance optimization becomes critical. Importing thousands of records in one go can strain your server and cause timeouts.
Start by splitting very large CSV files into smaller batches. Importing 500–1000 records at a time is safer than processing everything in a single run. This reduces memory spikes and execution time errors.
Increase your PHP memory limit and max execution time if your hosting environment allows it. A minimum of 256 MB of memory is generally recommended for structured imports with ACF fields, especially when handling images or repeater data.
If you are managing version-controlled data workflows, some developers maintain CSV files in Git-based repositories and deploy structured updates through automated processes. This is often discussed in contexts like “WordPress custom post type import with ACF integration GitHub” workflows, where staging and production sync must remain consistent.
Finally, always test large imports in a staging environment first. This helps identify serialization issues, image download failures, or relationship mismatches before affecting live data.
How to Update Custom Post Type Data ACF Fields
Updating existing posts is a critical part of a WordPress Custom Post Type Import with ACF Integration workflow. Instead of creating duplicate entries every time you import, you should configure the system to match and update existing records.
The first step is selecting a reliable, unique identifier. This can be the post slug, post ID, or a custom field such as listing_code. During the import configuration, choose the option to update existing posts based on this identifier.
When updating, you can either overwrite all mapped fields or update only specific ACF fields. If you want to preserve certain values, enable the option to skip empty values so existing data is not replaced with blanks.
To prevent duplicates, ensure that your unique identifier column contains consistent and unique values across all rows. If the identifier changes between imports, WordPress will treat the row as a new post.
For incremental updates, maintain a clean master CSV file and only modify changed records. This keeps your CPT structured, reduces unnecessary updates, and ensures long-term data stability.
How to Export Custom Post Types with ACF Fields
WP Ultimate CSV Importer also allows you to export Custom Post Type data along with ACF fields in a structured format. This is useful for backups, migrations, client delivery, or updating records externally.
To export data, open the exporter module inside your WordPress dashboard. Select the Custom Post Type you want to export, such as property, project, or any registered CPT. The plugin will display available core fields and associated ACF fields.
You can choose which fields to include in the export file. This typically includes the post title, content, slug, featured image, and all mapped ACF meta fields. Once selected, generate the export file and download it in CSV, XML, or Excel format.
The exported file will contain properly structured ACF meta values, including repeaters and relationship fields, formatted in a way that can be re-imported later without serialization issues. This makes it reliable for structured data management and large-scale content updates.
Limitations of WP Ultimate CSV Importer and Practical Alternatives
| Situation | Why It Happens | How to Fix It Using the Plugin |
| Import stops midway | Server memory or execution time is low | Increase the PHP memory limit and split large files into smaller batches |
| The flexible content layout is not structured properly | Column structure or indexing is inconsistent | Ensure repeater columns follow proper indexed format and match ACF field names exactly |
| The flexible content layout is not structured properly | Layout names or subfields are mismatched | Carefully verify layout structure and field mapping before running a full import |
| Relationship fields are empty | Related posts were not imported first | Import related CPT records first, then run the main import |
| Duplicate posts are created | Unique identifier not configured | Use slug, ID, or a custom unique field to update existing posts instead of creating new ones |
| Scheduled import not updating records | Incorrect update configuration | Enable the update option and define the correct unique identifier |
Frequently Asked Questions (FAQ)
1. Can I import Custom Post Types with Advanced Custom Fields together?
Yes. You can import Custom Post Types along with their Advanced Custom Fields in a single process, as long as your field names and meta keys are correctly structured in the import file.
2. How do I update existing Custom Post Type records instead of creating duplicates?
You can use a unique identifier such as a post ID, slug, or a custom field. Enable the update option and map the unique field properly to ensure existing records are updated.
3. Can I import repeater and relationship fields?
Yes. Repeater fields require a properly indexed column structure, and relationship fields require that related posts are already available on the site before import.
4. Is it possible to schedule imports automatically?
Yes. You can configure scheduled imports to run at specific intervals, which is useful for regularly updated datasets.
5. What file formats are supported for import?
The plugin supports multiple file formats, including CSV, XML, Excel, and other structured formats, depending on your workflow requirements.
6. What should I check before starting the import?
Ensure your Custom Post Type is created, Advanced Custom Fields are finalized, field names match exactly, and your file structure aligns with the required meta keys.
Conclusion
In this guide, we covered the complete workflow for WordPress Custom Post Type Import with ACF Integration, from preparing your CPT and ACF fields to structuring your CSV file, mapping fields correctly, configuring advanced settings, handling repeaters and relationships, scheduling imports, updating records, and exporting structured data.
The key to a successful Custom Post Type and ACF import is preparation and precision. When your Custom Post Type is properly configured, ACF field names are finalized, and your file structure matches the meta keys exactly, bulk importing becomes reliable and scalable. This approach saves hours of manual data entry and ensures long-term data consistency.
WP Ultimate CSV Importer provides a structured and dependable solution for managing large-scale Custom Post Type and ACF imports without risking data corruption or serialization errors. Whether you are a developer, agency, or growing business, a well-configured import workflow can significantly streamline your content operations.
If you are planning a complex import, handling large datasets, or facing structured mapping challenges, our technical team can help you streamline the entire process.
Reach out to us at [email protected] and get expert guidance tailored to your Custom Post Type and ACF import requirements.
