Table of Contents
CSV import is one of the most common requirements in WordPress websites, especially when you need to upload large amounts of data like posts, products, users, WooCommerce products, or custom content. Instead of adding data manually, CSV import allows you to upload everything quickly, accurately, and in a structured way.
Whether you manage a blog, business website, or e-commerce store, handling bulk data efficiently is important. A reliable CSV import process saves time, reduces manual work, and prevents data errors like duplication, missing fields, or formatting issues. This is where a dedicated import solution can make the process much easier and safer.
Tools like the WP Ultimate CSV Importer plugin help simplify bulk data import with structured mapping, automation options, and support for different post types. Using the right plugin ensures your CSV import process is smooth, scalable, and beginner-friendly without complex coding.
In this guide, you will learn a step-by-step approach to WordPress CSV import, what you need before starting, how to choose the right method, common mistakes to avoid, and how to import data safely using a reliable plugin-based workflow.
Key Takeaways
- CSV import helps upload bulk data quickly into WordPress
- Reduces manual work and prevents data errors
- Essential for posts, products, users, and custom fields
- Using a dedicated importer plugin makes the process easier
- Proper planning and testing ensure a successful import
Requirements and Prerequisites for WordPress CSV Import
Before starting the CSV import process in WordPress, make sure you have admin access to your dashboard, a properly formatted CSV file, and clarity on what you are importing, such as posts, products, users, or custom post types. Taking a full site backup is recommended to prevent data loss if something goes wrong.
Keep your CSV clean with clear headers, consistent formats, and correct image URLs. WP Ultimate CSV Importer simplifies field mapping and bulk imports. Always test with a small sample file before running the full import to avoid large-scale issues.
WordPress CSV Import Walkthrough: Step-by-Step Process
Purchase, Install, and Activate WP Ultimate CSV Importer
Before you can start importing CSV files into WordPress, you need the WP Ultimate CSV Importer plugin by Smackcoders. First, visit the Smackcoders website and log in to your account. Navigate to the WP Ultimate CSV Importer product page, select the plan that fits your requirements, whether for a single site or a multisite installation, and complete the purchase using your preferred payment method. After completing the purchase, you will receive a download link for the plugin ZIP file.
Once you have the plugin file, log in to your WordPress admin dashboard. Go to Plugins in the WordPress dashboard, then click Add New, and choose the Upload Plugin, select the downloaded ZIP file, and click Install Now. After the installation finishes, activate the plugin. You should now see WP Ultimate CSV Importer in your WordPress sidebar, ready to handle CSV imports efficiently and safely.
Upload CSV File
Once WP Ultimate CSV Importer is installed and activated, the next step is to upload your CSV file. To upload, navigate to the WP Ultimate CSV Importer menu in your WordPress dashboard and select Upload CSV. Choose your CSV file from your computer, and the plugin will analyze its structure.
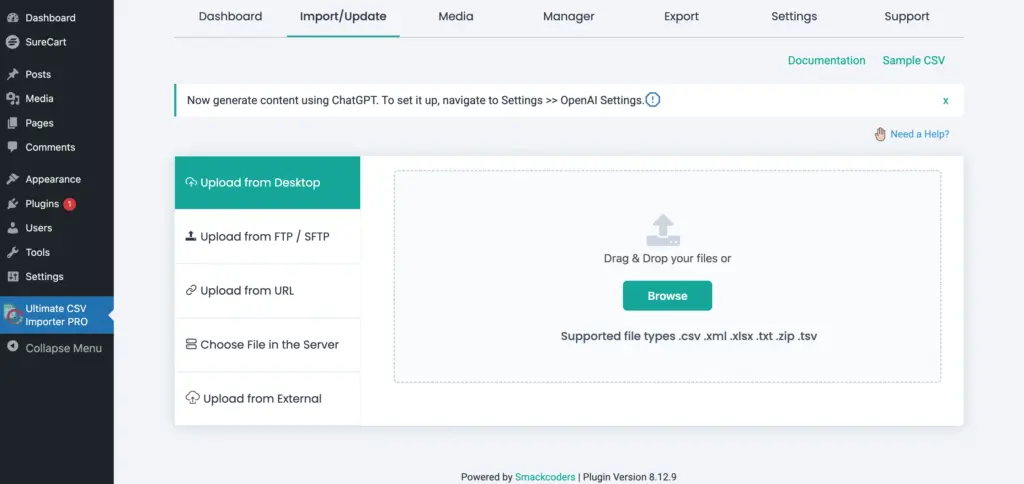
After this stage, the plugin will prompt you to select whether this is a Fresh Import (for new data) or an Update Content import (to update existing posts, products, or users). You will also need to select the Import Type, such as posts, pages, WooCommerce products, users, or custom post types, depending on the content you are importing.
Starting with a small sample file is recommended to test that all options are working correctly before importing a large dataset. This ensures that the correct import mode and content type are applied and avoids accidental overwriting or duplication of existing content.
Note
Our WP Ultimate CSV Importer plugin not only supports CSV files, but also supports XML, TXT, XLS, and XLSX file formats.
Field Mapping
After uploading your CSV file, the next step is field mapping, which ensures that each column in your CSV corresponds correctly to the relevant WordPress field, such as post title, content, categories, custom fields, or product SKU. Accurate mapping prevents missing data or incorrect entries during import.
WP Ultimate CSV Importer provides two modes for mapping: Advanced Mode and Drag & Drop Mode. Advanced Mode is for complex imports, allowing you to handle multiple custom fields, taxonomies, serialized data, and default values for missing fields. This mode is ideal for WooCommerce products with variations, multisite setups, or custom post types with unique metadata.
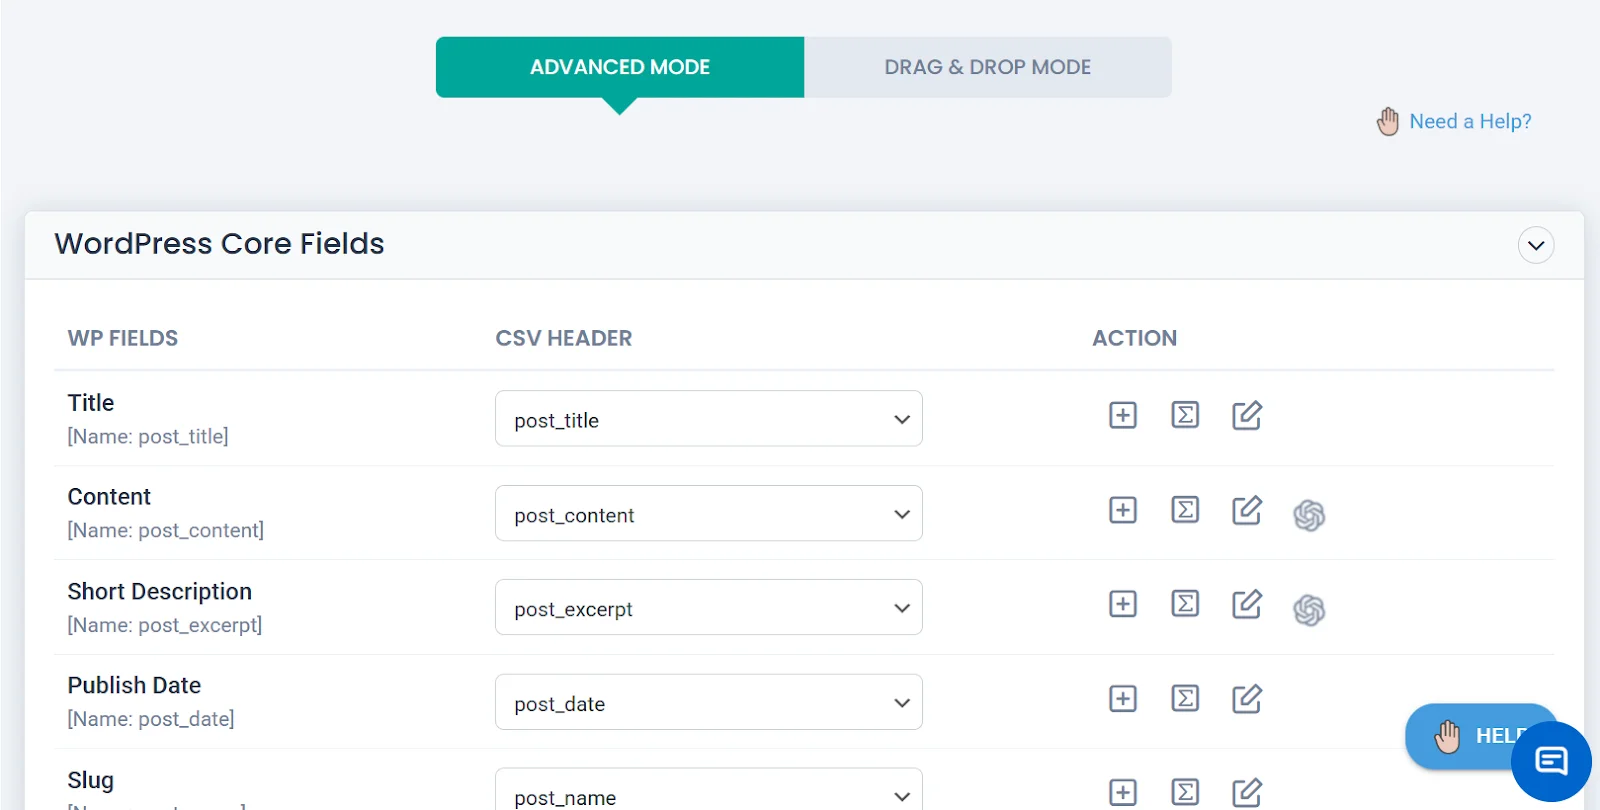
The Drag & Drop Mode offers a simple visual interface where you can match CSV columns to WordPress fields by dragging and dropping. This mode is perfect for beginners or for standard imports like posts, pages, and products, making it easier to map fields quickly and accurately.

Using the Manage & Filter Option After Mapping
After you finish mapping the fields, scroll down, and you will see the Manage & Filter section. In that section, you can choose which posts should be imported. If you want only published posts to be imported, select the correct field in Element (for blog posts, choose post_status). Then, in Rule, select Equals, and in Value, type publish. Now only the posts with publish status will be imported.

The same method works for WooCommerce products. If you want to import only products below a certain price, in Element, choose the price field (for WooCommerce products, select regular_price). In Rule, choose Less than, and in Value, enter the amount (for example, 500). Then only the products priced below 500 will be imported.
After mapping the fields using either mode, you can optionally save your mapping as a template to reuse it in future imports. This ensures consistency and saves time when importing similar CSV files repeatedly.
Configure Import Options
After mapping the fields, the next step is to configure the import options. WP Ultimate CSV Importer allows you to control how your CSV data is imported into WordPress to ensure accuracy and prevent issues like duplicates or missing content.
At this stage, you can choose to skip existing records, update existing content, or create new entries only, depending on your import goal. You can also set options for handling images, custom fields, and taxonomy assignments, ensuring that media files are linked correctly and metadata is imported without errors. Additionally, you can define the number of records to process per batch, which is useful for large CSV files to avoid server timeouts or memory issues.
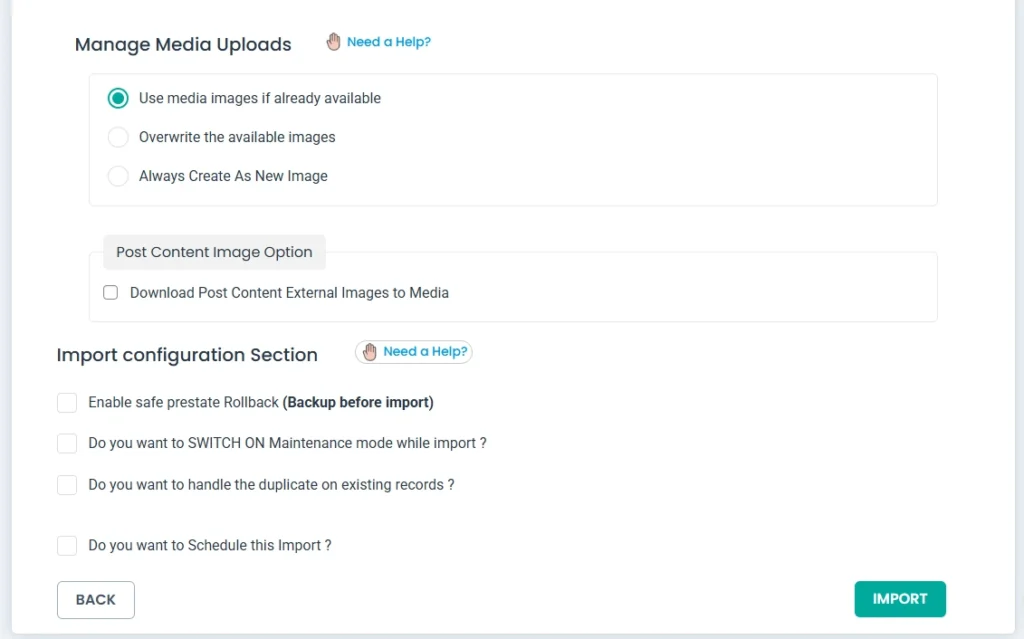
Once the options are configured, you can run the import. WP Ultimate CSV Importer will process your CSV according to the selected settings, creating or updating content in WordPress. After the import completes, always review your site to confirm that posts, products, users, or custom content have been imported correctly and that images and metadata appear as expected.
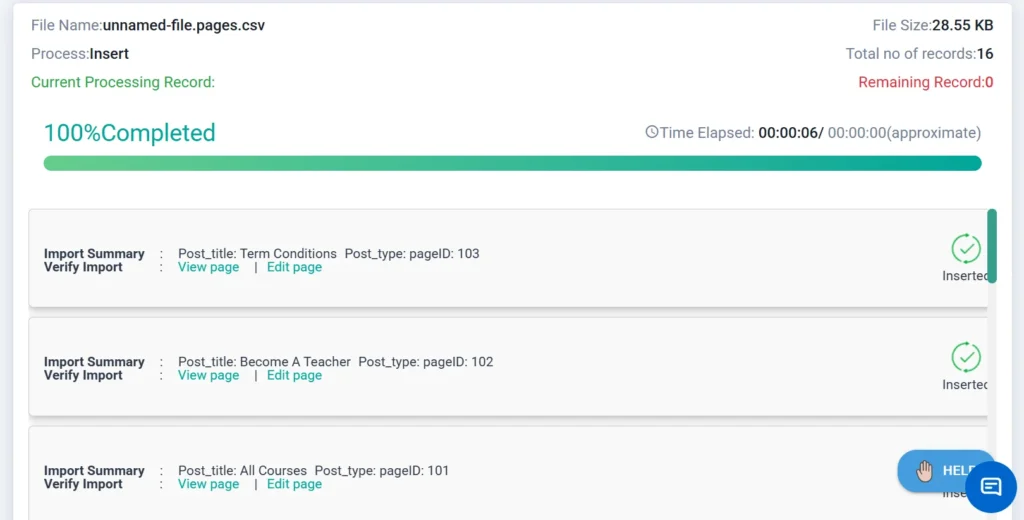
Run Import & Verify Results
After configuring the import options, you can run the CSV import by clicking the Import button in WP Ultimate CSV Importer. The plugin will process the CSV file according to your settings, creating or updating posts, pages, WooCommerce products, users, or custom post types.
Once the import is complete, verify the results by checking that all content appears correctly, including titles, descriptions, categories, custom fields, and images. For large datasets, it’s a good idea to review a few entries first to ensure the import worked as expected. This step ensures accuracy and prevents data errors on your site.
Import Everything with Our Plugin
With the help of WP Ultimate CSV Importer plugin, you can go beyond basic post imports and manage complex data effortlessly. Our solution supports multiple data types, making bulk imports faster, structured, and reliable.
- Import Taxonomies – Categories, tags, and custom taxonomies with accurate mapping.
- Import Custom Fields – Meta fields and advanced custom field data without breaking structure.
- Import Images – Import images using URLs and automatically attach them to the correct posts or products.
- Import eCommerce Data – Products, SKUs, pricing, stock details, and store data into WooCommerce.
- Import Any Custom Post Types – Seamlessly import data into any custom post types available on your website.
- Import Comments – Bulk import comments and map them correctly to posts.
- Import Users – Create or update users in bulk with roles and profile details.
Tips & Best Practices for CSV Import
When importing CSV files, always test on a staging site first to avoid mistakes on your live site. Make sure your CSV is clean, with clear headers and correct formats for dates, prices, and URLs.
Be careful with large files; they can time out or overload the server. WP Ultimate CSV Importer allows importing in small batches to prevent issues. Advanced Mode is recommended only if your CSV has custom fields or complex data.
After the import, check your site to ensure all posts, products, users, or custom content appear correctly. Fix any missing fields or errors before running the full import.
Frequently Asked Questions (FAQ)
1. How to import CSV into WordPress?
To import a CSV file into WordPress, go to your dashboard and navigate to the import section (or use a plugin like WP Ultimate CSV Importer). Upload your CSV file, map the file columns to the correct WordPress fields (such as title, content, category, etc.), and run the import. After completion, review the imported data to ensure everything is correctly assigned and formatted.
2. Can I import WooCommerce products using CSV?
Yes, you can import products, pricing, SKUs, and stock details into WooCommerce using a properly formatted CSV file.
3. Can I update existing content using CSV import?
Yes, you can update existing posts, products, or users by matching them using ID, slug, or unique fields during the import process.
4. Which mode should I use for field mapping?
For beginners, Drag u0026amp; Drop Mode is the easiest and fastest way to match CSV columns to WordPress fields. For more complex data, such as custom post types or WooCommerce product variations, Advanced Mode gives full control over all fields.
5. Can I test the import before running it on my live site?
Absolutely. Always start with a small sample CSV on a staging or test site. This helps confirm that your mapping, import options, and plugin settings are correct before doing a full import on the live site.
Conclusion
CSV import in WordPress becomes simple and safe when you follow a clear process. Start by purchasing, installing, and activating WP Ultimate CSV Importer, then upload your CSV, map the fields, configure the import options, and run the import. Always test with a small sample first and check the results carefully.
Following these steps ensures your posts, products, users, or custom content are imported accurately, reducing errors and saving time. With the right plugin and a structured approach, even beginners can handle CSV imports confidently.
For any questions or assistance, you can reach out to [email protected]. Get started today and simplify your WordPress CSV imports!
