Table of Contents
So you’ve decided to launch a WordPress website? Awesome! Getting your site online is easier than you might think if you follow the right steps.
Imagine turning your blog concept, small business vision, or portfolio dream into a fully functional WordPress website without coding headaches or trial-and-error frustration. In 2025, with over 43% of the internet powered by WordPress, building a website is more accessible than ever. But here’s the truth: 70% of beginners stumble over tech confusion, hidden costs, and setup mistakes that often lead to abandoned sites and missed opportunities.
That’s exactly why we created this guide. And we know how overwhelming it can feel at the start. Maybe you’re unsure whether to use WordPress.com or WordPress.org, wondering why “free WordPress” still requires paid hosting, or worried you’ll need to learn code.
Don’t worry. You don’t need technical skills to build a professional-looking WordPress site.
This guide will walk you through the essential steps to launch your WordPress website the right way, from choosing a domain and setting up hosting to publishing your first pages and installing must-have plugins.
Why WordPress Is Still the Best Choice in 2025 (Especially for Beginners)
If you’re just starting out and want to build a website without feeling overwhelmed, WordPress is still your best bet in 2025, and here’s why.
WordPress powers everything from personal blogs to large eCommerce stores, and it’s built to grow with you. It’s an open-source platform, which means it’s flexible, free to use, and supported by a huge global community. Additionally, with modern tools like Gutenberg’s block editor, you can design pages by simply dragging and dropping, eliminating the need for coding.
Easy for Non-Coders
Unlike other platforms, WordPress gives you full control without needing to touch code. With flexible editing tools, it’s even easier to use than builders like Wix or Squarespace.
SEO Right Out of the Box
WordPress is designed with search engines in mind. From customizable permalinks to built-in meta settings, it gives your site a solid SEO foundation from day one.
Quick Tip: One-Click Install
Most hosting providers offer one-click WordPress installation, so you can go from zero to live in just a few minutes. No tech experience needed.
What Does It Cost?
While the WordPress software itself is completely free, you’ll need to pay for hosting. Most beginners spend around $3–$10/month for a reliable hosting plan.
Step 1: Decide the Purpose of Your Website
Before creating your WordPress site, it’s important to clarify what you want your website to achieve. This will guide everything from your design choices to the content you create. Ask yourself these key questions:
What’s Your Goal?
- Personal Blog: Are you looking to share your thoughts, experiences, or expertise with the world? A personal blog lets you connect with an audience over topics you’re passionate about.
- Business Website: Do you have a small business or service to promote? A business website helps showcase what you do, attract new customers, and build your brand online.
- Online Store: Want to sell products? Whether physical or digital, an eCommerce site powered by WordPress lets you sell directly to customers with secure payment processing.
- Portfolio: Are you a photographer, designer, or creative professional? A portfolio website highlights your work and makes it easy for potential clients to hire you.
- Community or Forum: Want to create a space where people can interact and share ideas? A forum or community-driven website fosters engagement around a specific topic or interest.
The purpose of your website will impact your layout, theme, features, and content strategy. For example, if you’re building an online store, you’ll need eCommerce functionality, payment gateways, and product pages. If it’s a personal blog, your focus will be on writing, categories, and easy navigation.
Tip: Start Simple
It’s easy to get overwhelmed with ideas, but keep it simple at first. Focus on your primary goal. Once your site is live, you can always add new features and expand it over time!
Define the Structure of your Site
Once you know the purpose of your website, the next step is planning its structure. Planning your site’s structure early on will save you a lot of time later. By mapping out essential pages and creating a logical flow, you’re setting up your WordPress website for success from day one.
This is where you decide how to organize your pages and what kind of content you need. Think of it like creating a blueprint for your site; it’ll help visitors find what they need quickly and make your site easy to navigate.
Step 2: Pick a Domain Name
Choosing a domain name is one of the most exciting steps when creating your WordPress site. It’s your website’s address on the internet, so it should reflect your brand, be easy to remember, and help people find you online. Here’s how to pick the perfect domain name:
Tips for Choosing a Domain Name
- Keep It Short and Sweet
A short domain name is easier to remember, type, and share. Try to keep it under 15 characters if possible. Avoid using long, complicated words or phrases. - Make It Memorable
Choose something catchy and easy to recall. A unique name will help your audience remember you and make it easier to find you again. - Use Keywords When Possible
If your website is for a business, consider including keywords related to your niche. For example, if you’re a photographer, something like “SmithPhotography.com” could work well. Keywords can improve SEO (Search Engine Optimization) and help people understand what your site is about. - Avoid Numbers and Hyphens
Numbers and hyphens can confuse people and are harder to communicate verbally. Stick with letters only for a clean, simple domain name. - Be Brandable
Your domain name should reflect your brand’s identity. If you’re creating a blog or business, think about how your domain name will look on business cards, social media, and marketing materials. - Consider Different Extensions (.com, .net, .org, etc.)
The most common and professional domain extension is .com, but if that’s unavailable, you can consider alternatives like .net or .co. Just make sure it’s widely recognized and aligns with your brand. - Check for Trademarks
You don’t want to choose a name that’s too similar to an existing trademarked brand. Run a quick trademark search to avoid any potential legal issues later.
Check Domain Availability
Once you have a few name ideas in mind, you’ll need to check if your chosen domain is available. You can use domain registrars like GoDaddy, Namecheap, or even WordPress.com to check availability and purchase your domain.
If your preferred domain is already taken, don’t worry, try variations or consider using a different extension. Alternatively, you can try adding keywords (like “the” or “my”) to make it unique.
Domain Pricing
Domain names typically cost between $10 and $20 per year, depending on the registrar and the extension you choose. Many hosting providers also offer free domain registration for the first year if you sign up for a hosting plan.
Bonus Tip: Consider SEO
If you’re building a business site, choosing a domain with SEO in mind can be helpful. For example, if you sell handmade jewelry, a domain like HandmadeJewelryByJane.com can help you rank higher in search engines for keywords like “handmade jewelry.”
How to register your domain with GoDaddy:
Search for Your Domain: Go to the GoDaddy homepage. From the Hamburger menu on the left side, choose Domains > Search for domain names.
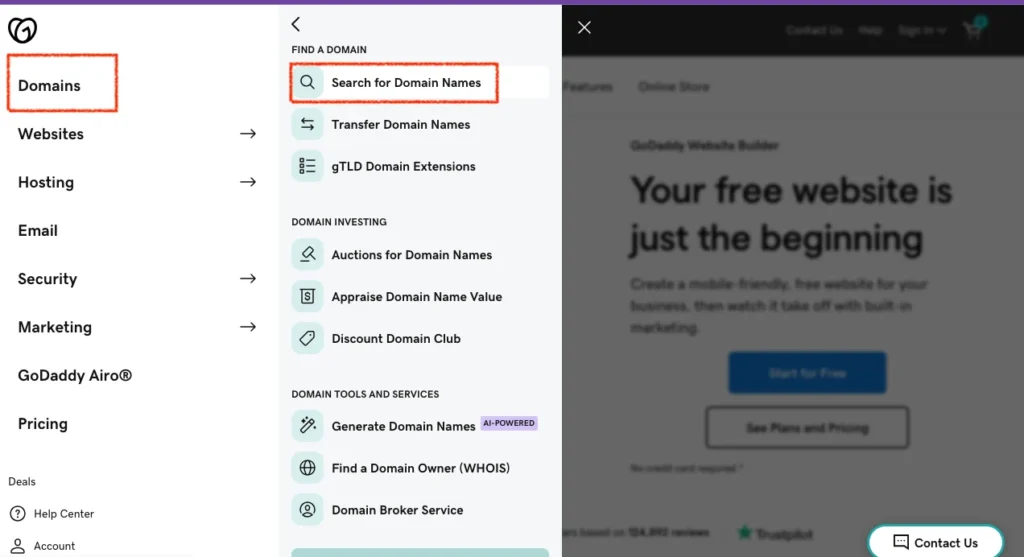
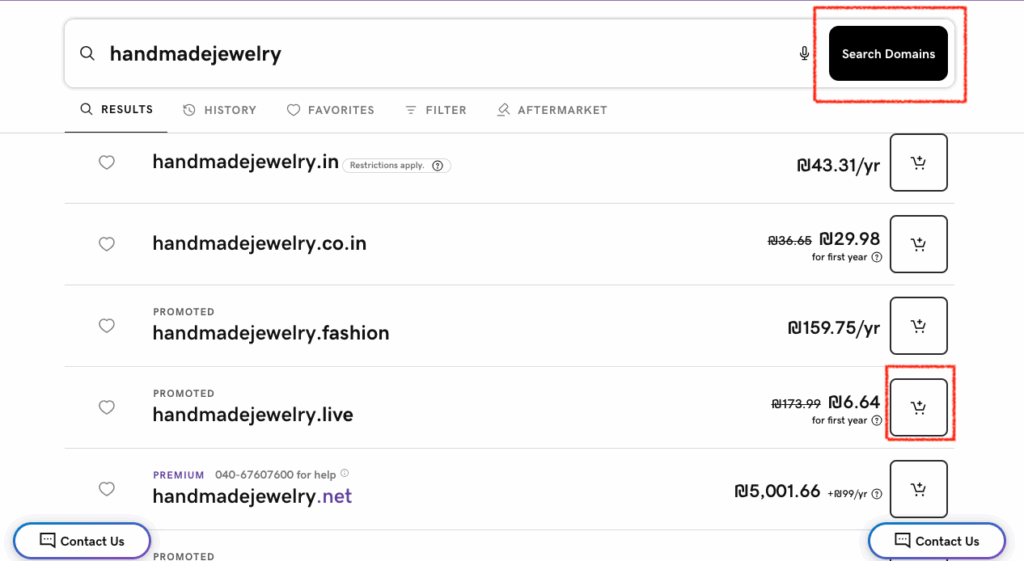
Use the search bar to check the availability of your desired domain name.

Choose Your Domain: If your domain is available, click ‘Add to Cart’. If it’s not available, GoDaddy will provide alternative suggestions.
Sign Up or Log In: If you don’t have an account with GoDaddy, you’ll need to create one before continuing with the purchase.
Select Additional Services (Optional): GoDaddy will offer add-ons like email, privacy protection, or website builders. These are optional and can be added later.
Checkout: Complete your payment details and finalize the domain registration.
Manage Your Domain: After purchasing your domain, log into your GoDaddy account to manage DNS settings, renew your domain, or set up forwarding.
Step 3: Choose a Web Hosting Provider
Hosting is where your website “lives” on the internet. If the domain is your street name, then the hosting is your home for your website, where your content, images, and files live.
Types of Web Hosting
There are different types of hosting, and choosing the right one depends on your needs, website size, and budget. Here’s a quick rundown:
| Type of Hosting | What It Is | Best For | Pros | Cons |
| Shared Hosting | Multiple websites share the same server resources. | Beginners, blogs, small businesses | Affordable, easy to set up, includes free domain (often), beginner-friendly | Limited resources, slower speeds during traffic spikes, less control |
| Managed WordPress Hosting | Hosting specifically optimized for WordPress sites. | WordPress users, bloggers, small businesses | Hassle-free management, automatic updates, better security & performance | More expensive than shared hosting, limited to WordPress only |
| VPS Hosting | A virtual server with dedicated resources within a shared server. | Growing websites, medium-sized businesses | More control, better performance, scalable | More expensive, requires some technical knowledge |
| Dedicated Hosting | You get an entire server to yourself. | Large websites, high-traffic sites, e-commerce | Maximum control, powerful performance, full customization | Very expensive, requires advanced technical knowledge |
| Cloud Hosting | Websites are hosted across multiple servers (cloud). | Growing businesses, fluctuating traffic | Scalable, flexible, reliable, fast speeds | Can become expensive as you scale, slightly more complex to manage |
Top Web Hosting Providers
Here are some of the best hosting providers for WordPress users, each with a focus on different needs:
1. Bluehost (Best for Beginners)
- Bluehost is WordPress.org’s recommended provider for beginners, and it’s been in the hosting game since 2005.
- Affordable pricing, free domain for the first year, one-click WordPress installation, and 24/7 customer support.
- Ideal for: New websites, personal blogs, and small businesses.
- Price: Starting at $3.99/month.
2. SiteGround (Best for Speed and Security)
- SiteGround is known for top-notch speed and security. It offers managed WordPress hosting and excellent customer support.
- Free daily backups, free SSL, a staging environment for testing changes, and automatic WordPress updates.
- Ideal for: WordPress users looking for a reliable and fast hosting solution.
- Price: Starting at $2.99/month.
3. HostGator (Best for Budget-Friendly Hosting)
- HostGator is known for affordable hosting plans, with plenty of features for WordPress beginners and small businesses.
- Free domain for the first year, 1-click WordPress install, 24/7 support, and unlimited bandwidth.
- Ideal for: Those on a tight budget who still want solid hosting performance.
- Price: Starting at $3.95/month.
4. WP Engine (Best for Premium Managed WordPress Hosting)
- WP Engine is a premium hosting provider designed specifically for WordPress websites. It offers premium performance, automatic backups, and 24/7 support.
- Managed WordPress hosting with premium support, automatic updates, and faster speeds for growing websites.
- Ideal for: Users who want hassle-free WordPress hosting with premium support and performance.
- Price: Starting at $50/month.
5. A2 Hosting (Best for Performance and Speed)
- Known for its blazing-fast speeds, A2 Hosting offers great performance for WordPress websites, especially with their Turbo plans.
- Turbo servers for up to 20x faster speeds, free SSL, and 1-click WordPress installation.
- Ideal for: Users looking for the best speed and performance.
- Price: Starting at $1.99/month.
What to Look for in a Hosting Provider
When choosing a hosting provider, here are some key factors to consider:
- Speed and Performance: Your hosting provider’s speed affects how fast your website loads. Choose a provider with fast loading times to improve user experience and SEO rankings.
- Support: Look for providers offering 24/7 support with live chat, phone, or email assistance. Issues can happen at any time, so good support is essential.
- Security: Ensure that your provider offers features like SSL certificates, daily backups, and firewall protection to keep your website secure.
- Scalability: Choose a hosting provider that can scale with your needs. If your website grows, you may need more resources, so flexibility is key.
- Price and Value: Compare pricing plans, but don’t just focus on the lowest price. Consider the features and support provided in relation to the cost.
How to Choose the Right Hosting for You
- Evaluate your website’s needs:
- Are you just starting? Shared hosting (like Bluehost or HostGator) may be enough.
- Is your site growing? Managed hosting (like SiteGround or WP Engine) will give you extra performance.
- Do you need high security and speed? Premium hosting providers like WP Engine are excellent.
- Are you just starting? Shared hosting (like Bluehost or HostGator) may be enough.
- Think about your budget:
- If you’re on a tight budget, shared hosting or affordable plans like HostGator may be ideal.
- If you can invest more for premium features, managed WordPress hosting like WP Engine or SiteGround might be the way to go.
- If you’re on a tight budget, shared hosting or affordable plans like HostGator may be ideal.
- Consider the long term:
- You don’t want to outgrow your hosting plan too soon, so choose one that offers scalability, whether you want to upgrade resources or services in the future.
- You don’t want to outgrow your hosting plan too soon, so choose one that offers scalability, whether you want to upgrade resources or services in the future.
Step 4: Install WordPress
Method 1: One-Click WordPress Installation (Easiest Method)
Most hosting providers, like Bluehost, SiteGround, and HostGator, offer one-click WordPress installation, which makes the process super easy for beginners.
Step-by-Step Guide:
- Log in to Your Hosting Account
- Open your hosting provider’s control panel (cPanel) by logging into your hosting account.
- Open your hosting provider’s control panel (cPanel) by logging into your hosting account.
- Find the One-Click Install Tool
- In the cPanel dashboard, look for a section called “Website” or “Softaculous Apps Installer”.
- Click on WordPress (you may see it listed under “Popular Apps”).
- In the cPanel dashboard, look for a section called “Website” or “Softaculous Apps Installer”.
- Start the Installation Process
- Once you click on WordPress, you will be prompted to click a button like “Install Now” or “Install WordPress”.
- Once you click on WordPress, you will be prompted to click a button like “Install Now” or “Install WordPress”.
- Choose the Domain and Directory
- Select the domain name where you want to install WordPress (e.g., example.com).
- Choose whether you want WordPress installed in the root directory (e.g., example.com) or a subdirectory (e.g., example.com/blog).
- If you’re using a subdomain or a temporary domain, make sure you select the correct one.
- Select the domain name where you want to install WordPress (e.g., example.com).
- Set Your Site Information
- Choose a site name (this can be changed later).
- Enter a site description (optional, but helpful for search engines).
- Set the admin username, password, and admin email. This will be used to log into the WordPress admin area.
- Choose a site name (this can be changed later).
- Select the Language
- Choose the language you want your WordPress website to be in.
- Choose the language you want your WordPress website to be in.
- Start the Installation
- Click Install to begin the installation process.
- Wait for the installation to complete. You’ll usually get a confirmation message once WordPress is successfully installed.
- Click Install to begin the installation process.
- Access WordPress Dashboard
- After installation, you can log in to your new site by going to yourdomain.com/wp-admin (replace yourdomain.com with your actual domain).
- Use the admin username and password you created during installation to access your WordPress admin panel.
- After installation, you can log in to your new site by going to yourdomain.com/wp-admin (replace yourdomain.com with your actual domain).
If your host offers “1-click WordPress install” (most do), use it. It takes less than 5 minutes.
Manual way (optional):
Installing WordPress Using Docker:
Docker makes it easy to run applications in isolated containers. You can use Docker to set up a WordPress environment with MySQL quickly.
Step-by-Step Guide:
Install Docker:
- Download Docker and install it.
- Make sure Docker is running on your system.
Create a docker-compose.yml File:
- Create a new folder for your WordPress project, for example, wordpress-docker.
- Inside the folder, create a docker-compose.yml file with the following content:
version: ‘3.8’
services:
wordpress:
image: wordpress:latest
restart: always
ports:
– “8080:80”
environment:
WORDPRESS_DB_HOST: db:3306
WORDPRESS_DB_NAME: wordpress
WORDPRESS_DB_USER: exampleuser
WORDPRESS_DB_PASSWORD: examplepass
volumes:
– wordpress_data:/var/www/html
db:
image: mysql:5.7
restart: always
environment:
MYSQL_ROOT_PASSWORD: rootpassword
MYSQL_DATABASE: wordpress
MYSQL_USER: exampleuser
MYSQL_PASSWORD: examplepass
volumes:
– db_data:/var/lib/mysql
volumes:
wordpress_data:
db_data:
This file configures two services:
- wordpress: The WordPress container.
- db: The MySQL container for the database.
Explanation:
- The WORDPRESS_DB_HOST environment variable tells WordPress where the MySQL database is running (in this case, it’s db, which is the name of the MySQL service defined in the docker-compose.yml file).
- The ports section exposes WordPress on port 8080 (you can access it in your browser via http://localhost:8080).
Install the latest WordPress version:
From wordpress.org, download the latest version of WordPress.
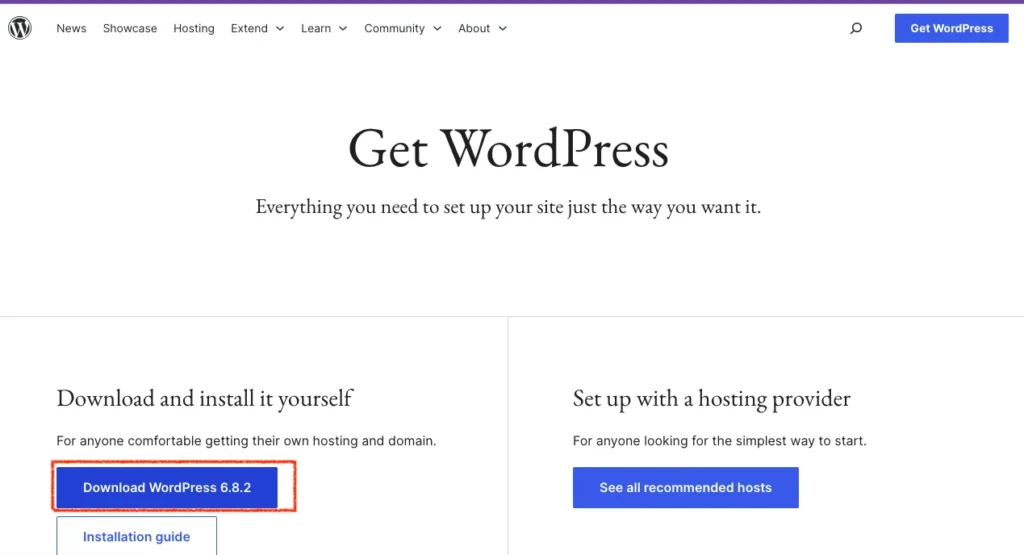
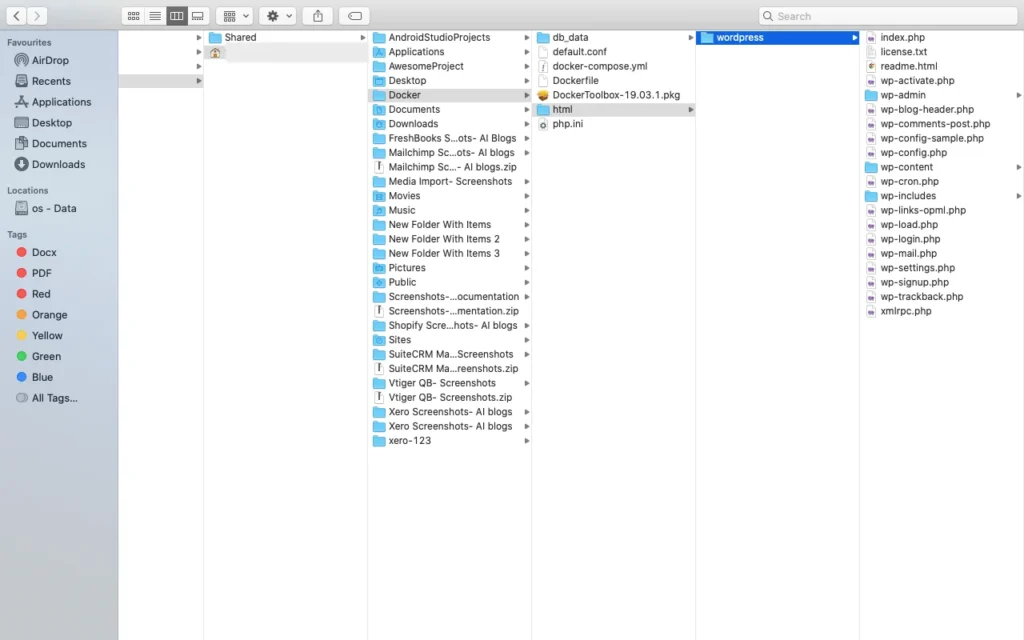
Navigate to the Docker file where you have located it, then click on html. Extract your WordPress file here.
Run the Docker Compose Command:
Open a terminal or command prompt in the folder where you created the docker-compose.yml file.
Run the following command:
docker-compose up -d
- This will download the necessary Docker images and start the containers in detached mode (-d).
Access WordPress:
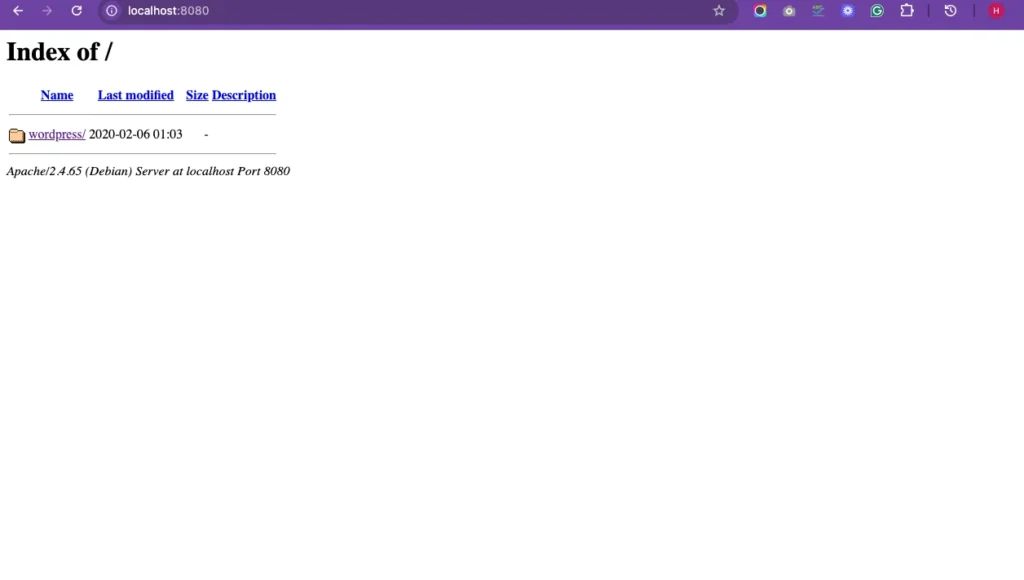
- Once the containers are running, open a web browser and go to http://localhost:8080.
- You should see the WordPress installation screen.
- Choose your language, and then fill in the required details (site title, admin username, password, email).
- Click Install WordPress.
Access the WordPress Dashboard:
- You can now access the WordPress dashboard by going to http://localhost:8080/wp-admin and logging in with the username and password you set during installation.
Step 5: Choose and Install a Theme
When choosing a theme for your WordPress site, you’re looking for something that suits your design preferences, works well for your content, and is optimized for performance. Here’s a step-by-step guide on how to pick and install a theme:
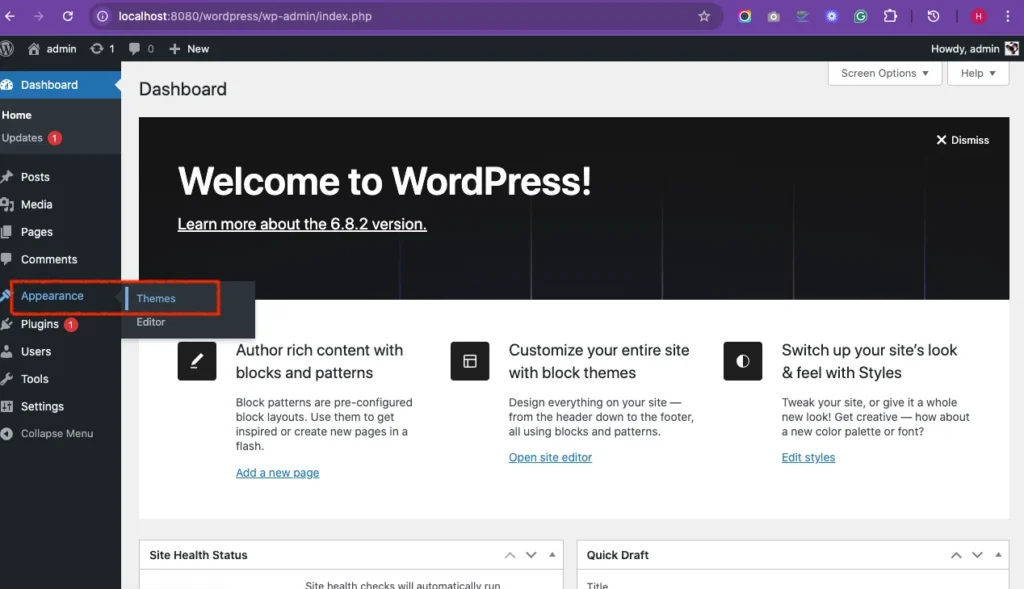
1. Access the Theme Repository:
- Go to: Dashboard > Appearance > Themes > Add New
- Here you’ll be able to browse both free and premium themes, either directly from WordPress or by uploading a theme you’ve purchased elsewhere.
2. Browse Free Themes:
- WordPress offers a vast directory of free themes. You can filter by popular, latest, or specific features (like “responsive” or “SEO-friendly”).
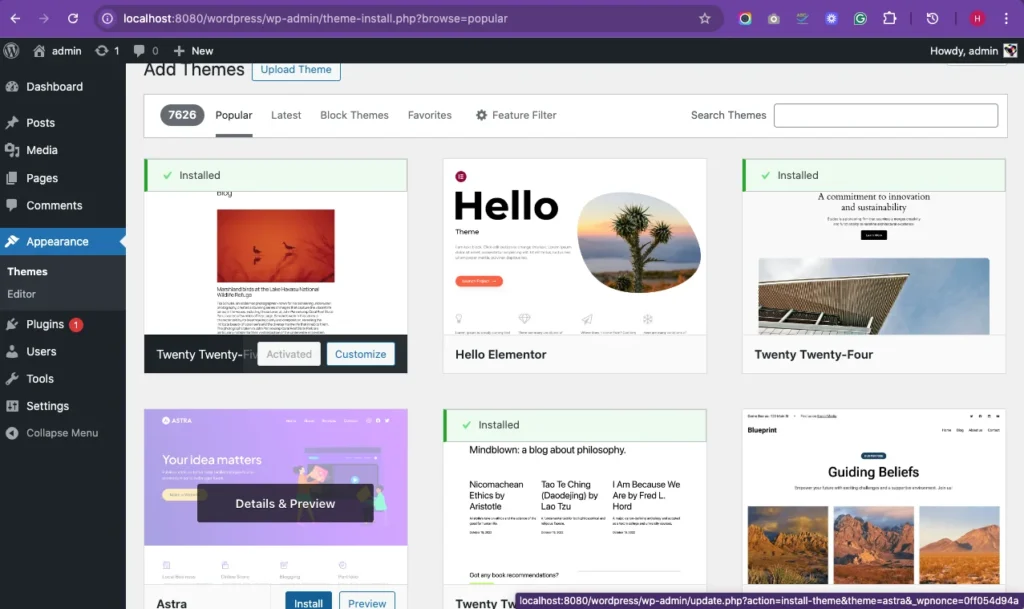
3. Preview Themes:
When you find a theme that interests you, click the Preview button. This lets you see what it would look like with sample content. Make sure the layout, typography, and overall feel match your vision.
Tip: Preview on mobile to ensure it’s responsive (works well on smartphones and tablets).
4. Consider Premium Themes (if you’re open to paid options):
Premium themes usually come with more features, customization options, and support. Some popular premium theme providers include:
Themeforest – A marketplace with thousands of themes for every niche.
Elegant Themes (Divi) – Known for its drag-and-drop builder and visual customization.
Astra – While Astra offers a free version, its paid version unlocks additional customization.
Why go premium?
- More customization options.
- Often built with better SEO and speed in mind.
- Regular updates and professional support.
5. Install and Activate the Theme:
After you’ve found your theme, click Install.
Once installed, hit Activate to apply the theme to your site.
If you’re using a premium theme, you may need to upload the theme’s .zip file instead of searching from the WordPress repository.
6. Customize the Theme:
After activation, go to Appearance > Customize to make changes to the theme’s colors, typography, layout, and other settings. This section is where you can:
Set the site identity (logo, site title, tagline), adjust menus and widgets. and choose a static front page or a blog layout.
7. Check Mobile Responsiveness:
Ensure your theme is mobile-friendly by checking how it looks on different screen sizes. Mobile responsiveness is a crucial factor for both user experience and SEO rankings.
8. SEO Optimization:
Many themes come with SEO-friendly features built in (such as proper heading structure, clean code, fast loading times, etc.). If SEO is a priority for you, check theme reviews or consult documentation to see how well it’s optimized.
Quick Tips:
- Speed: A fast loading time is essential. Some themes (like Astra) are designed to be lightweight and load quickly.
- Demo Content: Some themes offer demo content, which you can import to see how it looks with real data.
- Child Theme: If you’re planning to make custom code changes, consider creating a child theme to ensure your changes are safe during theme updates.
Step 6: Install Essential Plugins
Plugins are essential for enhancing the functionality of your WordPress site. They allow you to add features like SEO tools, forms, backups, and security without needing to write any code. Here’s how you can install and set up some must-have plugins:
How to Install Plugins:
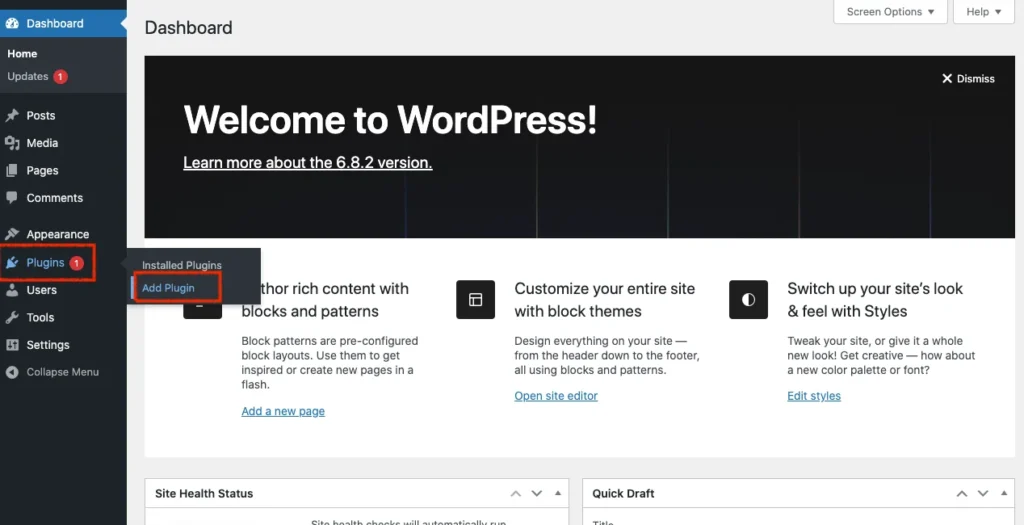
- Go to the Plugins Section:
- From your WordPress dashboard, navigate to Plugins > Add New.
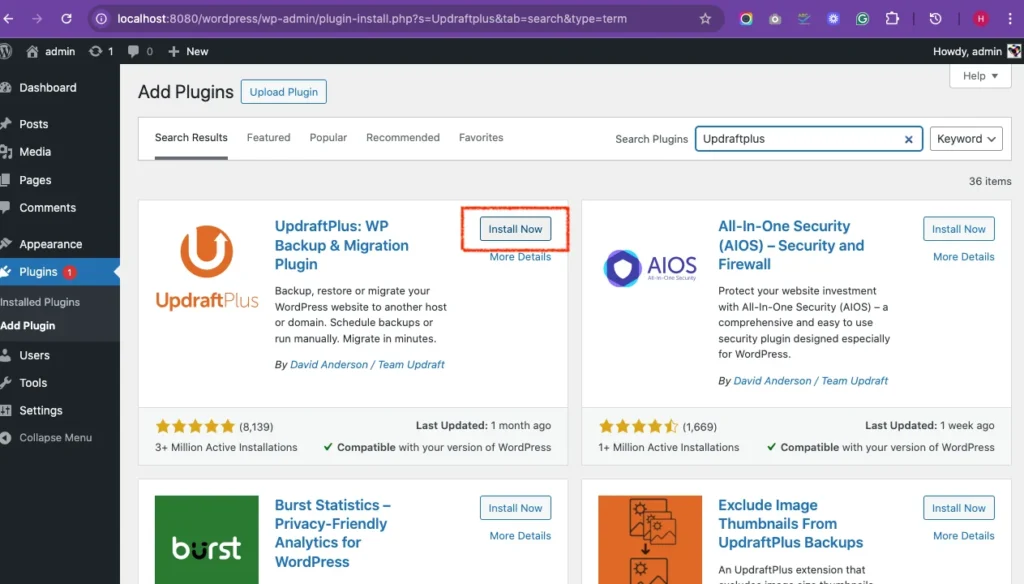
- Search for the Plugin:
- Use the search bar at the top right to find the plugin by name (e.g., “Yoast SEO” or “WPForms”).
- Use the search bar at the top right to find the plugin by name (e.g., “Yoast SEO” or “WPForms”).
- Install and Activate:
- Once you find the plugin, click Install Now.
- After installation, click Activate to enable the plugin on your site.
- Once you find the plugin, click Install Now.
Must-Have WordPress Plugins:
- Yoast SEO or Rank Math (for SEO)
Yoast SEO and Rank Math are the two most popular SEO plugins. Both allow you to optimize your website for search engines by adding meta descriptions, optimizing images, and improving your overall SEO score.
Yoast SEO: A great beginner-friendly plugin with built-in suggestions for SEO improvements.
Rank Math: Offers more advanced features for free, like rich snippets and advanced schema support.
How to Set Up:
After installing and activating the plugin, follow the setup wizard to configure it for your site.
Yoast and Rank Math both offer step-by-step guides for basic and advanced SEO configurations.
WPForms (for Contact Forms)
WPForms is a user-friendly plugin for creating custom contact forms. You can easily build contact forms, subscription forms, and even surveys. It integrates well with email marketing platforms and has a drag-and-drop builder for easy form creation.
How to Set Up:
After activation, go to WPForms > Add New to create your first form. You can choose from pre-built templates (e.g., contact form) or build one from scratch.
UpdraftPlus (for Backups)
UpdraftPlus is a powerful backup plugin that lets you schedule automatic backups of your entire website (files, database, plugins, and themes). Backups are critical! If something goes wrong with your site, you can restore it easily.
How to Set Up:
After activation, go to Settings > UpdraftPlus Backups.
Configure your backup schedule and choose a remote storage location (Google Drive, Dropbox, etc.) for storing backups.
Wordfence (for Security)
Wordfence is a comprehensive security plugin that provides firewall protection, malware scanning, and login attempt monitoring.WordPress sites are common targets for hackers, and this plugin helps protect your site from malicious attacks.
How to Set Up:
After activating, go to Wordfence > Dashboard to run an initial scan of your site.
Follow the setup wizard to configure security settings like blocking IP addresses and limiting login attempts.
LiteSpeed Cache or W3 Total Cache (for Speed Optimization)
LiteSpeed Cache and W3 Total Cache help improve your site’s speed by caching static files and optimizing the delivery of content. Faster websites improve user experience and SEO ranking.
How to Set Up:
LiteSpeed Cache: If you’re using LiteSpeed as your web server, this is the most efficient caching plugin.
After activating, go to LiteSpeed Cache > Settings and enable basic caching features.
W3 Total Cache: Offers more customization, including page, object, and database caching.
After activation, go to Performance > General Settings and enable caching.
Tips:
- Only install plugins you actually need. Too many plugins can slow down your site.
- Always update plugins regularly to ensure you’re using the latest features and security patches.
- If you don’t need a plugin anymore, be sure to deactivate and delete it to avoid unnecessary bloat.
Step 7: Add your content
Creating the core pages for your WordPress site is an exciting part of building your online presence! These pages will help inform your visitors about who you are, what you offer, and how they can get in touch with you. Here’s a breakdown of the essential pages you should create, along with tips on how to set them up:
Home Page: The Main Landing Page
This is the first impression visitors will get of your site, so it should clearly convey who you are and what you offer.
What to include:
A clear headline or introduction (who you are and what problem you solve).
Visuals like a hero image or video that represents your brand.
Call-to-action (CTA) buttons like “Contact Me” or “View Services”.
Links to important sections of your site (About, Services, etc.).
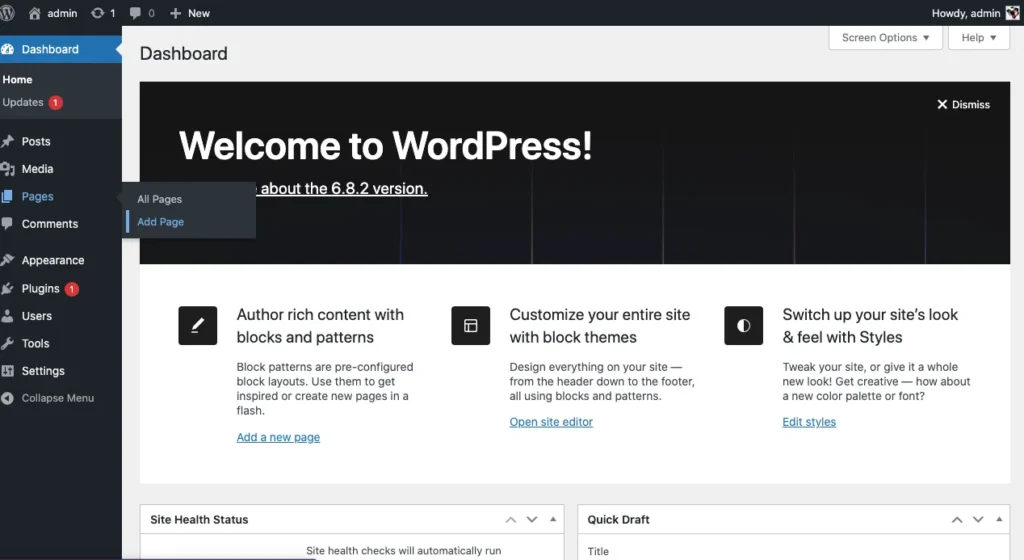
How to Set It Up:
Go to Pages > Add New, then name the page “Home” or something descriptive.
Design the page using a page builder like Elementor (drag-and-drop) or use the default WordPress editor.
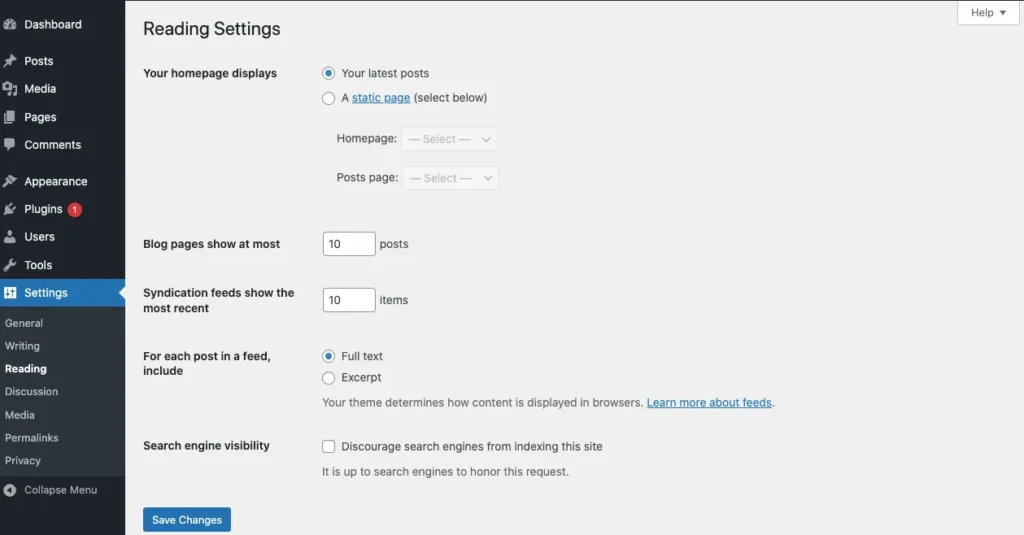
Once created, go to Settings > Reading, and set this page as your “Static Front Page.”
About Page: Who You Are and What You Do
Visitors want to know more about you or your business. The About page gives you a chance to share your story, values, and mission.
What to include:
- A short bio or company history.
- Why do you do what you do? Make it personal and relatable.
- Skills or areas of expertise (for personal brands) or services (for businesses).
- A photo of yourself or team members for a more human touch.
- Optional: Testimonials or achievements to build credibility.
How to Set It Up:
- Create a new page titled “About”.
- Add sections using a combination of text, images, and optional video.
- Use headings to break up the content and make it easy to read.
Services/Portfolio Page: What You Offer
This page should showcase the services you provide or the products you sell. If you’re a freelancer, this might be a portfolio of your work.
What to include:
- Detailed descriptions of your services or products.
- Pricing info or a CTA to contact for pricing (if applicable).
- Portfolio samples (images, case studies, or testimonials) if you offer creative services.
- Social proof, like client logos or reviews.
How to Set It Up:
- Create a new page titled “Services” or “Portfolio”.
- Organize your content into sections for each service or project.
- Use galleries or sliders to showcase portfolio pieces if you’re a creative professional.
Blog Page: Optional, but Great for SEO
A blog can improve your site’s SEO by regularly publishing fresh, relevant content. It’s also a great way to engage with your audience, share updates, and position yourself as an expert in your field.
- What to include:
- Blog posts related to your industry, interests, or expertise.
- Categories to organize content and make it easy for users to find what interests them.
- An option to subscribe to your blog via email.
- Option to allow comments (if you want interaction).
- Blog posts related to your industry, interests, or expertise.
How to Set It Up:
- Create a new page titled “Blog”.
- Go to Settings > Reading and make sure the blog page is set as the posts page.
- Start creating posts by going to Posts > Add New.
Contact Page: Get In Touch
This page should make it easy for visitors to contact you, whether for inquiries, support, or collaboration.
- What to include:
- Contact form using plugins like WPForms (this is the easiest way to create a form).
- Your email address, phone number, or physical address (if relevant).
- An interactive map (Google Maps integration) if you have a physical location.
- Social media links or other ways to connect.
- Contact form using plugins like WPForms (this is the easiest way to create a form).
How to Set It Up:
- Create a new page titled “Contact”.
- Use the WPForms plugin to easily add a contact form to the page.
- If needed, embed a Google Map or add your contact details manually.
Additional Tips for Page Creation:
- Navigation: Make sure these pages are easy to find in your site’s navigation menu. Go to Appearance > Menus to add pages to your main menu.
- Design Consistency: Ensure that all pages follow the same design principles (fonts, colors, etc.) for a consistent user experience.
- Content Strategy: Keep your content clear, concise, and engaging. Avoid overwhelming visitors with too much information.
- SEO: Use your SEO plugin (like Yoast SEO) to optimize each page for search engines. This includes setting page titles, meta descriptions, and keywords.
Step 8: Set Up Your Navigation Menu
Make your navigation menu easy for visitors to browse your site.
To create a menu:
- Go to Appearance > Menus
- Create a new menu (e.g., “Main Menu”)
- Add pages like Home, About, Contact, etc.
- Assign the menu to your site’s primary location (usually the header)
Simple and clean = best.
Step 9: Set Up Site Security & Backups
Even small or new sites get targeted by bots and hackers. Security and backups protect your hard work.
Security Tips
Install Wordfence or Sucuri
These plugins provide firewalls, malware scanning, login protection, and alerts for suspicious activity.
Use a strong password & limit login attempts
Choose long, unique passwords. Install a plugin like Login LockDown or Limit Login Attempts Reloaded to prevent brute-force attacks.
Keep everything updated
Outdated WordPress, plugins, or themes can become vulnerabilities. Always update when you see the notification.
Backup Tips:
Install UpdraftPlus
This plugin lets you easily schedule backups of your entire site, including files and the database.
Store backups in cloud services
Set UpdraftPlus to automatically send backups to Google Drive, Dropbox, or other cloud storage—just in case your site crashes or gets hacked.
Step 10: Optimize for Speed & SEO
A fast, optimized site not only keeps visitors happy but also helps you rank better in Google.
Speed Optimization:
Install a caching plugin (LiteSpeed Cache or WP Rocket)
Caching stores a version of your site and serves it faster to users. LiteSpeed Cache is great if your hosting uses the LiteSpeed server.
Compress images (Smush or ShortPixel)
Big image files slow down your site. These plugins reduce file sizes automatically without quality loss.
Use lightweight themes
Avoid bloated, slow-loading themes. Astra, GeneratePress, and Neve are excellent, fast options.
SEO Basics:
Install Yoast SEO or Rank Math
These plugins help optimize your content for search engines by suggesting improvements and managing meta tags.
Write meta titles & descriptions
These appear in search engine results. Good titles and descriptions improve click-through rates.
Submit your sitemap to Google Search Console
A sitemap helps Google discover your pages. Your SEO plugin generates a sitemap automatically—just copy the link and submit it to Google Search Console.
Step 11: Test Everything
Testing ensures your visitors have a smooth, error-free experience.
Check all links and buttons
Make sure navigation, CTAs, and internal links all work correctly. Broken links frustrate users and hurt SEO.
Test forms
Submit a test message through your contact form. Make sure it actually arrives in your inbox.
Check mobile responsiveness
Use your phone or browser’s device preview to make sure the site looks good on all screen sizes.
Run a speed test
Use GTmetrix or PageSpeed Insights to test your loading time. Aim for under 3 seconds.
Check SEO status
Use tools like Google Search Console or Ahrefs Webmaster Tools to check for crawl errors and performance insights.
Step 12: Launch Your Website!
Time to go live!
Remove “Coming Soon” or maintenance plugins
Deactivate and delete any plugins that hide your site. You want the world to see your content now!
Announce your launch
Share your site on social media, email your list, or post in relevant groups/forums. This drives early traffic and feedback.
Start promoting your services or content
Don’t wait—begin sharing blog posts, marketing services, or driving people to your contact page.
Bonus Tips for Ongoing Success
Building the site is just the start. Here’s how to grow and maintain it:
Update regularly
Regular updates keep your site secure and running smoothly. Always back up before major updates.
Backup often
Especially after changes to your theme, plugins, or settings.
Track performance
Use Google Analytics (e.g., via MonsterInsights) to understand your traffic, popular pages, and visitor behavior.
Create content consistently
Blogging, case studies, or landing pages help bring in new visitors and improve SEO.
Keep learning
WordPress is powerful. Explore more features over time—like eCommerce, membership sites, or advanced design tools.
Final Thoughts
Launching a WordPress site might seem complex, but breaking it down into these manageable steps makes it 100% doable even for beginners.
